
Categorie popolari
State cercando un filato?


Commenti / Domande (25)
![]() Doris Viklund ha scritto:
Doris Viklund ha scritto:
Har nu stickat sjalen DIANDRA men får den inte att stämma.Man ska ju öka i ena sidan o minska i den andra.Jag har stickat den i den längd som det står men snibbarna möter inte varandra hur jag än vrider o vänder.Ska jag efter halva sjalen ändra sidan för ökning o minskning
09.07.2019 - 14:51DROPS Design ha risposto:
Hei Doris. Man øker i en side og feller i den andre siden - hele stolaen, slik at den får en form som et skrått retangel (parallellogram form). God Fornøyelse!
26.08.2019 - 08:49
![]() Charlotte Ebert ha scritto:
Charlotte Ebert ha scritto:
Hallo, wie strickt man die Randmaschen, damit ein sauberer Rand entsteht? Letzte M einer R abheben, in der nächsten R re str? Oder letzte M er str, in der nächsten R abh? Oder immer rechts str, dann gibt es den Knötchenrand! Auf dem Modellfoto kann ich es nicht erkennen. Mit freundlichen Grüßen, Charlotte Ebert
28.03.2019 - 00:50DROPS Design ha risposto:
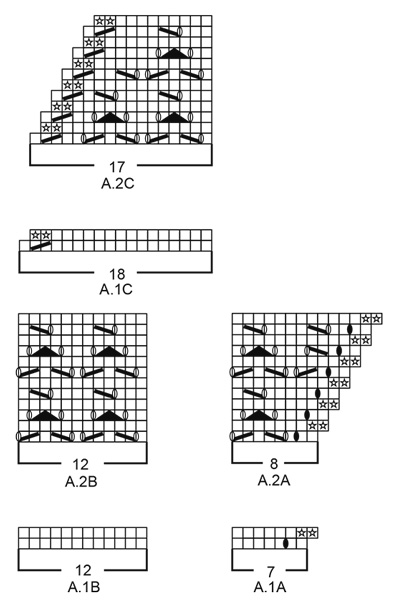
Liebe Frau Ebert, die Randmaschen werden krausrechts gestrickt, wie im Diagram gezeigt (siehe A.1A + A.1C und A.2A + A.2C). Viel Spaß beim stricken!
01.04.2019 - 09:24Jas ha scritto:
Ho, is knit from wrong side equivalent to ktbl.
29.09.2018 - 20:57DROPS Design ha risposto:
Dear Jas, the opposite of ktbl is the twisted purl stitch, you can either ptbl, or slip the stitch, put it back twisted and purl. Happy Knitting!
30.09.2018 - 08:45
![]() Christa Lessmann ha scritto:
Christa Lessmann ha scritto:
Ich vermisse auch eine Massskizze. Sie würde mir sehr helfen. Schon jetzt vielen Dank für Ihre Mühe.
27.08.2018 - 14:03DROPS Design ha risposto:
Liebe Frau Lessmann, die Maße der Stola finden Sie oben im Kopf der Anleitung. Im Prinzip ist die Stola wie ein Parallelogramm, d.h. wie ein Rechteck, bei dem die rechte und linke Seite nicht gerade hoch, sondern schräg verlaufen. Ich leite Ihr Anliegen aber gerne weiter. Gutes Gelingen!
29.08.2018 - 10:17
![]() Marina Verhaeghe ha scritto:
Marina Verhaeghe ha scritto:
Can my confusion come before the 2nd height of the lace pattern, because I put a mark after the first 8 stitches and for the last 17 stitches? I think Helene put her stitches in the front and at the back a brand sign. Thanks in advance. Marina
12.06.2018 - 10:04
![]() Marina Verhaeghe ha scritto:
Marina Verhaeghe ha scritto:
Do not understand how to knit the 2nd part of the lace pattern. I have 14 stitches at the beginning of the needle, so that's 6 stitches more than in A2A do I knit 6 then right? And in the end I have 11 stitches, how can I knit the A2C over there because it has 17 stitches ???????? Explanation in the reaction to Helene is really not clear though Thanks in advance, Marina
12.06.2018 - 08:22DROPS Design ha risposto:
Dear Mrs Verhaeghe, after you have worked A.2 one time in height, repeat A.2 the same way as before, ie A.2A over first 8 sts, repeat A.2B over the next 96 sts and finish with A.2C over the last 17 sts. Happy knitting!
12.06.2018 - 08:48
![]() Hélène ha scritto:
Hélène ha scritto:
Bonjoir, j’aimerais savoir combien il y a de répétition de rangs sur le modèle présenté? J’en ai compté 9. Je suis rendue à 3 répétitions et je suis un peu septique quant au résultat. Merci!
11.06.2018 - 13:29DROPS Design ha risposto:
Bonjour Hélène, c'est bien exact, si votre tension est correcte en hauteur, vous répéterez la rayure ajourée et la rayure point mousse 9 fois au total en hauteur. Bon tricot!
11.06.2018 - 16:16
![]() Helle Andersen ha scritto:
Helle Andersen ha scritto:
Hej, mit spørgsmål er til begyndelsen. 121 masker. Skal lave to ret og slå om. Mener I to ret sammen og slå om. Ellers ender jeg jo ikke på 121 masker igen, når der skal laves hulmønster. Jeg synes billedet er alm. Retstrikning. Det andre tvivl jo lave et hulmønster. Hvad er det, jeg ikke forstår? På forhånd tak
06.06.2018 - 21:53DROPS Design ha risposto:
Hej Helle, jo det stemmer, for du tager ud i den ene side ved at lave et omslag og ind i den anden side ved at strikke 2 ret sammen. Ja det stemmer at du skal strikke striber med hulmønster og retstrik, bare følg opskriften så får du din stola som på billedet :)
07.06.2018 - 08:17
![]() Marina Verhaeghe ha scritto:
Marina Verhaeghe ha scritto:
There is an error in Diandra\'s description. It states that the diagrams A1 and A2 show all needles in the pattern on the right side. That is not true with the translation from Norwegian. It should be that on the diagram A1 and A2 all needles can be seen. The rest should not be included. Creative greetings, Marina
04.06.2018 - 08:31DROPS Design ha risposto:
Dear Mrs Verhaeghe, diagrams are showing all sts and all rows (both from RS and from WS), but you will have to repeat the sts in A.1B/A.2B while A.1.A/A.2A and A.1C/A.2C will be worked only once (= at the beg/end of row). Happy knitting!
04.06.2018 - 09:52
![]() Christiane Klenke ha scritto:
Christiane Klenke ha scritto:
Bitte fügen Sie eine Maßskizze bei. Mir ist nicht ganz klar welche Form das Tuch hat.
04.06.2018 - 01:56
|
||||||||||||||||||||||
Diandra#diandrashawl |
||||||||||||||||||||||
 |
 |
|||||||||||||||||||||
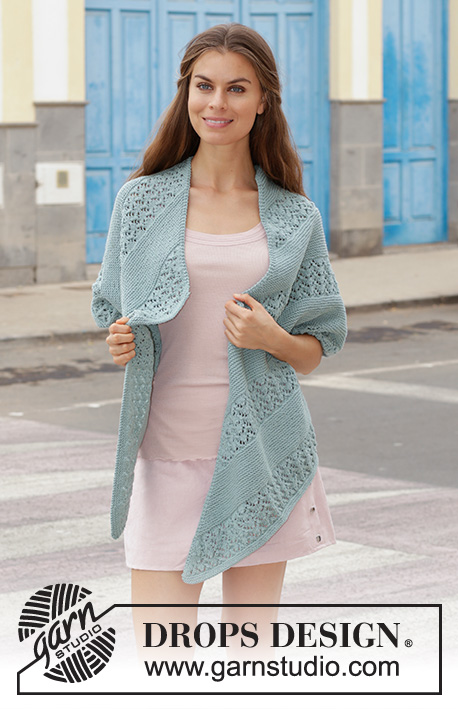
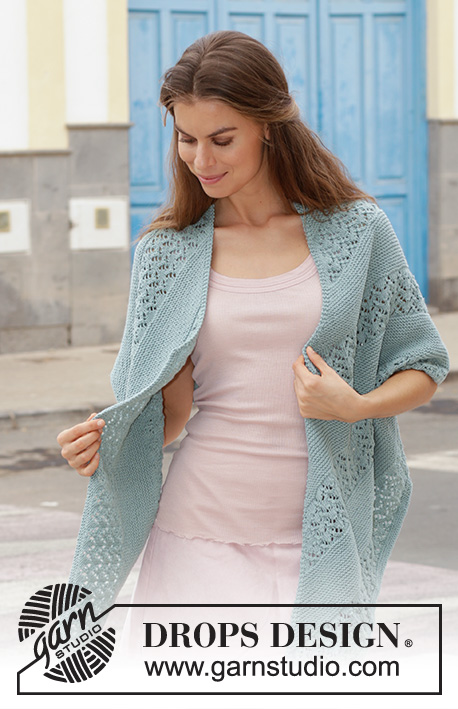
Stola lavorata ai ferri a maglia legaccio e motivo traforato diagonale. Lavorata in in DROPS Cotton Merino o Sky.
DROPS 188-39 |
||||||||||||||||||||||
|
INFORMAZIONI GENERALI: COSTA/MAGLIA LEGACCIO (lavorata avanti e indietro): 1 costa = 2 ferri diritto. SUGGERIMENTO PER GLI AUMENTI: Aumentare 1 maglia lavorando 1 maglia diritto e 1 maglia a diritto ritorto nella stessa maglia. MOTIVO: Vedere i diagrammi A.1 e A.2. I diagrammi mostrano tutti i ferri del motivo visti dal diritto del lavoro. SUGGERIMENTO PER IL CAMBIO DI COLORE: Quando si cambia gomitolo, è più pulito cambiare il gomitolo all’inizio o fine del ferro. Questo per evitare giunzioni al centro del lavoro. ---------------------------------------------------------- STOLA: A causa del n° di maglie, lavorare avanti e indietro sui ferri circolari. Aumentando a un lato del lavoro e diminuendo sull’altro, il motivo diventa diagonale. Leggere il SUGGERIMENTO PER IL CAMBIO DI COLORE! Avviare 121 maglie con i ferri circolari n° 4 mm e Cotton Merino o Sky e lavorare come segue: FERRO 1 (= diritto del lavoro): 2 maglie diritto, 1 gettato, lavorare a diritto fino a quando rimangono 3 maglie sul ferro, 2 maglie insieme a diritto e finire con 1 maglia diritto. FERRO 2 (= rovescio del lavoro): diritto (il gettato alla fine del ferro è lavorato a diritto ritorto per evitare un buco). Ripetere i ferri 1 e 2 fino a quando sono state lavorate 3 coste in totale. Poi lavorare a strisce alternando il motivo traforato e la maglia legaccio come descritto sotto. STRISCIA CON IL MOTIVO TRAFORATO: Il primo ferro è lavorato come segue dal diritto del lavoro: lavorare A.1A (= 7 maglie), lavorare A.1B sulle 96 maglie successive (= 8 ripetizioni di 12 maglie) e finire con A.1C (= 18 maglie). Lavorare dal rovescio del lavoro come indicato nel diagramma. Il ferro successivo è lavorato come segue dal diritto del lavoro: lavorare A.2A (= 8 maglie), lavorare A.2B sulle 96 maglie successive (= 8 ripetizioni di 12 maglie) e finire con A.2C (= 17 maglie). Continuare A.2 in questo modo fino a quando è stato lavorato tutto A.2 per un totale di 2 volte in altezza. Poi lavorare una striscia a maglia legaccio come descritto sotto. STRISCIA A MAGLIA LEGACCIO: FERRO 1 (= diritto del lavoro): 2 maglie diritto, 1 gettato, lavorare a diritto fino a quando rimangono 3 maglie sul ferro, 2 maglie insieme a diritto e finire con 1 maglia diritto. FERRO 2 (= rovescio del lavoro): diritto (il gettato alla fine del ferro è lavorato a diritto ritorto per evitare un buco). Ripetere i ferri 1 e 2 fino a quando sono state lavorate 18 coste in totale. FARE ATTENZIONE ALLA TENSIONE DEL LAVORO! Continuare in questo modo a strisce alternate con motivo traforato e maglia legaccio fino a quando la stola misura circa 158 cm lungo il lato lungo (o fino alla lunghezza desiderata), ma finire dopo una striscia con motivo traforato. Poi lavorare una piccola striscia a maglia legaccio nello stesso modo come descritto sopra, ma finire quando sono state lavorate 3 coste in totale. Intrecciare a diritto dal diritto del lavoro. La stola misura circa 160 cm lungo il lato lungo. |
||||||||||||||||||||||
Spiegazioni del diagramma |
||||||||||||||||||||||
|
||||||||||||||||||||||
 |
||||||||||||||||||||||
Avete terminato questo modello?Allora taggate le vostre foto con #dropspattern #diandrashawl o inviatele alla #dropsfan gallery. Avete bisogno di aiuto con questo modello?Troverete 19 video tutorial, una sezione per i commenti/domande e molto altro guardando il modello su www.garnstudio.com © 1982-2026 DROPS Design A/S. Ci riserviamo tutti i diritti. Questo documento, compreso tutte le sue sotto-sezioni, è protetto dalle leggi sul copyright. Potete leggere quello che potete fare con i nostri modelli alla fine di ogni modello sul nostro sito. |
||||||||||||||||||||||


Con oltre 40 anni di esperienza nel design di modelli di maglia e uncinetto, DROPS Design offre la più estesa collezione di modelli gratuiti su internet - tradotti in 17 lingue. Ad oggi vi possiamo fornire 324 cataloghi e 12239 modelli - 9507 dei quali sono tradotti in Italiano.
Ci stiamo impegnando molto per darvi il meglio che vi possiamo offrire in termini di maglia e uncinetto, ispirazioni e consigli così come filati di grande qualità ad un prezzo incredibile! Volete utilizzare i nostri modelli per qualcosa d'altro oltre al vostro uso personale? Potete leggere tutto ciò che è consentito nel testo sul Copyright in basso su tutte le pagine dei nostri modelli. Buon lavoro!
Lasciare un commento sul modello DROPS 188-39
Noi saremmo felici di ricevere i tuoi commenti e opinioni su questo modello!
Se vuoi fare una domanda, fai per favore attenzione a selezionare la categoria corretta nella casella qui sotto per velocizzare il processo di risposta. I campi richiesti sono indicati da *.