
Categorie popolari
State cercando un filato?


Commenti / Domande (47)
![]() Adélie ha scritto:
Adélie ha scritto:
Bonjour je ne comprends pas comment enfiler les liens et l'incorporer à l'ouvrage. Merci beaucoup.
09.04.2018 - 15:42DROPS Design ha risposto:
Bonjour Adélie, enfilez une des extrémités du lien dans le devant et l'autre extrémité dans le dos, serrez et nouez au niveau de l'épaule à la hauteur souhaitée. Bon assemblage!
09.04.2018 - 16:09
![]() Fanny ha scritto:
Fanny ha scritto:
Buenas tardes... no entiendo los puntos de aumento... Talla L. 44 cad. que se convierten en 35. ok. Empiezo con los aumentos del esquema (4 vueltas x 2 aum. a cada lado) 35 + 16=51p.altos. Hasta ahí perfecto. Despúes 13 vueltas con 3 aumentos en cada vuelta (13x3=39) 51+39=90 ???? según las instrucciones debería tener 74 puntos !!!! Necesito ayuda. Gracias por vuestra página
04.04.2018 - 16:40DROPS Design ha risposto:
Hola Fanny. En cada fila aumentamos 3 puntos altos. Los 5 puntos de cadeneta no cuentan como puntos altos (lee INFORMACIÓN PARA LA REALIZACIÓN DEL TRABAJO). Hay que trabajar un TOTAL de 13 filas con aumentos , no las filas del diagrama + 13, es decir 13x3 = 39 puntos aumentados + 35 puntos de la primera fila = 74 puntos
04.04.2018 - 23:14Robyn Ratcliffe ha scritto:
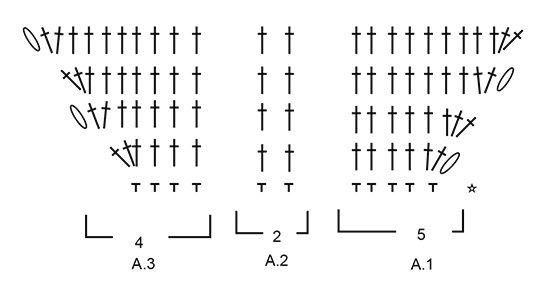
Hi, I'm new to crocheting. I don't understand the graph. In A1 it's for 5 single/double crochet but there are more that 5 symbols in some if the ries
20.09.2017 - 11:30DROPS Design ha risposto:
Dear Mrs Ratcliffe, in 1st row in A.1 work 3rd symbol (= 5 chains), then continue with 2 dc in 1st sc, then 1 dc in each of the next 4 sts. Happy crocheting!
20.09.2017 - 14:02
![]() Karen Mackin ha scritto:
Karen Mackin ha scritto:
How do I find what size I need??? normally theres a bust measurement or something
27.07.2017 - 20:11DROPS Design ha risposto:
Dear Karin, for sizing please refer to the measuremets given on the shematics at the bottom of the pattern.The measurements are given in cm. I hope this helps. Happy Knitting!
27.07.2017 - 23:15
![]() Audrey ha scritto:
Audrey ha scritto:
Bonsoir! Je suis presque à la fin de mon ouvrage mais je ne sis pas satisfaite de mon travail. En effet à partir du diagramme A4/A5 mon ouvrage gondole .. comme si j'avais trop de brides! Pourtant j'ai bel et bien 187 brides (taille M) au départ! Que faire? ! Merci de votre aide!
30.06.2017 - 23:42DROPS Design ha risposto:
Bonjour Audrey, pensez à toujours bien conserver la même tension en brides et en point fantaisie pour conserver la bonne largeur. Essayez avec un crochet plus petit si votre point fantaisie est trop large. Bon crochet!
03.07.2017 - 09:01
![]() Michi ha scritto:
Michi ha scritto:
Ich stehe gerade total auf dem Schlauch. Das Vorderteil wird von oben nach unten gehäkelt. Bei Größe S soll ich 42 Maschen anschlagen laut schriftlicher Anleitung. Wenn ich mir die Skizze ansehe, steht da am Anfang 18. Sind das dann die cm? Hilfe, verstehe ich nicht 😞
20.06.2017 - 21:11DROPS Design ha risposto:
Liebe Michi, es wird mit 42 Lm angefangen aber dann bei der 1. Reihe werden Lm überspringen = 35 fM am Ende der 1. Reihe = ca 19 cm in der Breite wenn Ihre Maschenprobe stimmt. Viel Spaß beim häkeln!
21.06.2017 - 10:10
![]() M. ANGELES ha scritto:
M. ANGELES ha scritto:
No consigo entender como hacer la primera vuelta de unión de las dos partes. Hago los puntos altos de la espalda y los puntos de cadeneta para la sisa, pero no sé cómo hacer el comienzo de los puntos altos del delantero ya que hay un desnivel, las cadenetas de la espalda quedan en la parte alta del punto alto y hay que unir al delantero pero no sé como hacerlo. Creo que no está bien explicado. Se necesita un video ya que entiendo que es dificil hacerlo en palabras.
04.06.2017 - 19:36DROPS Design ha risposto:
Hola M.Ángeles, después de las cadenetas, se trabaja 1 p.a. en el primer p.a. del delantero. Si tienes dificultad para trabajarlo, acércate a la tienda más cercana de DROPS, donde te podrán ayudar personalmente. Todos los videos que puedan servir de ayuda para realizar el patrón se pueden encontrar bajo el patrón.
17.06.2017 - 18:57Lucille ha scritto:
I dont understand the bottom part when i have worked 66 dc in both front and back then they ask to chain 6 in both and then i dont understand the rest. Could you kindly explain to me. Where do i slip stitch in 3rd chain? Is it in the front or back?
29.05.2017 - 09:50DROPS Design ha risposto:
Dear Lucille, work 1 dc in each of the 66 dc on back piece (starting with 3 ch to replace 1 st dc), then 6 ch for armhole, 1 dc in each of the 66 dc on front piece, then 6 ch for armhole, join now in the first dc at the beginning on back piece (= the first of the 66 dc of the back piece = the 3 ch at beg of row worked on back piece). You are working body in the round from now. Happy crocheting!
29.05.2017 - 10:30
![]() Christine ha scritto:
Christine ha scritto:
Please help me with is pattern. Im stuck in the body where they ask us to "work 6-12-12-16-24-30 chain stitches and finish with 1 slip stitch in 3rd chain stitch at beginning of round" but i dont understand it. Where do i insert tge slip stitch and does the back and front portion come together?
29.05.2017 - 09:49DROPS Design ha risposto:
Dear Christine, you will join with a sl st in the 1st st at beg of back piece (= 1st tr = 3 ch, work the sl st in the 3rd ch at beg of the last row worked on back piece). You will now have the 6-30 ch (see size) under each arm and continue in the round to the bottom end. Happy crocheting!
29.05.2017 - 10:28
![]() Christine ha scritto:
Christine ha scritto:
Please help me with is pattern. Im stuck in the body where they ask us to "work 6-12-12-16-24-30 chain stitches and finish with 1 slip stitch in 3rd chain stitch at beginning of round" but i dont understand it. Where do i insert tge slip stitch and does the back and front portion come together?
29.05.2017 - 09:48DROPS Design ha risposto:
Dear Christine, When you put the front and the back pieces together, the chanstiches will from the armholes, therefore you should put the slip stitch into the first stitch on the back, thus clising the circle. From this point you work in the round, as in you close the circle at the end of each round, but turn the piece and continue to crochet from the other side, in order to have the pattern the same in the whole piece. I hope this helped. Happy Cricheting!
21.06.2017 - 16:34
|
|||||||||||||||||||||||||
Hawaiian Breeze#hawaiianbreezetop |
|||||||||||||||||||||||||
|
|
|||||||||||||||||||||||||
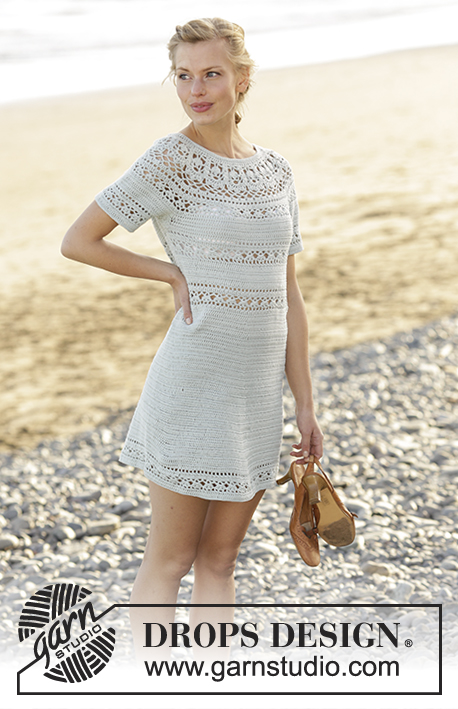
Top all’uncinetto con motivo traforato e frange, in DROPS Muskat. Taglie: Dalla S alla XXXL.
DROPS 175-27 |
|||||||||||||||||||||||||
|
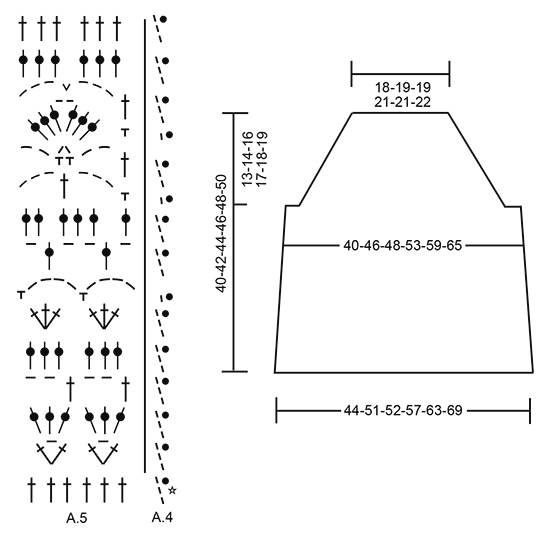
INFORMAZIONI PER IL LAVORO: All’inizio di ogni riga di maglie alte nei diagrammi A.1 e A.3, lavorare 5 catenelle per girare il lavoro. Queste 5 catenelle non sostituiscono la prima maglia alta. Quando si lavora in tondo, sostituire la prima maglia alta con 3 catenelle; finire il giro con 1 maglia bassissima nella 3a catenella dall’inizio del giro. MOTIVO: Vedere i diagrammi da A.1 a A.5. SUGGERIMENTO PER GLI AUMENTI: Per aumentare, lavorare 2 maglie alte in una maglia alta. ---------------------------------------------------------- TOP: Si lavora dall’alto verso il basso. Lavorare prima il davanti e il dietro separatamente avanti e indietro, poi lavorare le 2 parti insieme in tondo. DAVANTI: Con l’uncinetto n° 4 ed il filato Muskat avviare 42-44-44-47-47-49 catenelle morbide; girare e lavorare come segue: 1 maglia bassa nella seconda catenella dall’uncinetto (= 1 maglia bassa + 1 catenella per girare il lavoro), 1 maglia bassa in ognuna delle 0-2-2-0-0-2 catenelle successive, * saltare 1 catenella, 1 maglia bassa in ognuna delle 4 catenelle successive *, ripetere da *-* altre 7-7-7-8-8-8 volte = 33-35-35-37-37-39 maglie basse. Girare e lavorare il motivo come segue, iniziando dalla 2a riga: diagramma A.1 sulle prime 5 maglie basse, diagramma A.2 sulle 24-26-26-28-28-30 maglie basse successive, diagramma A.3 sulle restanti 4 maglie basse - VEDERE LE INFORMAZIONI PER IL LAVORO. RICORDARSI DI MANTENERE LA CORRETTA TENSIONE DEL LAVORO! Dopo aver lavorato i diagrammi da A.1 a A.3 una volta in verticale, proseguire con maglie alte e aumentare in modo uguale finché non sono state lavorate 11-12-13-14-15-16 righe con aumenti (aumentare 3 maglie alte su ogni riga). Ci sono ora 66-71-74-79-82-87 maglie alte. Lasciare il lavoro in sospeso. DIETRO: Lavorare come indicato per il davanti. DAVANTI E DIETRO: Lavorare ora le due parti insieme come segue: girare e lavorare 1 maglia alta in ognuna delle 66-71-74-79-82-87 maglie alte del dietro, lavorare 6-12-12-16-24-30 catenelle, lavorare 1 maglia alta in ognuna delle 66-71-74-79-82-87 maglie alte del davanti, 6-12-12-16-24-30 catenelle e finire con 1 maglia bassissima nella 3a catenella all’inizio del giro. Proseguire in tondo, lavorando 1 maglia alta in ogni maglia alta /catenella = 144-166-172-190-212-234 maglie alte. Quando si lavora in tondo, girare alla fine di ogni giro, per lavorare alternativamente sul diritto e sul rovescio del lavoro. In questo modo il motivo è uguale su tutto il top. Inserire 1 segno da ciascun lato, al centro delle 6-12-12-16-24-30 catenelle. DA ADESSO IN AVANTI MISURARE IL LAVORO DA QUESTO PUNTO. Quando il lavoro misura 4 cm, aumentare 1 maglia alta da ciascun lato di ognuno dei 2 segni - VEDERE IL SUGGERIMENTO PER GLI AUMENTI. Aumentare ogni 3-3-3-3-4-4 cm 4 volte in tutto = 160-182-188-206-228-250 maglie alte. Il lavoro misura ora 14-15-15-16-17-18 cm. Lavorare 1 giro e, allo stesso tempo, aumentare 3-5-5-5-1-3 maglie alte a intervalli regolari = 163-187-193-211-229-253 maglie alte. Proseguire come segue: Lavorare il diagramma A.4 sulla prima maglia alta del giro, poi ripetere il diagramma A.5 sulle restanti maglie alte. Il diagramma A.4 mostra come iniziare e finire il giro. Non girare, lavorare tutti i giri sul diritto del lavoro. Tagliare il filo dopo aver lavorato i diagrammi A.4 e A.5 1 volta in verticale. Il lavoro misura circa 40-42-44-46-48-50 cm in tutto. CORDINO: Lavorare 2 cordini morbidi come segue: con l’uncinetto n° 4 ed il filato Muskat lavorare una catenella di base lunga 100 cm, girare e lavorare 1 maglia bassissima in ogni catenella ma assicurarsi che le maglie bassissime non siano più strette delle catenelle. Tagliare il filo. Lavorare un altro cordino in modo uguale. Far passare un cordino su un lato del davanti, tra la seconda e la terza maglia alta dal bordo nella prima riga di maglie alte. Infilare il cordino sul lato del dietro nello stesso modo e fare un nodo per la spalla. Ripetere lungo l’altro lato del top. FRANGE: Tagliare 4 capi lunghi 20 cm. Piegarli in due, infilare l’anello attraverso 2 maglie alte nella parte in basso del top, sul diritto del lavoro. Passare le estremità dei fili attraverso l’anello e stringere. Attaccare le frange ogni 2 cm circa tutto intorno al bordo inferiore del top. |
|||||||||||||||||||||||||
Spiegazioni del diagramma |
|||||||||||||||||||||||||
|
|||||||||||||||||||||||||
 |
|||||||||||||||||||||||||
 |
|||||||||||||||||||||||||
Avete terminato questo modello?Allora taggate le vostre foto con #dropspattern #hawaiianbreezetop o inviatele alla #dropsfan gallery. Avete bisogno di aiuto con questo modello?Troverete 9 video tutorial, una sezione per i commenti/domande e molto altro guardando il modello su www.garnstudio.com © 1982-2026 DROPS Design A/S. Ci riserviamo tutti i diritti. Questo documento, compreso tutte le sue sotto-sezioni, è protetto dalle leggi sul copyright. Potete leggere quello che potete fare con i nostri modelli alla fine di ogni modello sul nostro sito. |
|||||||||||||||||||||||||


Con oltre 40 anni di esperienza nel design di modelli di maglia e uncinetto, DROPS Design offre la più estesa collezione di modelli gratuiti su internet - tradotti in 17 lingue. Ad oggi vi possiamo fornire 325 cataloghi e 12298 modelli - 9569 dei quali sono tradotti in Italiano.
Ci stiamo impegnando molto per darvi il meglio che vi possiamo offrire in termini di maglia e uncinetto, ispirazioni e consigli così come filati di grande qualità ad un prezzo incredibile! Volete utilizzare i nostri modelli per qualcosa d'altro oltre al vostro uso personale? Potete leggere tutto ciò che è consentito nel testo sul Copyright in basso su tutte le pagine dei nostri modelli. Buon lavoro!
Lasciare un commento sul modello DROPS 175-27
Noi saremmo felici di ricevere i tuoi commenti e opinioni su questo modello!
Se vuoi fare una domanda, fai per favore attenzione a selezionare la categoria corretta nella casella qui sotto per velocizzare il processo di risposta. I campi richiesti sono indicati da *.