
Categorie popolari
State cercando un filato?


Commenti / Domande (47)
![]() Pakki ha scritto:
Pakki ha scritto:
Estoy hecha un lío con el diagrama a-4 y a-5 . Sobre todo el a-4(primer punto) Hay algún video? O podría decirme si son 3 cadenetas y un punto raso? Muchas gracias
18.05.2019 - 00:06DROPS Design ha risposto:
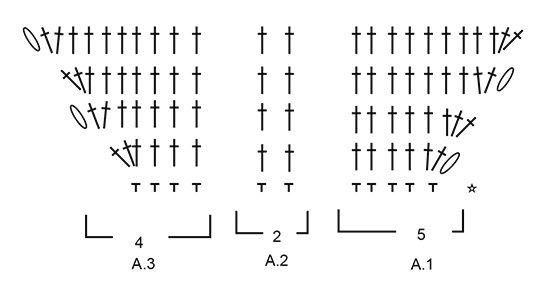
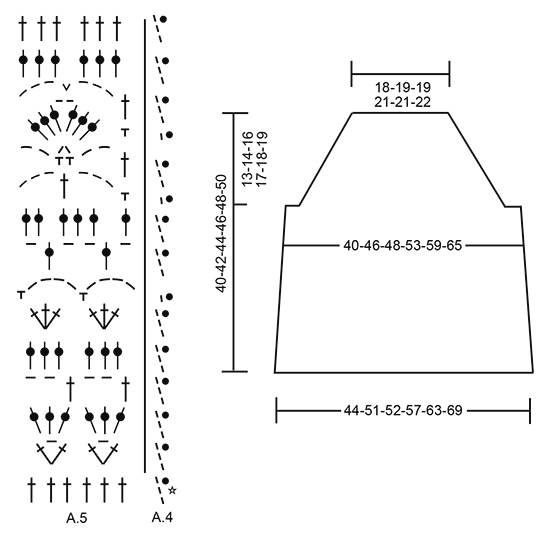
Hola Pakki, El diagrama A.4 muestra cómo comienza (con 3 puntos de cadeneta) y finaliza (con 1 punto enano en el tercer punto de cadeneta del inicio de la vuelta) la vuelta cuando trabajamos el cuerpo.
18.05.2019 - 20:07
![]() Terese ha scritto:
Terese ha scritto:
Er det mulig å gjøre denne oppskriften mindre? Hvor mange lm skal jeg hekle om toppen feks skal være en xs?
16.04.2019 - 02:37DROPS Design ha risposto:
Hei Terese. Denne oppskriften finnes dessverre ikke i XS. Det er selvfølgelig ikke noe i veien for at du lager den mindre selv, men vi har ikke mulighet til å regne den om for deg. Du kan ta utgangspunkt i de målene du ønsker, og gange med heklefastheten (gang med 1,8) så får du antall masker du trenger i bredden (det kan være lurt å justere dette så det går opp i hele rapporter av mønsteret). Når du hekler luftmaskene på starten hekles det1 luftmaske mer ca hver 4 maske (altså 5 luftmasker blir til 4 fastmasker neste omgang). God fornøyelse
23.04.2019 - 11:16
![]() Laura ha scritto:
Laura ha scritto:
Liebes Drops-Team, die Anleitung ist toll, aber ich hänge beim Rumpfteil mit den Zunahmen. Ich nehme an beiden Markierungen jeweils 4cm vorher und nachher einmal zu. Und dann? Alle 3cm über die ganze Breite? Was bedeutet insgesamt 4 mal? 4 Runden lang so zunehmen oder 4 mal alle 3 cm? Ich freue mich über eine Antwort Liebe Grüße
02.08.2018 - 08:31DROPS Design ha risposto:
Liebe Laura, nach 4 cm nehmen Sie 4 Maschen zu (= 1 M auf beiden Seite der Markierungen), dann *3-4 cm (siehe Größe) häkeln, bei der nächsten Runde noch mal 4 Maschen wie zuvor zunehmen (= 1 M auf beiden Seiten der Markierungen)*, und von *-* noch 2 Mal häkeln = Sie haben jetzt 4 Mal 4 Maschen zugenommen. Viel Spaß beim häkeln!
02.08.2018 - 09:31
![]() Audrey ha scritto:
Audrey ha scritto:
Bonsoir J aimerai me lancer mais j'ai déjà du mal au début..... Il faut 42ml ca c pour mon S Après je fait 7 fois Sauter une maille et 4 ms? Merci
25.06.2018 - 17:24DROPS Design ha risposto:
Bonjour Audrey, en taille S montez 42 ml, puis crochetez ainsi: 1 ml dans la 2ème ml à partir du crochet, (sautez 1 ml, 1 ms dans chacune des 4 ml suivantes), répétez de (à) encore 7 fois (= 8 fois au total) = vous avez 33 ms à la f in du 1er rang. Bon crochet!
26.06.2018 - 08:53
![]() Sheily ha scritto:
Sheily ha scritto:
When piece measures 4 cm / 1½, increase 1 double crochet on each side of each marker thread - READ INCREASE TIP. Increase every 3-3-3-3-4-4 cm / 1-1-1-1½1½ 4 times in total = 160-182-188-206-228-250 double crochets. Piece now measures 14-15-15-16-17-18 cm / 5½-6-6-6 1/4-6 3/4-7 work 1 round while increasing 3-5-5-5-1-3 double crochets evenly = 163- I dont understand this part. How many stitches am i increasing into on each side of the marker? How many rows Am I increasing?
13.06.2018 - 23:29DROPS Design ha risposto:
Dear Sheily, there are 2 markers (= 1 marker on each side) and you increase 1 st on each side of both markers = you will increase a total of 4 sts per increase row x 4 times in total every 3rd-4 cm/1-1½" (see size) = a total of 16 sts will be increased when all increases have been done. Happy crocheting!
14.06.2018 - 08:38
![]() Sheily ha scritto:
Sheily ha scritto:
When piece measures 4 cm / 1½, increase 1 double crochet on each side of each marker thread - READ INCREASE TIP. Increase every 3-3-3-3-4-4 cm / 1-1-1-1½1½ 4 times in total = 160-182-188-206-228-250 double crochets. Piece now measures 14-15-15-16-17-18 cm / 5½-6-6-6 1/4-6 3/4-7 work 1 round while increasing 3-5-5-5-1-3 double crochets evenly = 163- I dont understand this part. How many stitches am i increasing into on each side of the marker? How many rows Am I increasing?
13.06.2018 - 23:27
![]() Sheily ha scritto:
Sheily ha scritto:
Hi, Im working on the body of the top. In the instructions where it states to increase. How many stitches am i increasing into on the opposite side of the marks? Thank you.
13.06.2018 - 06:25DROPS Design ha risposto:
Dear Shelly, diagrams A.1 and A.3 are showing how to increase at the beg of row from RS (= in A.1) and end of row from RS (= in A.3) and how to increase at the beg of row from WS (= in A.3) and at the end of row from WS (= in A.1) , when the diagrams have been worked 1 time in height, continue increasing from RS and from WS as shown in diagram until you have worked the number of rows for your size. Happy crocheting!
13.06.2018 - 08:21
![]() Sheily ha scritto:
Sheily ha scritto:
Hi, Im working on the body of the top. In the instructions where it states to increase. How many stitches am i increasing into on the opposite side of the marks? Thank you.
13.06.2018 - 06:22
![]() Sheily ha scritto:
Sheily ha scritto:
Hi. I just started crocheting this top, and I'm confused with the instructions. In the crochet info it states that in rows A.1 and A.3 the 5 chs does not replace the first dc. Am I suppose to dc in the top of the 3rd ch of the 5ch. or dc into the ch 5-sp. Then continue with 3 dc increases for every row?
30.05.2018 - 21:09DROPS Design ha risposto:
Dear Sheily, these 5 ch in A.1 and A.3 do not replace the first tr, so that at the end of row, work 2/3 dc in the last dc and not in the 5 chains - see also diagram. Happy crocheting!
31.05.2018 - 08:08
![]() Maria ha scritto:
Maria ha scritto:
Hola.he usado el mismo hilo y el mismo ganchillo.Intento hacer una talla s y he tenido que deshacernos porque con las explicaciones sale muy grande.¿Me podéis ayudar? No se que hacer..
14.05.2018 - 00:27DROPS Design ha risposto:
Hola Maria. El tamaño del ganchillo en todos los patrones es solo recomendable. Lo importante es hacer una muestra con el hilo que vas a trabajar y el ganchillo y comprobar que tu tensión coincide con la recomendada en el patrón, en este caso: 18 puntos altos x 9 filas = 10 cm de ancho y 10 cm en vertical. Si tu muestra mide igual puedes empezar a trabajar pero siempre manteniendo la misma tensión del tejido. Si la muestra no tiene las medidas recomendadas tienes cambiar el ganchillo a un tamaño más pequeño ( si la muestra es demasiado grande) o más grande ( si la muestra es muy pequeña).
20.05.2018 - 19:29
|
|||||||||||||||||||||||||
Hawaiian Breeze#hawaiianbreezetop |
|||||||||||||||||||||||||
|
|
|||||||||||||||||||||||||
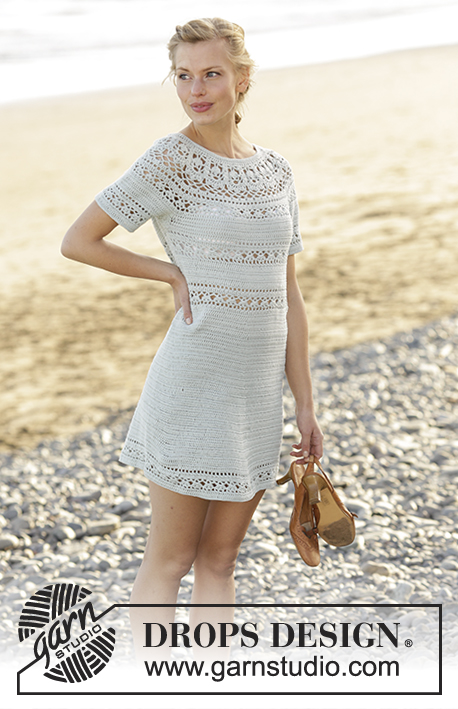
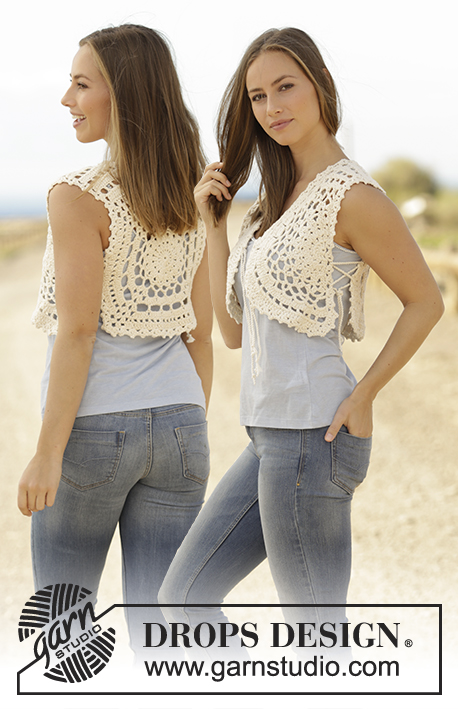
Top all’uncinetto con motivo traforato e frange, in DROPS Muskat. Taglie: Dalla S alla XXXL.
DROPS 175-27 |
|||||||||||||||||||||||||
|
INFORMAZIONI PER IL LAVORO: All’inizio di ogni riga di maglie alte nei diagrammi A.1 e A.3, lavorare 5 catenelle per girare il lavoro. Queste 5 catenelle non sostituiscono la prima maglia alta. Quando si lavora in tondo, sostituire la prima maglia alta con 3 catenelle; finire il giro con 1 maglia bassissima nella 3a catenella dall’inizio del giro. MOTIVO: Vedere i diagrammi da A.1 a A.5. SUGGERIMENTO PER GLI AUMENTI: Per aumentare, lavorare 2 maglie alte in una maglia alta. ---------------------------------------------------------- TOP: Si lavora dall’alto verso il basso. Lavorare prima il davanti e il dietro separatamente avanti e indietro, poi lavorare le 2 parti insieme in tondo. DAVANTI: Con l’uncinetto n° 4 ed il filato Muskat avviare 42-44-44-47-47-49 catenelle morbide; girare e lavorare come segue: 1 maglia bassa nella seconda catenella dall’uncinetto (= 1 maglia bassa + 1 catenella per girare il lavoro), 1 maglia bassa in ognuna delle 0-2-2-0-0-2 catenelle successive, * saltare 1 catenella, 1 maglia bassa in ognuna delle 4 catenelle successive *, ripetere da *-* altre 7-7-7-8-8-8 volte = 33-35-35-37-37-39 maglie basse. Girare e lavorare il motivo come segue, iniziando dalla 2a riga: diagramma A.1 sulle prime 5 maglie basse, diagramma A.2 sulle 24-26-26-28-28-30 maglie basse successive, diagramma A.3 sulle restanti 4 maglie basse - VEDERE LE INFORMAZIONI PER IL LAVORO. RICORDARSI DI MANTENERE LA CORRETTA TENSIONE DEL LAVORO! Dopo aver lavorato i diagrammi da A.1 a A.3 una volta in verticale, proseguire con maglie alte e aumentare in modo uguale finché non sono state lavorate 11-12-13-14-15-16 righe con aumenti (aumentare 3 maglie alte su ogni riga). Ci sono ora 66-71-74-79-82-87 maglie alte. Lasciare il lavoro in sospeso. DIETRO: Lavorare come indicato per il davanti. DAVANTI E DIETRO: Lavorare ora le due parti insieme come segue: girare e lavorare 1 maglia alta in ognuna delle 66-71-74-79-82-87 maglie alte del dietro, lavorare 6-12-12-16-24-30 catenelle, lavorare 1 maglia alta in ognuna delle 66-71-74-79-82-87 maglie alte del davanti, 6-12-12-16-24-30 catenelle e finire con 1 maglia bassissima nella 3a catenella all’inizio del giro. Proseguire in tondo, lavorando 1 maglia alta in ogni maglia alta /catenella = 144-166-172-190-212-234 maglie alte. Quando si lavora in tondo, girare alla fine di ogni giro, per lavorare alternativamente sul diritto e sul rovescio del lavoro. In questo modo il motivo è uguale su tutto il top. Inserire 1 segno da ciascun lato, al centro delle 6-12-12-16-24-30 catenelle. DA ADESSO IN AVANTI MISURARE IL LAVORO DA QUESTO PUNTO. Quando il lavoro misura 4 cm, aumentare 1 maglia alta da ciascun lato di ognuno dei 2 segni - VEDERE IL SUGGERIMENTO PER GLI AUMENTI. Aumentare ogni 3-3-3-3-4-4 cm 4 volte in tutto = 160-182-188-206-228-250 maglie alte. Il lavoro misura ora 14-15-15-16-17-18 cm. Lavorare 1 giro e, allo stesso tempo, aumentare 3-5-5-5-1-3 maglie alte a intervalli regolari = 163-187-193-211-229-253 maglie alte. Proseguire come segue: Lavorare il diagramma A.4 sulla prima maglia alta del giro, poi ripetere il diagramma A.5 sulle restanti maglie alte. Il diagramma A.4 mostra come iniziare e finire il giro. Non girare, lavorare tutti i giri sul diritto del lavoro. Tagliare il filo dopo aver lavorato i diagrammi A.4 e A.5 1 volta in verticale. Il lavoro misura circa 40-42-44-46-48-50 cm in tutto. CORDINO: Lavorare 2 cordini morbidi come segue: con l’uncinetto n° 4 ed il filato Muskat lavorare una catenella di base lunga 100 cm, girare e lavorare 1 maglia bassissima in ogni catenella ma assicurarsi che le maglie bassissime non siano più strette delle catenelle. Tagliare il filo. Lavorare un altro cordino in modo uguale. Far passare un cordino su un lato del davanti, tra la seconda e la terza maglia alta dal bordo nella prima riga di maglie alte. Infilare il cordino sul lato del dietro nello stesso modo e fare un nodo per la spalla. Ripetere lungo l’altro lato del top. FRANGE: Tagliare 4 capi lunghi 20 cm. Piegarli in due, infilare l’anello attraverso 2 maglie alte nella parte in basso del top, sul diritto del lavoro. Passare le estremità dei fili attraverso l’anello e stringere. Attaccare le frange ogni 2 cm circa tutto intorno al bordo inferiore del top. |
|||||||||||||||||||||||||
Spiegazioni del diagramma |
|||||||||||||||||||||||||
|
|||||||||||||||||||||||||
 |
|||||||||||||||||||||||||
 |
|||||||||||||||||||||||||
Avete terminato questo modello?Allora taggate le vostre foto con #dropspattern #hawaiianbreezetop o inviatele alla #dropsfan gallery. Avete bisogno di aiuto con questo modello?Troverete 9 video tutorial, una sezione per i commenti/domande e molto altro guardando il modello su www.garnstudio.com © 1982-2026 DROPS Design A/S. Ci riserviamo tutti i diritti. Questo documento, compreso tutte le sue sotto-sezioni, è protetto dalle leggi sul copyright. Potete leggere quello che potete fare con i nostri modelli alla fine di ogni modello sul nostro sito. |
|||||||||||||||||||||||||


Con oltre 40 anni di esperienza nel design di modelli di maglia e uncinetto, DROPS Design offre la più estesa collezione di modelli gratuiti su internet - tradotti in 17 lingue. Ad oggi vi possiamo fornire 325 cataloghi e 12298 modelli - 9569 dei quali sono tradotti in Italiano.
Ci stiamo impegnando molto per darvi il meglio che vi possiamo offrire in termini di maglia e uncinetto, ispirazioni e consigli così come filati di grande qualità ad un prezzo incredibile! Volete utilizzare i nostri modelli per qualcosa d'altro oltre al vostro uso personale? Potete leggere tutto ciò che è consentito nel testo sul Copyright in basso su tutte le pagine dei nostri modelli. Buon lavoro!
Lasciare un commento sul modello DROPS 175-27
Noi saremmo felici di ricevere i tuoi commenti e opinioni su questo modello!
Se vuoi fare una domanda, fai per favore attenzione a selezionare la categoria corretta nella casella qui sotto per velocizzare il processo di risposta. I campi richiesti sono indicati da *.