
Categorie popolari
State cercando un filato?


Commenti / Domande (25)
![]() Susanna ha scritto:
Susanna ha scritto:
Åh, så fin! Den måste jag göra!
07.07.2025 - 20:12
![]() Britt-Marie Rahm ha scritto:
Britt-Marie Rahm ha scritto:
Vill gärna kunna se hur man virkar ihop remsorna till väskan My Daisy
11.06.2025 - 10:58DROPS Design ha risposto:
Hej Britt-Marie, klicka på Videor överst i mönsteret, så ser du att vi har gjort en video som visar hur man syr ihop remsorna :)
12.06.2025 - 10:59
![]() Marit Roseth ha scritto:
Marit Roseth ha scritto:
Takk for fin oppskrift. Jeg bare lurer på om dere kan si hvor store hver rute skal være. Lurer på om jeg må gå ned på pinnestørrelsen :-) Mvh Marit
29.04.2025 - 11:27DROPS Design ha risposto:
Hej Marit, nål nr 5 – eller den nålen du må bruke for å få 14 staver på 10 cm i bredden. En ruter måler 12 cm i bredden og 12 cm i høyden.
30.04.2025 - 09:54
![]() Maryse GIRAUD ha scritto:
Maryse GIRAUD ha scritto:
Bonjour, je voudrais réaliser ce sac, et commander la laine sur votre site; je voudrais savoir combien de pelotes faut il pour 100 gr ? deux ? merci de votre réponse
14.03.2025 - 14:40DROPS Design ha risposto:
Bonjour Mme Giraud, tout à fait, DROPS Paris se présente sous la forme de pelotes de 50 g. Bon crochet!
14.03.2025 - 16:16
![]() Guenaele ha scritto:
Guenaele ha scritto:
J ai trouvé les explications pr faire la cordelette et la fixer insuffisante sinon le reste était très bien
25.02.2025 - 17:27
![]() Marja ha scritto:
Marja ha scritto:
Hallo, hoeveel garen heb ik nodig als ik de abrikoos, roze, lichtroze en perzik vervang voor 1 kleur?
15.06.2024 - 12:49DROPS Design ha risposto:
Dag Marja,
Eerlijk gezegd weet ik dat niet. Je zou de hoeveelheid garen kunnen bestellen in 1 kleur en de bollen die je over houdt terug kunnen brengen naar de winkel. Vraag je winkel naar hun retourbeleid, zodat je weet wat de mogelijkheden zijn.
16.06.2024 - 19:19
![]() Wesley Perry ha scritto:
Wesley Perry ha scritto:
As long as credit for the pattern is given, is it okay to sell the finished project? Also what is the appropriate way to give credit for the pattern? I’m assuming on the tag, but would just like to know how to give credit to the designer while also making sure people understand that the person selling still handmade the item. Would “Handmade by insert name. Pattern by insert designer” be appropriate and/or what are alternative ways to do this? Thank you!
17.03.2024 - 16:05DROPS Design ha risposto:
Dear Wesley, for details of how can youuse these patterns for making pieces for sale, please see the framed text at the bottom of the pattern. Happy Knitting!
19.03.2024 - 00:13
![]() Susan Viljoen ha scritto:
Susan Viljoen ha scritto:
I did read your answer on the strap, but I still dont get the 'picture' is there perhaps a tutorial on how to assemble the strap
16.09.2023 - 17:06DROPS Design ha risposto:
Dear Susan, unfortunately, we have no tutorials for how to assemble the cord. When looking at the picture, try to follow the union of the white string (A) into the chain space (the triangular shape) and the black string (B) into the loops formed by the A string. Happy crochetting!
17.09.2023 - 21:50
![]() Rosemarie Morlet ha scritto:
Rosemarie Morlet ha scritto:
Can you give me a more in-depth explanation of how to attach the strap
31.07.2022 - 21:32DROPS Design ha risposto:
Dear Mrs Morlet, insert the first strap = A (in chart) as shown in A.4, then insert the 2nd strap (B) the same way on the other side of bag - now you will insert the ends of strap B into the loop of A as shown in A.4 and knot both ends of B together. repeat on the other side with the ends of A into the loops of B (reversed). Happy assembly!
01.08.2022 - 12:03
![]() Paloma ha scritto:
Paloma ha scritto:
Me encantó hacer este bolso ❤ Creo que voy a repetirlo, está vez en otro colores. Gracias!!
10.04.2022 - 21:02
|
|||||||||||||||||||||||||||||||
My Daisy#mydaisybag |
|||||||||||||||||||||||||||||||
 |
 |
||||||||||||||||||||||||||||||
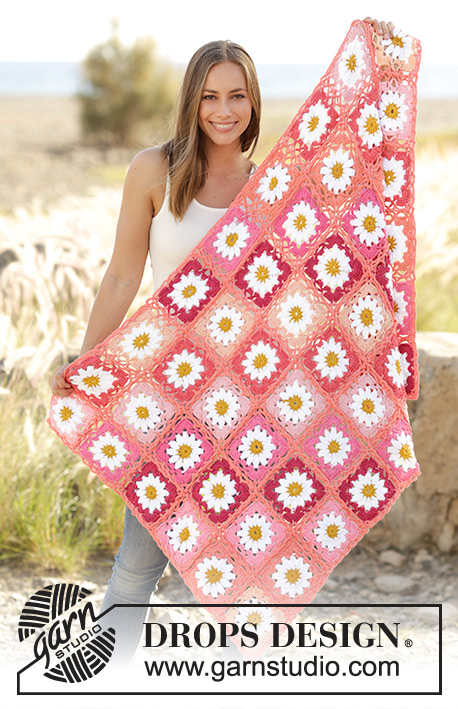
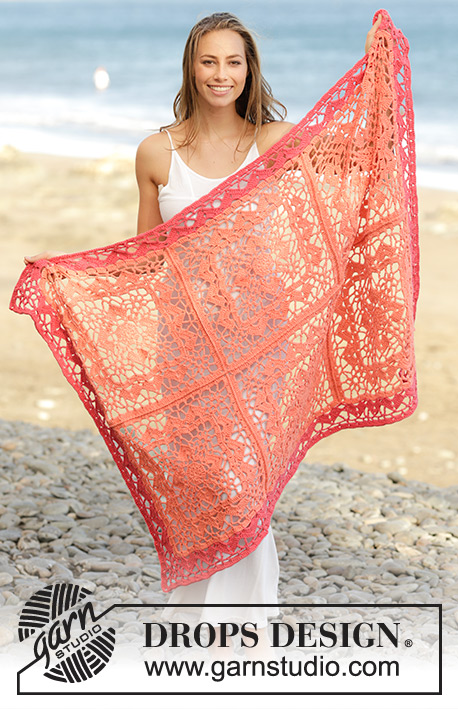
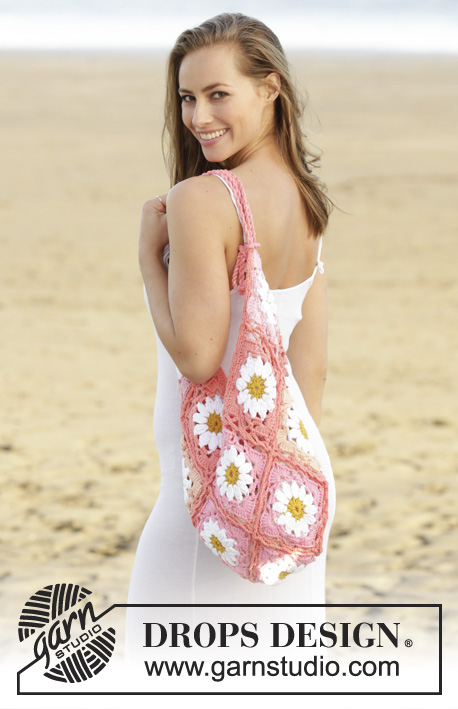
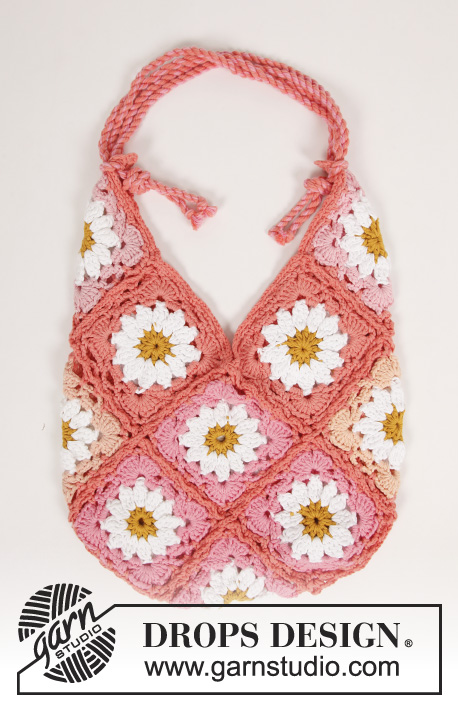
Borsa all’uncinetto formata da quadrati, in DROPS Paris.
DROPS 175-17 |
|||||||||||||||||||||||||||||||
|
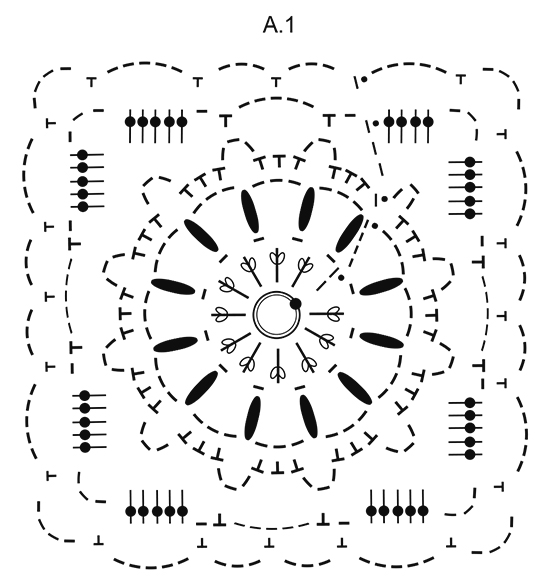
MOTIVO: Vedere i diagrammi da A.1 a A.4. Il diagramma A.3 mostra come assemblare la borsa. COLORI DEI QUADRATI: L’avvio e i giri 1, 2 e 5 sono uguali per tutti i quadrati. I giri 3 e 4 si lavorano nel colore indicato dal numero del quadrato. AVVIO + GIRO 1: giallo senape GIRO 2: bianco GIRO 5: albicocca QUADRATO 1: Lavorare 7 quadrati con il colore rosa medio. QUADRATO 2: Lavorare 2 quadrati con il colore pesca. QUADRATO 3: Lavorare 4 quadrati con il colore albicocca. QUADRATO 4: Lavorare 2 quadrati con il colore rosa chiaro. SUGGERIMENTO PER CAMBIARE COLORE: Per avere un cambio di colore pulito, lavorare l’ultima maglia bassissima del giro con il nuovo colore, come segue: puntare l’uncinetto nella prima catenella dall’inizio del giro, fare un gettato con il nuovo colore e passare il filo attraverso la maglia sull’uncinetto. Fissare i capi man mano che si procede con il lavoro. ---------------------------------------------------------- BORSA: La borsa è formata da 15 quadrati lavorati in 4 diverse combinazioni di colori – VEDERE COLORI DEI QUADRATI.. QUADRATO: Con l’uncinetto n° 5 ed il filato Paris lavorare il diagramma A.1 – VEDERE IL SUGGERIMENTO PER CAMBIARE COLORE. RICORDARSI DI MANTENERE LA CORRETTA TENSIONE DEL LAVORO! CONFEZIONE: Disporre i quadrati come indicato nel diagramma A.2 (le linee tratteggiate mostrano i quadrati che verranno piegati sul dietro della bora; gli altri quadrati vengono sovrapposti l’uno sull’altro). Unire i quadrati in strisce, in diagonale prima in una direzione, poi nell’altra. Unire i quadrati in strisce come segue: mettere 2 quadrati uno sopra l’altro, rovescio del lavoro contro rovescio del lavoro e unirli con il colore albicocca puntando l’uncinetto attraverso entrambi gli strati, come segue – vedere il diagramma A.3 (il diagramma A.3 mostra gli angoli dei 4 quadrati): 1 maglia bassa intorno all’angolo, * 4 catenelle, 1 maglia bassa intorno all’arco di catenelle successivo *, ripetere da *-* fino all’angolo (= 5 archi di catenelle), lavorare 4 catenelle (= passaggio tra i 2 quadrati successivi). Proseguire in questo modo finché tutti i quadrati non sono starti uniti. Tagliare il filo alla fine di ogni striscia. BORDO ALL’UNCINETTO: Per finire, con il colore albicocca lavorare un bordo tutto intorno all’apertura della borsa come segue: Iniziare in uno degli angoli in alto. Lavorare * 1 maglia bassa intorno all’arco di catenelle nell’angolo, 4 catenelle, 1 maglia bassa intorno allo stesso angolo, 4 catenelle, (1 maglia bassa intorno all’arco di catenelle successivo, 4 catenelle), ripetere da (-) fino all’angolo successivo della borsa *, ripetere da *-* lungo i 3 lati successivi, finire con 1 maglia bassissima nella prima maglia bassa all’inizio del giro. BRETELLA: Tagliare 4 capi del colore albicocca + 2 capi del colore rosa medio, lunghi 4 metri l’uno. Avvolgerli insieme finché non oppongono resistenza, piegarli in due in modo che si avvolgano di nuovo. Fare un nodo ad ogni estremità. Preparare un'altra bretella uguale. Far passare una delle bretelle nell’arco di catenelle di uno degli angoli in alto della borsa - come indicato nel diagramma A.4 (A). Far passare l’altra bretella nello stesso modo, ma dall’altra parte, nella parte in alto della borsa. Infilare poi la prima bretella nella seconda come indicato nel diagramma A.4 (B), legare le estremità delle bretelle con un nodo alla fine; ripetere con le estremità dell’altra bretella. |
|||||||||||||||||||||||||||||||
Spiegazioni del diagramma |
|||||||||||||||||||||||||||||||
|
|||||||||||||||||||||||||||||||
 |
|||||||||||||||||||||||||||||||
 |
|||||||||||||||||||||||||||||||
Avete terminato questo modello?Allora taggate le vostre foto con #dropspattern #mydaisybag o inviatele alla #dropsfan gallery. Avete bisogno di aiuto con questo modello?Troverete 10 video tutorial, una sezione per i commenti/domande e molto altro guardando il modello su www.garnstudio.com © 1982-2026 DROPS Design A/S. Ci riserviamo tutti i diritti. Questo documento, compreso tutte le sue sotto-sezioni, è protetto dalle leggi sul copyright. Potete leggere quello che potete fare con i nostri modelli alla fine di ogni modello sul nostro sito. |
|||||||||||||||||||||||||||||||


Con oltre 40 anni di esperienza nel design di modelli di maglia e uncinetto, DROPS Design offre la più estesa collezione di modelli gratuiti su internet - tradotti in 17 lingue. Ad oggi vi possiamo fornire 325 cataloghi e 12298 modelli - 9569 dei quali sono tradotti in Italiano.
Ci stiamo impegnando molto per darvi il meglio che vi possiamo offrire in termini di maglia e uncinetto, ispirazioni e consigli così come filati di grande qualità ad un prezzo incredibile! Volete utilizzare i nostri modelli per qualcosa d'altro oltre al vostro uso personale? Potete leggere tutto ciò che è consentito nel testo sul Copyright in basso su tutte le pagine dei nostri modelli. Buon lavoro!
Lasciare un commento sul modello DROPS 175-17
Noi saremmo felici di ricevere i tuoi commenti e opinioni su questo modello!
Se vuoi fare una domanda, fai per favore attenzione a selezionare la categoria corretta nella casella qui sotto per velocizzare il processo di risposta. I campi richiesti sono indicati da *.