
Categorie popolari
State cercando un filato?


Commenti / Domande (101)
![]() Karin Conte ha scritto:
Karin Conte ha scritto:
Ich weiß nicht wie ich bei der Anleitung "173-1 Taschen häkeln" in den Reihen 5 - 10 die Maschen zunehmen muß, damit es im Muster passt. Mit freundlichen Grüßen Karin Conte
08.08.2023 - 18:55DROPS Design ha risposto:
-Siehe Antwort unten, und vielleicht auch diese Lektion, unter Kästchendiagramme / Farbdiagramme wird es erklärt, wie man solche Diagramme häkelt. Viel Spaß beim häkeln!
09.08.2023 - 08:09
![]() Karin Conte ha scritto:
Karin Conte ha scritto:
Bei dieser Anleitung weiß ich nicht, wie ich in den Reihen 5 - 10 die Maschen zunehmen soll damit das Muster passt. Liebe Grüße Karin Conte
08.08.2023 - 18:51DROPS Design ha risposto:
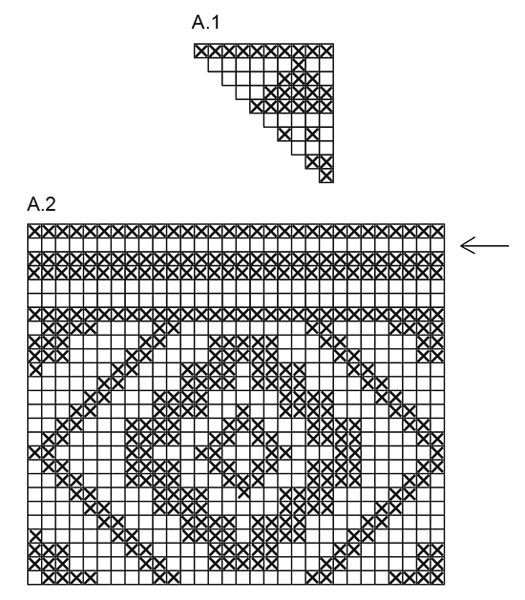
Liebe Frau Conte, die Zunahmen werden in die schriftlichen Anleitung erklärt, dh bei der 1. Runde häkeln Sie 12 Stäbchen = 12 Mal A.1; bei der 2. Runde, häkeln Sie 2 Stb in jedes Stb = 24 Stb, die wie bei der 2. Reihe A.1 gehäkelt werden; bei der 3. Runde verdoppelten Sie jedes 2. Stb = 36 Stb (12 x die 3 Stb in A.1 in der Runde) usw. Viel Spaß beim häkeln!
09.08.2023 - 08:08
![]() Guendalina ha scritto:
Guendalina ha scritto:
* 1 m.a in ognuna delle (prime 3 m.a /delle )3 m.a successive quindi si deve leggere così, "le prime 3 m.a. " non contano?
20.06.2023 - 17:18DROPS Design ha risposto:
Buongiorno Guendalina, all'inizio del giro lavoreeà 1 maglia alta in ognuna delle prime 3 maglie, poi 1 maglia alta nelle 3 maglie successive, e così via. Buon lavoro!
21.06.2023 - 08:20
![]() Guendalina ha scritto:
Guendalina ha scritto:
* 1 m.a in ognuna delle prime 3 m.a /delle 3 m.a successive, me lo spiegate meglio? Non lo capisco. Grazie mille
19.06.2023 - 23:54DROPS Design ha risposto:
Buonasera Guendalina, deve semplicemente lavorare 1 maglia alta in ognuna delle 3 maglie alte successive. Buon lavoro!
20.06.2023 - 16:58
![]() Guendalina Bosio ha scritto:
Guendalina Bosio ha scritto:
Domanda sul fondo : Come effettuare gli aumenti dalla riga 5 a 10?
13.06.2023 - 15:40DROPS Design ha risposto:
Buongiorno Guendalina, deve aumentare come nei giri precedenti lavorando 1 maglia in più tra gli aumenti ad ogni giro e continuando a lavorare il motivo A.1. Buon lavoro!
14.06.2023 - 08:41
![]() Mijai ha scritto:
Mijai ha scritto:
I had no problem what so ever about pattern But wondering if you have a video of strap Not sure how to attetch Thanks
30.08.2022 - 23:17DROPS Design ha risposto:
Dear Mijai, there is no video to the straps, make a bread with 36 strands of yarn (3 bunches of 12 strands each), starting after approx. 12 cm from one end (make a knot there). When the braid measures approx. 68 cm divide the strands into 2 bunches (18 strands each), insert one bunch into the round with holes on top of bag, from inside towards outside, insert the other bunch into the same round but 3 dc away from the first bunch and make a knot with both bunches. Unknot the knot at the beg of the braid and repeat on the other side of bag. Make another braid and fasten it the same way on the other side of bag. Hope it can help.
31.08.2022 - 07:54
![]() Luna ha scritto:
Luna ha scritto:
"På omg med pil hækles der således: * 1 st i hver af de 3 første/næste st, 1 lm, spring over 1 st *, gentag fra *-*. " Jeg forstår ikke. Betyder det. *1 st,1 st, 1 st, lm, spring over 1 st, forsæt med at hækle mønster ??
09.08.2022 - 13:08DROPS Design ha risposto:
Hej Luna, ja det stemmer som du beskriver, sådan gør du hele vejen rundt og fortsætter bagefter med mønster :)
11.08.2022 - 09:17
![]() Rebekah Lovelady ha scritto:
Rebekah Lovelady ha scritto:
So on the bottom, when doing the two stitches in the increase, they are both the same color? Like if the one box indicating the color on the diagram that falls on the increase is one color but two stitches? Forgive me if this question was asked before, but there are a lot of comments on this pattern lol!
20.04.2022 - 19:09DROPS Design ha risposto:
Dear Rebekah, it depends on the pattern. For example, in diagram A.1, you start with 1 stitch in dark grey. In the next round you increase to two stitches in dark grey. In the 3rd round, you increase one of them to 2 light beige stitches and work the third stitch in light beige. In the 4th round, you increase one light beige stitch to 1 dark grey stitch and 1 light beige stitch and work 1 dark grey stitch and 1 light beige stitch over the other 2 stitches. Happy crocheting!
20.04.2022 - 19:53
![]() Mona Ragheb ha scritto:
Mona Ragheb ha scritto:
Very nice pattern
08.03.2022 - 07:11
![]() Jaana ha scritto:
Jaana ha scritto:
When you have finished the A1 (bottom), you can´t start the A2 from the start, if you want to get the patterns aligned in the middle of the A1. You must begin from the third dc of the pattern A2.
30.06.2021 - 15:32
|
|||||||
Santa Fe#santafebag |
|||||||
|
|
|||||||
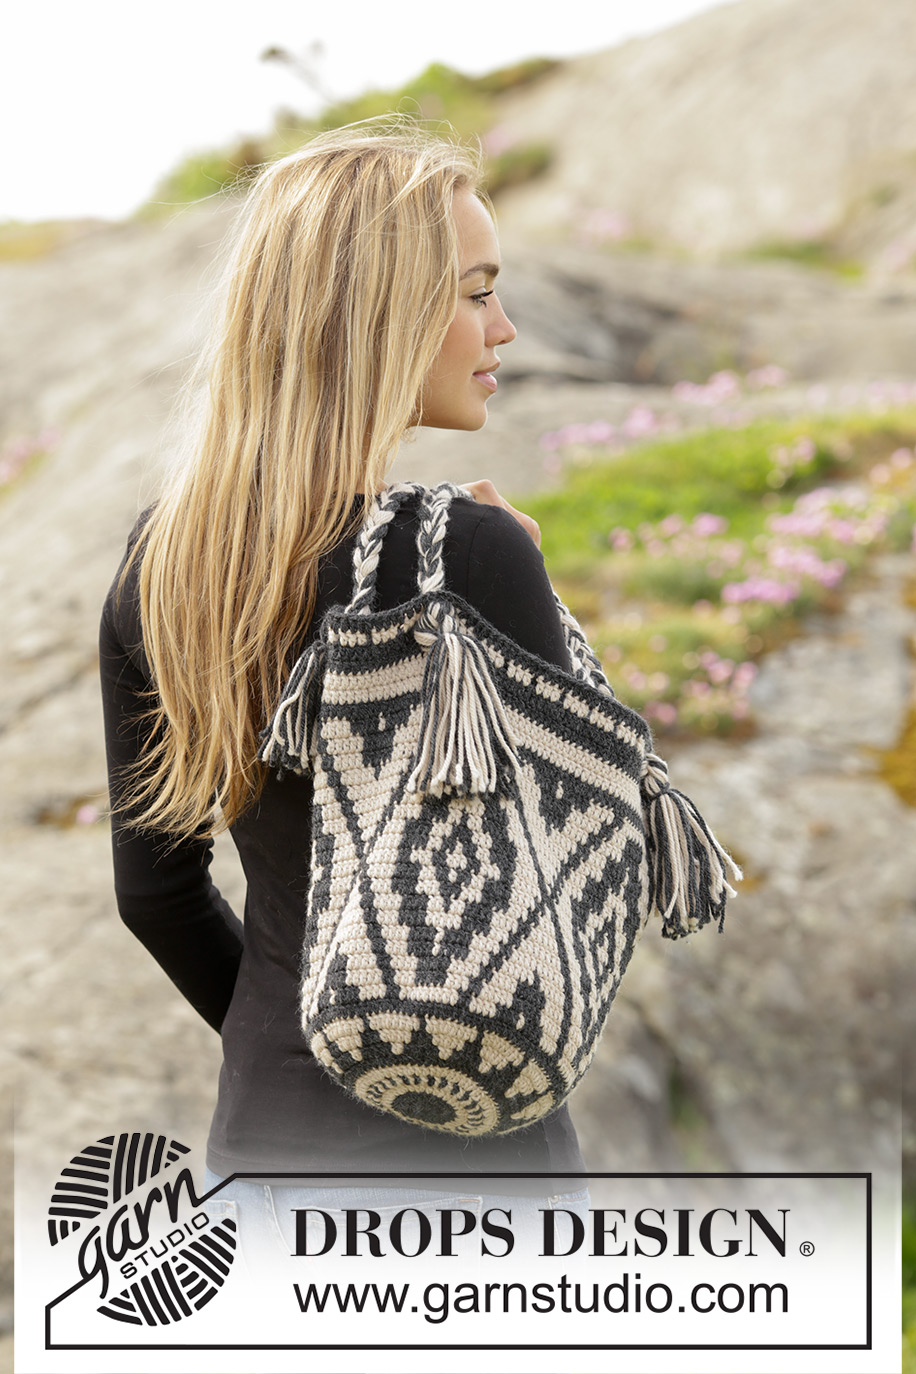
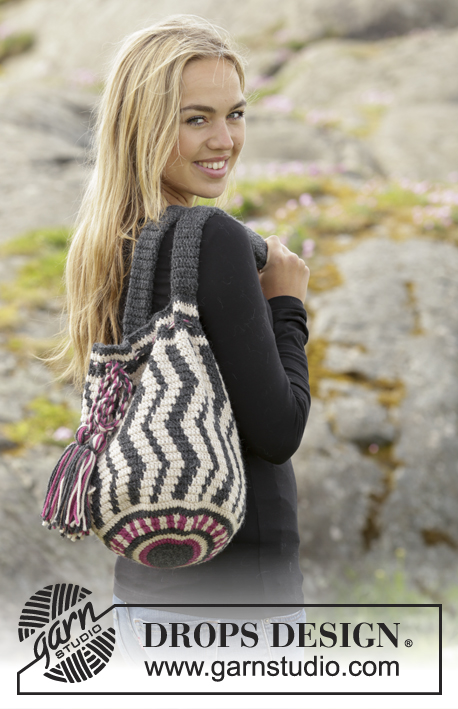
Borsa DROPS all’uncinetto, con motivo jacquard, in "Nepal".
DROPS 173-1 |
|||||||
|
MOTIVO JACQUARD: Vedere i diagrammi A.1 e A.2. I diagrammi mostrano i colori del motivo. 1 quadrato = 1 m.a. COLORI JACQUARD (in tondo): Quando si cambia colore, lavorare come segue: Lavorare l’ultima m.a con il primo colore, ma non fare l’ultima gettata, fare l’ultima gettata con il colore successivo, lavorare poi la m.a successiva. Quando si lavora con 2 colori, mettere il filo del colore non utilizzato sulle m del giro precedente, lavorare intorno al filo in modo che venga nascosto e segua il giro. INFORMAZIONI PER IL LAVORO: Sostituire la prima m.a all’inizio di ogni giro con 3 cat; finire il giro con 1 m.bss nella 3a cat. --------------------------------------------------------- BORSA: Si lavora in tondo. Con l’uncinetto n° 3,5 ed il colore grigio scuro, avviare 5 cat e formare un anello con 1 m.bss nella prima cat. Proseguire in tondo e seguendo il diagramma A.1 (lavorare 12 ripetizioni del diagramma A.1 in larghezza) - VEDERE COLORI JACQUARD. GIRO 1: 12 m.a nell’anello di cat – vedere le INFORMAZIONI PER IL LAVORO. GIRO 2: 2 m.a in ogni m.a = 24 m.a. GIRO 3: * 1 m.a nella m.a successiva, 2 m.a nella m.a successiva *, ripetere da *-* su tutto il giro = 36 m.a. GIRO 4: * 1 m.a in ognuna delle prime 2 m.a, 2 m.a nella m.a successiva *, ripetere da *-* su tutto il giro = 48 m.a. RICORDARSI DI MANTENERE LA CORRETTA TENSIONE DEL LAVORO! GIRI 5-10: continuare con gli aumenti e con il motivo come prima, quindi ad ogni giro lavorare 1 m.a in più tra ogni aumento = 120 m.a. GIRO 11: Continuare in tondo ma senza aumentare e lavorare seguendo il diagramma A.2 (= 4 ripetizioni del diagramma in larghezza). Al giro indicato dalla freccia, lavorare come segue: * 1 m.a in ognuna delle prime 3 m.a /delle 3 m.a successive, 1 cat, saltare 1 m.a *, ripetere da *-*. Continuare con il diagramma A.2 fino alla fine del lavoro. Tagliare il filo. MANICI: Tagliare 18 capi di ogni colore lunghi 120 cm l’uno = 36 capi. Mettere i capi insieme e fare un nodo lento lasciando ca.12 cm dopo il nodo. Dividere i capi in 3 gruppi di 12 capi l’uno. Intrecciare i 3 gruppi per ca.68 cm. Dividere i capi in 2 gruppi. Infilare i 2 gruppi nel giro traforato a 3 m.a l’uno dall’altro. Legare i 2 gruppi con un nodo sul davanti della borsa. Disfare il nodo fatto all’inizio della treccia e fissare alla borsa in modo uguale, ma sul lato opposto. Preparare un’altra treccia in modo uguale – vedere la fotografia. |
|||||||
Spiegazioni del diagramma |
|||||||
|
|||||||
 |
|||||||
Avete terminato questo modello?Allora taggate le vostre foto con #dropspattern #santafebag o inviatele alla #dropsfan gallery. Avete bisogno di aiuto con questo modello?Troverete 7 video tutorial, una sezione per i commenti/domande e molto altro guardando il modello su www.garnstudio.com © 1982-2026 DROPS Design A/S. Ci riserviamo tutti i diritti. Questo documento, compreso tutte le sue sotto-sezioni, è protetto dalle leggi sul copyright. Potete leggere quello che potete fare con i nostri modelli alla fine di ogni modello sul nostro sito. |
|||||||


Con oltre 40 anni di esperienza nel design di modelli di maglia e uncinetto, DROPS Design offre la più estesa collezione di modelli gratuiti su internet - tradotti in 17 lingue. Ad oggi vi possiamo fornire 324 cataloghi e 12290 modelli - 9561 dei quali sono tradotti in Italiano.
Ci stiamo impegnando molto per darvi il meglio che vi possiamo offrire in termini di maglia e uncinetto, ispirazioni e consigli così come filati di grande qualità ad un prezzo incredibile! Volete utilizzare i nostri modelli per qualcosa d'altro oltre al vostro uso personale? Potete leggere tutto ciò che è consentito nel testo sul Copyright in basso su tutte le pagine dei nostri modelli. Buon lavoro!
Lasciare un commento sul modello DROPS 173-1
Noi saremmo felici di ricevere i tuoi commenti e opinioni su questo modello!
Se vuoi fare una domanda, fai per favore attenzione a selezionare la categoria corretta nella casella qui sotto per velocizzare il processo di risposta. I campi richiesti sono indicati da *.