
Categorie popolari
State cercando un filato?


Commenti / Domande (19)
Denise Voiss ha scritto:
I want to convert this to stockinette stitch. How would I prevent it from curling? What edging could I add (4 stitches of seed stitch on each end)? And how would I knit this into the pattern given that there is only a 2 stitch cast on? Thank you!
10.01.2017 - 18:47DROPS Design ha risposto:
Dear Mrs Voiss, we are not able to adjust each our pattern to every individual request, you are welcome to contact your DROPS store for any further personnal assistance or maybe rather choose another pattern worked in stocking st if you rather. Happy knitting!
11.01.2017 - 09:12
![]() Amanda Dunn ha scritto:
Amanda Dunn ha scritto:
I love this scarf, wondered if it's possible to convert it to a crochet pattern?? I haven't tried knitting, not sure I could do it!!
07.11.2016 - 22:27DROPS Design ha risposto:
Dear Mrs Dunn, this pattern is only knitted one - you will find different videos showing how to knit if you like to learn, see tab "videos" and scrolling down to the bottom of the page. Happy knitting!
08.11.2016 - 09:52
![]() Petra Mohr ha scritto:
Petra Mohr ha scritto:
Hallo , habe das Drops Tuch fertig gestrickt und genau nach der Anleitung aber leider war das Tuch am Ende nur 39 cm lang . Habe alles nochmal mehrmals durchgelesen aber keinen Fehler gefunden. Hätte man die Wolle doppelt nehmen müssen ? Liebe Grüße Petra Mohr
27.10.2016 - 21:43DROPS Design ha risposto:
Liebe Frau Mohr, haben Sie auch alle Zunahmen am Anfang jeder 2. Reihe (dh gleichzeitig mit den verkürzte R) gestrickt? Diese Zunahmen geben Breit und Höhe (es gibt immer mehr M. mit den Zunahmen, und damit mehr verkürzten Reihen).
28.10.2016 - 09:37
![]() Carmen ha scritto:
Carmen ha scritto:
Cuando se termina la hilera antes de cambiar de color, se tejen los puntos de toda la hilera o sólo los 6 últimos y se cambia de color?
19.10.2016 - 07:08DROPS Design ha risposto:
Hola Carmen. ¿Puedes concretar la pregunta? ¿A qué fila y qué sección te estás refiriendo.?
30.10.2016 - 12:24
![]() Anke Graetz ha scritto:
Anke Graetz ha scritto:
Sehr geehrte Damen und Herren, ich bin Strickanfängerin. Wieviel Maschen werden ab Abschnitt 1 in jeder Rückreihe zugenommen? Abwechselnd 1M und dann 2M oder immer 2M. Danke im voraus für Ihre Hilfe. MfG Anke Graetz
17.09.2016 - 15:03DROPS Design ha risposto:
Liebe Frau Graetz, es wird immer abwechselnd 1M und 2 M am Anfang jeder Reihe zugenommen (also bei der Randmaschen, nicht in der mitte wo man die verkürtzte Reihe strickt).
19.09.2016 - 09:12
![]() Beatriz Silva ha scritto:
Beatriz Silva ha scritto:
O modelo é simples mas tem uma boa combinação de cores, permitindo alterar o colorido, mantendo o esquema
24.06.2016 - 17:01
![]() Johanna ha scritto:
Johanna ha scritto:
So simple and beautiful!
10.06.2016 - 12:38
![]() Candy ha scritto:
Candy ha scritto:
Been looking for just this shawl
07.06.2016 - 16:19
![]() Diane Charbonneau ha scritto:
Diane Charbonneau ha scritto:
On pourrait6 l'appeler....Rose des vents
04.06.2016 - 04:01
|
|
Tide Rose#tiderosescarf |
|
 |
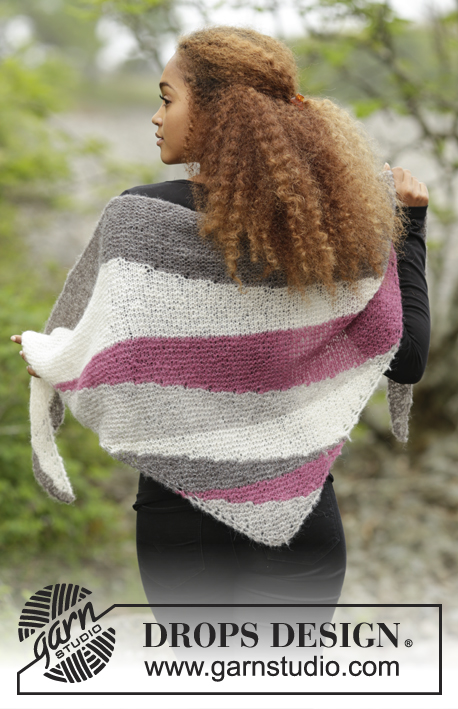 |
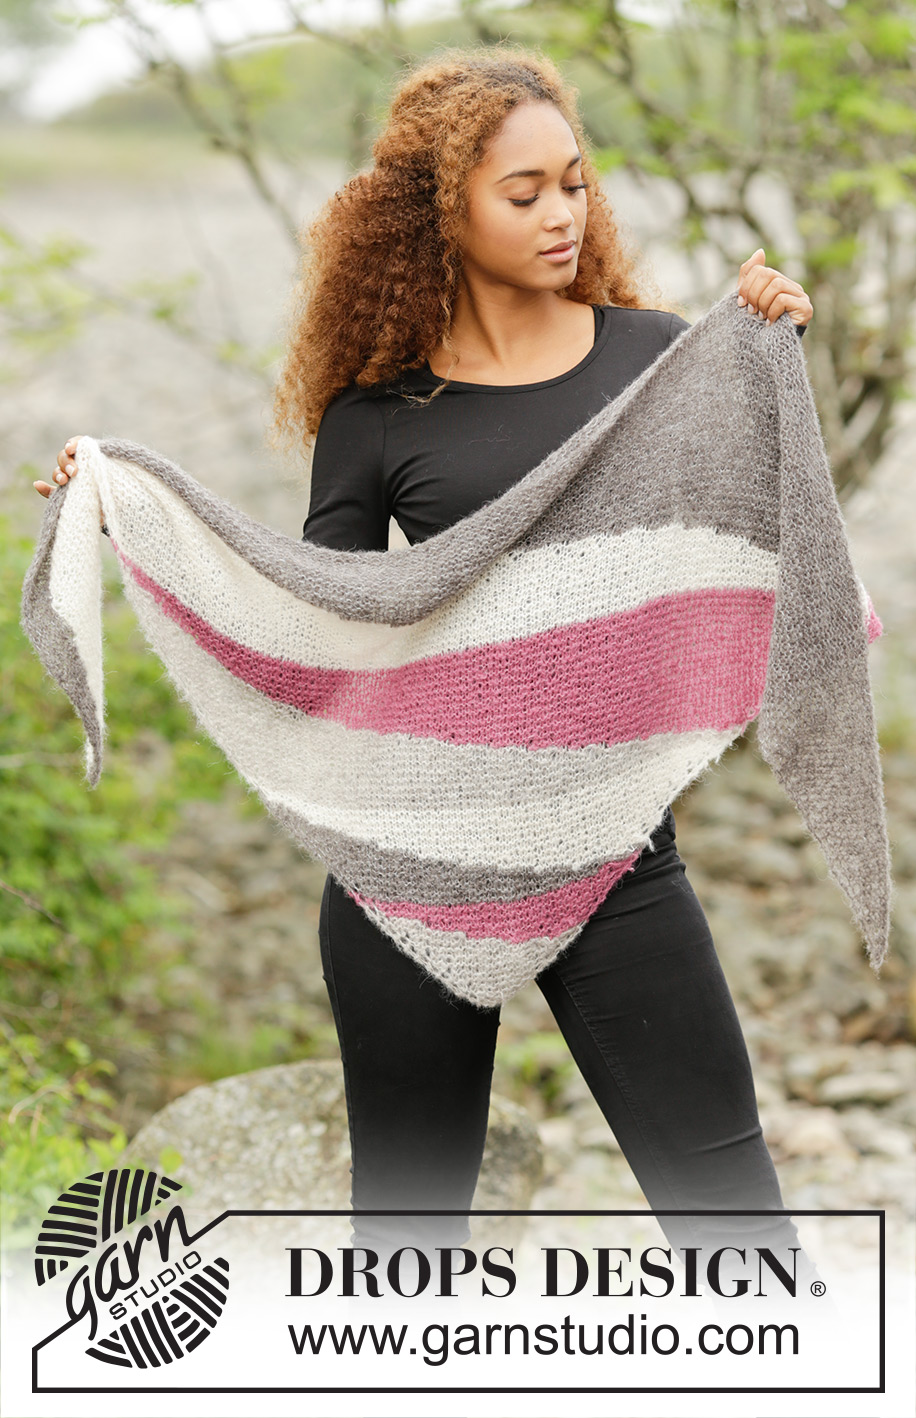
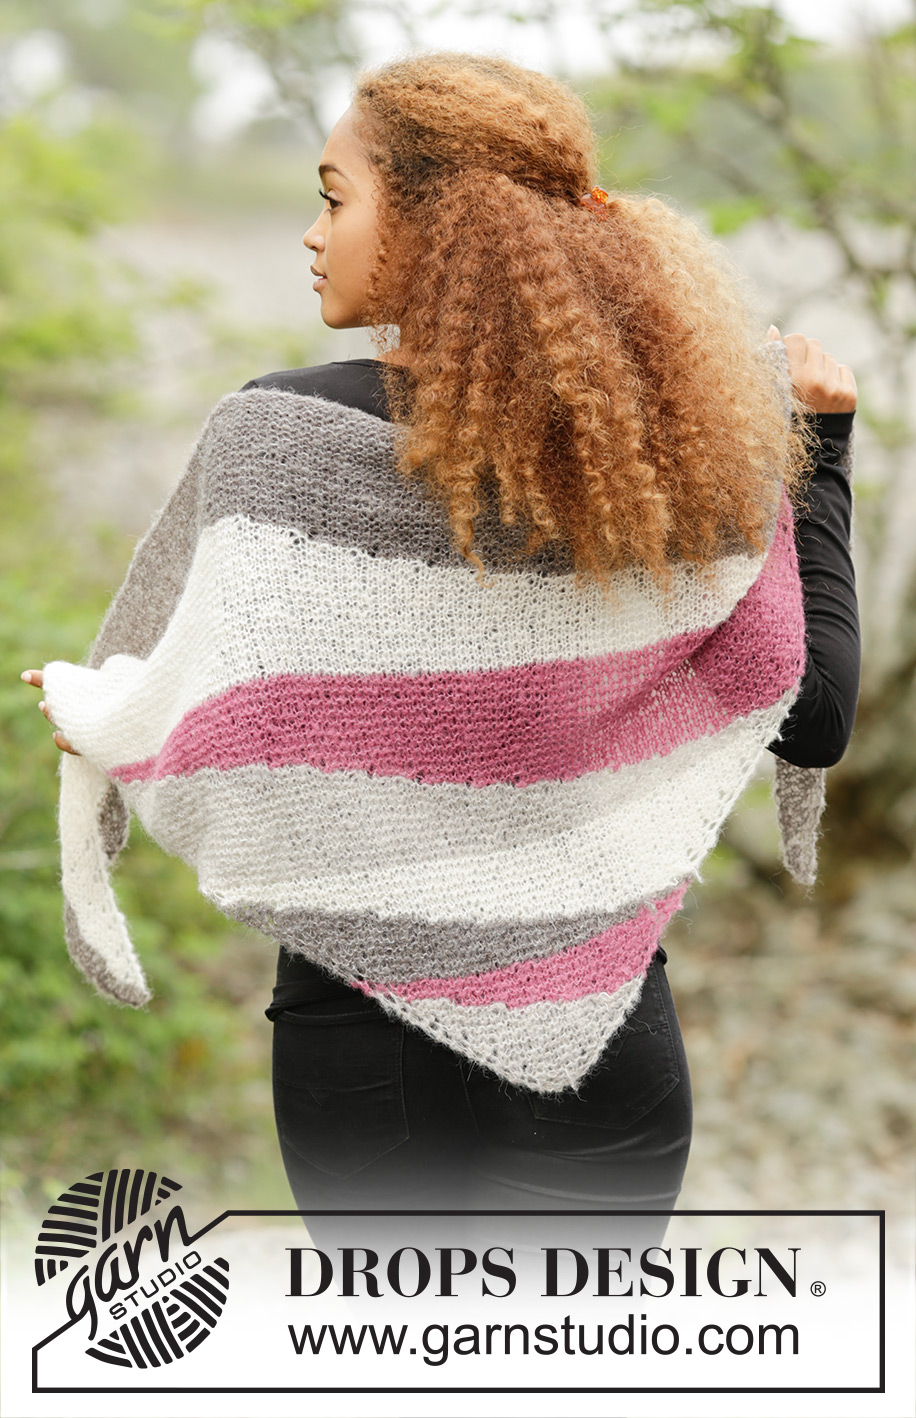
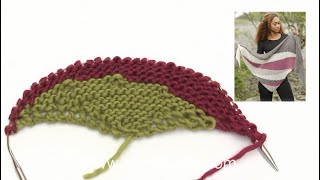
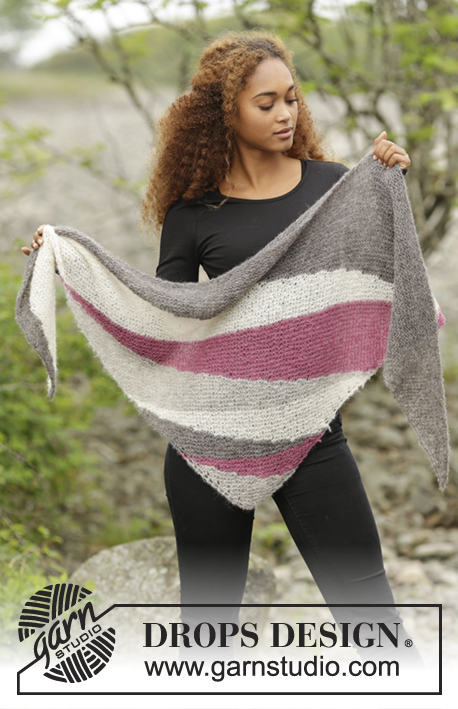
Scialle DROPS lavorato ai ferri con ferri accorciati e strisce in ”Brushed Alpaca Silk”.
DROPS 172-20 |
|
|
M LEGACCIO (avanti e indietro): Lavorare tutti i f a dir. 1 “costa” a m legaccio = 2 f dir. ---------------------------------------------------------- SCIALLE: Lavorato avanti e indietro sui f circolari per avere spazio per tutte le m. Lavorare dalla punta in su a M LEGACCIO – leggere la spiegazione sopra. Avviare 2 m con i f circolari n° 6 mm con il grigio chiaro. Poi lavorare come segue: FERRO 1 (= diritto del lavoro): 1 m dir, 1 gettato (= 1 aumento), lavorare il resto del f a dir. FERRO 2 (= rovescio del lavoro): 1 m dir, 1 gettato (= 1 aumento), lavorare il resto del f a dir. FERRO 3: 1 m dir, 1 gettato (= 1 aumento), 1 m dir, 1 gettato (= 1 aumento), lavorare il resto del f a dir (= 2 aumenti in totale). FERRO 4: 1 m dir, 1 gettato (= 1 aumento), 1 m dir, 1 gettato (= 1 aumento), lavorare il resto del f a dir (= 2 aumenti in totale). FARE ATTENZIONE ALLA TENSIONE DEL LAVORO! Ripetere i ferri 1-4 fino a quando il lavoro misura 6 cm, aggiustarlo in modo che il f successivo sia dal rovescio del lavoro. Ora lavorare a f accorciati come segue: SEZIONE 1: Continuare ad aumentare come prima, ma in questa sezione aumentare solo sul lato sinistro del lavoro (= all’inizio dei f dal rovescio del lavoro). Lavorare a f accorciati come segue: FERRO 1 (= rovescio del lavoro): lavorare a dir fino a quando rimangono 6 m, girare il lavoro (queste m non vengono più lavorate). FERRO 2 (= diritto del lavoro): dir. FERRO 3: lavorare a dir fino a quando rimangono 12 m (comprese le prime 6 m), girare il lavoro (queste m non vengono più lavorate). FERRO 4: dir. Continuare in questo modo, cioè lavorare 6 m in meno a f alterni e aumentare come prima sul lato sinistro del lavoro, fino a quando rimangono 6 o meno m sul f (l’ultimo f è dal diritto del lavoro). Lavorare 1 f su tutte le m dal rovescio del lavoro e aumentare come prima. SEZIONE 2: Passare al colore erika. Continuare ad aumentare come prima, ma in questa sezione aumentare solo sul lato destro del lavoro (= all'inizio di un ferro dal diritto del lavoro). Lavorare a f accorciati come segue: FERRO 1 (= diritto del lavoro): lavorare a dir le prime 6 m, girare il lavoro. FERRO 2 (= rovescio del lavoro): dir. FERRO 3: lavorare 6 m in più del 1° f, girare il lavoro (cioè gli aumenti sul 1° f non vengono contati). FERRO 4: dir. Continuare in questo modo, cioè lavorare 6 m in più a f alterni fino a quando è stata lavorata 1 “costa” su tutte le m (l’ultimo f è dal rovescio del lavoro). SEZIONE 3: Passare al grigio. Lavorare 1 f dir dal rovescio del lavoro. Lavorare come per la SEZIONE 1. SEZIONE 4: Passare al panna. Lavorare come per la SEZIONE 2. SEZIONE 5: Passare al grigio chiaro. Lavorare 1 f dir dal rovescio del lavoro. Lavorare come per la SEZIONE 1. SEZIONE 6: Passare al colore erika. Lavorare come per la SEZIONE 2. SEZIONE 7: Passare al panna. Lavorare 1 f dir dal rovescio del lavoro. Lavorare come per la SEZIONE 1. SEZIONE 8: Passare al grigio. Lavorare come per la SEZIONE 2. Intrecciare come segue: * Intrecciare 5 m, 1 gettato e intrecciare il gettato *, ripetere *-* fino a quando tutte le m sono state intrecciate. |
|
Avete terminato questo modello?Allora taggate le vostre foto con #dropspattern #tiderosescarf o inviatele alla #dropsfan gallery. Avete bisogno di aiuto con questo modello?Troverete 10 video tutorial, una sezione per i commenti/domande e molto altro guardando il modello su www.garnstudio.com © 1982-2026 DROPS Design A/S. Ci riserviamo tutti i diritti. Questo documento, compreso tutte le sue sotto-sezioni, è protetto dalle leggi sul copyright. Potete leggere quello che potete fare con i nostri modelli alla fine di ogni modello sul nostro sito. |
|


Con oltre 40 anni di esperienza nel design di modelli di maglia e uncinetto, DROPS Design offre la più estesa collezione di modelli gratuiti su internet - tradotti in 17 lingue. Ad oggi vi possiamo fornire 324 cataloghi e 12290 modelli - 9561 dei quali sono tradotti in Italiano.
Ci stiamo impegnando molto per darvi il meglio che vi possiamo offrire in termini di maglia e uncinetto, ispirazioni e consigli così come filati di grande qualità ad un prezzo incredibile! Volete utilizzare i nostri modelli per qualcosa d'altro oltre al vostro uso personale? Potete leggere tutto ciò che è consentito nel testo sul Copyright in basso su tutte le pagine dei nostri modelli. Buon lavoro!
Lasciare un commento sul modello DROPS 172-20
Noi saremmo felici di ricevere i tuoi commenti e opinioni su questo modello!
Se vuoi fare una domanda, fai per favore attenzione a selezionare la categoria corretta nella casella qui sotto per velocizzare il processo di risposta. I campi richiesti sono indicati da *.