
Categorie popolari
State cercando un filato?


Commenti / Domande (8)
![]() Emma ha scritto:
Emma ha scritto:
Ik ben gekomen aan het stuk na het minderen voor de hiel. Ik moet nu 12 keer minderen. Moet ik dat op de bovenkant van de voet doen Of rond de hiel? Ik ben al aan het verder doen en minder op de bovenkant van de voet maar vindt dat dat er anders uitziet dan op de foto. Alvast bedankt om mij te helpen!
25.11.2023 - 15:55DROPS Design ha risposto:
Dag Emma,
Na het minderen voor de hiel, haak je weer helemaal in de rondte. In de volgende paragraaf minder je weer steken aan elke kant van de steken op de bovenkant van de voet waardoor je de haak afmaakt voordat je de voet verder haakt.
26.11.2023 - 07:24
![]() Emma ha scritto:
Emma ha scritto:
Dag, Ik moet nu starten met minderen voor de hiel. Is het normaal dat ik dan geen symmetrie heb?
16.11.2023 - 19:54
![]() Alexandra ha scritto:
Alexandra ha scritto:
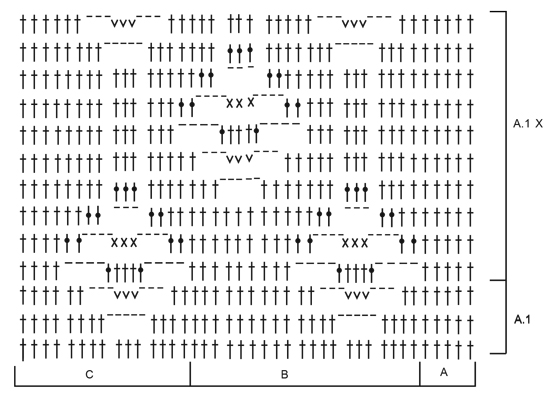
There are some empty spaces between dc in 2nd row in the scheme. I should skip it, or no?
09.04.2022 - 19:49DROPS Design ha risposto:
Dear Alexandra, the scheme tries to fit in 2D a 3D pattern. This is why blank spaces are added: to fit in the scheme the space necessary for the higher number of stitches in the last rows. There are also some - symbols between some dc groups; these represent ch, which you should work over some dc; for example ch5 over 3 dc (these dc are skipped). Happy crochetting!
10.04.2022 - 19:55
![]() Pauline ha scritto:
Pauline ha scritto:
Bonjour, je ne comprends pas comment faire le talon et les diminutions. Merci d'avance pour votre aide.
15.09.2021 - 19:02DROPS Design ha risposto:
Bonjour Pauline, le talon se crochète sur les 14-16-16 dernières brides à la fin des tours précédents + les 13-15-15 brides du début des tours = soit 5-5.5-6 cm en mailles serrées sur ces 27-31-31 brides. Crochetez ensuite les DIMINUTIONS TALON en suivant cette vidéo et, en même temps, le nombre de mailles indiqué pour votre taille dans ce modèle. Bon crochet!
16.09.2021 - 07:30
![]() Elfrieda ha scritto:
Elfrieda ha scritto:
Na 27 cm sok gehaakt te hebben moet je beginnen aan de hiel. Moet je daarvoor eerst afhechten en dan aanhechten aan de 1ste steek van de laatste 16st op de toer?
04.09.2019 - 17:41DROPS Design ha risposto:
Dag Elfrieda,
Ja dat klopt, je haakt de hiel aan de achterkant, dus zodat het midden van de hiel midden achter komt.
08.09.2019 - 17:47
![]() Kyla Hill ha scritto:
Kyla Hill ha scritto:
I finished the heel decrease, the next steps tell me to dc 15, 16, 41, and 16. I can't figure out where they are supposed to go and now I'm not even sure if I have done anything correctly! I have a photo of where I am at on this, if that helps. Thank you in advance!
21.02.2019 - 03:18DROPS Design ha risposto:
Dear Mrs Hill, after decrease for heel, work 1 st in each of the remaining 15 sts from heel, then work a total of 16 sts along the left side of heel, work 1 st in each of the 41 st for upper foot, a total of 16 sts along the right side of heel = there are now 88 sts and you have worked over all sts in the round for foot. Happy crocheting!
21.02.2019 - 10:19
![]() UneMailleEnLair ha scritto:
UneMailleEnLair ha scritto:
Merci pour ce joli modèle de chaussettes hautes. J'en ai fait une adaptation dans un fil de coton noir. A voir sur mon blog.
10.05.2017 - 10:58
![]() Manja ha scritto:
Manja ha scritto:
Het valt me op dat de 'naad' (overgang naar nieuwe toer) scheef loopt, dit is ook vrij logisch denk ik, omdat je telkens in 'de volgende' haakt, maar het ziet er niet zo mooi uit. Doe ik iets verkeerd, of hoort het zo?
27.08.2016 - 10:16DROPS Design ha risposto:
Hoi Manja. Je begint elke toer op dezelfde plek. De begin moet niet opschuiven. Plaats eventueel een markeerder zodat je weet waar de toer begint.
29.08.2016 - 11:51
|
|||||||||||||||||||
Walking on Sunshine#walkingonsunshinesocks |
|||||||||||||||||||
|
|
|||||||||||||||||||
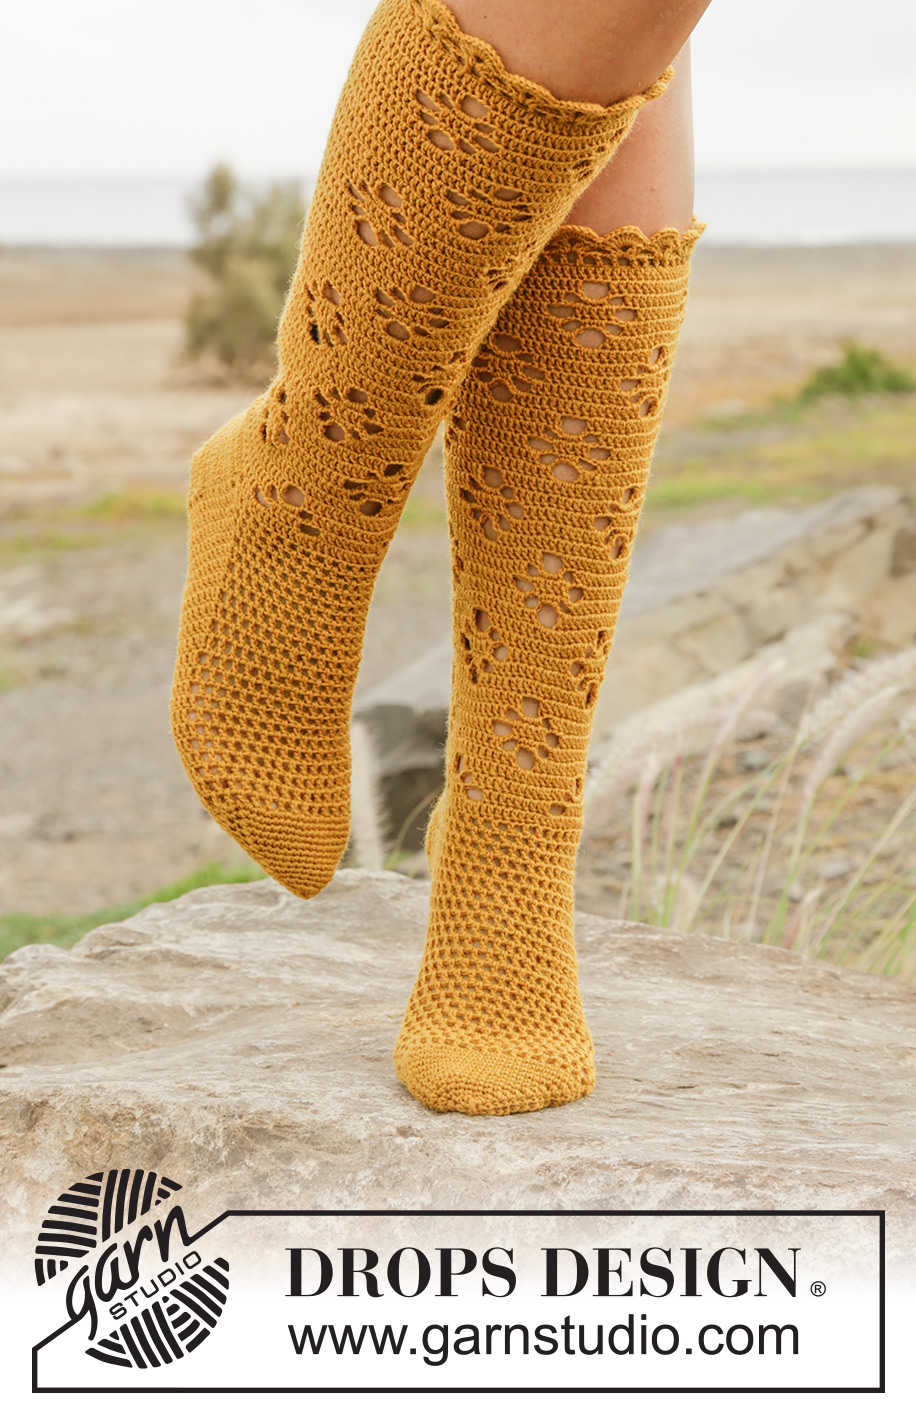
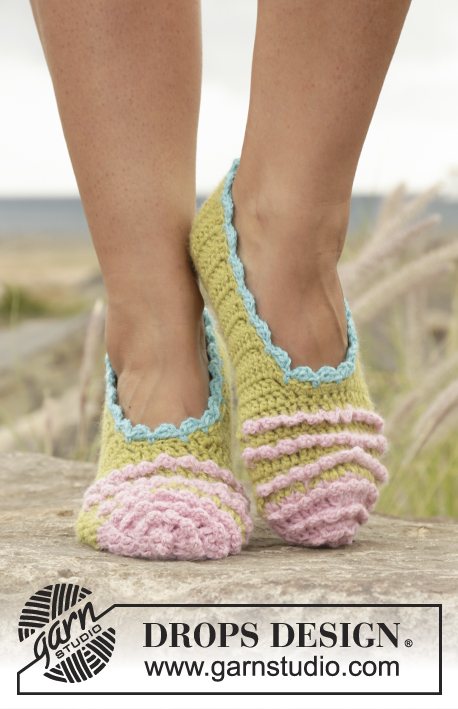
Calze DROPS lavorate all’uncinetto con motivo traforato in "Fabel". Taglie: 35 – 43.
DROPS Extra 0-1242 |
|||||||||||||||||||
|
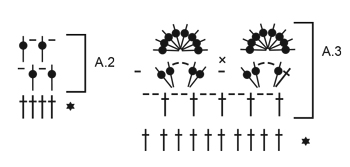
SUGGERIMENTO PER IL LAVORO: Sostituire la 1° m.a sul giro con 3 cat. Finire ogni giro con 1 m.bss nella 3° cat dall’inizio del giro. Sul tallone girare ogni riga a m.b con 1 cat. MOTIVO: Vedere i diagrammi A.1, A.2 e A.3. SUGGERIMENTO PER LE DIMINUZIONI: Diminuire 1 m come segue – iniziare 2 m prima del segnapunti: Lavorare 1 m.b/m.a ma aspettare con l’ultimo passaggio (= 2 m sull’uncinetto), poi lavorare la m.b/m.a successiva ma sull’ultimo passaggio, far passare il filo attraverso tutte le m sull’uncinetto = 1 m diminuita. DIMINUZIONI PER IL TALLONE: RIGA 1 (= diritto del lavoro): lavorare 19-22-22 m.b, ora rimangono 8-9-9 m.b sulla riga, diminuire 1 m.b – LEGGERE IL SUGGERIMENTO PER LE DIMINUZIONI = 20-23-23 m.b. Girare il lavoro. RIGA 2 (= rovescio del lavoro): lavorare 12-14-14 m.b, ora rimangono 8-9-9 m.b sulla riga, diminuire 1 m.b = 13-15-15 m.b. Girare il lavoro. RIGA 3: lavorare 12-14-14 m.b, diminuire 1 m.b, girare il lavoro. Ripetere la 3° riga 12-14-14 volte in totale, cioè fino a quando sono state diminuite tutte le m a ogni lato delle 13-15-15 m.b sul tallone. ---------------------------------------------------------- CALZE: Avviare 98-105-112 cat con l’uncinetto n° 2 mm con Fabel e formare un anello con 1 m.bss nella 1° cat. * Lavorare 1 m.a in ognuna delle prime 6 cat, saltare 1 cat *, ripetere *-* = 84-90-96 m.a – LEGGERE IL SUGGERIMENTO PER IL LAVORO. Continuare a lavorare come segue: 12-15-18 m.a, A.1A (= 5 m.a), ripetere A.1B sulle 40 m successive (= 2 ripetizioni in larghezza), lavorare A.1C (= 15 m.a), 12-15-18 m.a. Continuare questo motivo, quando A.1 è stato lavorato una volta in verticale, continuare con A.1 X. ALLO STESSO TEMPO quando il lavoro misura 5-5-5 cm, diminuire 1 m all’inizio e alla fine del giro – LEGGERE IL SUGGERIMENTO PER LE DIMINUZIONI. Ripetere le diminuzioni ogni 2 cm altre 9-10-11 volte = 64-68-72 m.a. FARE ATTENZIONE ALLA TENSIONE DEL LAVORO! Lavorare fino a quando il lavoro misura 25-27-29 cm. Ora continuare lavorando il tallone a m.b avanti e indietro sulle prime 13-15-15 m.a sul giro e sulle ultime 14-16-16 m.a sul giro. Lavorare 1 m.b in ogni m.b fino a quando sono stati lavorati circa 5-5½-6 cm sulle m del tallone. Inserire un segnapunti, ORA MISURARE IL LAVORO DA QUI! Ora diminuire per il tallone – leggere DIMINUZIONI PER IL TALLONE! Alla fine delle diminuzioni per il tallone lavorare come segue: 1 m.a in ognuna delle 13-15-15 m.b sul tallone, lavorare 14-15-16 m.a lungo il bordo sul tallone, 1 m.a un ognuna delle 37-37-41 m.a sopra il piede e lavorare 14-15-16 m.a lungo il bordo sull’altro lato del tallone = 78-82-88 m.a sul giro. Inserire 1 segnapunti a ogni lato delle 33-37-41 m.a centrali sul sopra del piede. Poi lavorare in tondo a m.a sotto il piede e con A.2 sulle 33-37-41 m.a sul sopra del piede e ALLO STESSO TEMPO diminuire 1 m.a a ogni lato delle 33-37-41 m sul sopra del piede, ripetere le diminuzioni su ogni giro altre 11-11-12 volte (12-12-13 diminuzioni in totale) = 54-58-62 m.a. Lavorare fino a quando il lavoro misura 19-21-23 cm dal segnapunti sul tallone (= mancano circa 3-3-4 cm alla fine del lavoro). Inserire 1 segnapunti a ogni lato in modo che ci siano 27-29-31 m.a sia sopra che sotto il piede. Finire come segue: 1 giro con 1 m.b in ogni m.a, poi lavorare 1 m.b in ogni m.b e ALLO STESSO TEMPO diminuire 1 m.b a ogni lato di tutti i segnapunti – LEGGERE IL SUGGERIMENTO PER LE DIMINUZIONI, ripetere le diminuzioni su ogni giro altre 9-10-11 volte (10-11-12 diminuzioni in totale) = 14 m.b rimaste. Sul giro successivo lavorare tutte le m insieme 2 a 2. Tagliare il filo e farlo passare attraverso le m.b rimaste, tirare bene e affrancare. Finire con un bordo in cima alla calza, lavorare seguendo A.3. Chiudere quando A.3 è stato lavorato 1 volta in verticale. Lavorare un’altra calza nello stesso modo. |
|||||||||||||||||||
Spiegazioni del diagramma |
|||||||||||||||||||
|
|||||||||||||||||||
 |
|||||||||||||||||||
 |
|||||||||||||||||||
Avete terminato questo modello?Allora taggate le vostre foto con #dropspattern #walkingonsunshinesocks o inviatele alla #dropsfan gallery. Avete bisogno di aiuto con questo modello?Troverete 10 video tutorial, una sezione per i commenti/domande e molto altro guardando il modello su www.garnstudio.com © 1982-2026 DROPS Design A/S. Ci riserviamo tutti i diritti. Questo documento, compreso tutte le sue sotto-sezioni, è protetto dalle leggi sul copyright. Potete leggere quello che potete fare con i nostri modelli alla fine di ogni modello sul nostro sito. |
|||||||||||||||||||


Con oltre 40 anni di esperienza nel design di modelli di maglia e uncinetto, DROPS Design offre la più estesa collezione di modelli gratuiti su internet - tradotti in 17 lingue. Ad oggi vi possiamo fornire 324 cataloghi e 12290 modelli - 9561 dei quali sono tradotti in Italiano.
Ci stiamo impegnando molto per darvi il meglio che vi possiamo offrire in termini di maglia e uncinetto, ispirazioni e consigli così come filati di grande qualità ad un prezzo incredibile! Volete utilizzare i nostri modelli per qualcosa d'altro oltre al vostro uso personale? Potete leggere tutto ciò che è consentito nel testo sul Copyright in basso su tutte le pagine dei nostri modelli. Buon lavoro!
Lasciare un commento sul modello DROPS Extra 0-1242
Noi saremmo felici di ricevere i tuoi commenti e opinioni su questo modello!
Se vuoi fare una domanda, fai per favore attenzione a selezionare la categoria corretta nella casella qui sotto per velocizzare il processo di risposta. I campi richiesti sono indicati da *.