
Categorie popolari
State cercando un filato?


Commenti / Domande (11)
![]() Carmen ha scritto:
Carmen ha scritto:
Cuando se trata de los 4 puntos que se pasan el penúltimo sobre el último tengo una confusión: ¿El último es el de la derecha o el de la izquierda de esos 4?
01.12.2019 - 08:54DROPS Design ha risposto:
Hola Carmen. El último punto de los 4 puntos es el punto a la derecha (el último punto pasado de la aguja derecha a la aguja izquierda).
10.12.2019 - 00:09
![]() Susana ha scritto:
Susana ha scritto:
Creo que son 71 puntos los que se deben montar y no 70. ¿O tendré 4 hebrasjuntas al inicio del patrón? (dos hebras de A3 del lado derecho y 2 hebras de A5 del lado izquierdo) Porque al repetir el patron: A3, A4, A4, A5, A3, A4, A4, A5 tengo esas 4 hebras juntas en A5, A3.
10.11.2019 - 06:25DROPS Design ha risposto:
Hola Susana. el patrón es correcto. No estas teniendo en cuenta los dos puntos centrales ( ver las explicaciones en el texto), que no están presentes en el diagrama y se separan los dos lazadas dobles a cada lado en el centro del delantero y el centro de la espalda.
10.11.2019 - 11:22
![]() LUCIA CAMARGO DO CARMO ha scritto:
LUCIA CAMARGO DO CARMO ha scritto:
Fiz este modelo e ficou lindo! Muito obrigada por compartilhar conosco!
25.09.2019 - 19:41
![]() Tali ha scritto:
Tali ha scritto:
I continue the question Ana asked - and the next time I finish A6-7 vertically - I add more waves again right? and begin A6-7 from the beginning...
08.04.2019 - 17:32DROPS Design ha risposto:
Dear Tali, correct, you repeat A.6/A.7 over the first/last stitch and work all stitches in between in A.4 - in each A.6/A.7 you increased 13 sts, when A.6/A.7 have been worked 1 time in height, you work A.6 over the first st, then A.4 over the next 13 sts (= the last 13 sts from previous A.6) and same but reversed for A.7. Happy knitting!
09.04.2019 - 09:56
![]() Ana ha scritto:
Ana ha scritto:
Hi, I'm a bit confused. So after I have completed A.6/A.7 once, vertically, I continue to work by starting the A.6/A.7 diagram all over again from the beginning (bottom)? Also work an extra 13 st (A.4 ) on each side of poncho? Did I understood correctly?
08.04.2019 - 15:30DROPS Design ha risposto:
Dear Ana, after you have worked A.6/A.7 one time in height, you will repeat same patterns, but there are now enough stitches between A.6 and A.7 to work 2 more repeats of A.4 between the new A.6/A.7 (=6 repeats instead of 4). Happy knitting!
08.04.2019 - 16:26
![]() Tali ha scritto:
Tali ha scritto:
I have just began knitting the poncho and I have some questions: 1. Should I stay with the same light beige color in the first 3 rows (p, k, p) and the first 4 rows of the wave part? 2. When should i change colors? just before the first stitch of A3? it is YO? Thanks a lot. Tali
29.03.2019 - 15:44DROPS Design ha risposto:
Dear Tali, the cast on row + the first 3 rounds (= P, K, P) are worked with light beige, then work stripes (= A.1 then A.2), ie A.1 starts with 4 rounds beige clair (= there will be a total of 7 rounds including the rounds before pattern worked with beige clair). Changing colours happens at the beg of the round, ie with A.3 (= eg start the new colour with a double YO on round 5) Happy knitting!
01.04.2019 - 11:31
![]() Tali ha scritto:
Tali ha scritto:
This poncho is lovely! but I am planning to use another yarn (as I was asked to use not just wool )-:). I found two relevant: one is for 6.5 mm needles and the other for 10 mm needles. What will be better to choose and how should I convert the instructions? I thought doing the small size (it is for 12 years old girl). Thanks a lot!, Tali
01.03.2019 - 16:40DROPS Design ha risposto:
Dear Tali, we are unfortunately not able to adapt each our patterns to each individual request. Please contact the store where you bought the yarn for any individual assistance. Happy knitting!
04.03.2019 - 07:32
![]() Debbie Stevenson ha scritto:
Debbie Stevenson ha scritto:
Hi I would love to make this poncho for my grand daughter. She is 1yrs old. Do you have it in children sizes
26.01.2019 - 09:53DROPS Design ha risposto:
Dear Mrs Stevenson, this pattern is only available in adult size - you will find here our poncho patterns for babies. Happy knitting!
28.01.2019 - 10:13
![]() Grace E. James ha scritto:
Grace E. James ha scritto:
Gorgeous! it was pretty easy, thank you so much for the directions
14.07.2018 - 06:57
![]() Nancy Kreglow ha scritto:
Nancy Kreglow ha scritto:
I also would like to make this in crochet! Please!
28.03.2018 - 23:17
|
||||||||||||||||||||||||||||||||||||||||||||||
Double Rainbow |
||||||||||||||||||||||||||||||||||||||||||||||
|
|
||||||||||||||||||||||||||||||||||||||||||||||
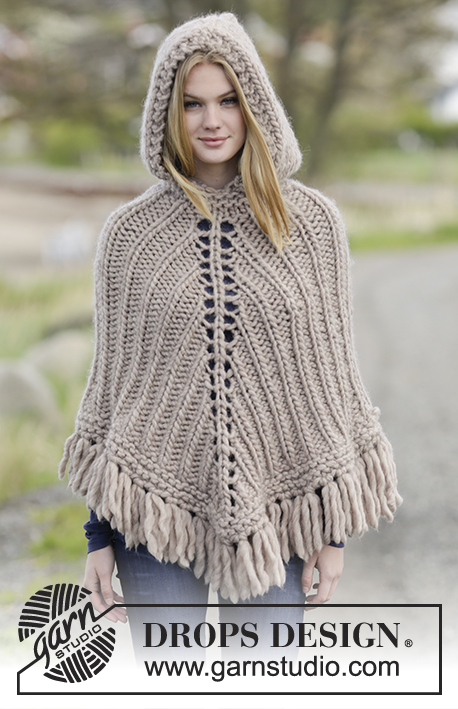
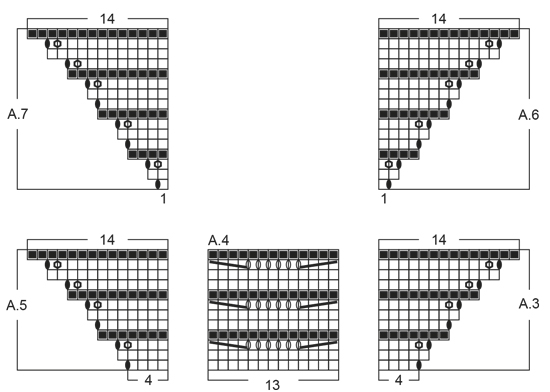
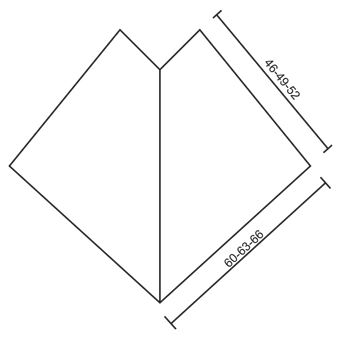
Poncho DROPS lavorato ai ferri con strisce e motivo ad onde, lavorato dall’alto in basso (top down) in ”Snow”. Taglie: S - XXXL.
DROPS Extra 0-1220 |
||||||||||||||||||||||||||||||||||||||||||||||
|
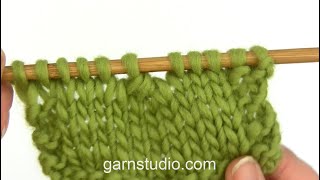
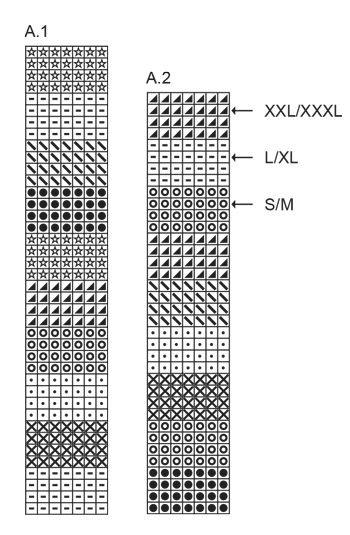
STRISCE: Lavorare le strisce seguendo il diagramma A.1, poi seguendo il diagramma A.2. MOTIVO AD ONDE: Vedere i diagrammi A.3-A.7. MAGLIA CENTRALE: Lavorare la m centrale a m rasata su tutti i giri a m rasata nei diagrammi A.3-A.7, ma sui giri che nei diagrammi A.3-A.7 sono lavorati a rov lavorare anche la m centrale a rov. SUGGERIMENTO PER IL LAVORO: Lavorare 4 m insieme a dir come segue: 4 m dir, riportarle sul f sinistro, accavallare la penultima m sull’ultima m in modo che la m sia attorno all’ultima m, ripetere fino a quando tutte e 3 le m sono state accavallate (= 3 diminuzioni), riportare l’ultima m lavorata sul f destro. Lavorare 4 m insieme a dir ritorto come segue: 4 m dir, accavallare la penultima m sull’ultima m in modo che la m sia attorno all’ultima m, ripetere fino a quando tutte e 3 le m sono state accavallate (= 3 diminuzioni). ---------------------------------------------------------- PONCHO: Lavorato in tondo con i f circolari dall’alto in basso (top down). Avviare 70 m per tutte le taglie con i f circolari n° 7 mm con il beige chiaro. Inserire 1 segnapunti nella 35° m e nella 70° m sul giro (= MAGLIA CENTRALE – leggere la spiegazione sopra, davanti e dietro), spostare i segnapunti verso l’alto durante il lavoro. Lavorare 1 giro rov, 1 giro dir e 1 giro rov. Passare ai f circolari n° 8 mm e lavorare le STRISCE – leggere la spiegazione sopra – e ALLO STESSO TEMPO lavorare il MOTIVO AD ONDE come segue: lavorare A.3 (= 4 m), lavorare il motivo ad onde secondo il diagramma A.4 sulle 26 m successive (= 2 ripetizioni), lavorare A.5 (= 4 m), 1 m dir (= m centrale con il segnapunti), A.3 (= 4 m), lavorare il motivo ad onde secondo il diagramma A.4 sulle 26 m successive (= 2 ripetizioni), A.5 (= 4 m) e lavorare 1 m dir (= m centrale con il segnapunti). Continuare il motivo in questo modo. FARE ATTENZIONE ALLA TENSIONE DEL LAVORO! Quando A.3-A.5 sono stati lavorati 1 volta in verticale, ci sono 110 m sul f (cioè 54 m a ogni lato della m centrale davanti e dietro). Lavorare il giro successivo come segue: lavorare A.6 (= 1 m), lavorare il motivo ad onde seguendo il diagramma A.4 sulle 52 m successive (= 4 ripetizioni), lavorare A.7 (= 1 m), 1 m dir (= m centrale con il segnapunti), A.3 (= 1 m), lavorare il motivo ad onde seguendo il diagramma A.4 sulle 52 m successive (= 4 ripetizioni), A.7 (= 1 m) e lavorare 1 m dir (= m centrale con il segnapunti). Continuare il motivo in questo modo. Quando A.6/A.7 sono stati lavorati 1 volta in verticale, ci sono 162 m sul f e c’è spazio per un’altra ripetizione di A.4 a ogni lato del poncho. Continuare a lavorare seguendo A.6/A.7 e finire il lavoro dopo il giro indicato con la freccia in A.2 per la taglia corretta (o lavorare fino alla lunghezza desiderata). Poi intrecciare senza stringere a rov. |
||||||||||||||||||||||||||||||||||||||||||||||
Spiegazioni del diagramma |
||||||||||||||||||||||||||||||||||||||||||||||
|
||||||||||||||||||||||||||||||||||||||||||||||
 |
||||||||||||||||||||||||||||||||||||||||||||||
 |
||||||||||||||||||||||||||||||||||||||||||||||
 |
||||||||||||||||||||||||||||||||||||||||||||||
Avete terminato questo modello?Allora taggate le vostre foto con #dropspattern o inviatele alla #dropsfan gallery. Avete bisogno di aiuto con questo modello?Troverete 19 video tutorial, una sezione per i commenti/domande e molto altro guardando il modello su www.garnstudio.com © 1982-2026 DROPS Design A/S. Ci riserviamo tutti i diritti. Questo documento, compreso tutte le sue sotto-sezioni, è protetto dalle leggi sul copyright. Potete leggere quello che potete fare con i nostri modelli alla fine di ogni modello sul nostro sito. |
||||||||||||||||||||||||||||||||||||||||||||||


Con oltre 40 anni di esperienza nel design di modelli di maglia e uncinetto, DROPS Design offre la più estesa collezione di modelli gratuiti su internet - tradotti in 17 lingue. Ad oggi vi possiamo fornire 324 cataloghi e 12290 modelli - 9561 dei quali sono tradotti in Italiano.
Ci stiamo impegnando molto per darvi il meglio che vi possiamo offrire in termini di maglia e uncinetto, ispirazioni e consigli così come filati di grande qualità ad un prezzo incredibile! Volete utilizzare i nostri modelli per qualcosa d'altro oltre al vostro uso personale? Potete leggere tutto ciò che è consentito nel testo sul Copyright in basso su tutte le pagine dei nostri modelli. Buon lavoro!
Lasciare un commento sul modello DROPS Extra 0-1220
Noi saremmo felici di ricevere i tuoi commenti e opinioni su questo modello!
Se vuoi fare una domanda, fai per favore attenzione a selezionare la categoria corretta nella casella qui sotto per velocizzare il processo di risposta. I campi richiesti sono indicati da *.