
Categorie popolari
State cercando un filato?


Commenti / Domande (21)
![]() Gudrun ha scritto:
Gudrun ha scritto:
Was heisst in der 2.Rückreihe einen Umschlag fallen lassen? Ich verstehe die Anleitung nicht.
27.06.2025 - 15:44DROPS Design ha risposto:
Liebe Gudrun, damit die Maschen nicht zu eng werden, strickt man bei Hinreihen Umschläge, aber diese Umschläge sind bei der nächsten Reihen (bei der Rückreihe) nicht gestrickt, so einfach von der Nadel fallen lassen, die Maschen werden so grösser sein. Viel Spaß beim Stricken!
27.06.2025 - 17:09
![]() Phyllis Simon ha scritto:
Phyllis Simon ha scritto:
According to the instruction: After eyelet edge switch to light lavender and work in garter st while AT THE SAMETIME inc 4 sts on every row from RS and 2 sts on every row from WS as before But shouldn't all 6 increases be done on the RS only, as instructed in ROW 1 and ROW 2 of original stockinette section?
03.01.2023 - 16:05DROPS Design ha risposto:
Dear Mrs Simon, after the eyelet row you will work in garter stitch and increase as before under stocking stitch section increasing 4 sts on row 1 (from RS) and increasing 2 sts on row 2 (from WS) - some of the yarn overs made on row 1 will be dropped off from needle on row 2, only 4 sts should be increased on row 1 (1 st on each side + 1 st on each side of the middle 34 sts) and 2 sts on row 2 (1 at each side of piece). Happy knitting!
03.01.2023 - 16:55
![]() Phyllis Simon ha scritto:
Phyllis Simon ha scritto:
Hi there: I am just about ready to start the eyelet edge and i don't understand where to do the increases ("4 sts on every row from RS and 2 sts on every row on wrong side as before"). Exactly where do I do the increases? Are the 6 increases to match the 6 locations in the stockinette portion, i.e. on the RS, 2 at the beginning and 2 at the end, and on the WS, 1 at each side of the marker, leaving the 34 stitches in the centre intact? Thanks for your help!
23.10.2022 - 23:20DROPS Design ha risposto:
Dear Mrs Simon, increase as explained under row 1 and 2, ie on row 1 you will make 6 yarn overs (the first and last yarn over of this RS row will be dropped on next row from WS = no increase) and on row 2 you increase with a yarn over inside 2 sts on each side. But correct you should keep the middle 34 sts intact, ie without increasing in these stitches. Happy knitting!
24.10.2022 - 09:10
![]() Phyllis Simon ha scritto:
Phyllis Simon ha scritto:
I am confused about this instruction for Row 1 of the pattern: ROW 1 (= RS): K 1, 1 YO, K 1, 1 YO, K until fi rst marker, 1 YO, K 34, 1 YO after second marker, K until 2 sts remain on row, 1YO, K 1, 1 YO, K 1. The first part: the last YO of 3 goes before the first marker, correct? The way it is described above is ambiguous and looks as though it should come after the first marker. Can yo clarify? Thanks
01.05.2022 - 20:17DROPS Design ha risposto:
Dear Mrs Simon, correct, the first 2 yarn overs are made at the beginning of the row (K1, YO, K1) and the 3rd yarn over is made before the marker = (YO, Marker), the 4th yarn over is worked after the marker (= Marker, YO), and the last 2 yarn overs are made at the end of the row (= YO, K1, YO, K1). Happy knitting!
02.05.2022 - 10:25
![]() Hanne ha scritto:
Hanne ha scritto:
Den danske opskrift er ikke rigtig. På vrang pindene skal man strikke til der er 3 masker tilbage - ikke 2 - ellers går det ikke op med 1 omslag, en ret, løft masken af pinden og en ret! Ligesom det heller ikke er korrekt at der tages 4 ud på retsiden og 2 på vrangen - alle 6 tages ud på retsiden og ingen på vrangen. På vrangen tages en ud og en slippes af pinden i hver ende.
30.03.2020 - 00:31
![]() Levy ha scritto:
Levy ha scritto:
Je ne comprends pas comment garder 34m si on doit faire 1 jeté après le 1er marqueur comme indiqué dans vos instructions ci dessous dans le RANG1. Et au début du RANG2, j'ai recommencé 2 fois, je me retrouve toujours avec 35m entre les 2 marqueurs (logique puisquil y a eu un jeté apres le 1er marqueur au RANG1...) et à la fin, comment tricoter *1 jeté, 1m end, lâcher le jeté, 1m end. * si on a plus que 2m restantes?? lacher quel jeté?
31.12.2019 - 14:20DROPS Design ha risposto:
Bonjour Mme Levy, vous devez augmenter avant le 1er marqueur et après le 2ème marqueur, ainsi, vous avez toujours les 34 m au milieu, entre les 2 marqueurs. À la fin du 1er rang, on termine par: 1 m end, 1 jeté, 1 m end, au début du 2ème rang, on lâche ce premier jeté (et le tout dernier jeté tricoté au début du 1er rang). Bon tricot!
02.01.2020 - 17:09
![]() Patricia ha scritto:
Patricia ha scritto:
Kan Lilia ook gebreid worden in tricotsteek?
04.11.2019 - 13:43DROPS Design ha risposto:
Dag Patricia,
Ja, dat kan. In het patroon staat dat je dit gedeelte in ribbelsteek breit, maar je bent natuurlijk vrij om dit naar eigen smaak aan te passen.
05.11.2019 - 10:10
![]() Maja Van Gompel ha scritto:
Maja Van Gompel ha scritto:
Hoe kan ik dit patroon downloaden? zie nergens een link daarvoor. Vriendelijke groeten, Maja
29.10.2018 - 11:37DROPS Design ha risposto:
Dag Maja,
Je klikt (vlak boven 'Instructies voor het patroon') op de knop 'Patroon' (die met het print-pictogrammetje erbij). Dan opent een nieuw venster in de browser en je klikt bovenaan op de link 'Het patroon afdrukken'. Je kunt er dan voor kiezen om hem af te drukken of als pdf op te slaan (bij je printerinstellingen)
31.10.2018 - 14:30
![]() Sarah ha scritto:
Sarah ha scritto:
Bonjour, j'ai recommencé mon chale en tenant compte de vos indications et ça ne va toujours pas, je suis au 20ème rang, j'ai le bon nombre de maille par contre j'ai 21 mailles avant le premier marqueur et 39 mailles après le deuxième marqueur et les jours après le deuxième marqueurs ne sont pas droits mais en biais alors je ne sais plus quoi faire! est ce qu'il n'y a pas une erreur dans le modèle? Merci
07.08.2018 - 12:59DROPS Design ha risposto:
Bonjour Sarah, les marqueurs doivent bien rester en place, de chaque côté des 34 m endroit, à chaque fois que vous augmentez vous devez procéder ainsi au milieu: 1 jeté, marqueur, 34 m end, marqueur, 1 jeté. Le nombre de mailles avant et après le marqueur va augmenter et le nombre de mailles entre les 2 marqueurs va toujours rester à 34 m. Bon tricot!
07.08.2018 - 15:14
![]() Sarah ha scritto:
Sarah ha scritto:
Bonjour, j'ai bien avancé dans la réalisation de ce chale mais je viens de voir que j'ai un problème, les jours qui sont de chaque coté des marqueurs ne sont pas symétriques, d'un coté ils sont droits et de l'autre ils partent en biais. Est ce qu'ils faut bouger les marqueurs ou pas ? Sinon les 34 mailles centrales seront plus nombreuses? Je n'ai respecté les 34 mailles centrales que pour le premier rang, pour les autres j'ai tricoter jusqu'au marqueur suivant. Merci
05.08.2018 - 13:32DROPS Design ha risposto:
Bonjour Sarah, les augmentations (jetés) se font de part et d'autres des 34 m, on doit toujours avoir: 1 jeté, 34 m, 1 jeté, ainsi les jours seront droits. Bon tricot!
06.08.2018 - 09:27
|
|
Lilia#liliashawl |
|
|
|
|
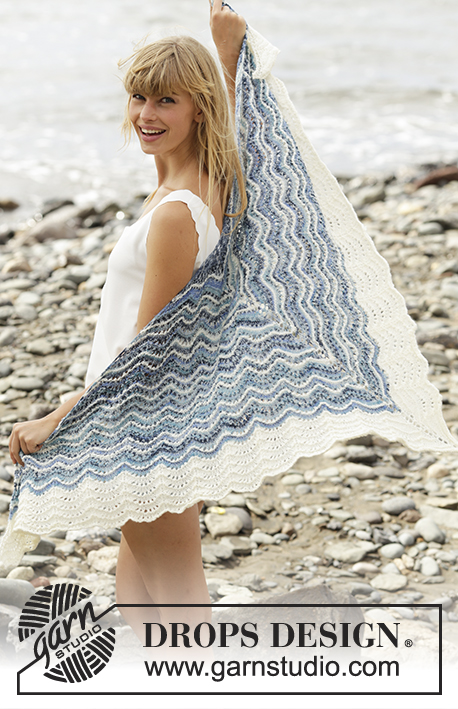
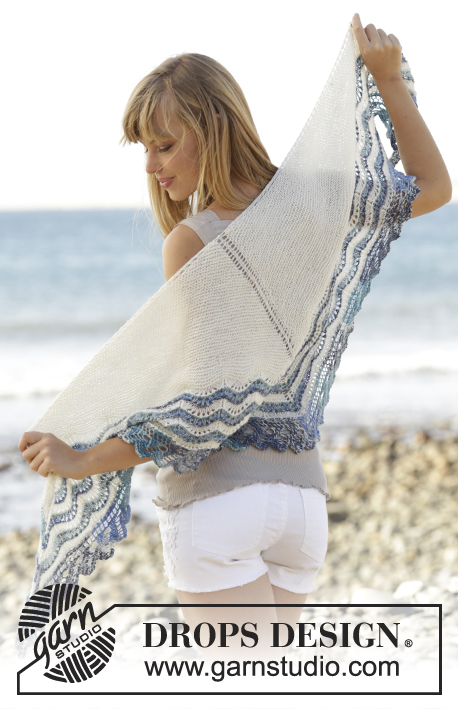
Scialle DROPS lavorato ai ferri con bordo a picot in ”Brushed Alpaca Silk”.
DROPS 168-14 |
|
|
M LEGACCIO (avanti e indietro): Lavorare tutti i f a dir. 1 “costa” a m legaccio = 2 f dir. BORDO CON BUCHINI: FERRO 1 (= diritto del lavoro): 1 m dir, 1 gettato, 1 m dir, 1 gettato, lavorare a dir fino al 1° segnapunti, 1 gettato, 34 m dir, 1 gettato dopo il 2° segnapunti, lavorare a dir fino a quando rimangono 2 m sul f, 1 gettato, 1 m dir, 1 gettato, 1 m dir. FERRO 2 (= rovescio del lavoro): 1 m dir, far cadere il gettato dal ferro, 1 m dir, 1 gettato, lavorare a dir fino a quando rimangono 2 m sul f, 1 gettato, 1 m dir, far cadere il gettato dal f, 1 m dir. FERRO 3 (= diritto del lavoro): 1 m dir, 1 gettato, 1 m dir, 1 gettato, * 2 m insieme a dir, 1 gettato *, ripetere *-* fino a quando rimangono 1 o 2 m prima del 1° segnapunti, 1 o 2 m dir, 1 gettato, ripetere *-* fino a quando rimangono 2 m prima del 2° segnapunti, 2 m dir, 1 gettato, ripetere *-* fino a quando rimangono 3 o 4 m sul f, 1 o 2 m dir, 1 gettato, 1 m dir, 1 gettato, 1 m dir. FERRO 4 (= rovescio del lavoro): 1 m dir, far cadere il gettato dal f, 1 m dir, 1 gettato, lavorare a dir fino a quando rimangono 2 m sul f, 1 gettato, 1 m dir, far cadere il gettato dal f, 1 m dir. ---------------------------------------------------------- SCIALLE: Lavorato avanti e indietro sui f circolari dall’alto in basso. Avviare 40 m con i f circolari n° 5 mm con il grigio verde chiaro. Lavorare 1 “costa” a M LEGACCIO – leggere la spiegazione sopra. Inserire 2 segnapunti nel lavoro come segue: Inserire il 1° segnapunti dopo le prime 3 m, inserire il 2° segnapunti quando rimangono 3 m sul f. Poi lavorare a m rasata come segue: FERRO 1 (= diritto del lavoro): 1 m dir, 1 gettato, 1 m dir, 1 gettato, a dir fino al 1° segnapunti, 1 gettato, 34 m dir, 1 gettato dopo il 2° segnapunti, lavorare a dir fino a quando rimangono 2 m sul f, 1 gettato, 1 m dir, 1 gettato, 1 m dir. FERRO 2 (= rovescio del lavoro): 1 m dir, far cadere il gettato dal f, 1 m dir, 1 gettato, lavorare a rov fino a quando rimangono 2 m sul f, 1 gettato, 1 m dir, far cadere il gettato dal f, 1 m dir. Dopo i primi 2 ferri sono state aumentate 6 m (4 m dal diritto del lavoro e 2 m dal rovescio del lavoro) e ci sono 46 m in totale sul ferro. Continuare ad aumentare nello stesso modo altre 37 volte = 268 m sul f (ci devono essere 38 buchi lungo ognuno dei 2 segnapunti e il lavoro misura circa 32 cm al centro del lavoro). FARE ATTENZIONE ALLA TENSIONE DEL LAVORO! Passare al panna e lavorare il BORDO CON I BUCHINI – leggere la spiegazione sopra. Dopo il bordo con i buchini passare al lavanda chiaro e lavorare a m legaccio e ALLO STESSO TEMPO aumentare 4 m su ogni f dal diritto del lavoro e 2 m su ogni f dal rovescio del lavoro come prima. Quando il lavoro misura 38 cm (misurati al centro del lavoro), tornare al panna e lavorare il BORDO CON I BUCHINI nello stesso modo dell’ultima volta. BORDO DI CHIUSURA CON PICOT: Dopo il bordo con i buchini, intrecciare con un bordo a picot dal diritto del lavoro come segue: lavorare 1 m dir, (* inserire il f destro tra le prime 2 m sul f sinistro (cioè tra le m sul f, non attraverso le m), fare 1 gettato sul f destro, tirare il gettato in avanti tra le m e trasferire il gettato sul f sinistro *, ripetere *-* altre 2 volte (= 3 nuove m sul f sinistro). ** Lavorare a dir la 1° m sul f sinistro, accavallare la 1° m sul f destro sull’ultima m lavorata **), ripetere **-** 5 volte in totale e ripetere (-) lungo tutto lo scialle fino a quando rimane 1 m. Tagliare il filo e farlo passare attraverso la m rimasta. |
|
Avete terminato questo modello?Allora taggate le vostre foto con #dropspattern #liliashawl o inviatele alla #dropsfan gallery. Avete bisogno di aiuto con questo modello?Troverete 15 video tutorial, una sezione per i commenti/domande e molto altro guardando il modello su www.garnstudio.com © 1982-2026 DROPS Design A/S. Ci riserviamo tutti i diritti. Questo documento, compreso tutte le sue sotto-sezioni, è protetto dalle leggi sul copyright. Potete leggere quello che potete fare con i nostri modelli alla fine di ogni modello sul nostro sito. |


Con oltre 40 anni di esperienza nel design di modelli di maglia e uncinetto, DROPS Design offre la più estesa collezione di modelli gratuiti su internet - tradotti in 17 lingue. Ad oggi vi possiamo fornire 324 cataloghi e 12290 modelli - 9561 dei quali sono tradotti in Italiano.
Ci stiamo impegnando molto per darvi il meglio che vi possiamo offrire in termini di maglia e uncinetto, ispirazioni e consigli così come filati di grande qualità ad un prezzo incredibile! Volete utilizzare i nostri modelli per qualcosa d'altro oltre al vostro uso personale? Potete leggere tutto ciò che è consentito nel testo sul Copyright in basso su tutte le pagine dei nostri modelli. Buon lavoro!
Lasciare un commento sul modello DROPS 168-14
Noi saremmo felici di ricevere i tuoi commenti e opinioni su questo modello!
Se vuoi fare una domanda, fai per favore attenzione a selezionare la categoria corretta nella casella qui sotto per velocizzare il processo di risposta. I campi richiesti sono indicati da *.