
Categorie popolari
State cercando un filato?


Commenti / Domande (6)
![]() Barbara Kamm ha scritto:
Barbara Kamm ha scritto:
Thanks you for those latest instructions. So the cable is not really a cable but I. Your last instructions I still don’t see the pattern for the o dented cable like pattern but I guess I can try to figure it out. Are there only 3 stitches in the cable like pattern?
05.09.2023 - 04:41DROPS Design ha risposto:
Dear Mrs Kamm, the cable is a real cable but you will either cross the first 6 sts or the last 6 sts - work 3rd row A.1 as follows: slip 3 sts on cable needle behind piece, K 3, K 3 from cable needle, K3, and work 11th row as follows: K3, slip 3 sts on cable needle behind piece, K 3, K 3 from cable needle. Happy knitting!
05.09.2023 - 13:35
![]() Barbara Kamm ha scritto:
Barbara Kamm ha scritto:
Wow, that I do not understand. I’m going to have to look for an American pattern. I don’t know how to read diagrams. It’s greek to me. So frustrating
03.09.2023 - 22:39
![]() Barbara Kamm ha scritto:
Barbara Kamm ha scritto:
I have 46 stitches on my needles, 4 stitches in garter, purl 1, 29 stitches in stocking knit, that 34 stitches than plus 3 at the end of the row =37, the other nine must be for the cable pattern. Which is on a diagonal. I don’t see any instructions on how to work the cable and the other stitches ?
02.09.2023 - 04:21DROPS Design ha risposto:
Dear Mrs Kamm, on right front piece in larger size, work the 46 sts as follows from right side: 4 front band stitches in garter stitch, work the 9 sts A.1 (= knit on 1st row, cable on 3rd row), then purl 1 and knit to the end of the row. from wrong side, work: K3, P29, K1, P9, K4. In A.1 as well as in A.2 all the stitches will not be crossed for the cable; in A.1 cross the first 6 sts and knit the last 3; then knit the first 3 and cross the last 6. Happy knitting!
04.09.2023 - 09:20
![]() Barbara Kamm ha scritto:
Barbara Kamm ha scritto:
I am sorry to keep bothering you. But I don’t see in The instructions how to do the cable pattern. I am totally lost
02.09.2023 - 03:57DROPS Design ha risposto:
Dear Barbara, the instructions for the cable pattern are in the charts A.1 and A.2, where, on specific rows, you will slip 3 stitches to the cable needle, knit 3 and place the stitches back onto the main needle. So you will have 1 stitch in garter stitch before the cable in A.2 and purl 1 after A.2. On the other front piece you will have A.1 instead of A.2 and 1 purl before the cable and the edge stitch after the cable. Happy knitting!
03.09.2023 - 20:08
![]() Barbara Kamm ha scritto:
Barbara Kamm ha scritto:
Hi: I am starting the right front and I am confused with the instructions. I am making the 3X size. I have knitted the first 4 stitches that you call Band. Then it states A.2, P1 which I assume is for pearl 1. That confuses me. Then it states 29 stitches in stocking knit. If I am looking at the picture and the right side is on the left, I am not sure what kind of stitch you do before and after the cable? I would think I would do pearl stitches bebore the cable and the cable is zig zag about
29.08.2023 - 05:39DROPS Design ha risposto:
Dear Mrs Kamm, on right front piece, work from RS as follows: 4 sts in garter stitch (K them on every row), then work A.2 (see diagram, read from right towards the left from RS and from the left towards the right from WS), purl 1 (this stitch will be knitted from WS), and work the next 29 sts in stocking stitch (= these stitches will be knitted from RS and purled from WS), end with 3 sts in garter stitch (knit them on every row). Happy knitting!
29.08.2023 - 09:27
![]() Barbara Kamm ha scritto:
Barbara Kamm ha scritto:
It confuses me that on the back piece of this sweater it say to do garter stitch on 3 stitches on each side and I interpret that at the beginning and end of the back ?? Why is that? I understand using it on the front pieces
19.08.2023 - 18:05DROPS Design ha risposto:
Dear Barbara, the 3 stitches in garter stitch in each side of the back form a small border for the vent at the lower part of the jacket. After finishing the vent, you will have a single edge stitch in garter stitch, which will be used for the seam. Happy knitting!
20.08.2023 - 17:19
|
||||||||||
Winter Sparkle Cardigan |
||||||||||
|
|
||||||||||
Cardigan DROPS lavorato ai ferri con trecce con 1 capo di Cloud o 2 capi di Air. Taglie: S - XXXL.
DROPS Extra 0-1188 |
||||||||||
|
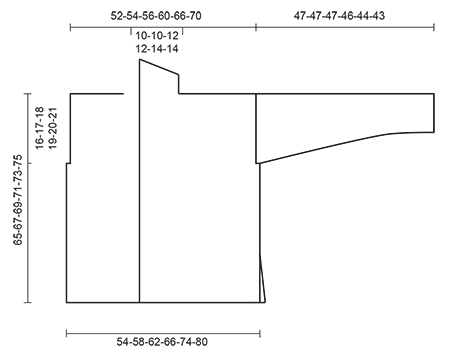
M LEGACCIO (avanti e indietro): Lavorare tutti i f a dir. 1 “costa” a m legaccio = 2 f dir. MOTIVO: Vedere i diagrammi A.1-A.2. I diagrammi mostrano tutti i f del motivo visti dal diritto del lavoro. ASOLE: Diminuire dal diritto del lavoro per 4 asole sul bordo destro. 1 ASOLE = lavorare 2 m dal centro davanti, fare 1 gettato, lavorare le 2 m successive a dir. Sul f successivo lavorare i gettati a dir. Diminuire per le asole quando il lavoro misura circa: TAGLIE S: 20, 29, 38 e 47 cm TAGLIE M: 20, 29, 38 e 47 cm TAGLIE L: 24, 33, 42 e 51 cm TAGLIE XL: 24, 33, 42 e 51 cm TAGLIE XXL: 25, 35, 45 e 55 cm TAGLIE XXXL: 25, 35, 45 e 55 cm ---------------------------------------------------------- DIETRO: Lavorato avanti e indietro sui f circolari. Avviare 54-58-62-66-74-80 m con i f circolari n° 8 mm con 1 capo di Cloud o 2 capi di Air. Lavorare 2 “coste” a M LEGACCIO – leggere le spiegazioni sopra. Passare ai f circolari n° 9 mm. Lavorare a m rasata con 2 m a m legaccio a ogni lato. Quando il lavoro misura 14 cm (= spacco), lavorare le 3 m a m legaccio a ogni lato del lavoro a m rasata e ALLO STESSO TEMPO avviare 1 m di vivagno a ogni lato del lavoro alla fine dei 2 f successivi = 56-60-64-68-76-82 m. Lavorare le m di vivagno a m legaccio. FARE ATTENZIONE ALLA TENSIONE DEL LAVORO! Quando il lavoro misura 49-50-51-52-53-54 cm, intrecciare 2-3-4-4-5-6 m a ogni lato del lavoro per gli scalfi all’inizio dei 2 f successivi = 52-54-56-60-66-70 m. Quando il lavoro misura 63-65-67-69-71-73 cm, intrecciare le 10-10-12-12-14-14 m centrali per il collo = 21-22-22-24-26-28 m rimaste per la spalla. Lavorare a m rasata fino a quando il lavoro misura 64-66-68-70-72-74 cm. Lavorare 1 “costa”. Intrecciare. Lavorare l'altra spalla nello stesso modo. DAVANTI DESTRO: Avviare 31-33-35-37-41-44 m (comprese 4 m per il bordo a m legaccio) con i f circolari n° 8 mm con 1 capo di Cloud o 2 capi di Air. Lavorare 2 “coste” – ALLO STESSO TEMPO sull’ultimo ferro distribuire 2 aumenti in modo uniforme = 33-35-37-39-43-46 m. Passare ai f circolari n° 9 mm. Lavorare come segue dal diritto del lavoro: 4 m del bordo a m m legaccio, A.2, 1 m rov, 16-18-20-22-26-29 m a m rasata, 3 m a m legaccio. Quando il lavoro misura 14 cm, lavorare le 3 m a m legaccio alla fine del f dal diritto del lavoro a m rasata, ALLO STESSO TEMPO avviare 1 m di vivagno alla fine del f dal diritto del lavoro = 34-36-38-40-44-47 m. Lavorare le m di vivagno a m legaccio. Ricordarsi delle ASOLE – leggere la spiegazione sopra. Quando il lavoro misura 49-50-51-52-53-54 cm, intrecciare 2-3-4-4-5-6 m per lo scalfo all’inizio del f successivo dal rovescio del lavoro = 32-33-34-36-39-41 m. Quando il lavoro misura 64-66-68-70-72-74 cm, aggiustarlo in modo che il f successivo sia dal rovescio del lavoro, lavorare 1 “costa” su tutte le m. Poi intrecciare le prime 21-22-22-24-26-28 m per la spalla = 11-11-12-12-13-13 m rimaste per il collo a scialle. Continuare a m legaccio su queste m – ALLO STESSO TEMPO lavorare a f accorciati, iniziare dal collo (diritto del lavoro) come segue: * lavorare 1 “costa” su tutte le m (= 2 f dir). Sul f successivo dal diritto del lavoro, lavorare 9 m dir, girare e lavorare a dir *, ripetere *-* fino a quando il lavoro misura 7-7-8-8-9-9 cm dalle m intrecciate per le spalle (lato corto). Intrecciare senza stringere. DAVANTI SINISTRO: Lavorare come per il destro, ma a specchio, lavorare A.1 invece di A.2. Intrecciare le m di vivagno alla fine del f dal rovescio del lavoro. Intrecciare per lo scalfo all’inizio del f dal diritto del lavoro. Intrecciare per la spalla all’inizio del f dal diritto del lavoro. MANICA: Lavorare avanti e indietro sui f circolari. Avviare 24-24-24-26-26-26 m con i f circolari n° 8 mm con 1 capo di Cloud o 2 capi di Air. Lavorare 2 “coste”. Passare ai f circolari n° 9 mm. Lavorare a m rasata con 1 m di vivagno a m legaccio a ogni lato. Quando il lavoro misura 9 cm, aumentare 1 m all'interno della m di vivagno a ogni lato del lavoro, ripetere gli aumenti ogni 9-7-6-5½-4½-4 cm altre 4-5-6-6-7-8 volte = 34-36-38-40-42-44 m. Intrecciare quando il lavoro misura 47-47-47-46-44-43 cm. NOTA! Misure più corte per le taglie più grandi a causa della maggiore ampiezza delle spalle. Lavorare un’altra manica. CONFEZIONE: Cucire i margini delle spalle. Attaccare le maniche. Cucire i margini dei lati e delle maniche all’interno della m di vivagno fino a dove fino state avviate le m di vivagno (cioè circa 14 cm di spacco). Cucire il collo al centro dietro. Cucire il collo alla scollatura al centro dietro del collo, cucire margine a margine per evitare una cucitura spessa. Attaccare i bottoni al davanti sinistro. |
||||||||||
Spiegazioni del diagramma |
||||||||||
|
||||||||||
 |
||||||||||
 |
||||||||||
Avete terminato questo modello?Allora taggate le vostre foto con #dropspattern o inviatele alla #dropsfan gallery. Avete bisogno di aiuto con questo modello?Troverete 26 video tutorial, una sezione per i commenti/domande e molto altro guardando il modello su www.garnstudio.com © 1982-2026 DROPS Design A/S. Ci riserviamo tutti i diritti. Questo documento, compreso tutte le sue sotto-sezioni, è protetto dalle leggi sul copyright. Potete leggere quello che potete fare con i nostri modelli alla fine di ogni modello sul nostro sito. |
||||||||||


Con oltre 40 anni di esperienza nel design di modelli di maglia e uncinetto, DROPS Design offre la più estesa collezione di modelli gratuiti su internet - tradotti in 17 lingue. Ad oggi vi possiamo fornire 324 cataloghi e 12291 modelli - 9562 dei quali sono tradotti in Italiano.
Ci stiamo impegnando molto per darvi il meglio che vi possiamo offrire in termini di maglia e uncinetto, ispirazioni e consigli così come filati di grande qualità ad un prezzo incredibile! Volete utilizzare i nostri modelli per qualcosa d'altro oltre al vostro uso personale? Potete leggere tutto ciò che è consentito nel testo sul Copyright in basso su tutte le pagine dei nostri modelli. Buon lavoro!
Lasciare un commento sul modello DROPS Extra 0-1188
Noi saremmo felici di ricevere i tuoi commenti e opinioni su questo modello!
Se vuoi fare una domanda, fai per favore attenzione a selezionare la categoria corretta nella casella qui sotto per velocizzare il processo di risposta. I campi richiesti sono indicati da *.