
Categorie popolari
State cercando un filato?


Commenti / Domande (38)
![]() Teresa ha scritto:
Teresa ha scritto:
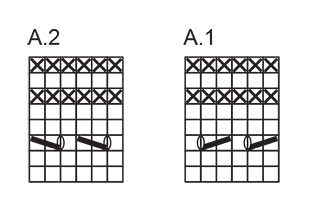
Buongiorno, trovo difficoltà nel seguire i diagrammi A.1 e A.2 Quando vado a lavorare per la prima volta il terzo ferro di entrambi, cioè quello con gli aumenti e le diminuzioni, mi ritrovo con una maglia in meno e il lavoro non viene speculare. Preciso che ho 20 maglie sul ferro, quindi mi trovo con lo schema dopo i primi 8 ferri. Sbaglio io?O c'è un errore nei diagrammi? Ringraziando e in attesa di risposta Cordiali saluti
22.12.2015 - 12:07DROPS Design ha risposto:
Buongiorno Teresa. Il ferro 3 viene lavorato come segue: 1 m dir, 1 gett, lavora il diag. A.1 solo sulle 6 m successive, 2 m dir, 1 gett, 2 m dir (m centrali), 1 gett, 2 m dir, lavora il diag. A.2 sulle 6 m successive , 1 gett, 1 m dir. Verifichi sempre di avere lo stesso numero di m calate e di m gettate ai due lati delle m centrali. Buon lavoro!
30.12.2015 - 17:17
![]() Teresa ha scritto:
Teresa ha scritto:
Salve, avrei una domanda riguardo allo schema. Al ferro 7, dopo il gettato, mi dice di lavorare le maglie fino alle 2 maglie centrali. Ma come devono essere lavorate?Sempre a diritto? Ferro 7: 1 m dir, 1 gettato, lavorare fino alle 2 m centrali, 1 gettato, 2 m dir (= m centrali), 1 gettato, lavorare A.2 fino a quando rimane 1 m, 1 gettato e 1 m dir = 20 m.
21.12.2015 - 14:13DROPS Design ha risposto:
Buongiorno Teresa. Deve lavorare le m seguendo il diagramma A.1. La ringraziamo per la segnalazione. Buon lavoro!
21.12.2015 - 16:58
![]() Olita ha scritto:
Olita ha scritto:
Hi! I was wondering how do you finish row 9 (i.e. in A2)? I seem to keep having more stitches in the "A2" diagram side, although I'm making sure to start off with the right amount. When I do the final double YO, I'm either faced with doing a YO right away and K1, or do and extra K1, then YO and the final K1. Would appreciate an answer the sooner the better! And thanx for a great pattern! :)
12.12.2015 - 21:11DROPS Design ha risposto:
Dear Olita, repeat diagram over the stated sts, after the last full repeat in width, work the next st as the first st in diagram, and finish as on row 7 (make sure you each yo in diag is compensated by a dec). Happy knitting!
14.12.2015 - 09:59Curtis Cleary ha scritto:
Does A1 restart from row 1 on row 9 of the pattern, or do i work row 3 of A1
02.12.2015 - 16:44DROPS Design ha risposto:
Dear Mrs Cleary, after you have worked the 8 rows in A.1 and A.2, repeat these 8 rows from 1st one as you did before, increasing on each side and either side of the 2 mid sts every row from RS - and K the 2 mid sts both from RS and from WS (as on row 7 and 8). Happy knitting!
02.12.2015 - 17:04Curtis Cleary ha scritto:
With the 8 stitches workable for row 9, how can I work the pattern for the remaining 2 stitches? Could you provide a written explanation for row 9 for the pattern please
30.11.2015 - 15:05DROPS Design ha risposto:
Dear Mrs Cleary, work the first 2 sts in diagram over the last sts to work: 6 sts as in diagram + 2 first sts (= K2 tog, YO in A.1). Happy knitting!
30.11.2015 - 16:40Curtis Cleary ha scritto:
So for Row 9 I would K1,yo , k2tog, double yo, k1, k2tog, double yo, k1, k2, yo, k2, yo, k2, k1, double yo, s1 k1 psso, k1, double yo, s1 k1 psso, yo, k1?
30.11.2015 - 15:02
![]() Marika Nieminen ha scritto:
Marika Nieminen ha scritto:
Hei, meneekö tähän hapsuhuiviin tosiaan vain 100 g lankaa, kun kuulostaa niin vähältä ?
03.11.2015 - 18:33DROPS Design ha risposto:
Tämä lanka on hyvin riittoisaa, 25 grammassa on jopa 140 metriä, joten langanmenekki on oikea.
05.11.2015 - 13:57
![]() Dedapper Arlette ha scritto:
Dedapper Arlette ha scritto:
Vanaf waar begint het patroon te lopen ??? vanaf de opzet , begrijp het niet goed !
03.11.2015 - 17:59DROPS Design ha risposto:
Hoi Arlette. Je begint met patroon A.1 en A.2 in nld 7 zoals beschreven: Nld 7: 1 r, 1 omsl, brei A.1 tot de 2 mid st over zijn, 1 omsl, 2 r (= mid st), 1 omsl, brei A.2 tot er 1 st overblijft, 1 omsl en 1 r = 20 st. Nld 8: 1 r, brei A.2 tot de mid st, 2 r (= mid st), brei A.1 tot er 1 st overblijft, 1 r.
04.11.2015 - 12:19
|
|||||||||||||
Calgary |
|||||||||||||
|
|
|||||||||||||
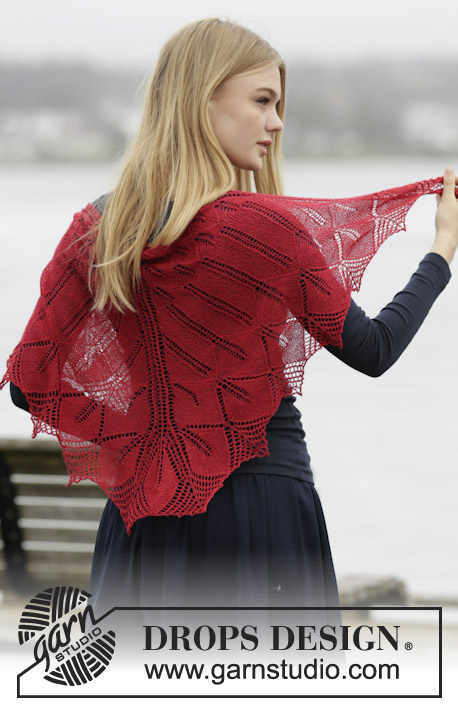
Scialle DROPS lavorato ai ferri con motivo traforato e frange in ”Brushed Alpaca Silk”.
DROPS Extra 0-1177 |
|||||||||||||
|
M LEGACCIO (avanti e indietro sui f): Lavorare tutti i f a dir. 1 "costa" a m legaccio = 2 f dir. MOTIVO: Vedere i diagrammi A.1 e A.2. I diagrammi mostrano tutti i f del motivo visti dal diritto del lavoro. ---------------------------------------------------------- SCIALLE: Lavorato avanti e indietro sui f circolari per avere spazio per tutte le m. Lavorare dal centro dietro verso il basso a M LEGACCIO con il motivo - leggere la spiegazione sopra. Avviare 4 m con i f circolari n° 5,5 mm con Brushed Alpaca Silk. Lavorare come segue: Ferro 1 (= diritto del lavoro): lavorare 2 m dir in ogni m = 8 m. Ferro 2 (= rovescio del lavoro): lavorare a dir e ALLO STESSO TEMPO lavorare 2 m nella 1° e nell'ultima m = 10 m. Ferro 3: 1 m dir, 1 gettato, 8 m dir, 1 gettato, 1 m dir = 12 m. Ferro 4: lavorare tutte le m a dir. Ferro 5: 1 m dir, 1 gettato, 4 m dir, 1 gettato, 2 m dir (= m centrali), 1 gettato, 4 m dir, 1 gettato, 1 m dir = 16 m. Ferro 6: lavorare tutte le m a dir. Inserire un segnapunti tra le 2 m centrali. Ferro 7: 1 m dir, 1 gettato, lavorare A.1 fino alle 2 m centrali, 1 gettato, 2 m dir (= m centrali), 1 gettato, lavorare A.2 fino a quando rimane 1 m, 1 gettato e 1 m dir = 20 m. Ferro 8: 1 m dir, lavorare A.2 fino alle m centrali, 2 m dir (= m centrali), lavorare A.1 fino a quando rimane 1 m, 1m dir. FARE ATTENZIONE ALLA TENSIONE DEL LAVORO! Ripetere il 7° e 8° f altre 57 volte (lavorare gli aumenti in A.1 e A.2) = 248 m in totale e il lavoro misura circa 55 cm misurati lungo le m centrali. Lavorare 4 "coste" a m legaccio su tutte le m (continuare con 4 aumenti su ogni f dal diritto del lavoro). Intrecciare con 2 capi. FRANGE: Tagliare 8 capi di Brushed Alpaca Silk lunghi 25 cm, piegarli a metà. Usare un uncinetto e far passare il centro dei capi attraverso la m sulla parte inferiore dello scialle. Far passare le estremità delle frange attraverso l'occhiello e tirare. Fare le frange lungo tutto il bordo inferiore dello scialle, con una frangia circa ogni 3 m. |
|||||||||||||
Spiegazioni del diagramma |
|||||||||||||
|
|||||||||||||
 |
|||||||||||||
Avete terminato questo modello?Allora taggate le vostre foto con #dropspattern o inviatele alla #dropsfan gallery. Avete bisogno di aiuto con questo modello?Troverete 17 video tutorial, una sezione per i commenti/domande e molto altro guardando il modello su www.garnstudio.com © 1982-2026 DROPS Design A/S. Ci riserviamo tutti i diritti. Questo documento, compreso tutte le sue sotto-sezioni, è protetto dalle leggi sul copyright. Potete leggere quello che potete fare con i nostri modelli alla fine di ogni modello sul nostro sito. |
|||||||||||||


Con oltre 40 anni di esperienza nel design di modelli di maglia e uncinetto, DROPS Design offre la più estesa collezione di modelli gratuiti su internet - tradotti in 17 lingue. Ad oggi vi possiamo fornire 324 cataloghi e 12290 modelli - 9561 dei quali sono tradotti in Italiano.
Ci stiamo impegnando molto per darvi il meglio che vi possiamo offrire in termini di maglia e uncinetto, ispirazioni e consigli così come filati di grande qualità ad un prezzo incredibile! Volete utilizzare i nostri modelli per qualcosa d'altro oltre al vostro uso personale? Potete leggere tutto ciò che è consentito nel testo sul Copyright in basso su tutte le pagine dei nostri modelli. Buon lavoro!
Lasciare un commento sul modello DROPS Extra 0-1177
Noi saremmo felici di ricevere i tuoi commenti e opinioni su questo modello!
Se vuoi fare una domanda, fai per favore attenzione a selezionare la categoria corretta nella casella qui sotto per velocizzare il processo di risposta. I campi richiesti sono indicati da *.