
Categorie popolari
State cercando un filato?


Commenti / Domande (47)
![]() Manuela Burkard ha scritto:
Manuela Burkard ha scritto:
Stricke gerade diese Mütze,super schöne Wolle und das Muster ist im Video prima erklärt,kann ich nur empfehlen.
02.10.2015 - 16:02
![]() Tine Agger ha scritto:
Tine Agger ha scritto:
Så er det mig igen☺️ Hvordan skal jeg i 27. Række i M1 kunne lave snoning af 1 m. Når diagrammet viser jeg skal have 5 m? På forhånd tak
22.09.2015 - 08:43DROPS Design ha risposto:
Hej igen Tine :) .... er du sikker på at vi ikke viser det i videoen?
23.09.2015 - 16:03
![]() Tine Agger ha scritto:
Tine Agger ha scritto:
Hej for det første kan jeg se der er kommet en rettelse i forhold til bladet og diagram på nettet. Men det mønster videoen bliver strikket efter ligner så ikke det diagram man kan printe ud. Kan det være rigtigt?
20.09.2015 - 10:43DROPS Design ha risposto:
Hej Tine, jo men det eneste som er rettet i A.2 er pind nr 9, så strik efter opskriften/diagrammerne, men hvis du kører fast så se på vidoen. God fornøjelse!
21.09.2015 - 08:31
![]() Susanne Moosmann ha scritto:
Susanne Moosmann ha scritto:
Habe die Mütze gerade fertig gestrickt!! Wunderschön!! Allerdings sind nach Beendigung aller Mustersätze 108 Maschen auf der Nadel und nicht nur 54. Ansonsten wäre es wohl arg eng um den Kopf ;-) Danke für eure tollen Muster und Ideen.
05.09.2015 - 13:35
![]() Sue Mitchell ha scritto:
Sue Mitchell ha scritto:
Just worked through the pattern. Once the first few rows of A4 are added, the chart repeats are A1, A2, A4, A3. From this point A1 & A2 are the same as A4 & A3. So in effect A1 & A2 are now repeated 12 times. This means that by the end of the hat there are 12 lots of 9 stitches making a total of 108 sts not 54 as stated. This makes far more sense as 54 sts is not enough to fit around a head. Am I correct in this? I hope you don't mind my picking up on this. Still love the pattern! Sue
05.09.2015 - 08:59DROPS Design ha risposto:
Dear Mrs Mitchell, a correction has been done, thank you. Happy knitting!
02.12.2015 - 17:29
![]() Sue Mitchell ha scritto:
Sue Mitchell ha scritto:
On row 14 of A2 you are told to decrease 2 taking 4 sts down to 2, but on row 15 you have 6 sts and work 4 yo to make 10. Is row 14 correct please? I've not followed the pattern but worked k1, yo, k2, yo, k1 to make the 6 sts required for row 15. I'm LOVING this pattern (now I understand how to add A3 and A4). Can't wait to wear it! Many thanks for your speedy reply yesterday. Sue
04.09.2015 - 09:05DROPS Design ha risposto:
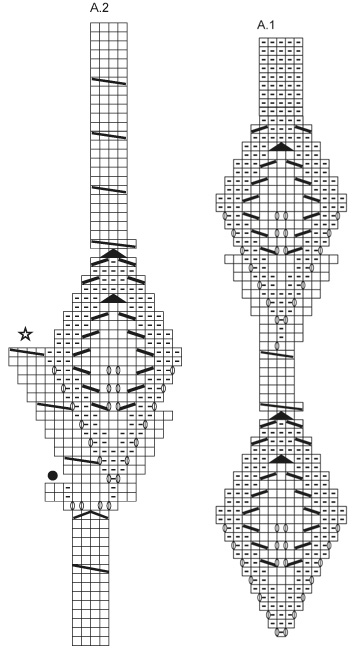
Dear Sue Mitchell, when working the 9th symbol in diagram text, you don't decrease sts, but increase to 6 sts making a cable: slip 2 sts on cable needle in front of piece, work 2 sts in each of the next 2 sts (= Kfb 2 sts = 2 sts inc to 4), K 2 from cable needle. Happy knitting!
04.09.2015 - 10:09
![]() Sue Mitchell ha scritto:
Sue Mitchell ha scritto:
The pattern notes say that A1 - A4 are to be used for the hat, yet the instructions only mention A1 and A2. Also, there is no mention of the rib at the bottom and I cannot believe that 54sts is sufficient for the brim. Am I reading this incorrectly?
03.09.2015 - 09:09DROPS Design ha risposto:
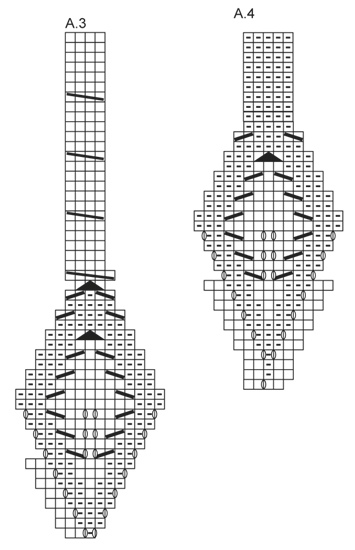
Dear Mrs Mitchell, when working A.2, you will work A.3 over the 3 sts marked with a black dot (see diagram text), then you will work A.4 over the 4 sts marked with a star. So that you will then work A.1, A.2, A.3 then A.1, A.2, A.4, A.3 which gives you the "rib" effect seen in the picture. Happy knitting!
03.09.2015 - 09:54
![]() Margaretha Larsson Åberg ha scritto:
Margaretha Larsson Åberg ha scritto:
Jag är intresserad av av sticka denna mössa; men var ska mönster A3-A4 in? Så här står det i beskrivningen: När A.1 och A.2 har stickats 1 gång på höjden är det 54 m på v. Sticka 1 v rätt och 1 v avigt, maska av på nästa v. Använd nål och tråd, tråckla ihop hålet på toppen av mössan. Strama tråden och fäst ordentligt. Det känns som om det fattas en bit i beskrivningen. Tacksam om ni kan hjälpa mig med detta! Vänlig hälsning Margaretha Larsson Åberg Lidköping
18.07.2015 - 17:15DROPS Design ha risposto:
Hej Margareta, jo om du tittar på pricken och stjärnan i diagrammet så står det var du skall fortsätta med A.3 och A.4! Lycka till!
29.07.2015 - 15:43Maira. ha scritto:
Me encanta este conjunto!!! es esquicito, por favor publiquen los patrones
23.06.2015 - 16:44
![]() Christina ha scritto:
Christina ha scritto:
Oh toll, wunderschöne Mütze - die würde ich sehr gern nachstricken! :-)
15.06.2015 - 21:42
|
||||||||||||||||||||||||||||||||||
Dancing Leaves#dancingleavesset |
||||||||||||||||||||||||||||||||||
 |
 |
|||||||||||||||||||||||||||||||||
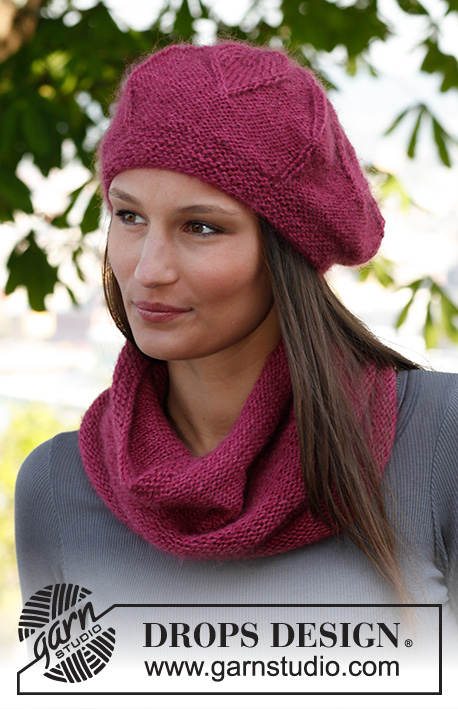
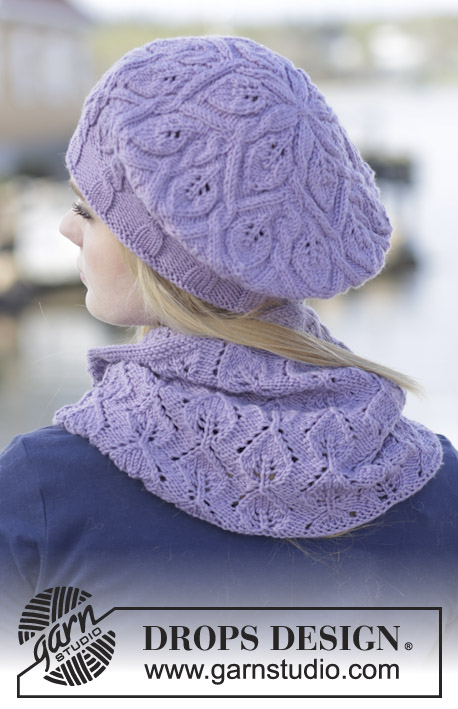
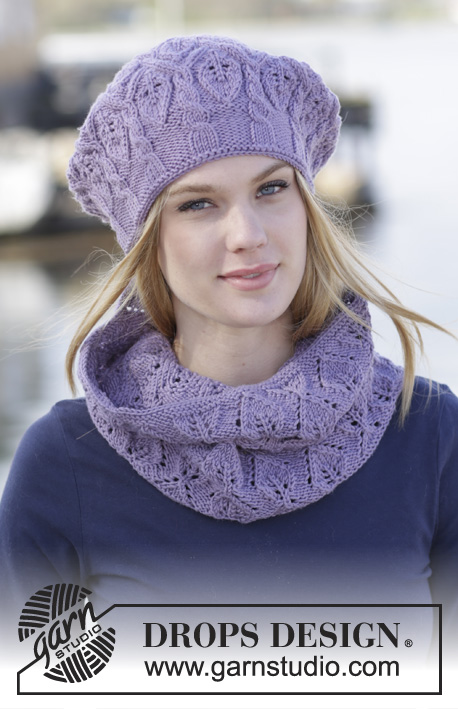
Completo DROPS ai ferri, formato da: Berretto con trecce e motivo a foglie e scalda collo con motivo a foglie, in "Merino Extra Fine".
DROPS 165-39 |
||||||||||||||||||||||||||||||||||
|
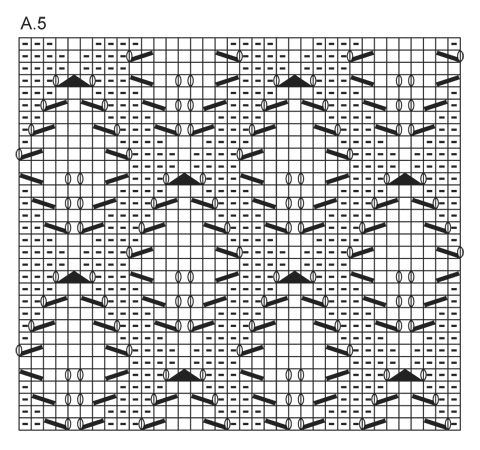
MOTIVO: Vedere i diagrammi da A.1 a A.5. I diagrammi da A.1 a A.4 sono per il berretto; il diagramma A.5 è per lo scaldacollo. ---------------------------------------------------------- BERRETTO: Si lavora dall’alto verso il basso, prima sui ferri a doppia punta e poi sui ferri circolari quando ci sono sufficienti m. Avviare 8 m sui ferri a doppia punta n° 3,5 con il filato Merino Extra Fine. GIRO 1: * 1 m dir, 1 m gettata *, ripetere da *-* 8 volte = 16 m. GIRO 2: Lavorare tutte le m a dir (lavorare le m gettate a dir ritorto per evitare che si formi un buco). GIRO 3: 1 m dir, * 1 m dir, 1 m gettata *, ripetere da *-* 14 volte, 1 m dir = 30 m. GIRO 4: Lavorare tutte le m a dir (lavorare le m gettate ritorte). GIRO 5: * Lavorare il diagramma A.1 (= 1 m), diagramma A.2 (= 4 m) *, ripetere da *-* 6 volte. Proseguire con il motivo in questo modo. Dopo aver lavorato i diagrammi A.1 e A.2 1 volta in verticale, ci sono 108 m. Lavorare 1 giro a dir e 1 giro a rov; al giro successivo, intrecciare le m. Passare un filo nelle m avviate per il berretto, stringere e fermare il filo. ---------------------------------------------------------- SCALDA COLLO: Avviare 144 m sui ferri circolari n° 4 con il filato Merino Extra Fine. Lavorare 1 giro a rov, 1 giro a dir, 1 giro a rov. Lavorare ora il diagramma A.5 (= 4 ripetizioni in larghezza). Proseguire finché il lavoro non misura 30 cm, finire dopo un ferro 5, 13, 21 o 29. Lavorare 1 giro a rov, 1 giro a dir e 1 giro a rov; intrecciare le m lavorandole a dir. |
||||||||||||||||||||||||||||||||||
Spiegazioni del diagramma |
||||||||||||||||||||||||||||||||||
|
||||||||||||||||||||||||||||||||||
 |
||||||||||||||||||||||||||||||||||
 |
||||||||||||||||||||||||||||||||||
 |
||||||||||||||||||||||||||||||||||
Avete terminato questo modello?Allora taggate le vostre foto con #dropspattern #dancingleavesset o inviatele alla #dropsfan gallery. Avete bisogno di aiuto con questo modello?Troverete 22 video tutorial, una sezione per i commenti/domande e molto altro guardando il modello su www.garnstudio.com © 1982-2026 DROPS Design A/S. Ci riserviamo tutti i diritti. Questo documento, compreso tutte le sue sotto-sezioni, è protetto dalle leggi sul copyright. Potete leggere quello che potete fare con i nostri modelli alla fine di ogni modello sul nostro sito. |
||||||||||||||||||||||||||||||||||


Con oltre 40 anni di esperienza nel design di modelli di maglia e uncinetto, DROPS Design offre la più estesa collezione di modelli gratuiti su internet - tradotti in 17 lingue. Ad oggi vi possiamo fornire 324 cataloghi e 12290 modelli - 9561 dei quali sono tradotti in Italiano.
Ci stiamo impegnando molto per darvi il meglio che vi possiamo offrire in termini di maglia e uncinetto, ispirazioni e consigli così come filati di grande qualità ad un prezzo incredibile! Volete utilizzare i nostri modelli per qualcosa d'altro oltre al vostro uso personale? Potete leggere tutto ciò che è consentito nel testo sul Copyright in basso su tutte le pagine dei nostri modelli. Buon lavoro!
Lasciare un commento sul modello DROPS 165-39
Noi saremmo felici di ricevere i tuoi commenti e opinioni su questo modello!
Se vuoi fare una domanda, fai per favore attenzione a selezionare la categoria corretta nella casella qui sotto per velocizzare il processo di risposta. I campi richiesti sono indicati da *.