
Categorie popolari
State cercando un filato?


Commenti / Domande (107)
![]() Susanne Altenburg ha scritto:
Susanne Altenburg ha scritto:
Hallo hab mal eine Frage. Ich muss ja bei meiner Größe 74 lm für die Ärmel nehmen.aber die 12 luft maschen für die Verbindung zählen die dann später zu den 74 luftmachen ? Dann hätte ich ja wenn ich alles ein mal rum häkel dann ins gesamt 86 Stäbchen für die ärmel were es richtig? Gruß Frau Altenburg
22.02.2021 - 17:49DROPS Design ha risposto:
Liebe Frau Altenburg, ja so stimmt es, und dann bei der 1. Runde bei den Ärmeln häkeln Sie noch 2 Stäbchen dazu und zwar jet 1 Stäbchen um das Stäbchen der Stäbchen Reihe an der Stelle, wo die Luftmaschen unter den Arm gehäkelt werden (-= also beidseitig, vor den 12 und nach den 12) = 86 + 2 = 88 Stäbchen. Viel Spaß beim häkeln!
23.02.2021 - 09:34
![]() Cloudy ha scritto:
Cloudy ha scritto:
Hi there I’m up to the finishing touch on the sleeve edge. It says for size L to do the A2 diagram 11 times but then it says to do it once vertically. Can you please explain which it is.
16.12.2020 - 05:11DROPS Design ha risposto:
Dear Cloudy, you have 88 sts around sleeve edge and can repeat a total of 11 times the 8 stitches in A.2. After you have worked the 2 rows of A.2, diagram is finished (and has been worked one time in height = vertically). Edge is finished. Cut and fasten the yarn. Happy crocheting!
16.12.2020 - 07:10
![]() Erin ha scritto:
Erin ha scritto:
Hello! I am working on this in XXL and I am confused on the marker placement portion. I have (23+4+4+20+4+4+46+4+4+23+4+4=144) with each + being a marker, but I need 164 stitches? Any clarification provided would be much appreciated. Thank you!
15.10.2020 - 18:31DROPS Design ha risposto:
Dear Erin, it looks like you have forgotten 20 one time after the 46+4+4, ie: 23+4+4+20 +4+4+ 46 + 4+4+20+4+4+23=164. Happy crocheting!
16.10.2020 - 08:54
![]() Cloudy ha scritto:
Cloudy ha scritto:
The garment on the model looks fitted coming in at the waist and flaring out towards the hem. Another reader said hers looks like a dress and so does mine. Very disappointed in this pattern.
09.10.2020 - 03:16DROPS Design ha risposto:
Dear Cloudy, did you check and kept correct tension as explained in the pattern? remember to check your size with the measurement chart - read more about charts here. Happy crocheting!
09.10.2020 - 08:08
![]() Moira ha scritto:
Moira ha scritto:
One more thing that’s confusing. It says in A1 to work 1st-3rd rounds 40 times (XL) size and then 3rd round until work measures 33cm. It looks like the 1st round is only done once like a set up row, is that correct? If it is and the 3rd is repeated then why are there two instructions, to repeat 40 times and to repeat until work measures 33cm? One would assume that 1st and 3rd rounds are repeated 40 times just by the way it’s written.i must admit these patterns are not easy to work out.
08.10.2020 - 19:28DROPS Design ha risposto:
Dear Moira, you repeat 40 times A.1 in the round in size XL (= the row with the arrow 1 to the row with the 3. on the right side) - then after these 3 rows have been worked, you repeat row 3 until piece measures 33 cm, then work row/repeat 4. in A.1 until piece measures 45 cm. Happy crocheting!
09.10.2020 - 07:39
![]() Moira ha scritto:
Moira ha scritto:
Hi there, the A1 diagram does not make any sense in your explanation to a previous knitter. According to your abbreviations, the first row is a sc, then skip 2 and 4 ch, but the next sc is not in any particular dc from the previous row, it is in the middle of two dc. I don’t understand that. Then row 2 (which doesn’t say it’s row 2) starts off with a dc in the chain space. Can you please clarify as your diagram and abbreviations are very confusing.
08.10.2020 - 17:44DROPS Design ha risposto:
Dear Moira, you repeat the diagram in widht, ie (1 sc in next dc, 4 chains, skip 2 dc, 1 sc in next dc, 4 chains, skip 2 dc) and repeat from (to). Row 2 just starts wit 3 ch (see CROCHET INFO-1) ie crochet: 3 chains (= 1st dc), 3 dc+2ch+3dc in next ch-space, and repeat with 1 dc in next ch-space. If you like the first dc of 2nd row being in the middle of the first ch-space, you can crochet some sl st in the first ch-space. Happy crocheting!
09.10.2020 - 07:27
![]() Johanna ha scritto:
Johanna ha scritto:
Erg mooi patroon! Ik heb een vraag over de markeerders. Ik ben nu bij de toer gekomen waar ik aan elke kant van de markeerders moet meerderen, maar wat moet ik met de markeerders doen wanneer ik naar de volgende toer ga? Moet ik ze laten zitten en dan op dezelfde hoogte in de volgende goede kant weer meerderen, of neem ik ze steeds mee naar de volgende toer? ( het is de eerste keer dat ik een ronde pas haak...😅) Alvast bedankt!
29.09.2020 - 01:23DROPS Design ha risposto:
Dag Johanna,
Je kunt de markeerders inderdaad laten zitten en meenemen in de hoogte, zodat je weet waar je de volgende keer moet meerderen.
21.10.2020 - 12:20
![]() Debbie Zaayman ha scritto:
Debbie Zaayman ha scritto:
I have started with this pattern and have started the first four rows of the fan pattern. Can i please give you my email address and then you can forward me your email address. I want to send you a picture so you can see if looks right before i continue. Currently it looks like a dress and dont know if it is suppose to look like that.\r
24.08.2020 - 16:44
![]() Debbie Zaayman ha scritto:
Debbie Zaayman ha scritto:
Can you please clarify for me with regrds to the first fan patter row..... do i understand it correctly: A1 the first row, is it three trebles in one chain, two chains(skip 2 chains) three treble in next chain and one treble in next chain
16.08.2020 - 16:46DROPS Design ha risposto:
Dear Mrs Zaayman, start A.1 with 1 double crochet (= UK Engish), then 4 chains, skip 2 stitches, then repeat (1 dc in next st, 4 chains, skip 2 sts) around. on 2nd row work 3 ch (at the beg of round only to replace 1st treble), then crochet around next ch-space: 3 tr, 2 ch, 3 tr, and repeat (1 tr around next ch-space, 3tr +2 ch+3 tr around next ch-space). Happy crocheting!
17.08.2020 - 08:51
![]() Anna ha scritto:
Anna ha scritto:
Bei den Zunahmen vor und nach, bzw. dann nur noch vor dem Markier steht, dass diese in den Hinreihen gearbeitet werden. Ist hiermit tatsächlich nur jede zweite Reihe gemeint und die Rückreihen finden ohne Zunahmen statt?
20.07.2020 - 09:19DROPS Design ha risposto:
Liebe Anna, wenn Sie in jede Hinreihe zunehmen sollen, dann nehmen Sie in jeder 2. Reihe, dh nur bei den Hinreihen, bei den Rückreihen werden Sie nicht zunehmen. Viel Spaß beim häkeln!
20.07.2020 - 10:01
|
||||||||||||||||||||||||||||
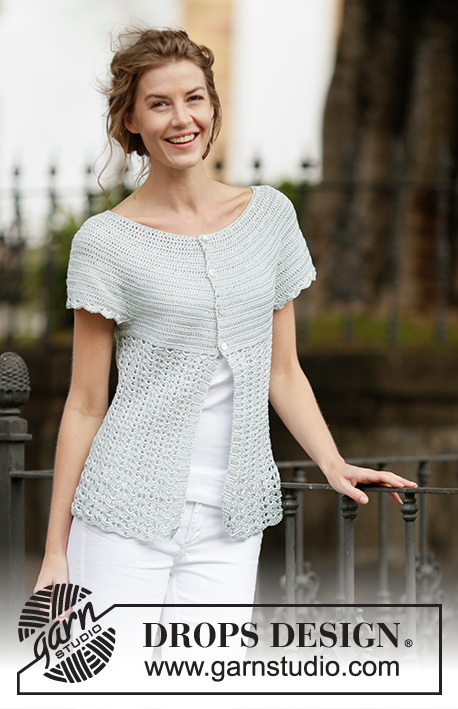
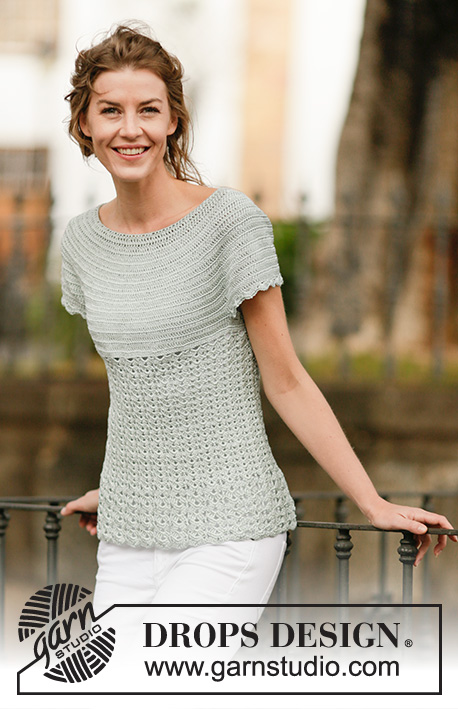
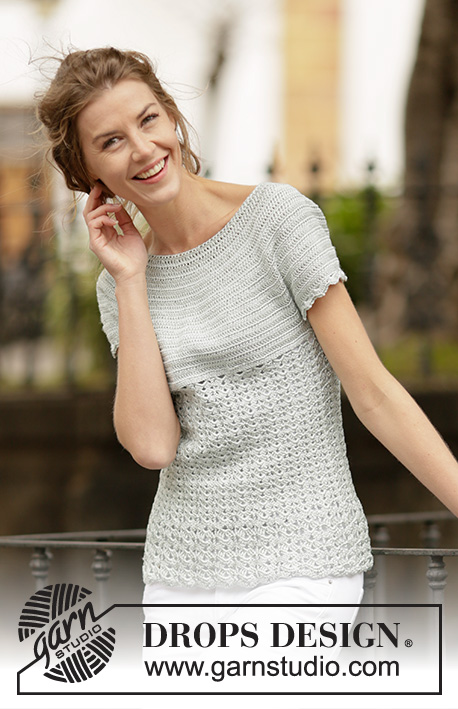
Lady Ascot#ladyascottop |
||||||||||||||||||||||||||||
 |
 |
|||||||||||||||||||||||||||
Top DROPS all’uncinetto, con motivo a ventaglio e sprone rotondo, lavorato dall’alto verso il basso (top down), in "Cotton Viscose". Taglie: Dalla S alla XXXL.
DROPS 162-26 |
||||||||||||||||||||||||||||
|
MOTIVO: Vedere i diagrammi A.1-A.2 INFORMAZIONI PER IL LAVORO-1: Sostituire la prima m.a di ogni riga di m.a con 3 cat; finire la riga con 1 m.bss nella 3a cat. INFORMAZIONI PER IL LAVORO-2: Iniziare ogni giro con 3 cat e finire ogni giro con 1 m.bss nella 3a cat. SUGGERIMENTO PER GLI AUMENTI: Per aumentare 1 m.a, lavorare 2 m.a nella stessa m.a. ---------------------------------------------------------- TOP: Si lavora dall’alto verso il basso con inizio al centro, sul dietro. Con l’uncinetto n° 3,5 ed il filato Cotton Viscose, avviare 133-137-142-147-152-157 cat e formare un anello con 1 m.bss nella prima cat. Lavorare il giro successivo, come segue: 3 cat (= 1 m.a), 1 m.a nella prima cat dell’anello di cat, * saltare 1 cat, 1 m.a in ognuna delle 5 cat successive *, ripetere da *-* finché non rimangono 0-4-3-2-1-0 cat, 1 m.a in ognuna delle ultime 0-4-3-2-1-0 cat = 112-116-120-124-128-132 m.a. Proseguire avanti e indietro. Finire ogni riga con 1 m.bss nella prima cat dall’inizio della riga - VEDERE LE INFORMAZIONI PER IL LAVORO -1. Girare il lavoro. Lavorare 1 riga con 1 m.a in ogni m.a e, ALLO STESSO TEMPO, aumentare 28 m.a a intervalli regolari (quindi aumentare 1 m.a dopo ca. ogni 4 m.a) – VEDERE IL SUGGERIMENTO PER GLI AUMENTI = 140-144-148-152-156-160 m.a. Inserire 12 segni, come segue: Lavorare 17-18-19-20-21-22 m.a (= metà dietro), ALLO STESSO TEMPO, aumentare 1-0-0-2-2-1 m.a a intervalli regolari, inserire il primo segno, * lavorare 4 m.a, inserire il segno successivo *, ripetere da *-* ancora 1 volta, lavorare 20 m.a, inserire il segno successivo, * lavorare 4 m.a, inserire il segno successivo *, ripetere da *-* ancora 1 volta, lavorare 34-36-38-40-42-44 m.a (= davanti), ALLO STESSO TEMPO aumentare 2-0-0-4-4-2 m.a a intervalli regolari, inserire il segno successivo, * lavorare 4 m.a, inserire il segno successivo *, ripetere da *-* ancora 1 volta, lavorare 20 m.a, inserire il segno successivo, * lavorare 4 m.a, inserire il segno successivo *, ripetere da *-* ancora 1 volta, lavorare 17-18-19-20-21-22 m.a (= metà dietro), ALLO STESSO TEMPO, aumentare 1-0-0-2-2-1 m.a a intervalli regolari = 144-144-148-160-164-164 m.a. RICORDARSI LA TENSIONE DEL LAVORO! Alla riga successiva sul diritto del lavoro, aumentare come segue: aumentare 1 m.a da ciascun lato di ogni segno (= 24 m.a aumentate), ripetere questi aumenti ad ogni riga sul diritto del lavoro 1-4-5-7-8-10 volte in tutto, poi aumentare prima di ogni segno (= 12 m.a aumentate), ripetere questi aumenti ad ogni riga sul diritto del lavoro 9-6-6-4-4-3 volte in tutto = 276-312-340-376-404-440 m.a. Il lavoro misura ca.18-18-20-20-22-23 cm. Lavorare la riga successiva come segue: 36-43-48-54-59-66 m.a (= metà dietro), lavorare 12 cat (inserire un segno al centro di queste nuove m = sotto manica), saltare 66-70-74-80-84-88 m.a della riga precedente (= manica), lavorare 72-86-96-108-118-132 m.a (= davanti), lavorare 12 cat (inserire un segno al centro di queste nuove m = sotto manica), saltare 66-70-74-80-84-88 m.a della riga precedente e lavorare 36-43-48-54-59-66 m.a (= metà dietro) = 168-196-216-240-260-288 m.a / cat (= 84-98-108-120-130-144 m.a /cat per il dietro e il davanti). Inserire 1 segno nel lavoro. DA ADESSO IN AVANTI, MISURARE IL LAVORO DA QUESTO PUNTO ! Lavorare 1 riga con 1 m.a in ogni m.a e 1 m.a in ogni cat sotto la manica e, ALLO STESSO TEMPO, aumentare 18-8-6-0-10-6 m.a a intervalli regolari = 186-204-222-240-270-294 m.a. Lavorare 1 riga con 1 m.a in ogni m.a. Lavorare ora in tondo senza girare il lavoro. MOTIVO A VENTAGLIO: Lavorare i giri 1 -3 del diagramma A.1 31-34-37-40-45-49 volte - VEDERE LE INFORMAZIONI PER IL LAVORO -2. Poi ripetere il giro 3 finché il lavoro non misura ca.29-31-31-33-31-31 cm. Lavorare ora il giro 4 finché il lavoro non misura ca.40-42-43-45-45-45 cm. Tagliare il filo. BORDO DELLA MANICA: Iniziare al centro, sotto la manica e lavorare come segue: Lavorare 1 m.b nella 6a cat delle 12 cat dello scalfo, 3 cat (= 1 m.a), 1 m.a in ognuna delle 6 cat successive, 1 m.a nella riga di m.a dove sono state lavorate le cat per lo scalfo, 1 m.a in ognuna delle 66-70-74-80-84-88 m.a successive (= manica); ALLO STESSO TEMPO, aumentare 0-4-0-2-6-2 m.a a intervalli regolari, 1 m.a nella riga di m.a dove sono state lavorate le cat per lo scalfo, 1 m.a in ognuna delle 5 cat rimanenti sotto la manica = 80-88-88-96-104-104 m.a. Ripetere il diagramma A.2 10-11-11-12-13-13 volte in tutto. Tagliare il filo quando il diagramma A.2 è stato lavorato 1 volta in verticale. Lavorare l’altro bordo della manica in modo uguale. |
||||||||||||||||||||||||||||
Spiegazioni del diagramma |
||||||||||||||||||||||||||||
|
||||||||||||||||||||||||||||
 |
||||||||||||||||||||||||||||
 |
||||||||||||||||||||||||||||
Avete terminato questo modello?Allora taggate le vostre foto con #dropspattern #ladyascottop o inviatele alla #dropsfan gallery. Avete bisogno di aiuto con questo modello?Troverete 13 video tutorial, una sezione per i commenti/domande e molto altro guardando il modello su www.garnstudio.com © 1982-2026 DROPS Design A/S. Ci riserviamo tutti i diritti. Questo documento, compreso tutte le sue sotto-sezioni, è protetto dalle leggi sul copyright. Potete leggere quello che potete fare con i nostri modelli alla fine di ogni modello sul nostro sito. |
||||||||||||||||||||||||||||


Con oltre 40 anni di esperienza nel design di modelli di maglia e uncinetto, DROPS Design offre la più estesa collezione di modelli gratuiti su internet - tradotti in 17 lingue. Ad oggi vi possiamo fornire 324 cataloghi e 12290 modelli - 9561 dei quali sono tradotti in Italiano.
Ci stiamo impegnando molto per darvi il meglio che vi possiamo offrire in termini di maglia e uncinetto, ispirazioni e consigli così come filati di grande qualità ad un prezzo incredibile! Volete utilizzare i nostri modelli per qualcosa d'altro oltre al vostro uso personale? Potete leggere tutto ciò che è consentito nel testo sul Copyright in basso su tutte le pagine dei nostri modelli. Buon lavoro!
Lasciare un commento sul modello DROPS 162-26
Noi saremmo felici di ricevere i tuoi commenti e opinioni su questo modello!
Se vuoi fare una domanda, fai per favore attenzione a selezionare la categoria corretta nella casella qui sotto per velocizzare il processo di risposta. I campi richiesti sono indicati da *.