
Categorie popolari
State cercando un filato?


Commenti / Domande (107)
![]() Marianne ha scritto:
Marianne ha scritto:
Hei, hvordan gjentar jeg rad 1 i A1? Hvor starter man fastmasken etter rad 3 og videre med byen med lm? ( det står i mønsteret at man skal gjenta fra 1- .3.)
27.05.2025 - 22:13DROPS Design ha risposto:
Hei Marianne. Du gjentar A.1 31-34-37-40-45-49 ganger i bredden (ikke i høyden), så når du har heklet 1. omgang i A.1 , hekler du 2. omgang i A.1 over 31-34-37-40-45-49 ganger, så hekler du 3. omgang i A.1 over 31-34-37-40-45-49 ganger. Når du har heklet 3. omgang 1 gang, skal denne omgangen gjentas til arbeidet måler ca 29-31-31-33-31-31 cm. Så skal 4.omgang i A.1 hekles til arbeidet måler ca 40-42-43-45-45-45 cm. Husk - les HEKLEINFO-2 om hvordan du starter og slutter hver omgang. mvh DROPS Design
02.06.2025 - 07:53
![]() Amy ha scritto:
Amy ha scritto:
Hello. I'm trying to find a replacement yarn for DROPS Cotton Viscose in the Lady Ascot pattern. Your conversion calculator asks for the thread number (I assume how many ply?) but I can't find the Cotton Viscose ply, so I can't complete the yarn replacement calculation.
14.06.2024 - 20:48DROPS Design ha risposto:
Dear Amy, DROPS Cotton Viscose used to be a yarn in the Yarngroup A, with a knitting gauge of 23 stitch x 30 rows. I suggest, you look for the replacement in the Yarngroup A, that has a similar gauge, and then go to the yarn-calculator to see just how much you need from the selected yarn. Happy Knitting!
15.06.2024 - 00:41
![]() Trine ha scritto:
Trine ha scritto:
Jeg hækler toppen i en str. small, men var forvirret over, at man skulle gentage rækken med 24 udtagninger 1 gang og samtidig ende med 276 masker (altså hækle 2 rækker m. 24 udtagninger). Kan så se på en tidligere kommentar, at man ikke skal GENTAGE den 1 gang, men kun lave den 1 gang TOTALT... Nu kan jeg så trævle 19 rækker op, fordi jeg er endt med 300 masker. Lidt forkert formulering :(
23.07.2023 - 22:43
![]() Melissa ha scritto:
Melissa ha scritto:
Hello. I'm following the 2nd set of digits, so starting with 137 ch, decrease to 116 dc, inc to 144 dc. After putting in the stitch markers, I followed the increases of 24 dc as per pattern & had 312 st, BUT I hadn't yet done the rows of 12dc increases. The pattern says I should have 312 stitches after all of those but the maths don't work. What should the stitch count be after adding the rows of 12 dc increases?
13.06.2023 - 17:59DROPS Design ha risposto:
Dear Melissa, you have inserted a total of 12 markers, and you will first increase 4 times 1 dc on each side of each marker (= you increase 2 sts x 12 markers = 24 sts on every increase round) a total of 4 times (= 144+ (24 sts increased x 4 times) = 240 sts; then you will increase only 1 st before each marker (1 stitch at 12 markers = 12 sts increased ) a total of 6 times = 240 + (12 sts increased x 6 times) = 312 sts. Happy crocheting!
14.06.2023 - 07:32
![]() Pavla Matoušková ha scritto:
Pavla Matoušková ha scritto:
Začínám vějířovity vzor A1 a není jednoznačné jak háçkovat 1. řadu. Krátký sloupek jasný, 4 řetízková oka jasná. Nechápu kam se krátký sloupek dává. Do každéko třetího dlouhého sloupku? Nebo nejak jinak? Předem děkuji za vysvětlení Pavla Matoušková
02.02.2023 - 14:01
![]() Birgitte Skov Iversen ha scritto:
Birgitte Skov Iversen ha scritto:
Ups kom til at skrive, at det var en kommentar, men det er et spørgsmål. I starten af opskriften står fl.g "DROPS HÆKLENÅL NR 3,5 – eller den nål du skal bruge for at få 22 st x 12 rækker på 10 x 10 cm, og 3 rapporter af 3. og 4.omg i A.1 på 9 cm i bredden2 Hvad betyder 3 rapporter af 3. og 4. omg. i A.1 på 9 cm. i bredden.
09.12.2022 - 12:16DROPS Design ha risposto:
Hei Birgitte. Da skal du hekle 3. og 4. omg av diagram A.1 3 ganger og få det til å bli 9 cm i bredden. Altså A.1 omgang (3+4)+(3+4)+(3+4) = 9 cm i bredden. mvh DROPS Design
12.12.2022 - 13:59
![]() Birgitte Skov Iversen ha scritto:
Birgitte Skov Iversen ha scritto:
I starten af opskriften står flg. "DROPS HÆKLENÅL NR 3,5 – eller den nål du skal bruge for at få 22 st x 12 rækker på 10 x 10 cm, og 3 rapporter af 3. og 4.omg i A.1 på 9 cm i bredden." Hvad betyder 3 rapporter af 3. og 4. omg. i A.1. på 9 cm. i bredden Hilsen Birgitte
09.12.2022 - 12:12
![]() Geetha ha scritto:
Geetha ha scritto:
For round 3 , we put a DC in the previous stitch , " 3dc,2 chain,3dc" in the chain space 1 and again "3dc,2chain,3dc" in chain space 2 , then put a DC in each of the below DC stitch ( total 7) before we reach the next 2 chains and put the "3dc,2chain,3dc" in each chain space and continue ?
01.08.2022 - 10:56DROPS Design ha risposto:
Dear Geetha, on round 3 work: *1 dc in the dc from previous round, skip 3 dc, 3 dc + 2 ch + 3 dc around the 2-chain-space, skip the next 3 dc*, repeat from *-*. So that you will work 3 dc+2ch+3 dc around the 2 chains from previous round. Happy crocheting!
01.08.2022 - 12:09
![]() Geetha ha scritto:
Geetha ha scritto:
So as per A1 diagram , for round 2 , we put a DC in chain space 1 , " 3dc,2chain,2dc" in chain space 2 , then dc in chain space 3 , "3dc,2chain,3dc" in chain space 4 , skip the single crochet stitch below and continue as above in the next 4 chain space?
01.08.2022 - 10:53DROPS Design ha risposto:
Dear Geetha, A.1 will be worked as follows on 2nd row: *1 dc in first chain space, (3 dc+2ch+3 dc) in next ch-space*, and repeat from *-* all the round. Happy crocheting!
01.08.2022 - 12:08
![]() Geetha ha scritto:
Geetha ha scritto:
Can you please explain the A1 diagram please ? The first round is a single crochet , 4 chains ,single crochet ( skipping 2 double crochet below ). The second round which chain space do we start the double crochet ? And the 3 DC ,chain 2 ,3 DC do all go into a single chain space ? Which chain space do we place them ? Similarly for round 3 which chain space do we need to place the stitches ?
30.07.2022 - 19:46DROPS Design ha risposto:
Dear Geetha, you work 1 double crochet in the first chain space and then, in the second one, work 3dc, chain 2, 3 dc in the next chain space (all in a single one). In round 3 and all the next ones you work double crochet groups inside each of the chain-2 spaces of the previous row. Happy crocheting!
31.07.2022 - 17:44
|
||||||||||||||||||||||||||||
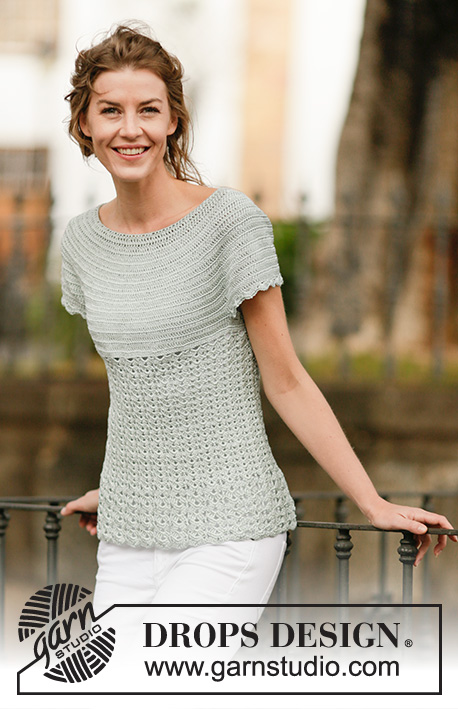
Lady Ascot#ladyascottop |
||||||||||||||||||||||||||||
 |
 |
|||||||||||||||||||||||||||
Top DROPS all’uncinetto, con motivo a ventaglio e sprone rotondo, lavorato dall’alto verso il basso (top down), in "Cotton Viscose". Taglie: Dalla S alla XXXL.
DROPS 162-26 |
||||||||||||||||||||||||||||
|
MOTIVO: Vedere i diagrammi A.1-A.2 INFORMAZIONI PER IL LAVORO-1: Sostituire la prima m.a di ogni riga di m.a con 3 cat; finire la riga con 1 m.bss nella 3a cat. INFORMAZIONI PER IL LAVORO-2: Iniziare ogni giro con 3 cat e finire ogni giro con 1 m.bss nella 3a cat. SUGGERIMENTO PER GLI AUMENTI: Per aumentare 1 m.a, lavorare 2 m.a nella stessa m.a. ---------------------------------------------------------- TOP: Si lavora dall’alto verso il basso con inizio al centro, sul dietro. Con l’uncinetto n° 3,5 ed il filato Cotton Viscose, avviare 133-137-142-147-152-157 cat e formare un anello con 1 m.bss nella prima cat. Lavorare il giro successivo, come segue: 3 cat (= 1 m.a), 1 m.a nella prima cat dell’anello di cat, * saltare 1 cat, 1 m.a in ognuna delle 5 cat successive *, ripetere da *-* finché non rimangono 0-4-3-2-1-0 cat, 1 m.a in ognuna delle ultime 0-4-3-2-1-0 cat = 112-116-120-124-128-132 m.a. Proseguire avanti e indietro. Finire ogni riga con 1 m.bss nella prima cat dall’inizio della riga - VEDERE LE INFORMAZIONI PER IL LAVORO -1. Girare il lavoro. Lavorare 1 riga con 1 m.a in ogni m.a e, ALLO STESSO TEMPO, aumentare 28 m.a a intervalli regolari (quindi aumentare 1 m.a dopo ca. ogni 4 m.a) – VEDERE IL SUGGERIMENTO PER GLI AUMENTI = 140-144-148-152-156-160 m.a. Inserire 12 segni, come segue: Lavorare 17-18-19-20-21-22 m.a (= metà dietro), ALLO STESSO TEMPO, aumentare 1-0-0-2-2-1 m.a a intervalli regolari, inserire il primo segno, * lavorare 4 m.a, inserire il segno successivo *, ripetere da *-* ancora 1 volta, lavorare 20 m.a, inserire il segno successivo, * lavorare 4 m.a, inserire il segno successivo *, ripetere da *-* ancora 1 volta, lavorare 34-36-38-40-42-44 m.a (= davanti), ALLO STESSO TEMPO aumentare 2-0-0-4-4-2 m.a a intervalli regolari, inserire il segno successivo, * lavorare 4 m.a, inserire il segno successivo *, ripetere da *-* ancora 1 volta, lavorare 20 m.a, inserire il segno successivo, * lavorare 4 m.a, inserire il segno successivo *, ripetere da *-* ancora 1 volta, lavorare 17-18-19-20-21-22 m.a (= metà dietro), ALLO STESSO TEMPO, aumentare 1-0-0-2-2-1 m.a a intervalli regolari = 144-144-148-160-164-164 m.a. RICORDARSI LA TENSIONE DEL LAVORO! Alla riga successiva sul diritto del lavoro, aumentare come segue: aumentare 1 m.a da ciascun lato di ogni segno (= 24 m.a aumentate), ripetere questi aumenti ad ogni riga sul diritto del lavoro 1-4-5-7-8-10 volte in tutto, poi aumentare prima di ogni segno (= 12 m.a aumentate), ripetere questi aumenti ad ogni riga sul diritto del lavoro 9-6-6-4-4-3 volte in tutto = 276-312-340-376-404-440 m.a. Il lavoro misura ca.18-18-20-20-22-23 cm. Lavorare la riga successiva come segue: 36-43-48-54-59-66 m.a (= metà dietro), lavorare 12 cat (inserire un segno al centro di queste nuove m = sotto manica), saltare 66-70-74-80-84-88 m.a della riga precedente (= manica), lavorare 72-86-96-108-118-132 m.a (= davanti), lavorare 12 cat (inserire un segno al centro di queste nuove m = sotto manica), saltare 66-70-74-80-84-88 m.a della riga precedente e lavorare 36-43-48-54-59-66 m.a (= metà dietro) = 168-196-216-240-260-288 m.a / cat (= 84-98-108-120-130-144 m.a /cat per il dietro e il davanti). Inserire 1 segno nel lavoro. DA ADESSO IN AVANTI, MISURARE IL LAVORO DA QUESTO PUNTO ! Lavorare 1 riga con 1 m.a in ogni m.a e 1 m.a in ogni cat sotto la manica e, ALLO STESSO TEMPO, aumentare 18-8-6-0-10-6 m.a a intervalli regolari = 186-204-222-240-270-294 m.a. Lavorare 1 riga con 1 m.a in ogni m.a. Lavorare ora in tondo senza girare il lavoro. MOTIVO A VENTAGLIO: Lavorare i giri 1 -3 del diagramma A.1 31-34-37-40-45-49 volte - VEDERE LE INFORMAZIONI PER IL LAVORO -2. Poi ripetere il giro 3 finché il lavoro non misura ca.29-31-31-33-31-31 cm. Lavorare ora il giro 4 finché il lavoro non misura ca.40-42-43-45-45-45 cm. Tagliare il filo. BORDO DELLA MANICA: Iniziare al centro, sotto la manica e lavorare come segue: Lavorare 1 m.b nella 6a cat delle 12 cat dello scalfo, 3 cat (= 1 m.a), 1 m.a in ognuna delle 6 cat successive, 1 m.a nella riga di m.a dove sono state lavorate le cat per lo scalfo, 1 m.a in ognuna delle 66-70-74-80-84-88 m.a successive (= manica); ALLO STESSO TEMPO, aumentare 0-4-0-2-6-2 m.a a intervalli regolari, 1 m.a nella riga di m.a dove sono state lavorate le cat per lo scalfo, 1 m.a in ognuna delle 5 cat rimanenti sotto la manica = 80-88-88-96-104-104 m.a. Ripetere il diagramma A.2 10-11-11-12-13-13 volte in tutto. Tagliare il filo quando il diagramma A.2 è stato lavorato 1 volta in verticale. Lavorare l’altro bordo della manica in modo uguale. |
||||||||||||||||||||||||||||
Spiegazioni del diagramma |
||||||||||||||||||||||||||||
|
||||||||||||||||||||||||||||
 |
||||||||||||||||||||||||||||
 |
||||||||||||||||||||||||||||
Avete terminato questo modello?Allora taggate le vostre foto con #dropspattern #ladyascottop o inviatele alla #dropsfan gallery. Avete bisogno di aiuto con questo modello?Troverete 13 video tutorial, una sezione per i commenti/domande e molto altro guardando il modello su www.garnstudio.com © 1982-2026 DROPS Design A/S. Ci riserviamo tutti i diritti. Questo documento, compreso tutte le sue sotto-sezioni, è protetto dalle leggi sul copyright. Potete leggere quello che potete fare con i nostri modelli alla fine di ogni modello sul nostro sito. |
||||||||||||||||||||||||||||


Con oltre 40 anni di esperienza nel design di modelli di maglia e uncinetto, DROPS Design offre la più estesa collezione di modelli gratuiti su internet - tradotti in 17 lingue. Ad oggi vi possiamo fornire 324 cataloghi e 12290 modelli - 9561 dei quali sono tradotti in Italiano.
Ci stiamo impegnando molto per darvi il meglio che vi possiamo offrire in termini di maglia e uncinetto, ispirazioni e consigli così come filati di grande qualità ad un prezzo incredibile! Volete utilizzare i nostri modelli per qualcosa d'altro oltre al vostro uso personale? Potete leggere tutto ciò che è consentito nel testo sul Copyright in basso su tutte le pagine dei nostri modelli. Buon lavoro!
Lasciare un commento sul modello DROPS 162-26
Noi saremmo felici di ricevere i tuoi commenti e opinioni su questo modello!
Se vuoi fare una domanda, fai per favore attenzione a selezionare la categoria corretta nella casella qui sotto per velocizzare il processo di risposta. I campi richiesti sono indicati da *.