
Categorie popolari
State cercando un filato?


Commenti / Domande (39)
![]() Lise ha scritto:
Lise ha scritto:
Kan man strikke den uden knapper i ryggen? Altså som bluse istedet.
05.03.2023 - 10:35DROPS Design ha risposto:
Hej Lise, jo det bestemmer du selv :) du kan evt følge forstykket på ryggen :)
07.03.2023 - 15:45
![]() Mieke ha scritto:
Mieke ha scritto:
Ik wil dit truitje breien zonder de knopen en dus voor- en achterpand rondbreien . Volstaat het dan dat ik de 10 biessteken gewoon weglaat? Ik brei maat L en heb dus 219 st ipv 229. Als ik begin met het VP, ziet het patroon er zo uit: 14 tric, 1A, 1B, 1C, 14tric, , 38 tric, 1C, 1A, 1C, 1A, 38 tric. De 52 st tric voor mijn maat verdeel ik als volgt: 10 st tric aan weerszijden van het stuk voorpand en 38 st tric aan weerszijden van de rug. Klopt deze indeling?
13.06.2022 - 14:15DROPS Design ha risposto:
Dag Mieke,
Het is voor ons helaas niet mogelijk om patronen aan te passen naar persoonlijke wensen. Je zou inderdaad de 10 voorbiessteken weg kunnen laten en dan het achterpand net zo breien als het voorpand.
16.06.2022 - 22:05
![]() Mieke ha scritto:
Mieke ha scritto:
Ik zou een antwoord op mijn vraag hier gekregen hebben, maar ik kan het nergens terugvinden. Is er iets misgegaan?
11.06.2022 - 08:01
![]() Mieke ha scritto:
Mieke ha scritto:
Ik wil dit truitje breien zonder de knopen en dus voor- en achterpand rondbreien . Volstaat het dan dat ik de 10 biessteken gewoon weglaat? Ik brei maat L en heb dus 219 st ipv 229. Als ik begin met het VP, ziet het patroon er zo uit: 14 tric, 1C, 1B, 1A, 14 tric , 38 tric, 1C, 1A, 1C, 1A, 38 tric. De 52 st tric voor mijn maat verdeel ik als volgt: 10 st tric aan weerszijden van het stuk voorpand en 38 st tric aan weerszijden van de rug. Klopt deze indeling?
09.06.2022 - 17:52
![]() Monique Chartrand ha scritto:
Monique Chartrand ha scritto:
Hello again, For the following instruction for the sleeve, do you bind off 4 stitches on each side of the starting point marker? « Then K 1 round while AT THE SAME TIME bind off 8 sts under sleeve = 66-70-74-78-82-86 sts remain on needle »
17.02.2021 - 22:53DROPS Design ha risposto:
Hi Monique, You bind off the first 4 stitches (after the marker), work to the end of the round and then bind off the last 4 stitches (before the marker). From then on you work back and forth. Happy knitting!
18.02.2021 - 07:32
![]() Monique Chartrand ha scritto:
Monique Chartrand ha scritto:
For the sleeve, when the pattern says “ Then K 1 round while AT THE SAME TIME bind off 8 sts under sleeve = 66-70-74-78-82-86 sts remain on needle” does binding off 8 sts under sleeve mean binding off the 8 middle stitches?
29.01.2021 - 01:05DROPS Design ha risposto:
Dear Mrs Chartrand, correct, these are the 8 sts on middle under sleeve (= the last 4 sts + the first 4 sts on round). Happy knititng!
29.01.2021 - 08:11
![]() Cho Cho Lwin ha scritto:
Cho Cho Lwin ha scritto:
After bind-off in right sight, finished sweater back and front piece. Then how to attached the sleeve knitted in round? e.g sweater piece needs to be started with WS and sleeve stitches needs to work in right sight? I am a bit confused. Thank you for all your hard work and the technical support. All the best wishes.
02.10.2020 - 06:01DROPS Design ha risposto:
Dear Mrs Lwin, this video shows how to place the sleeves on the same needle as the stitches on front and back pieces, over the cast off sts for armhole. You then just have to continue as explained (= sleeve sts in stocking st) decreasing for raglan. Happy knitting!
02.10.2020 - 08:33
![]() Hend Alatrash ha scritto:
Hend Alatrash ha scritto:
Hello , thank you for the nice pattern ... now i am in the decreasing for yoke part , and i come to a point where i have to decrease from the pattern stitches .. should i start the pattern after omitting the stitches decreased , or should i do pattern over stitches from sleeves? Thanks in advance .
11.06.2020 - 08:11DROPS Design ha risposto:
Dear Mrs Alatrash, you can continue the lace pattern, but just make sure there are always the correct number of sts, ie in the lace pattern there should be 1 decrease for 1 yarn over, if you cannot make the yarn over, then don't work the decrease (and reversed) - work then these stitches in stocking stitch - and continue decreasing for raglan. Happy knitting!
11.06.2020 - 08:50
![]() Grandet ha scritto:
Grandet ha scritto:
Merci beaucoup ! C'est très gentil de votre part de me répondre si rapidement. Bonne journée à vous.
20.04.2020 - 10:20
![]() Grandet ha scritto:
Grandet ha scritto:
Bonjour, je commence le 3e rang du motif. Je tricote A1. A : une maille endroit (2 mailles à l'endroit ensemble du 1er rang) et après, sur le diagramme 2 mailles sont tricotées ensembles mais la 2e mailles de ces deux mailles appartient à B ? (et la 1ère du C appartient à B ?). J'espère que je me suis bien expliquée... Merci de votre aide très précieuse.
18.04.2020 - 21:41DROPS Design ha risposto:
Bonjour Mme Grandet, les mailles des diagrammes vont se tricoter parfois en A/B parfois en B/C, autrement dit, au 2ème rang sur l'endroit vous tricotez A: 1 m end, 2 m ens à l'end (= 2 mailles), 1 jeté = 1ère maille de B, continuez jusqu'à ce qu'il reste 1 m dans B et tricotez cette maille + la 1ère m du B suivant/de C ensemble = dernière m de B, 1 jeté = 1ère maille du B suivant/de C. Vous pouvez mettre un marqueur entre chaque diagramme pour pouvoir bien vérifier votre nombre de mailles à chaque rang. Bon tricot!
20.04.2020 - 10:11
|
|||||||||||||||||||
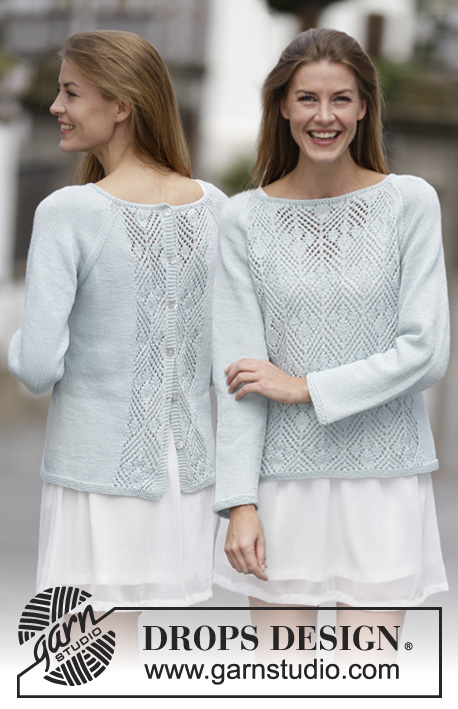
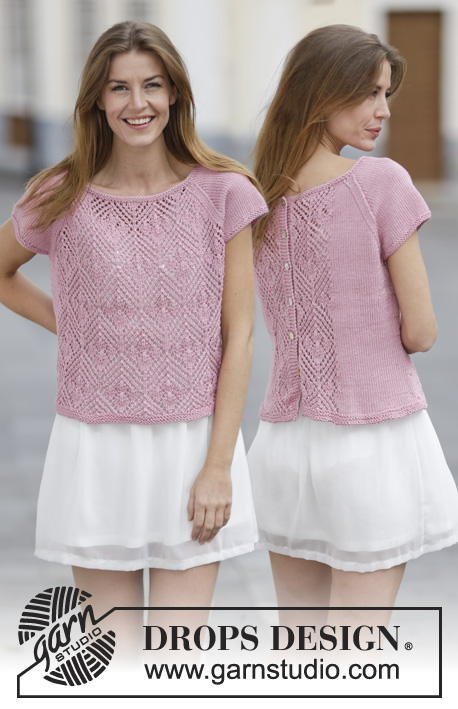
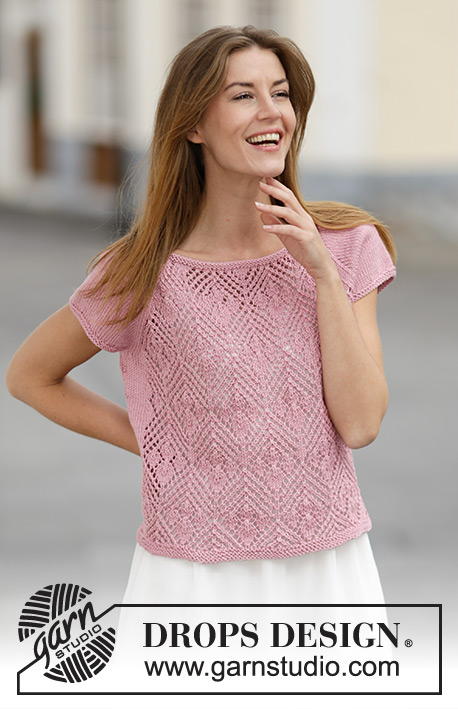
Summer Chic#summerchictop |
|||||||||||||||||||
 |
 |
||||||||||||||||||
Maglia DROPS ai ferri, con motivo traforato, raglan e bottoni sul dietro, in "Muskat" o in "Belle". Può anche essere indossato come un cardigan classico. Taglie: Dalla S alla XXXL.
DROPS 160-16 |
|||||||||||||||||||
|
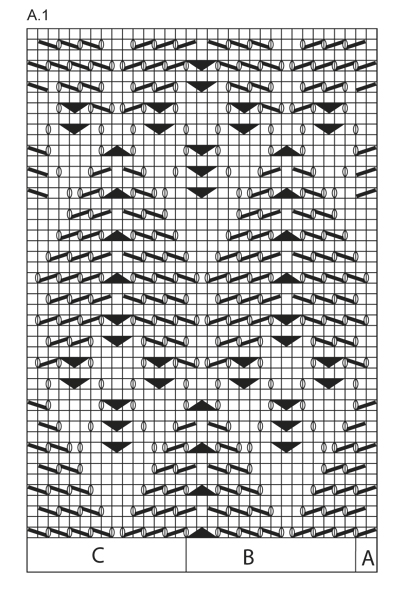
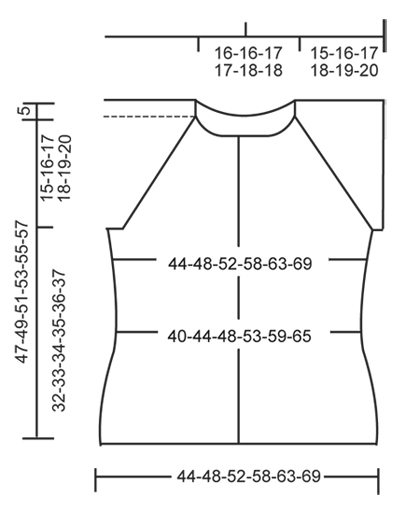
PUNTO LEGACCIO (avanti e indietro): Lavorare tutti i ferri a dir. 1 “costa” a legaccio = 2 ferri a dir. PUNTO LEGACCIO (in tondo): Lavorare * 1 giro dir, 1 giro rov *, ripetere da *-*. 1 “costa” a legaccio = 2 giri. MOTIVO: Vedere il diagramma A.1. Il diagramma mostra tutti i ferri del motivo, visti sul diritto del lavoro. RAGLAN: Diminuire 2 m in corrispondenza di ogni passaggio tra il davanti/dietro e le maniche. Diminuire come segue, sul diritto del lavoro: Iniziare 3 m prima del segno e lavorare come segue: 2 m insieme a dir, 2 m dir (il segno si trova tra queste 2 m), passare 1 m a dir senza lavorarla, 1 m dir, accavallare la m passata sulla m lavorata. Diminuire come segue, sul rovescio del lavoro: Iniziare 3 m prima del segno e lavorare come segue: 2 m insieme a rov ritorto, 2 m rov (il segno si trova tra queste 2 m), 2 m insieme a rov. ASOLE: Intrecciare le m per le asole sul primo bordo, sul diritto del lavoro. 1 asola = lavorare insieme a dir la 3a e la 4a m dal centro sul dietro e fare 1 m gettata. Intrecciare le m per le asole quando il lavoro misura: TAGLIA S: 6, 13, 20, 27, 34 e 42 cm. TAGLIA M: 6, 13, 20, 28, 36 e 44 cm. TAGLIA L: 6, 14, 22, 30, 38 e 46 cm. TAGLIA XL: 6, 14, 22, 30, 39 e 48 cm. TAGLIA XXL: 6, 14, 23, 32, 41 e 50 cm. TAGLIA XXXL: 9.18, 27, 36, 45 e 52 cm ---------------------------------------------------------- MAGLIA: Si lavora avanti e indietro sui ferri circolari dal centro, sul dietro. Avviare 197-213-229-253-277-301 m (comprese 5 m per il bordo al centro sul dietro da ciascun lato) sui ferri circolari n° 3,5 con il filato Muskat oppure con il filato Belle. Lavorare 3 coste a legaccio - vedere le spiegazioni sopra. Passare ai ferri circolari n° 4 e lavorare come segue - sul diritto del lavoro: 5 m a punto legaccio (= bordo), diagramma A.1 A (= 2 m), diagramma A.1 C (= 15 m), maglia rasata sulle 44-44-52-56-60-64 m successive, diagramma A.1 A (= 2 m), diagramma A.1B sulle 48-64-64-80-96-112 m successive, diagramma A1.C (= 15 m), maglia rasata sulle 44-44-52-56-60-64 m successive, finire con il diagramma A.1 A (= 2 m), diagramma A.1 C (= 15 m) e 5 m a punto legaccio (= bordo). Proseguire con il motivo in questo modo. RICORDARSI LA TENSIONE DEL LAVORO. Quando il lavoro misura 6 cm, inserire 2 segni nel lavoro: il primo segno dopo le prime 52-56-60-66-72-78 m ed il secondo segno prima delle ultime 52-56-60-66-72-78 m (= tra i due segni ci sono 93-101-109-121-133-145 m per il davanti). Diminuire ora 1 m da ciascun lato di ognuno dei due segni (= 4 m diminuite). Ripetere queste diminuzioni ogni 2 cm altre 3 volte = 181-197-213-237-261-285 m. Quando il lavoro misura 18 cm per tutte le taglie, aumentare 1 m da ciascun lato di ognuno dei due segni (= 4 m aumentate). Ripetere questi aumenti ogni 4-4-4-5-5-5 cm altre 3 volte = 197-213-229-253-277-301 m. Quando il lavoro misura 32-33-34-35-36-37 cm, intrecciare per gli scalfi da ciascun lato, come segue: Lavorare finché non rimangono 4 m prima del primo segno sul lato, intrecciare le 8 m successive, lavorare finché non rimangono 4 m prima del segno sull’altro lato, intrecciare le 8 m successive e lavorare le restanti m sul ferro. Ci sono ora 85-93-101-113-125-137 m per il davanti e 48-52-56-62-68-74 m per ogni dietro. Lasciare il lavoro in sospeso e proseguire con le maniche. MANICHE: Si lavorano in tondo sui ferri a doppia punta. Avviare 74-78-82-86-90-94 m sui ferri a doppia punta n° 3,5 con il filato Muskat oppure con il filato Belle. Lavorare 3 coste a legaccio - vedere le spiegazioni sopra. Lavorare ora 1 giro a dir e, ALLO STESSO TEMPO, intrecciare 8 m sotto le maniche = sui ferri rimangono 66-70-74-78-82-86 m. Lasciare il lavoro in sospeso e proseguire con la seconda manica. SPRONE: Trasferire le m delle maniche sullo stesso ferro circolare usato per lavorare il dietro e il davanti, nel punto in cui sono state intrecciate le m per gli scalfi = 313-337-361-393-425-457 m. Inserire un segno in corrispondenza di ogni passaggio tra le maniche e il davanti / dietro (= 4 segni). Proseguire a maglia rasata e con il motivo come prima; ALLO STESSO TEMPO, nel corso del ferro successivo sul diritto del lavoro, iniziare a diminuire per il RAGLAN – vedere le spiegazioni sopra (= 8 m diminuite). Ripetere queste diminuzioni ogni 2 ferri per un totale di 20-21-22-22-23-24 volte, e poi ad ogni ferro per 3-4-5-7-8-9 volte. Terminate tutte le diminuzioni per il raglan, sui ferri rimangono 129-137-145-161-177-193 m. Lavorare 2 coste a legaccio su tutte le m; ALLO STESSO TEMPO, nel corso del primo ferro, diminuire 20-26-32-45-50-58 m in modo uniforme = 109-111-113-116-127-135 m. Intrecciare le m. CONFEZIONE: Cucire le aperture sotto le maniche. Attaccare i bottoni sul bordo destro. |
|||||||||||||||||||
Spiegazioni del diagramma |
|||||||||||||||||||
|
|||||||||||||||||||
 |
|||||||||||||||||||
 |
|||||||||||||||||||
Avete terminato questo modello?Allora taggate le vostre foto con #dropspattern #summerchictop o inviatele alla #dropsfan gallery. Avete bisogno di aiuto con questo modello?Troverete 29 video tutorial, una sezione per i commenti/domande e molto altro guardando il modello su www.garnstudio.com © 1982-2026 DROPS Design A/S. Ci riserviamo tutti i diritti. Questo documento, compreso tutte le sue sotto-sezioni, è protetto dalle leggi sul copyright. Potete leggere quello che potete fare con i nostri modelli alla fine di ogni modello sul nostro sito. |
|||||||||||||||||||


Con oltre 40 anni di esperienza nel design di modelli di maglia e uncinetto, DROPS Design offre la più estesa collezione di modelli gratuiti su internet - tradotti in 17 lingue. Ad oggi vi possiamo fornire 324 cataloghi e 12290 modelli - 9561 dei quali sono tradotti in Italiano.
Ci stiamo impegnando molto per darvi il meglio che vi possiamo offrire in termini di maglia e uncinetto, ispirazioni e consigli così come filati di grande qualità ad un prezzo incredibile! Volete utilizzare i nostri modelli per qualcosa d'altro oltre al vostro uso personale? Potete leggere tutto ciò che è consentito nel testo sul Copyright in basso su tutte le pagine dei nostri modelli. Buon lavoro!
Lasciare un commento sul modello DROPS 160-16
Noi saremmo felici di ricevere i tuoi commenti e opinioni su questo modello!
Se vuoi fare una domanda, fai per favore attenzione a selezionare la categoria corretta nella casella qui sotto per velocizzare il processo di risposta. I campi richiesti sono indicati da *.