
Categorie popolari
State cercando un filato?


Commenti / Domande (14)
![]() Ula ha scritto:
Ula ha scritto:
Dzień dobry. Czy na wysokości siódmego rzędu schematu A1 pomiedzy A,B i C nalezy robic podwójny narzut? Pytam ponieważ A1 kończy sie narzutem a B nim zaczyna. Z góry dziękuję za pomoc. Ula
16.04.2023 - 15:00DROPS Design ha risposto:
Witaj Ulu, we wzorze nie ma podwójnych narzutów. Wykonujesz zawsze 1 narzut. Pozdrawiamy!
17.04.2023 - 08:53
![]() Cecilia ha scritto:
Cecilia ha scritto:
Hi! I am a bit confused about A1. I undertand that I am not to knot A1A, then A1B, then A1C. If I knit A1A, then A1B 15 times and then knit one A1C, reading the chart from the bottom-up, on round 15, A1C begins in the middle of a stitch. How is this handled? Or am I completely reading the directions wrong?
06.11.2022 - 20:35DROPS Design ha risposto:
Dear Cecilia, in that moment, the last stitch of A.1B is knitted together with the first stitch of A.1C. Happy knitting.
06.11.2022 - 23:23
![]() Anne ha scritto:
Anne ha scritto:
Pour info je fais ce modèle taille XL/XXL - il est écrit qu’il faut 5 pelotes (250g) j’en suis à la 6ème pelotes et il va m’en falloir une 7ème, voir une 8ème 🤨 Je tricote normalement avec des aiguilles 4 comme indiqué. Alors faites attention ⚠️
03.08.2020 - 22:13DROPS Design ha risposto:
Bonjour Anne, tricotez-vous bien ce modèle en DROPS Cotton Merino? Avez-vous bien le bon échantillon en jersey autrement dit 21 m x 28 rangs = 10 x 10 cm? Vous trouverez plus d'infos sur l'échantillon/la tension ici. Bon tricot!
04.08.2020 - 09:55
![]() Jan ha scritto:
Jan ha scritto:
Finally, about to start this project; thank you for answering my question above. I just want to be clear about the "2 ridges in garter stitch"; I read this as: (K 1 Round P 1 Round) = one ridge. So 2 ridges would repeat K 1 round P 1 round. effectively having 4 rounds. Then A1 would start with Round 5. Is this correct? The *-* repeat reference in the 'explanation' confused me.
10.07.2020 - 17:34DROPS Design ha risposto:
Hi jan, Yes, to work 2 ridges you need to work 4 rounds. Happy knitting!
13.07.2020 - 07:35
![]() Jan Micare ha scritto:
Jan Micare ha scritto:
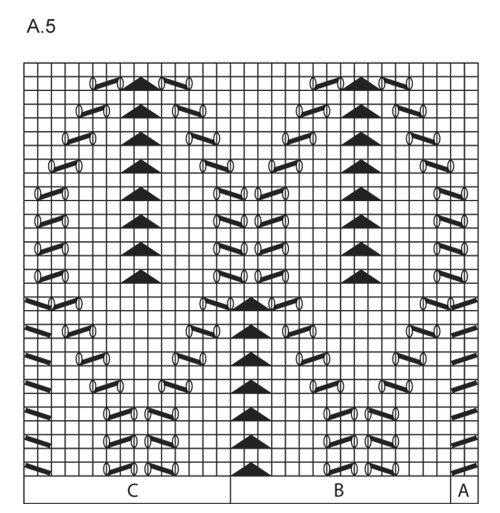
A.1.B is supposed to be repeated 13 times. HOwever, by round 13 the pattern shifts and the 12th stitch in A.1.B is part of the YO, slip 1 st as if to K, K 1, psso, YO sequence - how is this repeated in the middle of a sequence. Can you spell out how to do rounds 13, 15, 17, 19, and 21. A.3 and A.5 will have similar issues.
17.04.2020 - 17:34DROPS Design ha risposto:
Dear Mrs Jan Care, on rows 11, 13, and 15, work the last stitch in A together with the first st in B (the first yarn over = last stitch in B), then work the last stitch in B together with the first stitch in next B (than in C for the last time), the first yarn over is now the last stitch in B. Adding markers between each diagram may help you to check out the number of stitches in each diagram on these rows so that you are sure to get the pattern working. Happy knitting!
20.04.2020 - 08:25
![]() Joëlle Colder ha scritto:
Joëlle Colder ha scritto:
Bonjour j aimerai faire ce modèle mais ne voit pas dans le diagramme le troisième picto carré avec bordure plus claire (le surjet je crois). Par ailleurs les deux mailles tricotées ensembles sont toujours à l endroit quel que soit le sens de la barre dans le diagramme ? Merci 🙏
29.03.2019 - 09:49DROPS Design ha risposto:
Bonjour Mme Colder, sauf erreur de ma part, tous les surjets (simples et doubles) figurent dans le diagramme et la légende. On tricote ici en rond, on va lire les diagrammes en commençant en bas à droite et tricoter tous les tours de droite à gauche - vous trouverez ici comment lire un diagramme. Bon tricot!
01.04.2019 - 10:20
![]() Marianne ha scritto:
Marianne ha scritto:
Bedankt voor jullie snelle reactie. Heb nu A2 één keer gebreid. Twijfel nu of ik dit nog 1 keer moet herhalen zoals jullie zeggen. Klopt dit wel? Alvast dank voor de hulp!
09.08.2018 - 23:54DROPS Design ha risposto:
Dag Marianne, Inderdaad, je hebt gelijk: A.2 brei je 1 keer in de hoogte en niet 2 keer. Zo staat het ook in het patroon, dus ik had verkeerd gekeken, excuus. (A.1 brei je wel 2 keer in de hoogte).
10.08.2018 - 08:45
![]() Marianne ha scritto:
Marianne ha scritto:
Heb het garen al langer in huis. Ben nu begonnen met de halswarmer. De beschrijving van A1 is duidelijk. Heel leuk om te breien. Mijn vraag gaat over A2.er staat verder niets meer bij beschreven. Zijn dit 2 naalden? Hoe moeten die gebreid worden? De eerste nld. eerst A en dan B met herhalingen, dan C zoals ik aannneem. Dan de tweede nld. : hoe moet ik die breien? Wat moet er dan herhaald worden? A 4 zal dan wel op dezelfde manier gebreid worden!
04.08.2018 - 18:00DROPS Design ha risposto:
Dag Marianne, A.2 brei je op exact dezelfde manier zoals omschreven is voor A.1. Dus A.2A , A.2B 13-15-17 keer in de breedte in totaal, A.2C. A.2 bestaat inderdaad uit 2 naalden en zoals in het patroon beschreven, brei je deze 2 keer, dus totaal 4 naalden. Vervolgens ga je verder met A.3, A.4 en A.5. Hoeveel herhalingen je hiervan doet staat in de beschrijving.
06.08.2018 - 10:40
![]() Sophie ha scritto:
Sophie ha scritto:
Bonjour, C'est la 1ère fois que je vais tricoter avec un diagramme. Les cases "vides" (entre 2 rangs de cases avec les symboles) représentent-elles bien 1 rang à tricoter à l'endroit ? Ou bien doit-on enchainer les mailles fantaisies à chaque rang ? Merci de votre aide. Sophie
20.10.2016 - 19:17DROPS Design ha risposto:
Bonjour Sophie, dans les diagrammes, 1 case = 1 m x 1 rang, ainsi, tous les 2 rangs (= après chaque rang de diminutions/jetés) vous tricotez toutes les mailles à l'endroit. Bon tricot!
21.10.2016 - 09:16
![]() Francesca ha scritto:
Francesca ha scritto:
Buongiorno non capisco cosa sbaglio... Il disegno man mano corrisponde ma il punto (quello in mezzo ai due buchi-gettati, sia le 2 m accavallate che le 2 m insieme a diritto) che in foto è ben definito a maglia rasata a me viene più aggrovigliato eppure ho controllato anche i video e non ci sono ritorti.
23.09.2016 - 16:48DROPS Design ha risposto:
Buongiorno Francesca. Il punto tra i due gettati viene lavorato a dir sul diritto e a rov sul rovescio. Verifichi di lavorare correttamente i due gettati. Se ha possibilità provi a fare un campione con i punti interessati e a lavarlo: con il lavaggio il lavoro diventa più regolare. Buon lavoro.
23.09.2016 - 17:08
|
||||||||||||||||
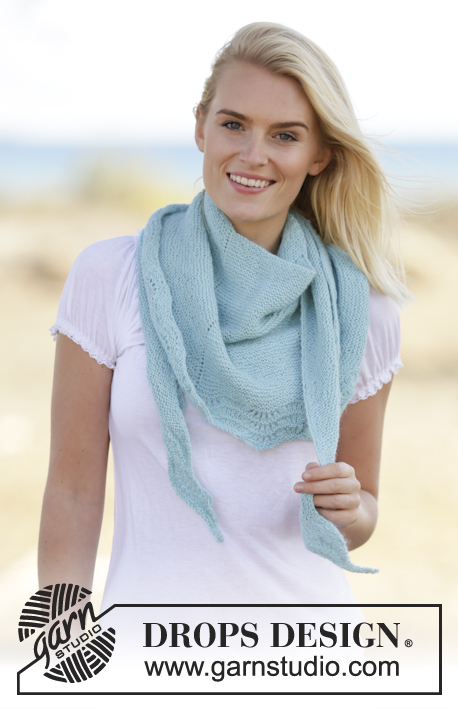
Spring Breeze#springbreezeneckwarmer |
||||||||||||||||
 |
 |
|||||||||||||||
Scaldacollo DROPS lavorato ai ferri con motivo traforato in ”Cotton Merino”. Taglie: S - XXXL.
DROPS 161-6 |
||||||||||||||||
|
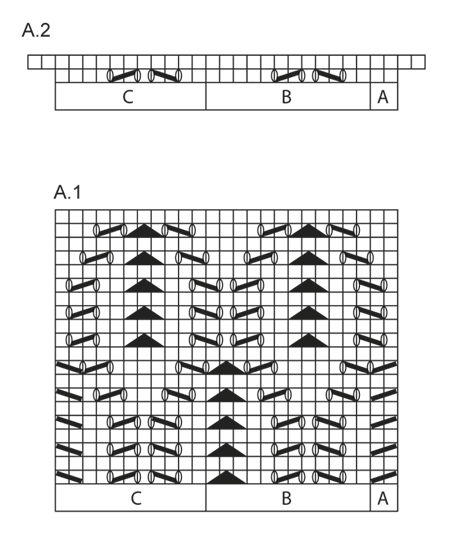
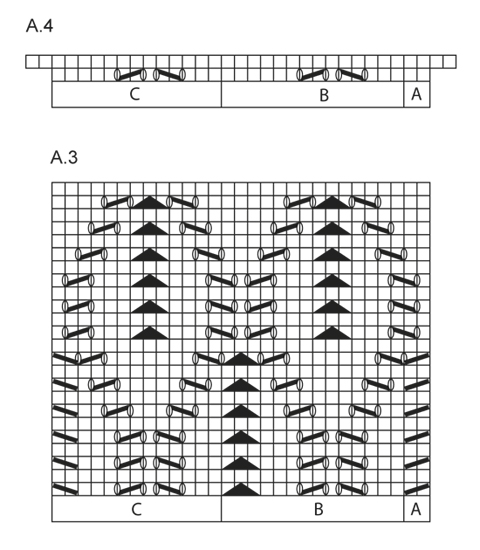
M LEGACCIO (lavorata in tondo): 1 “costa” a m legaccio = 2 giri. * 1 giro dir e 1 giro rov *, ripetere *-*. MOTIVO: Vedere i diagrammi A.1-A.5. ---------------------------------------------------------- SCALDACOLLO: Lavorato in tondo, dall’alto in basso (top-down). Avviare senza stringere 169-193-217 m con i f circolari n° 4 mm con Cotton Merino. Lavorare 2 “coste” a M LEGACCIO – leggere la spiegazione sopra. Poi lavorare come segue: A.1A (= 2 m), A.1B (= 12 m) 13-15-17 volte in larghezza in totale, A.1C (= 11 m). Continuare con questo motivo fino a quando A.1 è stato lavorato 2 volte in verticale. FARE ATTENZIONE ALLA TENSIONE DEL LAVORO! Poi continuare il motivo nello stesso modo ma ora lavorare A.2 invece di A.1. Quando A.2 è stato lavorato 1 volta in verticale, sono state aumentate 2 m in ogni ripetizione = 197-225-253 m. Poi lavorare il motivo come prima ma ora lavorare A.3 invece di A.2. Continuare fino a quando A.3 è stato lavorato 1-2-2 volte in verticale. Poi lavorare il motivo come prima ma ora lavorare A.4 invece di A.3. Quando A.4 è stato lavorato 1 volta in verticale, sono state aumentate 2 m in ogni ripetizione = 225-257-289 m. Poi lavorare il motivo come prima ma ora lavorare A.5 invece di A.4. Continuare fino a quando A.5 è stato lavorato 2 volte in verticale. Lavorare 2 “coste” su tutte le m. Intrecciare. Per evitare che il motivo si contragga, bagnare lo scaldacollo e asciugarlo su una superficie piana prima dell’uso. |
||||||||||||||||
Spiegazioni del diagramma |
||||||||||||||||
|
||||||||||||||||
 |
||||||||||||||||
 |
||||||||||||||||
 |
||||||||||||||||
Avete terminato questo modello?Allora taggate le vostre foto con #dropspattern #springbreezeneckwarmer o inviatele alla #dropsfan gallery. Avete bisogno di aiuto con questo modello?Troverete 16 video tutorial, una sezione per i commenti/domande e molto altro guardando il modello su www.garnstudio.com © 1982-2026 DROPS Design A/S. Ci riserviamo tutti i diritti. Questo documento, compreso tutte le sue sotto-sezioni, è protetto dalle leggi sul copyright. Potete leggere quello che potete fare con i nostri modelli alla fine di ogni modello sul nostro sito. |
||||||||||||||||


Con oltre 40 anni di esperienza nel design di modelli di maglia e uncinetto, DROPS Design offre la più estesa collezione di modelli gratuiti su internet - tradotti in 17 lingue. Ad oggi vi possiamo fornire 324 cataloghi e 12290 modelli - 9561 dei quali sono tradotti in Italiano.
Ci stiamo impegnando molto per darvi il meglio che vi possiamo offrire in termini di maglia e uncinetto, ispirazioni e consigli così come filati di grande qualità ad un prezzo incredibile! Volete utilizzare i nostri modelli per qualcosa d'altro oltre al vostro uso personale? Potete leggere tutto ciò che è consentito nel testo sul Copyright in basso su tutte le pagine dei nostri modelli. Buon lavoro!
Lasciare un commento sul modello DROPS 161-6
Noi saremmo felici di ricevere i tuoi commenti e opinioni su questo modello!
Se vuoi fare una domanda, fai per favore attenzione a selezionare la categoria corretta nella casella qui sotto per velocizzare il processo di risposta. I campi richiesti sono indicati da *.