
Categorie popolari
State cercando un filato?


Commenti / Domande (50)
![]() Niva ha scritto:
Niva ha scritto:
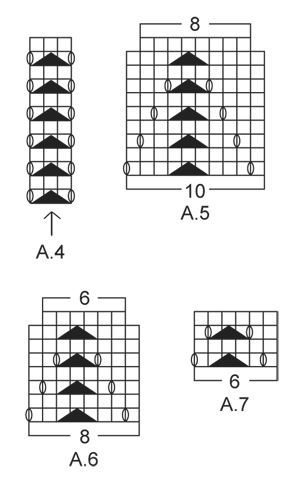
Must admit this is the most confusing pattern I’ve ever tried and I’m an accomplished knitter. I’ve read it so many times to work it out and I’m almost there. Does the A4 pattern stop after the 12 rows in the graph?
08.04.2021 - 04:33DROPS Design ha risposto:
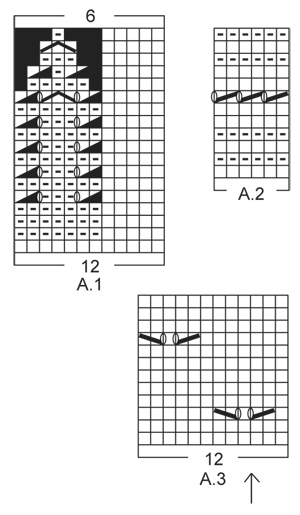
Dear Niva, A.4 will be repeated in height until all decreases for raglan are done. Happy knitting!
08.04.2021 - 07:51
![]() Nova ha scritto:
Nova ha scritto:
At the beginning of the A4 graph is the YO between the last stitch on the body and the first stitch on the sleeve?
07.04.2021 - 13:43DROPS Design ha risposto:
Dear Nova, the stitch with the arrow in A.4 should be the one with the marker at the transitions, so that you will have 1 yarn over, the double decrease with marker in the middle stitch, 1 yarn over; this means there will be one hole (yarn over) on body and on sleeve. Happy knitting!
07.04.2021 - 14:26
![]() Nova ha scritto:
Nova ha scritto:
After attaching the sleeves for size L and beginning middle back for the first round, it says to start on the same row for the sleeve as for the body. Does this mean if I’m on row 4 on the body (A1) that I start on row 4 for the sleeves (A3)? Also A1 the arrow designates the middle of the sleeve but the graph starts with A4 which is 3 stitches and A3 is another 3 sts total 6 sts wouldn't the middle be half of 68 sts which is 34 sts?
06.04.2021 - 14:03DROPS Design ha risposto:
Dear Nova, you should finish the sleeves 8adjust its length) so you will end up in the same row if the pattern as on the body, so you can continue the pattern without disrupting it. The arrow should match the middle of the sleeves, the upper middle line, put the stitch marked there, and count outwards to find out where you should start. Happy Knitting!
06.04.2021 - 14:26
![]() Nova ha scritto:
Nova ha scritto:
This is becoming a real challenge but I’m not going to give up! I am attaching the sleeves to the body but notice you don’t mention double pointed needles in your materials needed for this project. How are you supposed to knit these sleeves together with the body without them? It won’t work.
25.03.2021 - 01:52DROPS Design ha risposto:
Dear Nova, when you have knitted the sleeves, you put all the stitches on one curcular needle, (back, sleeve, fron, sleeve), and knot the circular needle on the round. You don't knit "together" as a three needle bind off, but along with the body, in one big circle, that is getting decreased as you get to the neckline. Happy Knitting!
25.03.2021 - 02:26
![]() Nova ha scritto:
Nova ha scritto:
Hi again. I’m up to the yoke and I’m really confused about this section of the pattern. The fact that there are 3 graphs to be worked is a challenge in itself. The confusion is in the A4 graph between the body and the sleeves, does this have to do with the shaping of the raglan?
09.03.2021 - 13:31DROPS Design ha risposto:
Dear Nova, pattern A.4 is between each body and sleeve, right at the raglan line. Shaping happens before and after this pattern. Happy Knitting!
09.03.2021 - 13:57
![]() Nova ha scritto:
Nova ha scritto:
When you get to the side where the first increases have been worked you have two extra stitches so to keep the eyelet pattern uniform, the space between the next eyelet is 9 stitches and that throws the whole eyelet pattern out. I don’t know how you can keep the eyelet pattern 7 stitches between with these increases on the side. The new repeat would make more sense at the beginning of the round.
26.02.2021 - 23:15DROPS Design ha risposto:
See answer below - if you can't work a part of decrease (K2 tog, YO), over the new stitches, just work these stitches in stocking stitch without the lace pattern. You shoulud have the correct number of sts between each eyelet in width. Hope this will help. Happy knitting!
01.03.2021 - 08:00
![]() Nova ha scritto:
Nova ha scritto:
The beginning of the round the increases can be worked out but it’s the increases halfway on the side marker those stitches throw the whole eyelet pattern out. You can’t do 7 stitches between the pattern it doesn’t work out I’ve tried it
26.02.2021 - 22:52DROPS Design ha risposto:
Dear Nova, if you don't have enough stitches to work the whole lace pattern on the side, this means there are not enough stitches yet, just work these stitches in stocking stitch. Work the lace pattern over the new stitches only if you have enough stitches to work them. This means each lace pattern should be worked with 7 knit stitches in between. Happy knitting!
01.03.2021 - 07:58
![]() Nova ha scritto:
Nova ha scritto:
Are you saying to read the graph from left to right and then right to left alternately and the added stitches will work out with the eyelet pattern?
26.02.2021 - 16:33DROPS Design ha risposto:
Hi Nova, when working in the round all rounds are worked from the right side, and the diagram is read solely from right to left. When starting a new round, simply start working the first symbol on the next row in diagram. Happy knitting!
28.02.2021 - 21:14
![]() Nova ha scritto:
Nova ha scritto:
For example on the 3rd round after the first increases there are 4 stitches left at the end of the round and I’m not sure whether to knit those stitches as normal or do the pattern.
26.02.2021 - 15:19DROPS Design ha risposto:
Dear Nova, see previous answer, make always sure that the eyelet pattern fit in height, it shouldn't be displaced. Happy knitting!
26.02.2021 - 16:17
![]() Nova ha scritto:
Nova ha scritto:
When doing the body and the A3 and making the increases on either side of the markers I notice that those extra stitches will throw the alternate pattern out where the holes should be. Is that how it’s supposed to be?
26.02.2021 - 15:08DROPS Design ha risposto:
Dear Nova, the increased stitches should be worked in A.3, this means at the beg of A.3 work the new stitches as a new repeat reading diagram from the left towards the right (= there should be always 7 sts before the next K2 tog, YO in the lace pattern. And at the end of A.3, work the new stitches as a new repeat of A.3 (reading from the right towards the left). Hope this will help. Happy knitting!
26.02.2021 - 16:16
|
||||||||||||||||||||||||||||
White Romance#whiteromancetop |
||||||||||||||||||||||||||||
 |
 |
|||||||||||||||||||||||||||
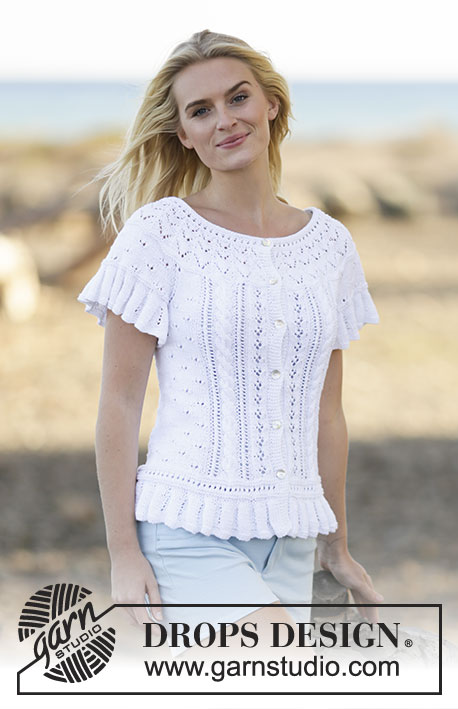
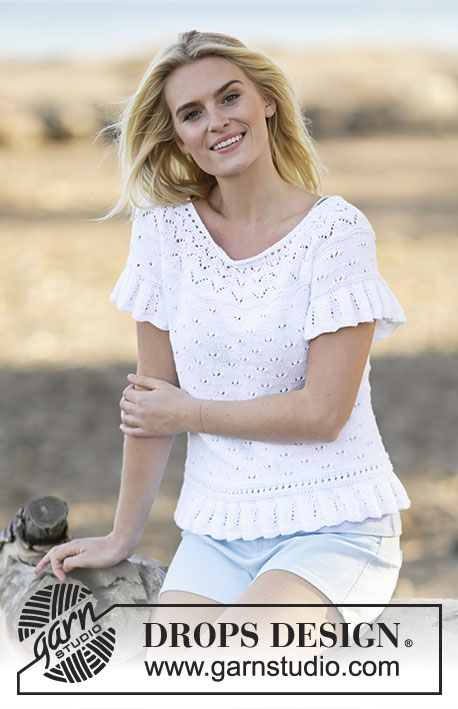
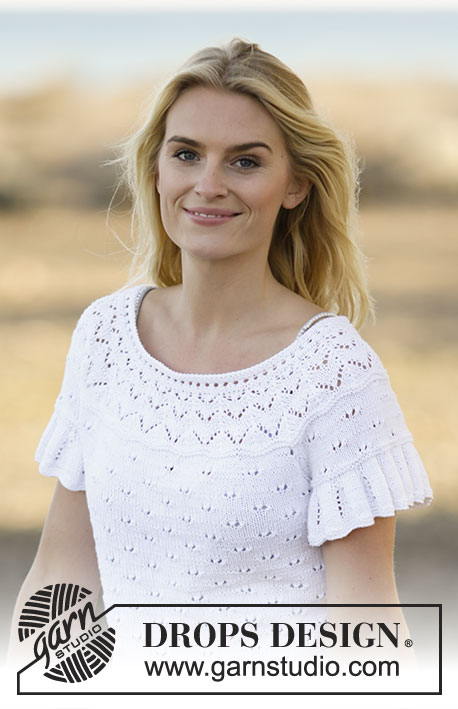
Top DROPS ai ferri, con motivo traforato, maniche corte e sprone rotondo, in "Safran". Taglie: Dalla S alla XXXL.
DROPS 159-12 |
||||||||||||||||||||||||||||
|
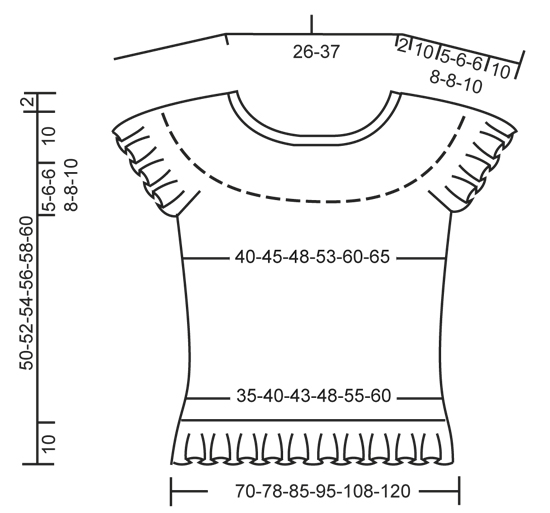
PUNTO LEGACCIO (in tondo, sui ferri circolari): Lavorare * 1 giro a dir, 1 giro a rov *, ripetere da *-*. 1 “costa” a legaccio = 2 giri. MOTIVO: Vedere i diagrammi da A.1 a A.7. I diagrammi mostrano tutte le righe del motivo, viste sul diritto del lavoro. SUGGERIMENTO PER GLI AUMENTI: Per aumentare 1 m fare 1 m gettata; nel corso del giro successivo, lavorare la m gettata ritorta per evitare che si formi un buco. Lavorare le m aumentate a maglia rasata. RAGLAN: Diminuire per il raglan da ciascun lato del diagramma A.4, ad ogni passaggio tra il davanti / dietro e le maniche. Diminuire come segue, dopo il diagramma A.4: Passare 1 m a dir senza lavorarla, 1 m a dir, accavallare la m passata sulla m lavorata. Diminuire come segue quando rimangono 2 m prima del diagramma A.4: lavorare 2 m insieme a dir. ---------------------------------------------------------- DAVANTI E DIETRO: Si lavorano in tondo sui ferri circolari. Avviare 336-372-408-456-516-576 m sui ferri circolari n° 2,5 con il filato Safran. Lavorare 2 COSTE A LEGACCIO - vedere le spiegazioni sopra. Passare ai ferri circolari n° 3 e lavorare il motivo seguendo il diagramma A.1. Dopo aver lavorato il diagramma A.1 1 volta in verticale, sui ferri ci sono 168-186-204-228-258-288 m. Proseguire seguendo il diagramma A.2. Dopo aver completato il diagramma A.2, lavorare 2 giri a dir e, ALLO STESSO TEMPO, aumentare 0-6-0-0-6-0 m in modo uniforme durante l’ultimo giro = 168-192-204-228-264-288 m. Inserire 1 segno all’inizio del giro e 1 segno dopo 84-96-102-114-132-144 m (= lati). Proseguire seguendo il diagramma A.3. RICORDARSI LA TENSIONE DEL LAVORO! ALLO STESSO TEMPO, quando il lavoro misura 12 cm, aumentare 1 m da ciascun lato di ognuno dei due segni - VEDERE IL SUGGERIMENTO PER GLI AUMENTI (= 4 m aumentate). Ripetere questi aumenti da ciascun lato ogni 4-4-4-5-5-5 cm per un totale di 6 volte = 192-216-228-252-288-312 m - ATTENZIONE: Lavorare le m aumentate a maglia rasata. Proseguire finché il lavoro non misura 35-36-38-38-40-40 cm. Lavorare ora il giro successivo, come segue: Intrecciare 5-5-5-6-6-6 m per lo scalfo, lavorare 86-98-104-114-132-144 m (= davanti), intrecciare 10-10-10-12-12-12 m per lo scalfo (intrecciare quindi le 5-5-5-6-6-6 m che precedono e le 5-5-5-6-6-6 m che seguono il segno), lavorare 86-98-104-114-132-144 m (= dietro) e intrecciare le rimanenti 5-5-5-6-6-6 m. Lasciare il lavoro in sospeso e proseguire con le maniche. MANICHE: Si lavorano in tondo sui ferri circolari. Avviare 144-156-156-168-168-180 m sui ferri circolari n° 2,5 con il filato Safran. Lavorare 2 COSTE A LEGACCIO - vedere le spiegazioni sopra. Passare ai ferri circolari n° 3 e lavorare seguendo il diagramma A.1. Dopo aver lavorato il diagramma A.1, sui ferri ci sono 72-78-78-84-84-90 m. Lavorare 2 coste a legaccio; ALLO STESSO TEMPO, nel corso dell’ultimo giro, intrecciare le 10-10-10-12-12-12 m al centro, sotto la manica = sui ferri rimangono 62-68-68-72-72-78 m. Lasciare il lavoro in sospeso e proseguire con la seconda manica. SPRONE: Trasferire (senza lavorarle) le m delle maniche sullo stesso ferro circolare usato per lavorare il dietro e il davanti, nel punto in cui sono state intrecciate le m per gli scalfi = 296-332-344-372-408-444 m. ALLO STESSO TEMPO, inserire un segno nella prima m e un segno nell’ultima m di ognuna delle 2 maniche (= 4 segni). Iniziare al centro, sul dietro e proseguire con il motivo come prima sul davanti e sul dietro; ALLO STESSO TEMPO, lavorare il diagramma A.3 sulle maniche (la freccia nel diagramma deve coincidere con il centro della manica, iniziare dalla stessa riga del diagramma del davanti e dietro). Inoltre, lavorare il diagramma A.4 ad ogni passaggio tra il davanti / dietro e le maniche (la freccia nel diagramma deve coincidere con la m con il segno). Dopo aver lavorato 2 giri in tondo su tutte le m, iniziare a diminuire per il RAGLAN - vedere le spiegazioni sopra (= 8 m diminuite). Ripetere queste diminuzioni ogni 4 giri 4-5-5-7-7-8 volte in tutto = 264-292-304-316-352-380 m. Lavorare 2 coste a legaccio su tutte le m e, ALLO STESSO TEMPO, nel corso del primo giro, diminuire 4-12-4-6-12-10 m in modo uniforme = 260-280-300-310-340-370 m. Lavorare 2 giri a dir. Iniziare ora a diminuire per lo sprone rotondo e lavorare il motivo in tondo seguendo il diagramma A.5 (= 26-28-30-31-34-37 ripetizioni del diagramma sul giro – ATTENZIONE: Passare ai ferri circolari più corti quando necessario). Dopo aver lavorato il diagramma A.5 1 volta in verticale, lavorare il diagramma A.6 al posto del diagramma A.5. Dopo aver lavorato il diagramma A.6 1 volta in verticale, sui ferri ci sono 156-168-180-186-204-222 m. Lavorare ora il diagramma A.7 al posto del diagramma A.6. Dopo aver lavorato il diagramma A.7 1 volta in verticale, lavorare un’alzata per il collo, sul dietro. Inserire 1 segno al centro, sul davanti. Iniziare al centro, sul dietro e lavorare a dir finché non rimangono 14-14-16-16-18-20 m prima del segno. Girare, lavorare il ferro di ritorno a dir finché non rimangono 14-14-16-16-18-20 m prima del segno dall’altra parte. Girare, lavorare a dir finché non rimangono 30-30-34-34-38-42 m prima del segno. Girare, lavorare il ferro di ritorno a dir finché non rimangono 30-30-34-34-38-42 m prima del segno dall’altra parte. Girare, lavorare a dir finché non rimangono 46-46-52-52-58-64 m prima del segno. Girare, lavorare il ferro di ritorno a dir finché non rimangono 46-46-52-52-58-64 m prima del segno dall’altra parte. Girare, lavorare a dir finché non rimangono 62-62-70-70-76-86 m prima del segno. Girare, lavorare il ferro di ritorno a dir finché non rimangono 62-62-70-70-76-86 m prima del segno dall’altra parte. Girare e lavorare a dir fino all’ inizio del giro. COLLO: Passare ai ferri circolari n° 2,5 e lavorare in tondo su tutte le m seguendo il diagramma A.2. ALLO STESSO TEMPO, nel corso del 1° giro, diminuire 22-24-24-26-30-32 m in modo uniforme = 134-144-156-160-174-190 m. Dopo aver completato il diagramma A.2, intrecciare le m senza stringere troppo il filo lavorando a dir sul diritto del lavoro. Il top misura ca.52-54-56-58-60-62 cm dalla spalla fino al bordo inferiore. CONFEZIONE: Cucire le aperture sotto le maniche. |
||||||||||||||||||||||||||||
Spiegazioni del diagramma |
||||||||||||||||||||||||||||
|
||||||||||||||||||||||||||||
 |
||||||||||||||||||||||||||||
 |
||||||||||||||||||||||||||||
 |
||||||||||||||||||||||||||||
Avete terminato questo modello?Allora taggate le vostre foto con #dropspattern #whiteromancetop o inviatele alla #dropsfan gallery. Avete bisogno di aiuto con questo modello?Troverete 30 video tutorial, una sezione per i commenti/domande e molto altro guardando il modello su www.garnstudio.com © 1982-2026 DROPS Design A/S. Ci riserviamo tutti i diritti. Questo documento, compreso tutte le sue sotto-sezioni, è protetto dalle leggi sul copyright. Potete leggere quello che potete fare con i nostri modelli alla fine di ogni modello sul nostro sito. |
||||||||||||||||||||||||||||


Con oltre 40 anni di esperienza nel design di modelli di maglia e uncinetto, DROPS Design offre la più estesa collezione di modelli gratuiti su internet - tradotti in 17 lingue. Ad oggi vi possiamo fornire 324 cataloghi e 12290 modelli - 9561 dei quali sono tradotti in Italiano.
Ci stiamo impegnando molto per darvi il meglio che vi possiamo offrire in termini di maglia e uncinetto, ispirazioni e consigli così come filati di grande qualità ad un prezzo incredibile! Volete utilizzare i nostri modelli per qualcosa d'altro oltre al vostro uso personale? Potete leggere tutto ciò che è consentito nel testo sul Copyright in basso su tutte le pagine dei nostri modelli. Buon lavoro!
Lasciare un commento sul modello DROPS 159-12
Noi saremmo felici di ricevere i tuoi commenti e opinioni su questo modello!
Se vuoi fare una domanda, fai per favore attenzione a selezionare la categoria corretta nella casella qui sotto per velocizzare il processo di risposta. I campi richiesti sono indicati da *.