
Categorie popolari
State cercando un filato?


Commenti / Domande (186)
![]() Marie ha scritto:
Marie ha scritto:
Liebes Drops-Team, wie rechne ich die Maschenzahl auf Kindergrößen runter, hier 152 bzw. 164. Vielen Dank im Voraus für eure Hilfe, Marie
12.01.2020 - 12:53DROPS Design ha risposto:
Liebe Marie, leider können wir jeder Anleitung nach jedem individuellen Frage anpassen und einzelne Modelle auf individuellen Wunsch hin umrechnen. Wenn sie Hilfe damit brauchen, wenden Sie sich bitte an dem Laden wo Sie die Wolle gekauft haben, dort hilft man Ihnen gerne weiter. Viel Spaß beim häkeln!
13.01.2020 - 09:52
![]() Valerie Smith ha scritto:
Valerie Smith ha scritto:
Can i use crochet thread size 3 or 10 in this pattern
04.09.2019 - 13:14DROPS Design ha risposto:
Dear Mrs Smith, please find more informations about the yarn used under its shadecard. Happy crocheting!
04.09.2019 - 13:59
![]() Annikki Nilsson ha scritto:
Annikki Nilsson ha scritto:
Hej jag har problem med avmaskning för halsen på framstycket. Behöver en utförligare beskrivning. Tack på förhand. Annikki Nilsson
23.08.2019 - 09:46DROPS Design ha risposto:
Hej Annikki, du virkar första halva delen av maskorna på framstycket (31-34-37-37-40-46st) och virkar ihop nästa 3 st - se 3 ST TILLS - överst i mönstret. Vänd arbetet och sticka tillbaka, nu minskar du såhär värje gång du virkar sista 3 maskorna mot mitt fram. Lycka till!
10.09.2019 - 14:57
![]() Nicky ha scritto:
Nicky ha scritto:
Hartelijk dank! Het is een haakpatroon, lijkt me niet dat ik een stokje kan breien 😊 Dank voor de hulp!
24.07.2019 - 16:25
![]() Nicky ha scritto:
Nicky ha scritto:
Klopt het dat bij het meerderen van de mouw het patroon niet meer goed doorloopt aan de zijkant? Ik vind het heel ingewikkeld om het patroon aan te houden met de meerderingen aan de zijkant
19.07.2019 - 09:26DROPS Design ha risposto:
Dag Nicky,
Het klopt dat het patroon bij het meerderen verbroken wordt, omdat je telkens 1 steek meerdert. Pas als er 4 steken gemeerderd zijn kun je weer een patroonherhaling breien. Tot die tijd kun je de gemeerderde steken als een extra stokje breien. Hopelijk helpt dit je.
23.07.2019 - 11:43
![]() Nicky ha scritto:
Nicky ha scritto:
Ik zie staan patroon mouw: Gebreid, moet zijn gehaakt? A.x. moet zijn A.2.?
26.06.2019 - 10:10DROPS Design ha risposto:
Dag Nicky,
Je hebt gelijk, er stond inderdaad nog een foutje in. Ik heb het nu aangepast naar 'gehaakt'. Dankjewel voor het doorgeven en veel haakplezier!
27.06.2019 - 12:35
![]() Nicky ha scritto:
Nicky ha scritto:
Haak 1 stk in elk van de eerste 1-1-3-3-1-1 stk, A.2 tot er 1-1-3-3-1-1 stk over zijn, (= 6-6-6-6-7-7 keer in de breedte), 1 stk in elke van de laatste 1-1-3-3-1-1 stk. Als A.2 een keer in de hoogte is gebreid, herhaal dan A.x tot het werk klaar is. Meerder bij een hoogte van 8-8-8-10-10-10 cm 1 stk door 2 stk te haken in eerste en laatste stk op de toer (= 2 stk gemeerderd). gebreid = gehaakt A x. = A.2. ???
26.06.2019 - 10:07
![]() Cindy Arnold ha scritto:
Cindy Arnold ha scritto:
Do you have a knitted pattern for a pullover similar to this?
31.05.2019 - 01:51DROPS Design ha risposto:
Dear Mrs Arnold, please find all our jumpers with lace pattern here. Happy knitting!
31.05.2019 - 09:59
![]() Gerd ha scritto:
Gerd ha scritto:
Hei. Er overvidden på denne genseren f.eks i str.xxxl 61cm × 2 ?
09.05.2019 - 18:43DROPS Design ha risposto:
Hei Gerd. Det nederste målet på målskisen er overvidden, altså i XXXL er denne 76 x 2 (rundt hele). Målet på toppen er fra skulder til skulder, der ermene er sydd fast i bolen. God fornøyelse
10.05.2019 - 07:39
![]() Margreet ha scritto:
Margreet ha scritto:
Dank je wel voor de uitleg, ik ga het uitproberen. als het niet lukt kom ik er op terug. groetjes Margreet
10.04.2019 - 16:36
|
|||||||||||||
Just Me#justmesweater |
|||||||||||||
 |
 |
||||||||||||
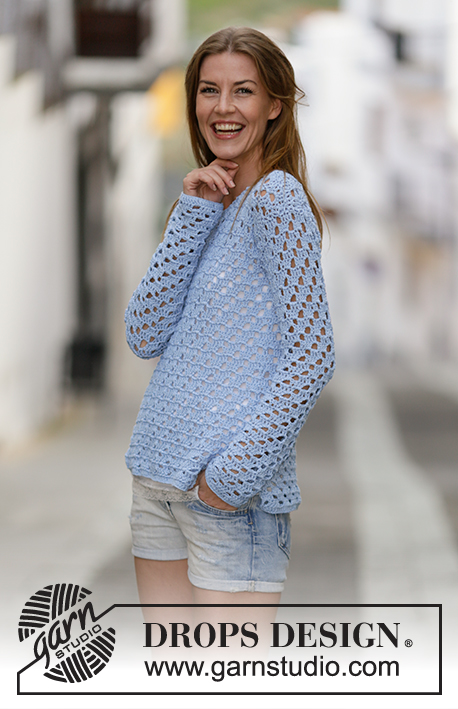
Maglione DROPS lavorato all’uncinetto con motivo traforato in ”Cotton Light”. Taglie: S - XXXL.
DROPS 162-3 |
|||||||||||||
|
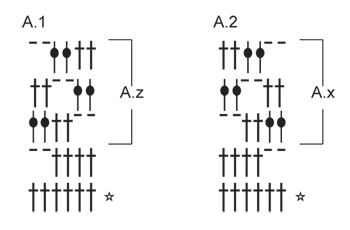
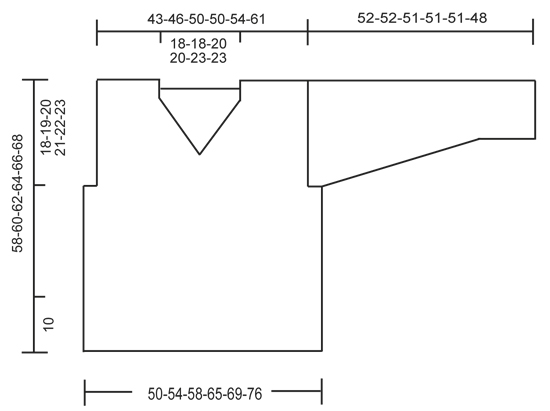
MOTIVO: Vedere i diagrammi A.1-A.2. INFORMAZIONI PER IL LAVORO: Sostituire la 1° m.a all’inizio di ogni riga a m.a con 3 cat. 3 MAGLIE ALTE INSIEME: Lavorare 3 m.a in 1 m.a come segue: * lavorare 1 m.a ma aspettare con l’ultimo passaggio (= 2 capi sull’uncinetto) *, ripetere *-* un’altra volta, poi lavorare la m.a successiva ma sull’ultimo passaggio, far passare il filo attraverso tutte le m sull’uncinetto. ---------------------------------------------------------- DIETRO: Lavorare avanti e indietro. Avviare 94-101-108-122-129-143 cat con l’uncinetto n° 4,5 mm con Cotton Light. Lavorare 1 m.a nella 4° cat dall’uncinetto (= 2 m.a), 1 m.a in ognuna delle 5 cat successive, * 1 m.a in ognuna delle 6 cat successive, saltare 1 cat *, ripetere *-* fino a quando rimane 1 cat, 1 m.a nell’ultima cat = 80-86-92-104-110-122 m.a. Poi lavorare come segue: 3 cat – LEGGERE LE INFORMAZIONI PER IL LAVORO, saltare 1 m.a (sostituita da 3 cat), A.1 (= 6 m) 13-14-15-17-18-20 volte in totale, finire con 1 m.a nell’ultima m.a. Continuare il motivo in questo modo. I buchini in A.1 vanno in diagonale verso le 2 m a sinistra su ogni riga (visto dal diritto del lavoro) fino a quando il buco incontra la m.a sul lato sinistro del lavoro. FARE ATTENZIONE ALLA TENSIONE DEL LAVORO! Quando A.1 è stato lavorato 1 volta in verticale, ripetere A.z fino alla fine del lavoro. Chiudere e affrancare quando il lavoro misura 40-41-42-43-44-45 cm. Ora lavorare il motivo come prima sulle 68-74-80-80-86-98 m centrali (= 6-6-6-12-12-12 m a ogni lato per lo scalfo). Quando il lavoro misura 54-56-58-60-62-64 cm, aggiustarlo in modo che la riga successiva sia dal diritto del lavoro. Lavorare sulle prime 20-23-24-24-24-31 m (= spalla) come segue: lavorare 1 m.a in ogni m.a e 2 m.a in ogni spazio di cat = 20-23-24-24-24-31 m.a. Lavorare 2 righe con 1 m.a in ogni m.a. Chiudere e affrancare. Fare lo stesso sull’altra spalla. DAVANTI: Lavorare come per il dietro ma lavorare A.2 invece di A.1, cioè i buchini vanno in diagonale verso destra (visto dal diritto del lavoro). Ripetere A.x fino alla fine del lavoro. Quando il lavoro misura 45-47-48-50-51-53 cm, aggiustarlo dopo un’intera ripetizione di A.x diminuire per il collo (la riga successiva è dal rovescio del lavoro) come segue: lavorare come prima sulle prime 31-34-37-37-40-46 m.a, lavorare 3 M.A INSIEME – leggere la spiegazione sopra. Girare il lavoro. Ripetere questa diminuzione su ogni riga verso il centro davanti 7-7-8-8-9-9 volte in totale = 20-23-24-24-25-31 m rimaste per la spalla. Poi lavorare 1 riga con 1 m.a in ogni m.a e 2 m.a in ogni spazio di cat. Lavorare 2 righe con 1 m.a in ogni m.a. Chiudere e affrancare. Fare lo stesso sull’altra spalla. MANICA: Lavorare avanti e indietro. Avviare 45-45-49-49-52-52 cat con l’uncinetto n° 4,5 mm con Cotton Light. Lavorare 1 m.a nella 4° cat dall’uncinetto (= 2 m.a), 1 m.a in ognuna delle 5-5-7-7-5-5 cat successive, * 1 m.a in ognuna delle 6 cat successive, saltare 1 cat *, ripetere *-* fino a quando rimangono 1-1-3-3-1-1 cat, 1 m.a nelle ultime 1-1-3-3-1-1 cat = 38-38-42-42-44-44 m.a. Lavorare 1 m.a in ognuna delle prime 1-1-3-3-1-1 m.a, A.2 fino a quando rimangono 1-1-3-3-1-1 m.a, (= 6-6-6-6-7-7 volte in larghezza), 1 m.a in ognuna delle ultime 1-1-3-3-1-1 m.a. Quando A.2 è stato lavorato 1 volta in verticale, ripetere A.x fino alla fine del lavoro. Quando il lavoro misura 8-8-8-10-10-10 cm, aumentare 1 m.a lavorando 2 m.a nella 1° e nell’ultima m.a sulla riga (= 2 m.a aumentate). Ripetere gli aumenti ogni 4½-4-4-3-3-2½ cm altre 9-10-10-12-12-14 volte = 58-60-64-68-70-74 m. Incorporare le m aumentate nel motivo. NOTA: C’è sempre 1 m.a (o 3 cat = 1 m.a) a ogni lato del lavoro. Chiudere e affrancare quando il lavoro misura 52-52-51-51-51-48 cm (misure più corte nelle taglie più grandi a causa della maggiore ampiezza delle spalle). Lavorare un’altra manica nello stesso modo. CONFEZIONE: Unire le spalle dal rovescio del lavoro come segue attraverso entrambi gli strati: 1 m.b nella 1° m.a, * 1 cat, saltare 1 m.a, 1 m.b nella m.a successiva *, ripetere *-*. Attaccare le maniche. Unire il sottobraccio e i lati dal rovescio del lavoro come segue attraverso entrambi gli strati: * 1 m.b nel filo più esterno, 3 cat, saltare 1 riga *, ripetere *-* fino a quando rimangono circa 10 cm sul corpo per lo spacco a ogni lato. Chiudere e affrancare. BORDO DEL COLLO: Lavorare un bordo attorno al collo come segue dal centro sulla cima della spalla: 1 m.b, * 3 cat, saltare circa 1 cm, 1 m.b *, ripetere *-* attorno a tutto il collo e finie con 1 m.bss nella 1° m.b sul giro. Chiudere e affrancare. |
|||||||||||||
Spiegazioni del diagramma |
|||||||||||||
|
|||||||||||||
 |
|||||||||||||
 |
|||||||||||||
Avete terminato questo modello?Allora taggate le vostre foto con #dropspattern #justmesweater o inviatele alla #dropsfan gallery. Avete bisogno di aiuto con questo modello?Troverete 5 video tutorial, una sezione per i commenti/domande e molto altro guardando il modello su www.garnstudio.com © 1982-2026 DROPS Design A/S. Ci riserviamo tutti i diritti. Questo documento, compreso tutte le sue sotto-sezioni, è protetto dalle leggi sul copyright. Potete leggere quello che potete fare con i nostri modelli alla fine di ogni modello sul nostro sito. |
|||||||||||||


Con oltre 40 anni di esperienza nel design di modelli di maglia e uncinetto, DROPS Design offre la più estesa collezione di modelli gratuiti su internet - tradotti in 17 lingue. Ad oggi vi possiamo fornire 324 cataloghi e 12290 modelli - 9561 dei quali sono tradotti in Italiano.
Ci stiamo impegnando molto per darvi il meglio che vi possiamo offrire in termini di maglia e uncinetto, ispirazioni e consigli così come filati di grande qualità ad un prezzo incredibile! Volete utilizzare i nostri modelli per qualcosa d'altro oltre al vostro uso personale? Potete leggere tutto ciò che è consentito nel testo sul Copyright in basso su tutte le pagine dei nostri modelli. Buon lavoro!
Lasciare un commento sul modello DROPS 162-3
Noi saremmo felici di ricevere i tuoi commenti e opinioni su questo modello!
Se vuoi fare una domanda, fai per favore attenzione a selezionare la categoria corretta nella casella qui sotto per velocizzare il processo di risposta. I campi richiesti sono indicati da *.