
Categorie popolari
State cercando un filato?


Commenti / Domande (186)
Tiggy ha scritto:
Hi, I'm really confused about the neckline. I'm working in size L. Surely if I start the neckline on the WS and do 37 dc plus my 3dc tog, then I will always be doing my 3 doc tog at the end of row the WS and the start of the row on the RS, and not the other way round as it suggests on the pattern? Or am I missing something? Thanks
12.05.2015 - 16:32DROPS Design ha risposto:
Dear Tiggy, decrease have to be done towards mid front (neck) every row. Happy crocheting!
18.05.2015 - 10:50
![]() Benedetta ha scritto:
Benedetta ha scritto:
Buongiorno, sono bloccata all"ultino giro del grafico A1 in specifico all'ultimo giro di AZ.Premetto che non sono molto brava con l'uncinetto ma non riesco a capire come finire il giro dopo le due catenelle finali perché mu rimango o , dal giro precedente,2 m.alte.Quindi dopo le 2 catenelle come posso finire il giro? Grazie!
12.05.2015 - 11:30DROPS Design ha risposto:
Buongiorno Benedetta, A.1 viene lavorato su 6 m e ripetuto più volte con 1 m.a prima e dopo tutte le ripetizioni di A.1: le 2 cat dell'ultimo giro di A.z sono lavorate sulle 2 m.a del giro precedente. Ci riscriva se non è chiaro. Buon lavoro!!
12.05.2015 - 11:47
![]() Ilona ha scritto:
Ilona ha scritto:
Dobry den,chtela jsem zacit tento krasny svetrik,ale zasekla jsem se hned na prvni rade,nejak nevim co v textu znamenaji ty hvezdicky. Dekuji za vysvetleni
09.05.2015 - 16:37DROPS Design ha risposto:
Dobrý den, hvězdičky v textu vymezují sekvenci, úsek, který se má stále opakovat (většinou v rámci celé řady, resp. kruhové řady). Hodně zdaru! Hana
11.05.2015 - 01:17
![]() Dione ha scritto:
Dione ha scritto:
Hi, I think you made a mistake on the pattern and on the answer you gave me... For size L the total is 92 sts (15 repeats + 2 DC), so I think for the neckline I'll need to work over the 1st 7 repeats plus the 3DC TOG..... Is this correct?!
05.05.2015 - 20:37DROPS Design ha risposto:
Dear Dione, you are correct, you have 15 repeats + 2 dc before shaping armholes, but after armholes (as on back piece), you get 80 sts, ie 13 repeats + 2 dc. Happy crocheting!
06.05.2015 - 09:26
![]() Irene ha scritto:
Irene ha scritto:
Hola de nuevo. Estoy estudiando el patrón y me surgen nuevas dudas. Una de ellas es qué significa "punto alto en arco". No consigo encontrar por ninguna parte una explicación de este tipo de punto. Muchas gracias. Saludos.
03.05.2015 - 16:18DROPS Design ha risposto:
Hola Irene, p.a. en arco = se trabaja 1 p.a. dentro (alrededor) del bucle de 2 p.de cad de la fila anterior.
04.05.2015 - 10:18
![]() Diond ha scritto:
Diond ha scritto:
..and also, if my 1st question is correct, I work the 1st 37DC and leave 25 unworked DC, how do I do the second part of the neck?! Once again, thank you so much!!
02.05.2015 - 23:59DROPS Design ha risposto:
Dear Mrs Diond, when crocheting the 2nd part of the neck start on the next 3 dc in middle repeat and work as 1st but reversed, ie start with 3 dc tog, then 6 repeat + 1 dc. Happy crocheting!
04.05.2015 - 09:55
![]() Dione ha scritto:
Dione ha scritto:
Hi, I need help with the decreases...I'm making a size large so I have 62DC total....if I work the 1st 37DC it only remais 25DC.....is this correct? what am I missing here?! Thank you so much for your attention
02.05.2015 - 23:29DROPS Design ha risposto:
Dear Dione, in size L you should get 80 sts, ie 13 times A.2 (= 6 sts) + 1 dc each side. For neckline work over the first 6 repeat (36 sts + 1st dc), then work the first 3 dc of next repeat tog (= 38 sts). Continue working 3 dc tog towards neckline 7 more times: 38 sts - 14 (2 dc dec x 7 times) = 24 sts. Happy crocheting!
04.05.2015 - 09:00
![]() Irene ha scritto:
Irene ha scritto:
Hola. He comprado Drops París para hacer este jersey y ahora no estoy segura de sí me servirá. ¿Podré usar esta lana con la aguja de 4.5? Muchas gracias
26.04.2015 - 21:44DROPS Design ha risposto:
Hola Irene, este modelo se trabaja con lana del grupo B. Paris es del grupo C (mas gruesa) Para trabajar con esta lana tendrías que hacer muchos ajustes. Prueba a hacer una muestra pero ten en cuenta para otra vez el apartado lanas alternativas en el patrón.
04.05.2015 - 09:15
![]() Sandra Pribik ha scritto:
Sandra Pribik ha scritto:
Bonjour, j'ai un soucis avec le col de se modèle, j'ai choisis la taille L (3ème chiffre) et quand je fais mes diminutions je n'arrive pas à les faire 8 fois, après les avoir fait 6 fois j'ai déjà les 24 m des épaules. Pouvez vous m'éclairer svp merci :)
25.04.2015 - 19:24DROPS Design ha risposto:
Bonjour Mme Pribik, en taille L, vous avez au 1er rang de l'encolure 37 B + 1 (3 B écoulées ens) = 38 B, vous diminuez encore 7 fois 2 B = 14 B, soit 38-14= 24 B. Bon crochet!
28.04.2015 - 09:25Alexandra ha scritto:
Hello again! Front piece, decrease for neck: if a work the first 31 tr and then 3tr tog means that i will have 32 tr when finish first row. Accordingly when finish second row i will have 30 tr and so on.. Is this correct??
23.04.2015 - 08:21DROPS Design ha risposto:
Dear Alexandra, you decrease with 3 dc tog tog every row towards neck (from RS + from WS), on 2nd row, you will have 30 tr, then 28 tr, .. and 20 tr when all dec are done. Happy crocheting!
23.04.2015 - 10:00
|
|||||||||||||
Just Me#justmesweater |
|||||||||||||
 |
 |
||||||||||||
Maglione DROPS lavorato all’uncinetto con motivo traforato in ”Cotton Light”. Taglie: S - XXXL.
DROPS 162-3 |
|||||||||||||
|
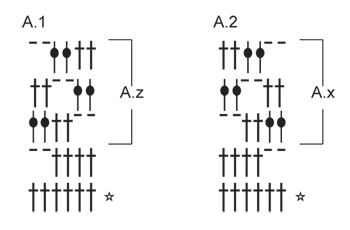
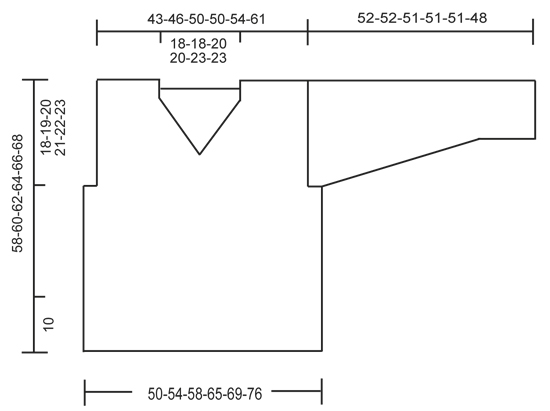
MOTIVO: Vedere i diagrammi A.1-A.2. INFORMAZIONI PER IL LAVORO: Sostituire la 1° m.a all’inizio di ogni riga a m.a con 3 cat. 3 MAGLIE ALTE INSIEME: Lavorare 3 m.a in 1 m.a come segue: * lavorare 1 m.a ma aspettare con l’ultimo passaggio (= 2 capi sull’uncinetto) *, ripetere *-* un’altra volta, poi lavorare la m.a successiva ma sull’ultimo passaggio, far passare il filo attraverso tutte le m sull’uncinetto. ---------------------------------------------------------- DIETRO: Lavorare avanti e indietro. Avviare 94-101-108-122-129-143 cat con l’uncinetto n° 4,5 mm con Cotton Light. Lavorare 1 m.a nella 4° cat dall’uncinetto (= 2 m.a), 1 m.a in ognuna delle 5 cat successive, * 1 m.a in ognuna delle 6 cat successive, saltare 1 cat *, ripetere *-* fino a quando rimane 1 cat, 1 m.a nell’ultima cat = 80-86-92-104-110-122 m.a. Poi lavorare come segue: 3 cat – LEGGERE LE INFORMAZIONI PER IL LAVORO, saltare 1 m.a (sostituita da 3 cat), A.1 (= 6 m) 13-14-15-17-18-20 volte in totale, finire con 1 m.a nell’ultima m.a. Continuare il motivo in questo modo. I buchini in A.1 vanno in diagonale verso le 2 m a sinistra su ogni riga (visto dal diritto del lavoro) fino a quando il buco incontra la m.a sul lato sinistro del lavoro. FARE ATTENZIONE ALLA TENSIONE DEL LAVORO! Quando A.1 è stato lavorato 1 volta in verticale, ripetere A.z fino alla fine del lavoro. Chiudere e affrancare quando il lavoro misura 40-41-42-43-44-45 cm. Ora lavorare il motivo come prima sulle 68-74-80-80-86-98 m centrali (= 6-6-6-12-12-12 m a ogni lato per lo scalfo). Quando il lavoro misura 54-56-58-60-62-64 cm, aggiustarlo in modo che la riga successiva sia dal diritto del lavoro. Lavorare sulle prime 20-23-24-24-24-31 m (= spalla) come segue: lavorare 1 m.a in ogni m.a e 2 m.a in ogni spazio di cat = 20-23-24-24-24-31 m.a. Lavorare 2 righe con 1 m.a in ogni m.a. Chiudere e affrancare. Fare lo stesso sull’altra spalla. DAVANTI: Lavorare come per il dietro ma lavorare A.2 invece di A.1, cioè i buchini vanno in diagonale verso destra (visto dal diritto del lavoro). Ripetere A.x fino alla fine del lavoro. Quando il lavoro misura 45-47-48-50-51-53 cm, aggiustarlo dopo un’intera ripetizione di A.x diminuire per il collo (la riga successiva è dal rovescio del lavoro) come segue: lavorare come prima sulle prime 31-34-37-37-40-46 m.a, lavorare 3 M.A INSIEME – leggere la spiegazione sopra. Girare il lavoro. Ripetere questa diminuzione su ogni riga verso il centro davanti 7-7-8-8-9-9 volte in totale = 20-23-24-24-25-31 m rimaste per la spalla. Poi lavorare 1 riga con 1 m.a in ogni m.a e 2 m.a in ogni spazio di cat. Lavorare 2 righe con 1 m.a in ogni m.a. Chiudere e affrancare. Fare lo stesso sull’altra spalla. MANICA: Lavorare avanti e indietro. Avviare 45-45-49-49-52-52 cat con l’uncinetto n° 4,5 mm con Cotton Light. Lavorare 1 m.a nella 4° cat dall’uncinetto (= 2 m.a), 1 m.a in ognuna delle 5-5-7-7-5-5 cat successive, * 1 m.a in ognuna delle 6 cat successive, saltare 1 cat *, ripetere *-* fino a quando rimangono 1-1-3-3-1-1 cat, 1 m.a nelle ultime 1-1-3-3-1-1 cat = 38-38-42-42-44-44 m.a. Lavorare 1 m.a in ognuna delle prime 1-1-3-3-1-1 m.a, A.2 fino a quando rimangono 1-1-3-3-1-1 m.a, (= 6-6-6-6-7-7 volte in larghezza), 1 m.a in ognuna delle ultime 1-1-3-3-1-1 m.a. Quando A.2 è stato lavorato 1 volta in verticale, ripetere A.x fino alla fine del lavoro. Quando il lavoro misura 8-8-8-10-10-10 cm, aumentare 1 m.a lavorando 2 m.a nella 1° e nell’ultima m.a sulla riga (= 2 m.a aumentate). Ripetere gli aumenti ogni 4½-4-4-3-3-2½ cm altre 9-10-10-12-12-14 volte = 58-60-64-68-70-74 m. Incorporare le m aumentate nel motivo. NOTA: C’è sempre 1 m.a (o 3 cat = 1 m.a) a ogni lato del lavoro. Chiudere e affrancare quando il lavoro misura 52-52-51-51-51-48 cm (misure più corte nelle taglie più grandi a causa della maggiore ampiezza delle spalle). Lavorare un’altra manica nello stesso modo. CONFEZIONE: Unire le spalle dal rovescio del lavoro come segue attraverso entrambi gli strati: 1 m.b nella 1° m.a, * 1 cat, saltare 1 m.a, 1 m.b nella m.a successiva *, ripetere *-*. Attaccare le maniche. Unire il sottobraccio e i lati dal rovescio del lavoro come segue attraverso entrambi gli strati: * 1 m.b nel filo più esterno, 3 cat, saltare 1 riga *, ripetere *-* fino a quando rimangono circa 10 cm sul corpo per lo spacco a ogni lato. Chiudere e affrancare. BORDO DEL COLLO: Lavorare un bordo attorno al collo come segue dal centro sulla cima della spalla: 1 m.b, * 3 cat, saltare circa 1 cm, 1 m.b *, ripetere *-* attorno a tutto il collo e finie con 1 m.bss nella 1° m.b sul giro. Chiudere e affrancare. |
|||||||||||||
Spiegazioni del diagramma |
|||||||||||||
|
|||||||||||||
 |
|||||||||||||
 |
|||||||||||||
Avete terminato questo modello?Allora taggate le vostre foto con #dropspattern #justmesweater o inviatele alla #dropsfan gallery. Avete bisogno di aiuto con questo modello?Troverete 5 video tutorial, una sezione per i commenti/domande e molto altro guardando il modello su www.garnstudio.com © 1982-2026 DROPS Design A/S. Ci riserviamo tutti i diritti. Questo documento, compreso tutte le sue sotto-sezioni, è protetto dalle leggi sul copyright. Potete leggere quello che potete fare con i nostri modelli alla fine di ogni modello sul nostro sito. |
|||||||||||||


Con oltre 40 anni di esperienza nel design di modelli di maglia e uncinetto, DROPS Design offre la più estesa collezione di modelli gratuiti su internet - tradotti in 17 lingue. Ad oggi vi possiamo fornire 324 cataloghi e 12290 modelli - 9561 dei quali sono tradotti in Italiano.
Ci stiamo impegnando molto per darvi il meglio che vi possiamo offrire in termini di maglia e uncinetto, ispirazioni e consigli così come filati di grande qualità ad un prezzo incredibile! Volete utilizzare i nostri modelli per qualcosa d'altro oltre al vostro uso personale? Potete leggere tutto ciò che è consentito nel testo sul Copyright in basso su tutte le pagine dei nostri modelli. Buon lavoro!
Lasciare un commento sul modello DROPS 162-3
Noi saremmo felici di ricevere i tuoi commenti e opinioni su questo modello!
Se vuoi fare una domanda, fai per favore attenzione a selezionare la categoria corretta nella casella qui sotto per velocizzare il processo di risposta. I campi richiesti sono indicati da *.