
Categorie popolari
State cercando un filato?


Commenti / Domande (27)
Linda Weiss ha scritto:
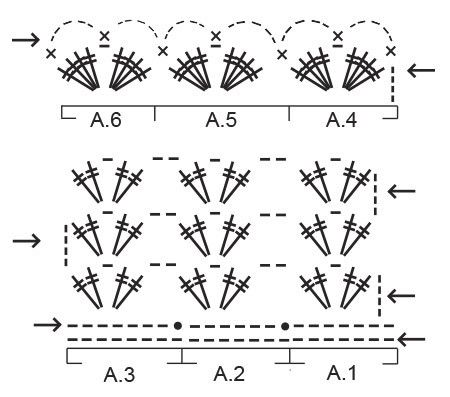
What is the difference between A.1, A.2 and A.3. Do I go into the chain space after every 2 tr? Also, for clarity, is this a UK or US pattern? Is the TR really a double crochet or a triple crochet? I am hoping to complete this by this Sunday and will work on it after your response. I am just concerned because mine looks a bit different from your completed photo. Hope you respond today. Thank you
06.05.2016 - 18:17DROPS Design ha risposto:
Dear Mrs Weiss, to be sure about the crochet terminology, make sure you are reading correct language (change language by clicking on the arrow below the picture). You are working the fans with dtr (UK-English)/tr (US-English) groups - A.1 starts with ch 4 at the beg of row from RS, then work 1 dtr/tr group in next 1-ch-space - repeat A.2 (= 1 dtr/tr group in the mid chain in every dtr/tr-group) and A.3 ends with 1 dtr/tr group in mid ch on last dtr/tr group and starts with ch 4 at the beg of row from WS. Happy crocheting!
09.05.2016 - 08:58Linda Weiss ha scritto:
Thank you so much for your quick response! I'm not sure what the difference is between A.1, A.2 and A.3. From the diagram they look very similar. What is the difference? Thank you!
04.05.2016 - 20:07DROPS Design ha risposto:
Dear Mrs Weiss, A.1 shows how to work diagram at the beg of row from RS and at the end of row from WS, A.2 has to be repeated across, and A.3 shows how to work diagram at the end of row from RS and at the beg of row from WS. Happy crocheting!
06.05.2016 - 08:38Linda Weiss ha scritto:
Question: Frst half. At the end of row 2, is written repeat the entire row 2 until piece measures 66cm/26'. Is only row 2 repeated? Also, do I do the 2tr, ch 1, 2 tr between each ch 1? More details on the pattern would be appreciated for the end of the rows and which ch-space to go into.
04.05.2016 - 16:36DROPS Design ha risposto:
Dear Mrs Weiss, repeating row 2, you will start every row with 4 ch, then repeat *2 tr in next ch-space, 1 ch and 2 tr in same 1-ch-space between tr-group from previous row, ch 2* all the row. Happy crocheting!
04.05.2016 - 17:04Linda Weiss ha scritto:
I love this pattern. Question: on row one and two of the first half, what stitch do you put into the chain 4 at the end of the row?
04.05.2016 - 16:28DROPS Design ha risposto:
Dear Mrs Weiss, on row 1, you are working diagrams A.1, A.2 and A.3: A.1 1 time in width, then repeat A.2 until last 7-ch-space and finish with A.3. On row 2, read from the left towards the right and work A.3 1 time, repeat A.2 and finish with A.1 over the last repeat (= the 4 ch from beg of previous row won't be worked). Happy crocheting!
04.05.2016 - 17:01
![]() Maren ha scritto:
Maren ha scritto:
Hallo Ich habe eine Frage. Wo muß das Diagramm A4-A6 angesetzt werden? Wird die Arbeit nur gewendet und mit dem Muster begonnen? Nur... wo ist da eine LM-Kette?? ...Dann Diagramm A.4 bis A.6.häkeln: 1. REIHE: 4 Lm, * 4 Doppel-Stb in den nächsten Lm-Bogen, 1 Lm und 4 Doppel-Stb in den gleichen Lm-Bogen .... Würde mich sehr über eine Antwort freuen, vielen Dank Maren
19.04.2016 - 11:15
![]() Kicki ha scritto:
Kicki ha scritto:
Hej! I mönstret står det " Varv 2: Virka 4 lm, *2 dst om nästa lm-båge, 1 lm och 2 dst i samma lm-båge*. Upprepa *-*v ut." När jag tittar på diagrammet (A.1, A.2, A.3) är det inritat 2 lm mellan "2 dst- 1lm- 2dst grupperna". Detta står inte angivet i texten. Viket är det rätta?
07.01.2015 - 20:54DROPS Design ha risposto:
Hej Kicki, Du måste följa diagramtexten. Lycka till!
05.02.2015 - 14:53
![]() Myriam ha scritto:
Myriam ha scritto:
Je commence ce modèle et j'ai déjà utilisé 2 pelotes de 100g de LACE alors que j'ai fait seulement la moitié de l'étole (pour 2 fils). S'agit il d'une erreur dans les explications ? Le fil est-il utilisé "en simple" ? (mais, même en simple, il me manquerait quand même 100g pour le réaliser) Merci pour votre réponse rapide car je dois faire une nouvelle commande.
13.05.2014 - 18:46DROPS Design ha risposto:
Bonjour Myriam, cette étole requiert 100 g de DROPS Lace sur la base d'un échantillon de 6 groupes de DB = 10 cm de large en travaillant souplement pour pouvoir l'étirer aux mesures indiquées. Pensez à bien vérifier votre tension. Bon crochet!
16.05.2014 - 10:30
![]() Laura ha scritto:
Laura ha scritto:
Onkohan ohjeessa reunuksen suhteen virhe? Tai oikeammin puutos, pitkien sivujen reunuksista ei nimittäin mainita ohjeessa mitään. Muuten oikein onnistunut malli!
18.02.2014 - 17:22DROPS Design ha risposto:
Huiviin ei virkata erillistä reunusta, vaan työ virkataan kahtena kappaleena piirroksen mukaisesti.
21.02.2014 - 14:10Beatriz ha scritto:
It will be of help if a diagram of confection can be showed and/or measure of the first part crocheted, because there is no gauge and have no idea of how the final piece should look.
13.02.2014 - 15:25DROPS Design ha risposto:
Dear Beatriz, you will find measurements and gauge at the right side of the picture under tab "Materials" as well as some videos related to this pattern under the tab "videos". Happy crocheting!
13.02.2014 - 16:00Eileen Imlah ha scritto:
Perfect for Spring
26.01.2014 - 12:22
|
|||||||||||||||||||
Down By The Sea#downbytheseacardigan |
|||||||||||||||||||
|
|
|||||||||||||||||||
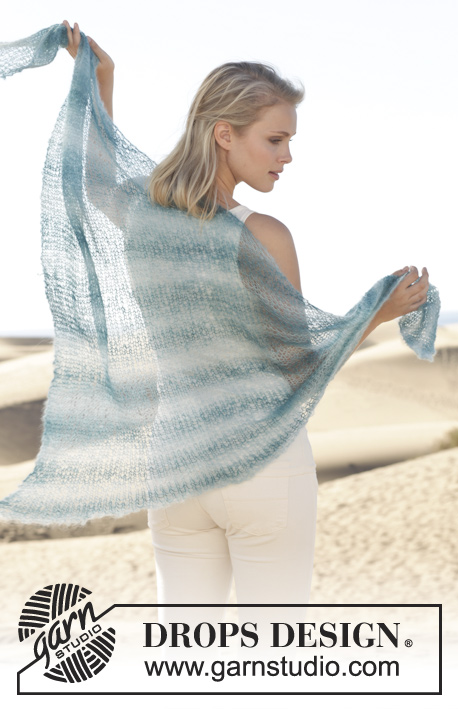
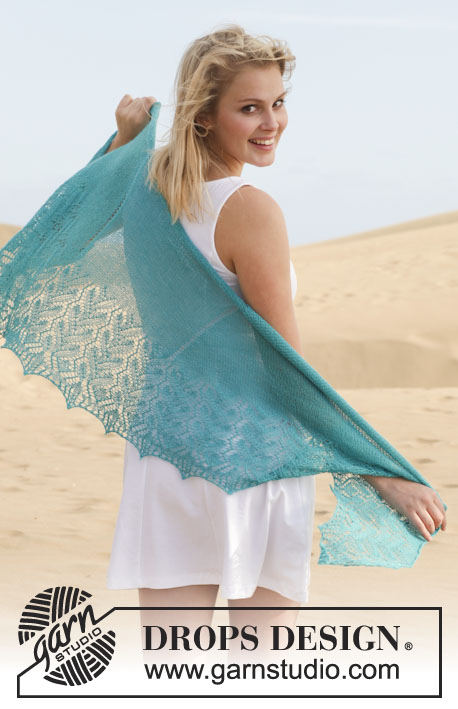
Scialle DROPS all’uncinetto, in "Lace".
DROPS 152-23 |
|||||||||||||||||||
|
MOTIVO: Vedere i diagrammi da A.1 a A.3 e da A.4 a A.6. I diagrammi mostrano tutte le righe del motivo, viste sul diritto del lavoro. I diagrammi sono divisi in 3 parti. I diagrammi A.1 e A.4 vengono lavorati sul lato destro del lavoro, i diagrammi A.2 e A.5 vengono ripetuti sulle m centrali, e i diagrammi A.3 e A.6 vengono lavorati sul lato sinistro del lavoro. ---------------------------------------------------------- SCIALLE: Si lavora avanti e indietro in due parti. Iniziare lavorando la prima metà dello scialle, lavorare la seconda parte partendo dall’inizio della prima metà. PRIMA META’: Con l’uncinetto n° 4 ed il filato Lace, avviare 151 cat. Girare il lavoro e lavorare come segue: lavorare 1 m.bss nella 15a cat dall’uncinetto e continuare come segue: * 7 cat, saltare 7 cat e lavorare 1 m.bss nella cat successiva *. Ripetere da *-* su tutta la riga e finire con 1 m.bss nell’ultima cat della riga = 18 archi di cat. Girare il lavoro e lavorare seguendo i diagrammi da A.1 a A.3 – VEDERE IL MOTIVO sopra. Lavorare quindi come segue: RIGA 1: 4 cat, lavorare 2 m.a.d nel primo arco di cat, 1 cat e 2 m.a.d nello stesso arco di cat, * 2 cat e saltare fino all’ arco di cat successivo, lavorare 2 m.a.d, 1 cat, 2 m.a.d nello stesso arco di cat *, ripetere da *-* su tutta la riga. Girare il lavoro. RIGA 2: 4 cat, 2 m.a.d nel primo arco di cat, 1 cat e 2 m.a.d nello stesso arco di cat, *2 cat e saltare fino all’arco di cat successivo, 2 m.a.d nell'arco di cat, 1 cat, 2 m.a.d nello stesso arco di cat *, ripetere da *-* su tutta la riga. Girare il lavoro. Proseguire lavorando come la riga 2 finché il lavoro non misura 66 cm. Lavorare ora seguendo i diagrammi da A.4 a A.6. Lavorare quindi come segue: RIGA 1: 4 cat, * 4 m.a.d nell’ arco di cat successivo, 1 cat e 4 m.a.d nello stesso arco di cat (= 1 gruppo grande di m.a.d), saltare fino all’arco di cat successivo *, ripetere da *-* su tutta la riga. Girare il lavoro. RIGA 2: * 5 cat, 1 m.b nella cat della riga precedente, 5 cat, 1 m.b tra i gruppi di m.a.d della riga precedente *, ripetere da *-* su tutta la riga e finire con 1 m.b nella 4a cat dall’inizio della riga precedente. Tagliare il filo e passarlo attraverso l’ultima m. SECONDA META’: Girare il lavoro e lavorare sotto i 18 archi di cat all’inizio della prima metà. Lavorare come la prima metà, ma iniziare dalla riga 1. BLOCCAGGIO: Mettere lo scialle in acqua tiepida in modo che si impregni d’acqua. Molto delicatamente fare pressione sullo scialle in modo da far uscire la maggior parte dell’acqua – non torcere lo scialle; avvolgere poi lo scialle in un asciugamano e fare pressione delicatamente in modo da far uscire ulteriore acqua. Lo scialle deve rimanere solo umido. Stendere lo scialle su un tappeto o su un materasso – con molta cautela tirare lo scialle per portarlo alle misure corrette. Lasciare asciugare lo scialle. Ripetere questo procedimento ogni volta che viene lavato. |
|||||||||||||||||||
Spiegazioni del diagramma |
|||||||||||||||||||
|
|||||||||||||||||||
 |
|||||||||||||||||||
Avete terminato questo modello?Allora taggate le vostre foto con #dropspattern #downbytheseacardigan o inviatele alla #dropsfan gallery. Avete bisogno di aiuto con questo modello?Troverete 5 video tutorial, una sezione per i commenti/domande e molto altro guardando il modello su www.garnstudio.com © 1982-2026 DROPS Design A/S. Ci riserviamo tutti i diritti. Questo documento, compreso tutte le sue sotto-sezioni, è protetto dalle leggi sul copyright. Potete leggere quello che potete fare con i nostri modelli alla fine di ogni modello sul nostro sito. |
|||||||||||||||||||


Con oltre 40 anni di esperienza nel design di modelli di maglia e uncinetto, DROPS Design offre la più estesa collezione di modelli gratuiti su internet - tradotti in 17 lingue. Ad oggi vi possiamo fornire 324 cataloghi e 12290 modelli - 9561 dei quali sono tradotti in Italiano.
Ci stiamo impegnando molto per darvi il meglio che vi possiamo offrire in termini di maglia e uncinetto, ispirazioni e consigli così come filati di grande qualità ad un prezzo incredibile! Volete utilizzare i nostri modelli per qualcosa d'altro oltre al vostro uso personale? Potete leggere tutto ciò che è consentito nel testo sul Copyright in basso su tutte le pagine dei nostri modelli. Buon lavoro!
Lasciare un commento sul modello DROPS 152-23
Noi saremmo felici di ricevere i tuoi commenti e opinioni su questo modello!
Se vuoi fare una domanda, fai per favore attenzione a selezionare la categoria corretta nella casella qui sotto per velocizzare il processo di risposta. I campi richiesti sono indicati da *.