
Categorie popolari
State cercando un filato?


Commenti / Domande (85)
![]() Pauline ha scritto:
Pauline ha scritto:
Just finished making this jumper, I found the pattern hard at first but once I read it a couple of times it made sense and I am really pleased with the result. Also this is a really quick make, only took me two days so definitely going to make this again.
29.03.2019 - 08:43
![]() Lezlie Wilcox ha scritto:
Lezlie Wilcox ha scritto:
DROPS is famous for it's poorly written, hard to follow patterns. This is no exception.
21.01.2019 - 02:46DROPS Design ha risposto:
Dear Mrs Wilcox, we are sorry to hear you have worries with this pattern, you are welcome to ask your question here and to contact the store where you bought the yarn for any individual assistance. Happy crocheting!
21.01.2019 - 13:00
![]() Brona ha scritto:
Brona ha scritto:
Please help i\'m stuck after row 6, don\'t understand diagram. Need written version or explaination please.
13.11.2018 - 18:48DROPS Design ha risposto:
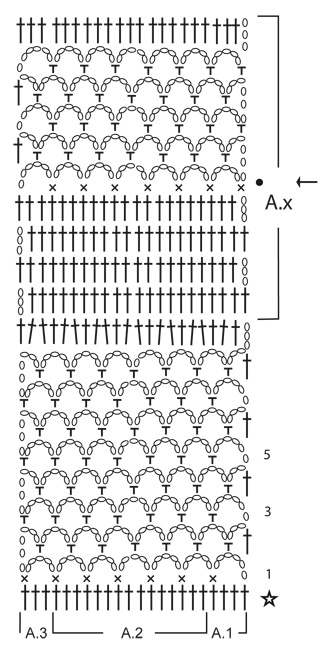
Dear Brona, each symbol in diagram represents 1 stitch - see diagram key. Start working from RS at the bottom corner on the right side (see 1 = row 1) and work A.1 over the first 4 sts, then repeat A.2 until 3 sts remain at the end of the row and work A.3. From WS read diagram from the left towards the right: A.3, repeat A.2 and finish with A.1. Happy crocheting!
14.11.2018 - 08:04
![]() Monique ha scritto:
Monique ha scritto:
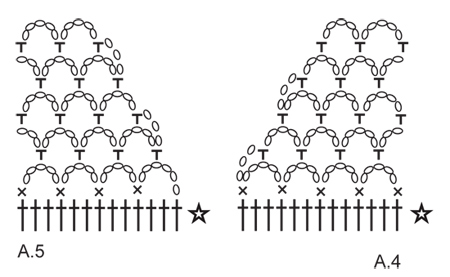
Ich bin gerade beim Vorderteil (Größe L) in Höhe der 43cm, wo ich nun die Schultern einzeln häkeln soll, und bin mit der 4. Bogenreihe gerade fertig. Muss ich erst einmal normal weiter häkeln, bis ich eine Stäbchenreihe haben, bevor ich die Schultern beginne (so ähnlich wie auf dem Foto)? Ich bin mir unsicher, ob das gut aussieht, wenn ich in einer Bogenreihe mit den Schultern starte. Außerdem sind in A4 und A5 Stäbchenreihen als erste Reihe.
30.07.2018 - 19:44DROPS Design ha risposto:
Liebe Monique, Die Schultern beginnen mit einer Bogenreihe, aber gerne können Sie anpassen, jenach dem Sie Bogenreihe oder Stb häkeln (damit Muster gleich wie beim Rückenteil wird), einfach über die ersten 33 Stb häkeln für die erste Schulter. Viel Spaß beim häkeln!
31.07.2018 - 09:54
![]() Katharina ha scritto:
Katharina ha scritto:
Hallo, ich bin beim Vorderteil bei Diagramm A4, Größe L. Über die ersten 33 Stäbchen sollen Lfm-Bögen, macht 11 Bögen. Dann 2 Bögen abketten in den nächsten Reihen macht 9 Bögen. Dann sollen 4 stb in den ersten Bogen, danach je 3 stb pro Bogen und am Ende nochmal 4 stb. Das sind bei mir allerdings 29 stb und nicht wie in der Anleitung benötigt 26. Was mache ich falsch? Liebe Grüße!
15.05.2018 - 21:37DROPS Design ha risposto:
Liebe Katharina, arrangieren Sie die Maschenanzahl bei der 1. Reihe mit Stb so daß Sie die richtige Breite bekommen - Ihr Hinweis wird unser Designteam weiterleitet. Viel Spaß beim häkeln!
16.05.2018 - 09:01
![]() Nadia Trappeniers ha scritto:
Nadia Trappeniers ha scritto:
Hallo, wat geeft het beste resultaat: voor- en achterpand aan elkaar naaien of aan elkaar haken. Dankuwel
11.08.2017 - 20:01DROPS Design ha risposto:
Hallo Nadia, In dit geval is in elkaar naaien met kleine steekjes het mooist (althans naar mijn smaak ;)
15.08.2017 - 17:23
![]() Gaby ha scritto:
Gaby ha scritto:
Liebes Drops-Team, habe die ersten 8 Lochmusterreihen gehäkelt, und das Teil wellt sich wie ein Regenbogen, das heißt der Lochmusterstreifen misst 10cm mehr als der Stäbchenstreifen. Sollte ich das Lochmuster mit einer dünneren Häkelnadel probieren, oder ist das normal am Anfang? Auch wenn ich das Lochmuster in die Höhe ziehe, ist es immer noch recht wellig.
25.04.2017 - 21:33DROPS Design ha risposto:
Liebe Gaby, beachten Sie Ihre Maschenprobe und, passen Sie mal auf, das Lochmuster nicht zu locker zu häkeln, damit Sie die richtige Breite behalten. Viel Spaß beim häkeln!
26.04.2017 - 09:32
![]() Kerry ha scritto:
Kerry ha scritto:
Hello! I have just started crocheting this and am already confused on the second row! It says to work one rebbe in every treble. Do I miss the chain spaces from the previous row? If I don't then I end up with 81 stitches and this doesn't fit with the A.1, A.2 and A.3 pattern for the third row. If I miss the chain space then the piece is becoming u-shaped! Do I need to still have 70 trebles on rows 1-6? Thanks!
28.03.2017 - 14:46DROPS Design ha risposto:
Dear Kerry, on very first row, you are crocheting trebles, skipping chains evenly = 70-112 tr (see size). On 2nd row, work then 1 tr in every tr, number of tr should be now the same, ie 70-112 tr. Work a total of 6-5 row with tr. Then work following diagrams A.1 (1 time), repeat A.2 and finish with A.3 starting on row 1 (row with the star shows the last tr-row). Happy crocheting!
28.03.2017 - 16:45
![]() Jean ha scritto:
Jean ha scritto:
I am stuck on Left Shoulder. "Work chain spaces as before" = where did I do this before? (with 2 dc between every sc on first row with chain spaces). I don't understand what this means. Thank you
23.03.2017 - 22:07DROPS Design ha risposto:
Dear Jean, just crochet same pattern as before but over the first 27-45 dc only (leave the remaining sts on row unworked, these are for neck and right shoulder). at the same time, decrease for neck as shown in diagram A.4, ie work the last of these 27-45 dc as in A.4. Happy crocheting!
24.03.2017 - 09:02
![]() Jean ha scritto:
Jean ha scritto:
Is there a video available for this pattern?
23.03.2017 - 22:05DROPS Design ha risposto:
Dear Jean, there is no specific video to this pattern, just read the diagram starting from the bottom corner on the right side towards the left from RS and from left towards right from WS. Happy crocheting!
24.03.2017 - 08:57
|
||||||||||||||||||||||
Amber#ambersweater |
||||||||||||||||||||||
|
|
||||||||||||||||||||||
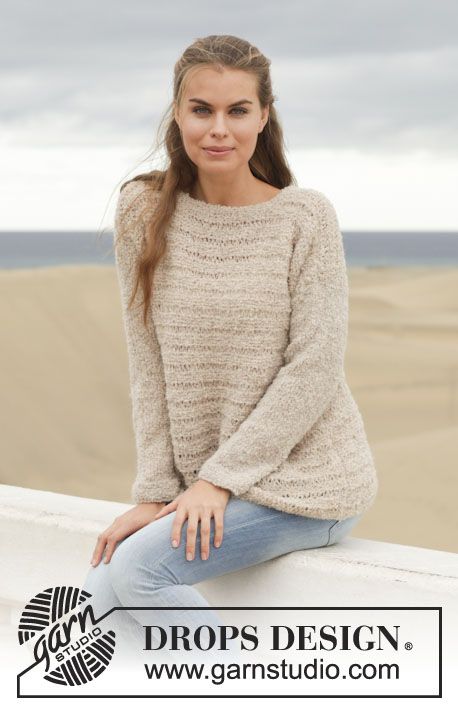
Maglia DROPS all’uncinetto, con motivo traforato e maglie alte, in "Cotton Light". Taglie: Dalla S alla XXXL.
DROPS 152-17 |
||||||||||||||||||||||
|
INFORMAZIONI PER IL LAVORO: All’inizio della riga, sostituire 1 m.a con 3 cat. MOTIVO: Vedere i diagrammi da A.1 a A.5. SUGGERIMENTO PER IL LAVORO: Iniziare e finire in corrispondenza della freccia, al centro del diagramma A.x. SUGGERIMENTO PER LE DIMINUZIONI: Per diminuire 1 m.a, lavorare 2 m.a insieme come segue: lavorare 1 m.a, ma non fare l’ultima gettata (= 2 m sull’uncinetto), lavorare la m.a. successiva e all’ultima chiusura, passare il filo attraverso tutte e 3 le m sull’uncinetto. ---------------------------------------------------------- DIETRO: Si lavora avanti e indietro. Con l’uncinetto n° 4,5 ed il filato Cotton Light, avviare 83-90-100-107-121-132 cat morbide. RIGA 1: Lavorare 1 m.a nella 4a cat dall’uncinetto (= 2 m.a), Proseguire lavorando 1 m.a in ognuna delle 2-2-5-5-5-2 cat successive, * saltare 1 cat, lavorare 1 m.a in ognuna delle 6 cat successive *, ripetere da *-* altre 10-11-12-13-15-17 volte = 70-76-85-91-103-112 m.a. Lavorare altre 5-5-5-4-5-5 righe con 1 m.a in ogni m.a (=in tutto 6-6-6-7-6-6 righe con 1 m.a in ogni m.a) – VEDERE LE INFORMAZIONI PER IL LAVORO. Proseguire seguendo il MOTIVO come segue: Lavorare il diagramma A.1 su 4 m.a, lavorare il diagramma A.2 finché non rimangono 3 m.a, lavorare il diagramma A.3 sulle restanti 3 m.a della riga precedente. Proseguire con i diagrammi A.1 – A.3 avanti e indietro per 8 righe, ora ci sono 8 buchi in diagonale, in altezza (= prima striscia con il motivo traforato) e una riga a m.a. RICORDARSI LA TENSIONE DEL LAVORO! Proseguire con strisce di m.a e strisce con il motivo traforato, in modo uguale, ma lavorare seguendo il diagramma A.x; ALLO STESSO TEMPO, quando il lavoro misura 32-32-32-40-41-41 cm e mentre si sta lavorando una striscia di m.a, inserire un segno da ciascun lato per gli scalfi. Proseguire seguendo il motivo come prima. Quando il lavoro misura 49-50-51-60-62-63 cm, iniziare a diminuire per lo scollo e finire ogni spalla separatamente come segue, sul diritto del lavoro: lavorare 1 riga di m.a sulle prime 21-24-27-30-36-39 m.a, girare il lavoro e diminuire 1 m.a – VEDERE IL SUGGERIMENTO PER LE DIMINUZIONI. Lavorare la restante riga. Quando il lavoro misura 51-52-53-62-64-65 cm, il dietro è completato. Tagliare il filo. Lavorare l’altra spalla in modo uguale ma a specchio. DAVANTI: Lavorare come indicato per il dietro. Quando il lavoro misura 43-43-43-53-54-54 cm, iniziare a diminuire per lo scollo e lavorare ogni spalla separatamente. Lavorare la spalla sinistra come segue, sul diritto del lavoro: Lavorare gli archi di cat come prima (con 2 m.a tra ogni m.b sulla prima riga degli archi di cat) sulle prime 27-30-33-36-42-45 m.a; ALLO STESSO TEMPO, diminuire per lo scollo come segue: diminuire 1 arco di cat nel motivo traforato seguendo il diagramma A.4. Proseguire in questo modo avanti e indietro finché il diagramma A.4 non è stato lavorato 1 volta in verticale. Alla riga successiva, lavorare 4 m.a nel primo arco di cat, 3 m.a in ogni arco di cat successivo finché non rimane 1 arco di cat e 4 m.a nell’ultimo arco di cat della riga = per la spalla rimangono 20-23-26-29-35-38 m.a. Proseguire con 1 m.a in ogni m.a. Quando il lavoro misura 51-52-53-62-64-65 cm in tutto, il davanti è completato. Tagliare il filo. Lavorare l’altra spalla in modo uguale ma a specchio e seguire il diagramma A.5 al posto del diagramma A.4. Cucire le spalle. MANICHE: Si lavorano dall’alto verso il basso, iniziando dagli scalfi. RIGA 1: Iniziare in corrispondenza di uno dei segni per gli scalfi e lavorare archi di cat sullo scalfo, come segue: 1 m.b, * 5 cat, 1 m.b *, ripetere da *-* finché non ci sono 20-21-23-23-25-26 archi di cat (ogni arco di cat = ca. 1½-2 cm). Proseguire avanti e indietro seguendo il diagramma A.x finché il diagramma non è stato lavorato in tutto 3 volte in verticale - VEDERE IL SUGGERIMENTO PER IL LAVORO - ALLO STESSO TEMPO, diminuire in ogni sezione lavorata a m.a come segue: La 1a e la 2a volta che si lavora il diagramma A.x, diminuire 1 m.a da ciascun lato nel corso della 1a, della 3a e della 5a riga di m.a nel diagramma A.x = vengono diminuite 6 m.a da ciascun lato. Rimangono 48-51-57-57-63-66 m.a. La 3a volta che si lavora il diagramma A.x, diminuire come segue: diminuire 1 m.a da ciascun lato nel corso delle prime 4-5-5-5-5-5 righe di m.a = rimangono 40-41-47-47-53-56 m.a. Proseguire con 4-3-2-2-1-0 righe di m.a. La manica misura ora ca.36-35-34-34-33-32 cm. Tagliare il filo. COLLO: Lavorare un bordo intorno al collo come segue, iniziando nella parte superiore della spalla: 1 m.b, * 3 cat, saltare ca.1 cm, 1 m.b *, ripetere da *-* tutto intorno il collo e finire con 1 m.bss nella 1a m.b del giro. Tagliare il filo. CONFEZIONE: Cucire i lati e sotto le maniche nelle m vivagno. |
||||||||||||||||||||||
Spiegazioni del diagramma |
||||||||||||||||||||||
|
||||||||||||||||||||||
 |
||||||||||||||||||||||
 |
||||||||||||||||||||||
 |
||||||||||||||||||||||
Avete terminato questo modello?Allora taggate le vostre foto con #dropspattern #ambersweater o inviatele alla #dropsfan gallery. Avete bisogno di aiuto con questo modello?Troverete 4 video tutorial, una sezione per i commenti/domande e molto altro guardando il modello su www.garnstudio.com © 1982-2026 DROPS Design A/S. Ci riserviamo tutti i diritti. Questo documento, compreso tutte le sue sotto-sezioni, è protetto dalle leggi sul copyright. Potete leggere quello che potete fare con i nostri modelli alla fine di ogni modello sul nostro sito. |
||||||||||||||||||||||


Con oltre 40 anni di esperienza nel design di modelli di maglia e uncinetto, DROPS Design offre la più estesa collezione di modelli gratuiti su internet - tradotti in 17 lingue. Ad oggi vi possiamo fornire 324 cataloghi e 12290 modelli - 9561 dei quali sono tradotti in Italiano.
Ci stiamo impegnando molto per darvi il meglio che vi possiamo offrire in termini di maglia e uncinetto, ispirazioni e consigli così come filati di grande qualità ad un prezzo incredibile! Volete utilizzare i nostri modelli per qualcosa d'altro oltre al vostro uso personale? Potete leggere tutto ciò che è consentito nel testo sul Copyright in basso su tutte le pagine dei nostri modelli. Buon lavoro!
Lasciare un commento sul modello DROPS 152-17
Noi saremmo felici di ricevere i tuoi commenti e opinioni su questo modello!
Se vuoi fare una domanda, fai per favore attenzione a selezionare la categoria corretta nella casella qui sotto per velocizzare il processo di risposta. I campi richiesti sono indicati da *.