
Categorie popolari
State cercando un filato?


Commenti / Domande (84)
![]() Kathrine Normann Olsen ha scritto:
Kathrine Normann Olsen ha scritto:
Rigtig fin hat, som det er lykkedes mig at få lavet efter denne opskrift og ved at læse svar på de mange spørgsmål. Jeg vil gerne foreslå, at diagrammet tilføjes rækkenumre eller en “start her pil”. Jeg troede nemlig, at jeg skulle starte med standmasker, som er det nederste i diagrammet. Det ville også have hjulpet, hvis der havde stået, at man skulle tilføje YDERLIGERE en dstgm ved hver af de sidste 4 rækker, så man har 7, 8, 9, 10 og 11 i hver gruppe.
09.08.2022 - 20:19DROPS Design ha risposto:
Hej Kathrine, tak for tipset. Vi anbefaler at se på videoen vi har lavet til denne opskrift :)
10.08.2022 - 07:42
![]() Maria Afonso ha scritto:
Maria Afonso ha scritto:
I liked the pattern and will try making it for the first time. Thank You
14.05.2022 - 19:22
![]() Susanna Malmsten ha scritto:
Susanna Malmsten ha scritto:
Många riktigt usla drops mönster har jag försökte att tolka och själv göra om så att de fungerar i verkligen, men detta mönster slår verkligen alla rekord! Det måste vara något riktigt grundläggande fel! Nu har jag virkat om det 3 gånger och det blir INTE en hattliknande form utan snarare som en platt duk. Vad gör jag för fel alternativt vad är fel i mönstret?
30.09.2021 - 21:22
![]() Yu-Chi ha scritto:
Yu-Chi ha scritto:
Hi, I followed the pattern, but the hat turned out to be not so flat as the photo, especially the fans part , and the brim looks wider than the photo. What could be wrong? :(
11.09.2021 - 16:18
![]() Åsa ha scritto:
Åsa ha scritto:
Jag har precis samma problem som Klara har beskrivit tidigare i frågorna. Mitt arbete blir bara vidare hela tiden. När jag har virkat varv 9-10 (S/M) och gör minskningarna enl mönstret, så får hatten en mycket konstig form. Vad gör jag för fel?
28.06.2021 - 11:33DROPS Design ha risposto:
Hej Åsa, har du set videon som ligger nederst i mönsteret ?
30.06.2021 - 13:45
![]() Maria Joly ha scritto:
Maria Joly ha scritto:
I love the pattern, it turned out very nice, thank you so much
14.05.2021 - 15:57
![]() Klara ha scritto:
Klara ha scritto:
Dear Garnstudio, I am working on Glimpse of spring hat. I have done the double crochet rounds and two rounds of diagram pattern. The hat is getting very wide, instead of making hat shape. Would you know what I might be doing wrong? Basicly I do shell stich: 5 tr, skip 2, sc, skip 2, 5tr, etc. Would you know why is my hat getting wide? It looks more like a placemat than a hat. Thank you for your reply. Klara
01.04.2021 - 21:06
![]() Anna Yafi ha scritto:
Anna Yafi ha scritto:
Thank you!!! I bought 4 balls of this exact drops serie and color to try reproduce the same result, we will see:)
16.02.2021 - 01:34
![]() Anna Yafi ha scritto:
Anna Yafi ha scritto:
Not sure I made myself clear on the first question, just wanted to ask, at the beginning, should we have overall 8 or 9 rows of double crochets? In other terms, after the increase row of 85 (size S), it says to continue in Pattern A1, A2 13 times ... Should we continue with the base of row of double crochet in the diagram? on directly with the shell stitches? If we do the double crochet base, then we would have only 1 remaining row of shell stitches, unlike the photo
12.02.2021 - 15:59DROPS Design ha risposto:
Dear Mrs Yafi, when you have worked to row 8 and there are 85 sts on the round, you now crochet the pattern following diagrams with first row on fans (the row with dc at the beg just shows how to crochet the stitches on first round in the pattern). Happy crocheting!
15.02.2021 - 06:46
![]() Anna Yafi ha scritto:
Anna Yafi ha scritto:
Not sure I made myself clear on the first question, just wanted to ask, at the beginning, should we have overall 8 or 9 rows of double crochets? In other terms, after the increase row of 85 (size S), it says to continue in Pattern A1, A2 13 times ... Should we continue with the base of row of double crochet in the diagram? on directly with the shell stitches? If we do the double crochet base, then we would have only 1 remaining row of shell stitches, unlike the photo
12.02.2021 - 15:55
|
||||||||||||||||
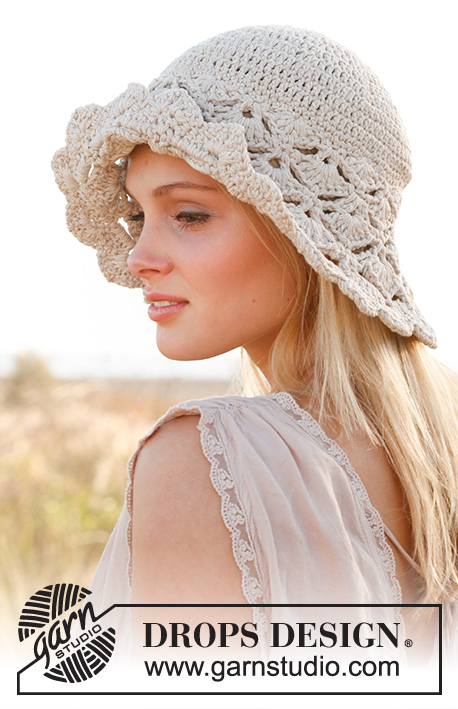
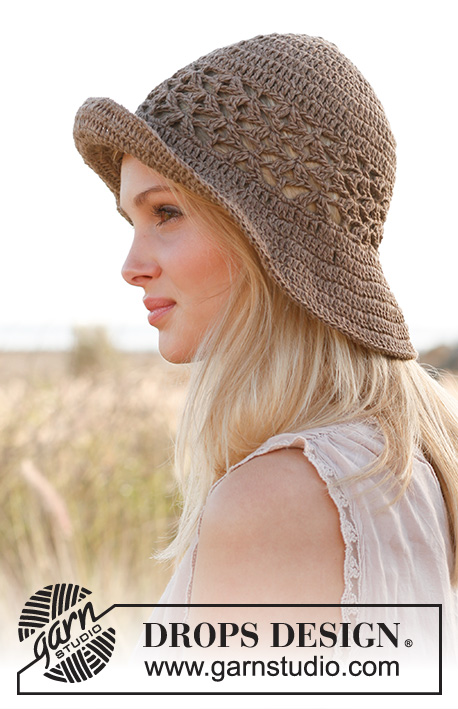
Glimpse of Spring#glimpseofspringhat |
||||||||||||||||
|
|
||||||||||||||||
Cappello DROPS, all’uncinetto, in "Muskat".
DROPS 153-36 |
||||||||||||||||
|
SUGGERIMENTO PER IL LAVORO: Sostituire la prima m.a all’inizio di ogni giro di m.a con 3 cat. Finire ogni giro di m.a con 1 m.bss nella 3a cat dall’inizio del giro (= nella prima m.a). Sostituire la prima m.b all’inizio di ogni giro di m.b con 1 cat. Finire ogni giro di m.b con 1 m.bss nella cat all’inizio del giro. SUGGERIMENTO PER GLI AUMENTI: Aumentare 1 m.a o 1 m.b lavorando 2 m.a / m.b nella stessa m. MOTIVO: Vedere i diagrammi da A.1 a A.3. ---------------------------------------------------------- CAPPELLO: Con l’uncinetto n° 4 e 1 capo del filato Muskat, avviare 5 cat e formare un anello con 1 m.bss nella prima cat. VEDERE IL SUGGERIMENTO PER IL LAVORO ! GIRO 1: Lavorare 10 (10) m.a nell’anello di cat. GIRO 2: Lavorare 2 m.a in ogni m.a = 20 (20) m.a. GIRO 3: * 1 m.a nella m.a successiva, 2 m.a nella m.a successiva *, ripetere da *-* = 30 (30) m.a. GIRO 4: * 1 m.a in ognuna delle 2 m.a successive, 2 m.a nella m.a successiva *, ripetere da *-* = 40 (40) m.a. GIRI 5-8 (5-9): proseguire aumentando in modo uguale, quindi aumentare 10 m.a ogni giro; aumentare nello stesso punto del giro precedente, lavorare quindi 1 m.a in più tra ogni aumento ad ogni giro. Aumentare come prima lavorando 2 m.a in 1 m.a; ALLO STESSO TEMPO, nel corso del giro 8 (9) aumentare ulteriori 5 (1) m.a a intervalli regolari – VEDERE IL SUGGERIMENTO PER GLI AUMENTI = 85 (91) m.a. Il lavoro misura 9 (10) cm. GIRI 9-10 (10-11): Proseguire con il motivo come segue: Lavorare il diagramma A.1, ripetere il diagramma A.2 13 (14) volte in tutto, e finire con il diagramma A.3. Al giro successivo lavorare come segue: GIRO 1: Lavorare 1 m.b nella prima m.b del giro precedente, saltare 1 m.a.d, 1 m.b in ognuna delle 2 m.a.d successive, * 1 m.b in ognuna delle 3 m.a.d successive, saltare 1 m.a.d, 1 m.b nella m.b successiva, saltare 1 m.a.d, 1 m.b in ognuna delle 2 m.a.d successive *, ripetere da *-* finché sul giro non rimangono 4 m.a.d, 1 m.b in ognuna delle ultime 4 m.a.d = 85 (91) m.b sul giro. GIRO 2: Lavorare 1 cat, * 1 m.b nella m.b successiva, 1 cat, saltare 1 m.b *, ripetere da *-* su tutto il giro e finire con 1 m.bss nella prima cat dall’inizio del giro. GIRO 3: Lavorare 1 m.b nella cat successiva, * 1 m.b nella m.b successiva, 1 m.b nella cat successiva *, ripetere da *-* su tutto il giro; ALLO STESSO TEMPO, aumentare 6 (12) m.b a intervalli regolari sul giro = 91 (103) m.b. Finire con 1 m.bss nella prima m.b dall’inizio del giro. TESA: Proseguire lavorando la tesa, come segue: GIRO 1: Proseguire con il motivo, come segue: Lavorare il diagramma A.1, ripetere il diagramma A.2 14 (16) volte in tutto, e finire con il diagramma A.3. GIRI 2-5: proseguire lavorando i diagrammi A.1, A.2 e A.3; ALLO STESSO TEMPO, aumentare 1 m.a.d in ogni gruppo di m.a.d (quindi iniziando dal 2° giro, lavorare 8 m.a.d in ogni gruppo di m.a.d). Proseguire in modo uguale e aumentare ad ogni giro 1 m.a.d in ogni gruppo di m.a.d. Dopo aver lavorato il giro 5 della tesa, lavorare 1 m.b in ogni m.a.d del giro precedente. Tagliare il filo. CORDINO: Tagliare 8 capi lunghi ca. 3 metri ciascuno. Avvolgerli insieme molto stretti, finché non oppongono resistenza, piegarli in due in modo che si avvolgano ancora. Fare un nodo ad una estremità. Passare l’estremità del cordino senza nodo attraverso la riga traforata lavorata nel giro 2 dopo la prima parte di gruppi di m.a. Regolare la lunghezza del cordino alla lunghezza desiderata e fare un nodo all’altra estremità. |
||||||||||||||||
Spiegazioni del diagramma |
||||||||||||||||
|
||||||||||||||||
 |
||||||||||||||||
Avete terminato questo modello?Allora taggate le vostre foto con #dropspattern #glimpseofspringhat o inviatele alla #dropsfan gallery. Avete bisogno di aiuto con questo modello?Troverete 11 video tutorial, una sezione per i commenti/domande e molto altro guardando il modello su www.garnstudio.com © 1982-2026 DROPS Design A/S. Ci riserviamo tutti i diritti. Questo documento, compreso tutte le sue sotto-sezioni, è protetto dalle leggi sul copyright. Potete leggere quello che potete fare con i nostri modelli alla fine di ogni modello sul nostro sito. |
||||||||||||||||


Con oltre 40 anni di esperienza nel design di modelli di maglia e uncinetto, DROPS Design offre la più estesa collezione di modelli gratuiti su internet - tradotti in 17 lingue. Ad oggi vi possiamo fornire 324 cataloghi e 12290 modelli - 9561 dei quali sono tradotti in Italiano.
Ci stiamo impegnando molto per darvi il meglio che vi possiamo offrire in termini di maglia e uncinetto, ispirazioni e consigli così come filati di grande qualità ad un prezzo incredibile! Volete utilizzare i nostri modelli per qualcosa d'altro oltre al vostro uso personale? Potete leggere tutto ciò che è consentito nel testo sul Copyright in basso su tutte le pagine dei nostri modelli. Buon lavoro!
Lasciare un commento sul modello DROPS 153-36
Noi saremmo felici di ricevere i tuoi commenti e opinioni su questo modello!
Se vuoi fare una domanda, fai per favore attenzione a selezionare la categoria corretta nella casella qui sotto per velocizzare il processo di risposta. I campi richiesti sono indicati da *.