
Categorie popolari
State cercando un filato?


Commenti / Domande (40)
![]() Beverley ha scritto:
Beverley ha scritto:
Next question. If 1 repetition is 8 rows (2 rows at narrowest), on row 9 do you start the repetition again until row 16, if so, what happens to next 4 rows from row 17 to row 20 to complete A4?
15.08.2021 - 21:53DROPS Design ha risposto:
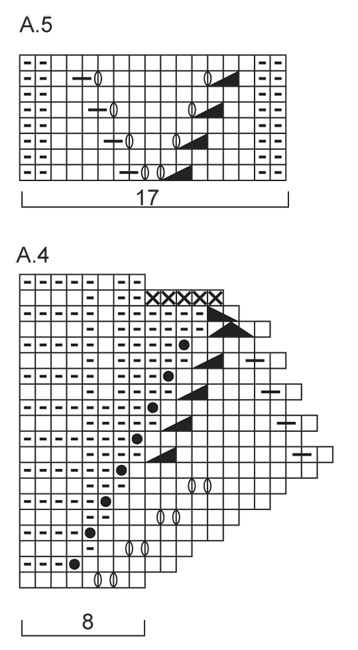
Dear Beverley, when working the short rows, you will work the stitches in A.4 just as shown in the diagram (= every row is worked with A.4 at the beg of row from RS/end of row from WS), then work the ridge pattern after A.4 as frollwos: row 1-4 ridge pattern on row 3 to 6, then work row 1-2 ridge pattern on row 7-8 short rows; then row 3-4 ridge pattern on row 3-4 next repeat short rows, etc... Hope this will help. Happy knitting!
16.08.2021 - 08:29
![]() Beverley ha scritto:
Beverley ha scritto:
Just to clarify my question, there are 8 rows to a pattern but the 1st two rows don’t contain and ridge stitches. On row 3 to 8 these have ridge stitches ( total of 6 rows) but the pattern for ridge stitches has 4 rows ). What pattern of ridge stitch do I knit on row 7 and 8 of the main pattern?
15.08.2021 - 21:24DROPS Design ha risposto:
Dear Beverly, you just have to always repeat the 4 rows in the ridge pattern, this means you will always repeat these 4 rows over the first 12 sts ridge pattern (after A.4) and repeat the 4 rows ridge pattern after A.5 (see previous answer). Happy knitting!
16.08.2021 - 08:25
![]() Beverley ha scritto:
Beverley ha scritto:
Hi, I understand the principles of how to knit this by knitting as instructions then turn to go back then kip it the next row plus a few more of the pattern and so on. What I don’t understand is on row 5 out of 8 when you start A5 for the first time and which row of the 4 ridge stiches rows that constructed the 6 ridge stitches? Is it the same row as the 12?
15.08.2021 - 19:24DROPS Design ha risposto:
Dear Beverley, you will work the stitches in A.5 just when you will work row 5 to 8, ie the first time you work row 5, work row 1 in A.5, then work on row 6 to 8, you will work row 2 to 4. Next time you will work row 5 -8 in short rows, you will then work row 5 to 8 in A.5 etc. The 6 sts ridge pattern are worked then repeating the 4 rows the same way, ie when working row 5-8 short rows, work row 1 to 4 ridge pattern. Happy knitting!
16.08.2021 - 08:19
![]() Sally ha scritto:
Sally ha scritto:
When working the short rows, when it says "Work 1row over all stitches" does "all stitches" mean all the stitches worked so far or all the stitches cast on?
23.03.2019 - 17:16DROPS Design ha risposto:
Dear Sally, when working the short rows, "work 1 row over all stitches" means to work all stitches on left needle = the onen previously worked with the short rows as well as the other ones. Happy knitting!
25.03.2019 - 10:36
![]() Deb ha scritto:
Deb ha scritto:
Are the charts to be read from left to right or right to left? Thank you.
21.11.2018 - 21:58DROPS Design ha risposto:
Hi Deb, The charts are read from bottom right to left on first row. If you are working back and forth the next row is read from left to right, if you are working in the round continue the next row from right to left. Happy knitting!
22.11.2018 - 07:46
![]() Kate Gomes ha scritto:
Kate Gomes ha scritto:
Is this garment knitted from the top down?
15.10.2018 - 21:15DROPS Design ha risposto:
Dear Mrs Gomes, the cape is worked sideways with short rows. Happy knitting!
16.10.2018 - 09:10
![]() Torunn Riise-Larsen ha scritto:
Torunn Riise-Larsen ha scritto:
Og hva skal stikkes når det står: "strikk 1 p over a4, snu og strikk tilbake. Men hva slags masker skal man bruke? Synes ikke det er så lett å forstå oppskriften deres...
02.10.2018 - 17:13DROPS Design ha risposto:
Hei Torunn. Vendinger er det samme som forkortede pinner: altså på hver pinne fra retten strikker du over fler masker enn forrige pinne. Du skal strikke dette samtidig som du strikker mønster etter diagram - så når det står snu og strikk tilbake følger du anvisningene i diagrammet som vanlig. Altså første gang strikker du en omgang A.4, snur og strikker neste omgang A.4 tilbake. Så snur du arbeidet igjen og strikker neste omgang A.4 og strikker videre 2 masker rett og 12 masker åpne rille. Så snur du og strikker tilbake osv. Dette gjentar du til halsen måler 35 cm i den korteste siden. God fornøyelse.
03.10.2018 - 14:19
![]() Torunn Riise-Larsen ha scritto:
Torunn Riise-Larsen ha scritto:
Ang. vendinger. Skal det gjøres etter at hele A4, dvs 20 pinner, er strikket. Eller etter hver pinne av a4?
02.10.2018 - 15:52
![]() Patricia ha scritto:
Patricia ha scritto:
Pourriez vous mettre une vidéo pour le commencement du diagramme A4 svp merci ?
18.11.2016 - 16:21DROPS Design ha risposto:
Bonjour Patricia, votre demande a été enregistrée, mais en attendant la vidéo, lisez le diagramme en commençant en bas à droite sur l'endroit de droite à gauche et de gauche à droite sur l'envers. Retrouvez sous la légende la signification de chaque symbole. Bon tricot!
18.11.2016 - 17:43
![]() Maple ha scritto:
Maple ha scritto:
Thanks for your answer. but i don't understand..i understand how to read the diagram but i don't understand the shoulder piece paragraph. so confused. can you write it step by step. for example, step 1, knit 1 row . step 2, p 1 rows. sorry i am too dumb..
28.06.2016 - 02:22DROPS Design ha risposto:
Dear Maple, The Shoulder piece paragraph explains how to work the sts, ie which pattern will be used to work the sts, at the same time work the short rows to get the correct shape. For any further individual assistance, you are welcome to contact the store where you bought your yarn. Happy knitting!
28.06.2016 - 08:29
|
|||||||||||||||||||||||||||||||||||||||||||
Miss Marple#missmarpleset |
|||||||||||||||||||||||||||||||||||||||||||
 |
 |
||||||||||||||||||||||||||||||||||||||||||
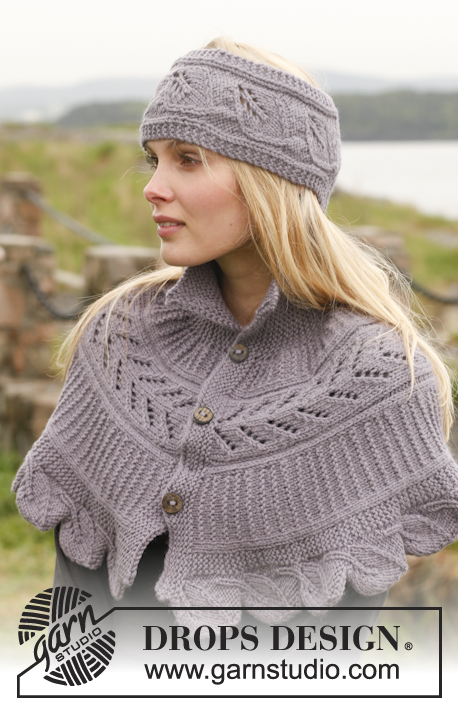
Fascia per la testa e coprispalle con motivo a foglie DROPS in "Nepal"
DROPS 149-41 |
|||||||||||||||||||||||||||||||||||||||||||
|
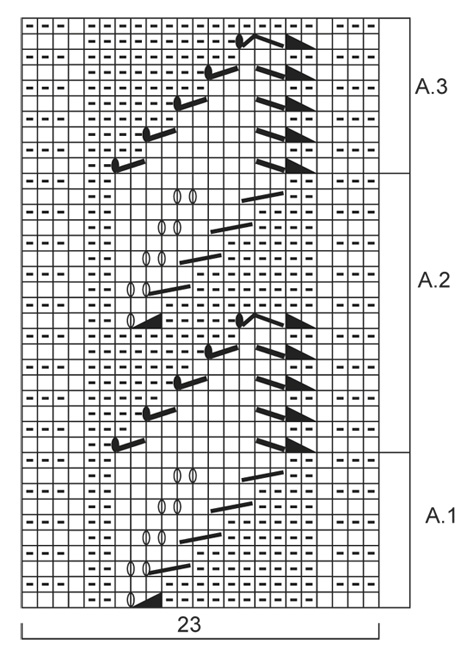
M. LEGACCIO (avanti e indietro sui f.): Lavorare tutti i f. a dir. 1 “costa” a m. legaccio = 2 f. dir. MOTIVO DELLA FASCIA: Vedere i diagrammi A.1-A.3. I diagrammi mostrano tutti i f. dal diritto del lavoro. MOTIVO DEL COPRISPALLE: Vedere i diagrammi A.4-A.5. I diagrammi mostrano tutti i f. del motivo dal diritto del lavoro. MOTIVO A COSTE A M. LEGACCIO (avanti e indietro sui f.): 1° f.: a dir. dal diritto del lavoro. 2° f.: a rov. dal rovescio del lavoro. 3° f.: a dir. dal diritto del lavoro. 4° f.: a dir. dal rovescio del lavoro. FERRI ACCORCIATI: Lavorare a f. accorciati come segue: * Lavorare 1 f. su A.4, girare e lavorare indietro. Lavorare 1 f. su A.4 + 2 m. dir, + 12 m. con il motivo a “coste” a m. legaccio, girare e lavorare indietro. Lavorare 1 f. su A.4 + 2 m. dir. + 12 m. con il motivo a “coste” a m. legaccio + 2 m. dir. + A.5 + 2 m. dir. + 6 m. con il motivo a “coste” a m. legaccio, girare e lavorare indietro. Lavorare 1 f. su tutte le m., girare e lavorare indietro *. Ripetere *-*, cioè 8 f. nel punto più ampio e 2 f. nel punto più stretto in 1 ripetizione. ---------------------------------------------------------- FASCIA PER LA TESTA: Avviare 23 m. con i f. n° 5 mm con Nepal. Lavorare a M. LEGACCIO – leggere la spiegazione sopra – per 3 cm. Poi lavorare secondo A.1. Quando A.1 è stato lavorato 1 volta in verticale, continuare secondo A.2. Quando il lavoro misura circa 46 cm, aggiustarlo dopo un’intera ripetizione di A.2, lavorare secondo A.3. Lavorare A.3 1 volta in verticale, poi lavorare a m. legaccio per 3 cm, o la misura desiderata. Intrecciare. Cucire le maglie intrecciate insieme a quelle avviate con piccoli bei punti. ---------------------------------------------------------- COPRISPALLE: Lavorato avanti e indietro sui f. circolari. Avviare 67 m. con i f. circolari n° 5 mm con il Nepal. Lavorare 5 COSTE a m. legaccio – leggere la spiegazione sopra. Poi lavorare il motivo come segue: A.4, 2 m. a m. rasata, motivo a coste a m. legaccio sulle 12 m. successive, 2 m. a m. rasata, A.5, 2 m. a m. rasata, 6 m. con il motivo a coste, 18 m. a m. legaccio. ALLO STESSO TEMPO lavorare a FERRI ACCORCIATI – leggere la spiegazione sopra. Lavorare a f. accorciati fino a quando il collo misura 35 cm nel lato più corto (o la misura desiderata), aggiustare dopo un’intera ripetizione di A.4. Lavorare 3 “coste” a m. legaccio, sul f. successivo dal diritto del lavoro diminuire per le asole come segue: lavorare 16 m., 2 m. insieme a dir., 1 gettato, * lavorare 13 m., 2 m. insieme a dir., 1 gettato *, ripetere *-* 3 volte, finire con 4 m. dir. Continuare a m. legaccio fino a quando sono state lavorate 5 “coste” a m. legaccio in totale, intrecciare. Attaccare i bottoni sul bordo sinistro. |
|||||||||||||||||||||||||||||||||||||||||||
Spiegazioni del diagramma |
|||||||||||||||||||||||||||||||||||||||||||
|
|||||||||||||||||||||||||||||||||||||||||||
 |
|||||||||||||||||||||||||||||||||||||||||||
 |
|||||||||||||||||||||||||||||||||||||||||||
Avete terminato questo modello?Allora taggate le vostre foto con #dropspattern #missmarpleset o inviatele alla #dropsfan gallery. Avete bisogno di aiuto con questo modello?Troverete 18 video tutorial, una sezione per i commenti/domande e molto altro guardando il modello su www.garnstudio.com © 1982-2026 DROPS Design A/S. Ci riserviamo tutti i diritti. Questo documento, compreso tutte le sue sotto-sezioni, è protetto dalle leggi sul copyright. Potete leggere quello che potete fare con i nostri modelli alla fine di ogni modello sul nostro sito. |
|||||||||||||||||||||||||||||||||||||||||||


Con oltre 40 anni di esperienza nel design di modelli di maglia e uncinetto, DROPS Design offre la più estesa collezione di modelli gratuiti su internet - tradotti in 17 lingue. Ad oggi vi possiamo fornire 324 cataloghi e 12290 modelli - 9561 dei quali sono tradotti in Italiano.
Ci stiamo impegnando molto per darvi il meglio che vi possiamo offrire in termini di maglia e uncinetto, ispirazioni e consigli così come filati di grande qualità ad un prezzo incredibile! Volete utilizzare i nostri modelli per qualcosa d'altro oltre al vostro uso personale? Potete leggere tutto ciò che è consentito nel testo sul Copyright in basso su tutte le pagine dei nostri modelli. Buon lavoro!
Lasciare un commento sul modello DROPS 149-41
Noi saremmo felici di ricevere i tuoi commenti e opinioni su questo modello!
Se vuoi fare una domanda, fai per favore attenzione a selezionare la categoria corretta nella casella qui sotto per velocizzare il processo di risposta. I campi richiesti sono indicati da *.