
Categorie popolari
State cercando un filato?


Commenti / Domande (71)
![]() Romy ha scritto:
Romy ha scritto:
Ich hätte gerne gewusst wie die Anleitung zu lesen ist. Am Bild sind die Ecken bei Ärmelbeginn gleich lang. ABER ich habe 6 cm gestrickt und dann soll ich nur 4 Maschen oder doch 4 cm zunehmen für den Ärmel. ?????? Müsste die Zunahme nicht auch 6 cm sein? Vielen Dank
11.11.2023 - 10:19DROPS Design ha risposto:
Liebe Romy, in die 5. Größe schlägt man 4 Maschen am ende der 2 nächsten Reihe wenn die Arbeit 6 cm misst - siehe Maßskizze. Diese 4 Maschen werden dann nach 44 cm (insgesamt 50 cm von der Anschlagskante) abgekettet. Viel Spaß beim stricken!
13.11.2023 - 07:34
![]() Luize ha scritto:
Luize ha scritto:
Hello, thank you for previous response, I still have a question for the edge: what is the meaning knitting in round, does this mean that there is no seam anywhere and that is worked all around only on RS? Thank you
29.05.2022 - 18:17DROPS Design ha risposto:
Dear Luize, yes, that's correct. You don't turn the garment so you always work on the same side (RS) and there is no need to make seams. Happy knitting!
29.05.2022 - 22:19
![]() Luize ha scritto:
Luize ha scritto:
The pattern here has an issue as you are calling beginning with 78 st equivalent to 80 cm as measure, whereas the gauge you are listing is 13 st * 15 rows for 10*10 cm, so even 78 loose stitches go to approx 63 cm… so it does not fit the measurements written on the pattern, care to explain? Thank you
14.05.2022 - 03:39DROPS Design ha risposto:
Dear Luize, the gauge for this pattern is 9.5 sts with pattern A.1 = 10 cm; you can see it in the materials section. It's important to measure them when working A.1, since it may contract slightly while working. When working, you need to take into account the gauge in the pattern and not in the yarn label. Happy knitting!
16.05.2022 - 00:04
![]() Anne B ha scritto:
Anne B ha scritto:
Hei! Jeg lurer på hvordan jeg skal gå frem for å ta mål av kroppen for å finne ut hvilken størrelse jeg skal strikke? Det blir vel ikke riktig å måle overvidde som til en genser eller jakke, siden denne ikke skal lukkes foran? Takk for hjelpen :)
30.04.2022 - 19:04
![]() Simona ha scritto:
Simona ha scritto:
Buonasera Il modello e’ molto carino; chiedo se devo fare 2 pezzi uguali ( uno per il davanti e uno per il dietro) Una volta fatti i due pezzi non mi e’ chiaro come unirli Grazie per L’ aiuto
13.01.2022 - 21:59DROPS Design ha risposto:
Buonasera Simona, il lavoro è in un pezzo unico e poi procede come indicato per l'assemblaggio. Buon lavoro!
13.01.2022 - 22:05
![]() Milena ha scritto:
Milena ha scritto:
Good afternoon! I can't understand, does the bolero fit in a circle or in rotating rows?
19.10.2021 - 13:44DROPS Design ha risposto:
Dear Milena, the bolero is first worked back and forth (see chart and knitting direction), then sew (see dotted lines) then stitches are picked up along cast on + cast on edges (leaving 1 "hole" on each side for the sleeves)and the edge is worked in the round. Happy knitting!
20.10.2021 - 07:29
![]() Martina ha scritto:
Martina ha scritto:
.. auch dieses Model wird über die Firma KNITKNITSYLT gewerblich auf etsy vertrieben und ihre Bilder benutzt. Ich bin leider selbst Opfer von Bilder und Designklau dieser Dame, daher dachte ich, es interessiert vielleicht auch die Firma Drops. Leider kann man keine Mail schreiben, hätte es gerne etwas diskreter gemacht...
24.06.2021 - 18:09
![]() Natalia ha scritto:
Natalia ha scritto:
Hallo, könnten sie mir bitte sagen, was bedeutet, Garn Gruppe D? Ich würde gerne dieses Model aus anderem Garn stricken (70% Moher, 30% Seide, 1000m/100g), tue mir aber schwer richtige Menge zu errechnen. Vielen Dank für die Antwort im Voraus.
05.10.2020 - 20:52
![]() Heike Salzer ha scritto:
Heike Salzer ha scritto:
Danke für die Anleitung. Lässt sich wunderbar nacharbeiten. Macht so viel Spass
06.07.2020 - 18:01
![]() Van Den Berghe ha scritto:
Van Den Berghe ha scritto:
Bonjour, J'aimerais acheter le modèle déjà tricoté. Serait-il possible
23.04.2019 - 11:49DROPS Design ha risposto:
Bonjour Mme Van Den Berghe, prenez contact avec nos différents revendeurs, l'un d'eux pourra peut être vous aider.
23.04.2019 - 14:55
|
||||||||||||||||||||||
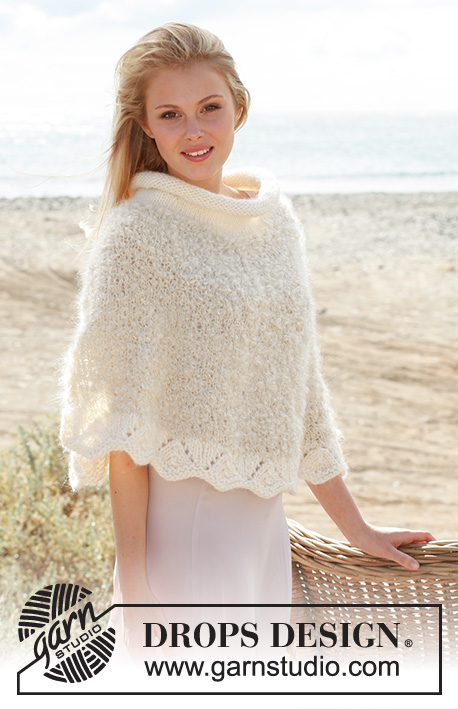
Cloud#cloudbolero |
||||||||||||||||||||||
 |
 |
|||||||||||||||||||||
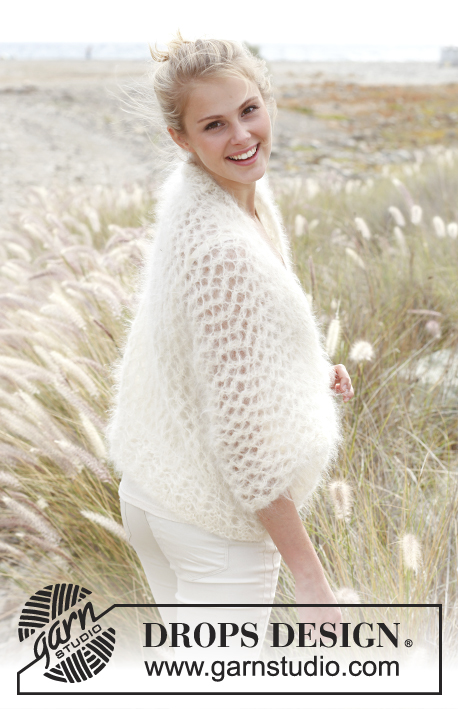
Bolero DROPS ai ferri in "Vienna" o "Melody". Taglie: Dalla S alla XXXL.
DROPS 148-24 |
||||||||||||||||||||||
|
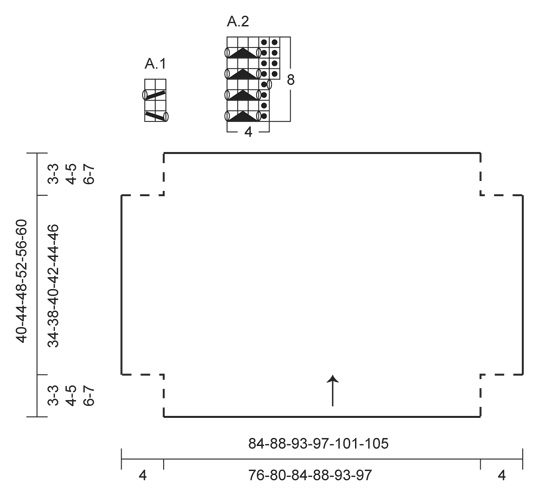
PUNTO LEGACCIO: Avanti e indietro sui ferri:Lavorare tutti i ferri a dir. In tondo, sui ferri: Lavorare * 1 giro a dir e 1 giro a rov *, ripetere da *-*. Lavorare le m vivagno a punto legaccio. MOTIVO: Vedere i diagrammi A.1 e A.2. I diagrammi mostrano tutti i ferri di 1 ripetizione del motivo, visti sul diritto del lavoro. -------------------------------------------------------- DAVANTI e DIETRO: Si lavorano avanti e indietro sui ferri. Avviare 74-78-82-86-90-94 m, senza stringere troppo il filo, sui ferri circolari n° 8 con il filato Vienna o Melody. ATTENZIONE! Assicurarsi che il bordo di avvio non sia troppo stretto. Lavorare il primo ferro sul diritto del lavoro come segue: 1 m vivagno a PUNTO LEGACCIO - vedere le spiegazioni sopra, lavorare il diagramma A.1 finché non rimane 1 m, finire con 1 m vivagno a punto legaccio. Proseguire lavorando il diagramma A.1 con 1 m vivagno a punto legaccio da ciascun lato, finché il lavoro non misura 3-3-4-5-6-7 cm. RICORDARSI LA TENSIONE DEL LAVORO! Avviare ora 4 nuove m da ciascun lato, per le maniche = 82-86-90-94-98-102 m, lavorare queste nuove m seguendo il motivo. Proseguire seguendo il diagramma A.1 con 1 m vivagno da ciascun lato. Quando il lavoro misura 37-41-44-47-50-53 cm, intrecciare 4 m all’inizio dei 2 ferri successivi = 74-78-82-86-90-94 m. Proseguire seguendo il diagramma A.1 con 1 m vivagno da ciascun lato finché il lavoro non misura 40-44-48-52-56-60 cm; intrecciare tutte le m senza stringere troppo il filo. ATTENZIONE! Assicurarsi che il bordo di chiusura delle m non sia troppo stretto CONFEZIONE: Mettere il bordo di avvio delle m contro il bordo di chiusura della m, rovescio del lavoro contro rovescio del lavoro, cucire i lati e il sotto delle maniche all’interno della m vivagno – vedere la linea tratteggiata nel diagramma. BORDO: Si lavora in tondo sui ferri. Riprendere, sul diritto del lavoro, ca. da 140 a 180 m lungo tutta l’apertura tra le maniche. Lavorare 1 giro a dir e, ALLO STESSO TEMPO, portare il n° delle m a 144-152-160-168-176-184. Lavorare ora seguendo il diagramma A.2 in tondo (= 36-38-40-42-44-46 ripetizioni). ATTENZIONE: Al 5° giro del motivo, lavorare le m gettate (= gli aumenti) a rov ritorto per evitare che si formino dei buchi. Dopo aver lavorato il diagramma A.2 1 volta in verticale, sui ferri ci sono 180-190-200-210-220-230 m. Lavorare ora 2 giri a punto legaccio; al giro successivo, intrecciare tutte le m senza stringere troppo il filo. ATTENZIONE ! Assicurarsi che il bordo di chiusura delle m non sia troppo stretto. |
||||||||||||||||||||||
Spiegazioni del diagramma |
||||||||||||||||||||||
|
||||||||||||||||||||||
 |
||||||||||||||||||||||
Avete terminato questo modello?Allora taggate le vostre foto con #dropspattern #cloudbolero o inviatele alla #dropsfan gallery. Avete bisogno di aiuto con questo modello?Troverete 17 video tutorial, una sezione per i commenti/domande e molto altro guardando il modello su www.garnstudio.com © 1982-2026 DROPS Design A/S. Ci riserviamo tutti i diritti. Questo documento, compreso tutte le sue sotto-sezioni, è protetto dalle leggi sul copyright. Potete leggere quello che potete fare con i nostri modelli alla fine di ogni modello sul nostro sito. |
||||||||||||||||||||||


Con oltre 40 anni di esperienza nel design di modelli di maglia e uncinetto, DROPS Design offre la più estesa collezione di modelli gratuiti su internet - tradotti in 17 lingue. Ad oggi vi possiamo fornire 324 cataloghi e 12290 modelli - 9561 dei quali sono tradotti in Italiano.
Ci stiamo impegnando molto per darvi il meglio che vi possiamo offrire in termini di maglia e uncinetto, ispirazioni e consigli così come filati di grande qualità ad un prezzo incredibile! Volete utilizzare i nostri modelli per qualcosa d'altro oltre al vostro uso personale? Potete leggere tutto ciò che è consentito nel testo sul Copyright in basso su tutte le pagine dei nostri modelli. Buon lavoro!
Lasciare un commento sul modello DROPS 148-24
Noi saremmo felici di ricevere i tuoi commenti e opinioni su questo modello!
Se vuoi fare una domanda, fai per favore attenzione a selezionare la categoria corretta nella casella qui sotto per velocizzare il processo di risposta. I campi richiesti sono indicati da *.