
Categorie popolari
State cercando un filato?


Commenti / Domande (36)
![]() Raquel Polo ha scritto:
Raquel Polo ha scritto:
Al comienzo de la vuelta 3 no se exactamente qué hay que hacer. 5 cadenetas y luego ? Lo que explica el patrón no queda claro. No hay forma de que quede bien. Me lo podéis explicar mejor? Gracias
04.08.2025 - 18:33DROPS Design ha risposto:
Hola Raquel, el grupo de p.a se explica arriba: 2 p.a., 2 cad y 2 p.a. en el mismo p.a La vuelta 3 es: Hacer 5 cad, * ( 2 p.a., 2 cad y 2 p.a.) en el p.a. siguiente, 2 cad, 1 p.a. en el bucle de cad del grupo de p.a. sig, 2 cad *, repetir de *a* en toda la vta, terminar con 1 grupo de p.a. en el último p.a., 2 cad y 1 p.bjs en la 3ª cad del inicio de la vta. Es decir, después de los 5 p.de cad, vas a repetir toda la vuelta: 1 grupo de p.a en el p.a - 2 p.de cad - 1 p.a en los 2 p.de cad del grupo debajo - 2 p.de cad. En el último p.a trabajas el grupo de p.a y terminas con 2 p.de cad y 1 punto enano o punto bajísimo en el 3º p.de cad de las 5 p.de cad iniciales.
05.08.2025 - 13:00
![]() Lis Arnoldi ha scritto:
Lis Arnoldi ha scritto:
Sorry det var mig der havde misforstået opskriften.
27.07.2024 - 14:35
![]() Lis Arnoldi ha scritto:
Lis Arnoldi ha scritto:
Er der ikke en fejl i opskriften. Der er28 stangmaske grupper. 112:4=28. Hilsen Lis Arnoldi
27.07.2024 - 14:27
![]() Nathalie ha scritto:
Nathalie ha scritto:
Hej! Jag förstår inte riktigt hur man ska göra en st-grupp? Vad menas med att " I samma st virkas 2 st, 2 lm och 2 st"?
27.11.2022 - 22:24DROPS Design ha risposto:
Hei Nathalie. Du hekler 2 staver i sammen stav, så hekler du 2 luftmasker og så 2 staver i den samme staven du heklet de 2 første stavene i. Dette (2 staver+2 luftmasker+2 staver) danner en gruppe = stav-gruppe. mvh DROPS Design
28.11.2022 - 14:20
![]() Ines ha scritto:
Ines ha scritto:
Hallo, ich würde die Tasche gern mit einer Kordel beenden anstatt des Schulterriemens. Hätten Sie einen Vorschlag, wie ich das machen könnte? Freundliche Grüße Ines
14.07.2021 - 10:59DROPS Design ha risposto:
Liebe Ines, Sie können sich vielleicht von unseren anderen gehäkelten Taschen mit Kordel inspirieren lassen. Viel Spaß beim häkeln!
15.07.2021 - 09:19
![]() Ines ha scritto:
Ines ha scritto:
Hallo, vielen Dank für eure schnelle Antwort und die Erklärung! Jetzt komme ich prima mit dem Muster klar! Freundliche Grüße Ines
12.07.2021 - 19:02
![]() Ines ha scritto:
Ines ha scritto:
Hallo, in der 3. Reihe des Musters müsste ich es doch dann eigentlich so arbeiten; 5 Luftmaschen, 1 Stäbchen in die 2 Luftmaschen der Vorreihe, eine Stäbchengruppe ins folgende Stäbchen. Ist das so richtig? Danke für Ihre Antwort, freundliche Grüße, Ines
12.07.2021 - 13:34DROPS Design ha risposto:
Liebe Ines, nach der ersten 5 Lm (= 1. Stb + 2 Lm) häkeln Sie von *bis* = *1 Stb-Gruppe in das nächste Stb, 2 Lm, 1 Stb in den Luftmaschenbogen der nächsten Stb-Gruppen, 2 Lm*, und von *bis* wiederholen. dh das 1. Stäbchen am Anfang der 3. Reihe in A.1 wird durch 3 Luftmaschen ersetzt + 2 Lm = 5 Lm. Viel Spaß beim häkeln!
12.07.2021 - 16:17
![]() Ines ha scritto:
Ines ha scritto:
Hallo, jetzt muss ich euch doch noch einmal fragen; soll ich in der 3. Runde des Musters die erste Stäbchengruppe komplett überspringen und die erste Stäbchengruppe in das Stäbchen danach häkeln? Leider stehe ich nach wie vor auf dem Schlauch und weiß nicht recht weiter. Freundliche Grüße, Ines
12.07.2021 - 10:31
![]() Ines ha scritto:
Ines ha scritto:
Hallo, ich häkele gerade diese hübsche marineblaue Tasche für den Urlaub am Meer und das Häkeln bereitet mir wie immer große Freude. Momentan möchte ich die dritte Muschelreihe (2 Stäbchen, 2 Luftmaschen, 2 Stäbchen) beginnen und überlege nach den 5 Luftmaschen, in welches Stäbchen das erste Stäbchen gehört. In das erste Stäbchen der Reihe oder wie genau ist das gemeint? Ist gerade ein wenig undurchsichtig für mich. Freundliche Grüße Ines
11.07.2021 - 21:50DROPS Design ha risposto:
Liebe Ines, diese 5 Luftmaschen gelten für 3 Lm = 1. Stäbchen + 2 Luftmaschen als 1. Luftmaschenbogen - siehe auch Diagram A.1. Viel Spaß beim häkeln!
12.07.2021 - 08:33
![]() Le Chat Détricote ha scritto:
Le Chat Détricote ha scritto:
Bonjour, Merci pour votre réponse. Je bute maintenant sur le début du tour 3 du point de fantaisie A1.😞 Le tour 2 commence par 1 groupe de B, 2ml, 1 B dans l'arceau du groupe de B suivant... et finit par 1 groupe de B, 2ml, 1mc dans la 3e ml du début du tour. Le tour 3 commence par 5ml, 1 groupe de B dans la B suivante, 2ml,... Mais au rang en dessous, j'ai déjà un groupe de B? Je ne vois pas comment faire? Merci pour vos lumières. Belle journée
21.08.2020 - 12:44DROPS Design ha risposto:
Bonjour Le Chat Détricote, le motif se croc hète sur 8 mailles, au 2ème tour vous devez terminez par 1 bride dans le groupe de Brides, 2 ml, 1 mc dans le groupe de brides du début du tour (= la 3ème ml qui remplace la1ère bride du 1er groupe de brides), le 3ème tour va ainsi commencer par 3 ml, (= 1ère bride), puis 2 ml, 1 groupe de bride dans la bride suivante, etc... Au début du 3ème rang, vous pouvez crocheter des mc dans le 1er arceau pour que les 3 ml partent au milieu du groupe de brides du début du 2ème tour. Bon crochet!
21.08.2020 - 13:12
|
||||||||||||||||
Jean#jeanbag |
||||||||||||||||
 |
 |
|||||||||||||||
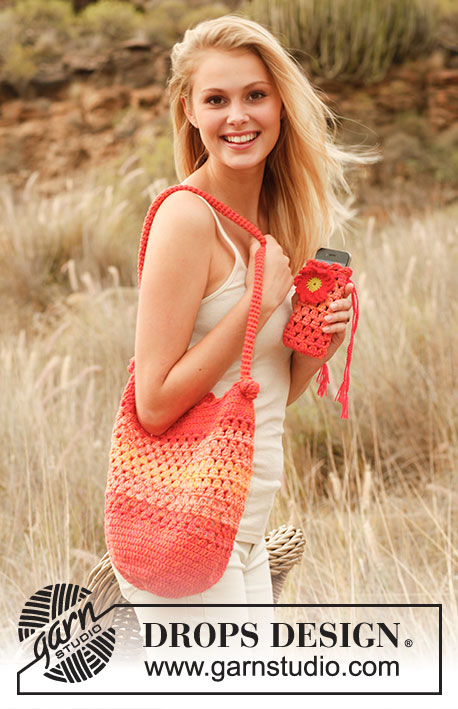
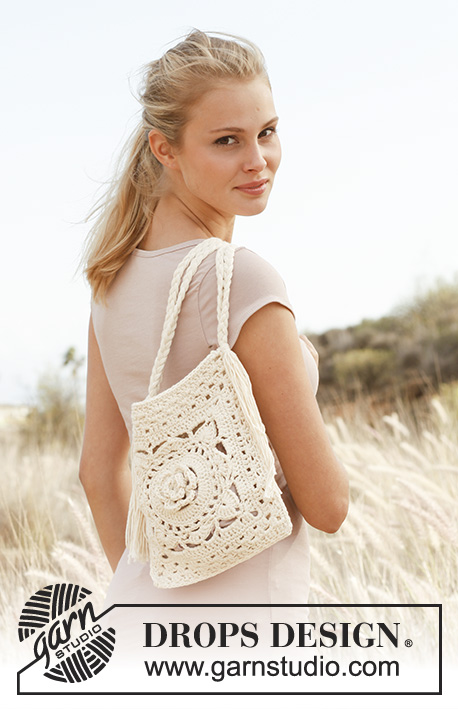
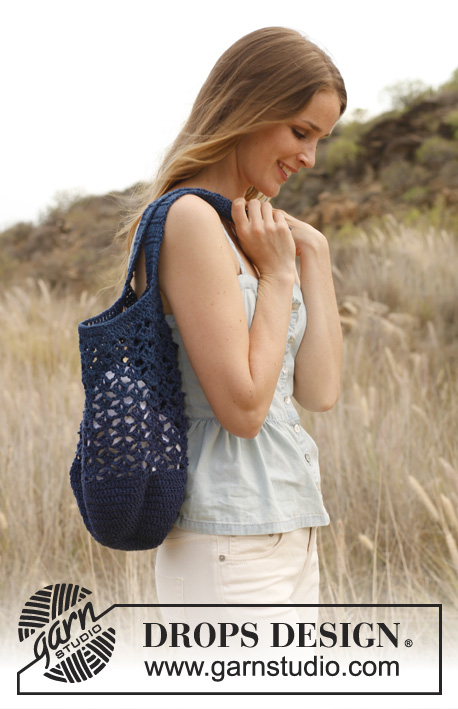
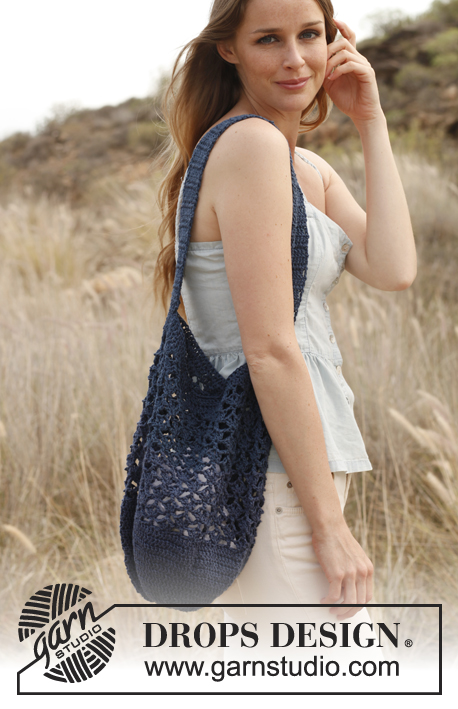
Borsa da shopping lavorata all’uncinetto, in DROPS Bomull Lin oppure DROPS Paris.
DROPS 147-22 |
||||||||||||||||
|
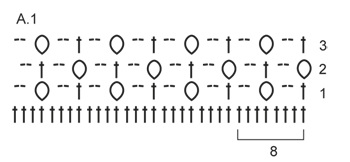
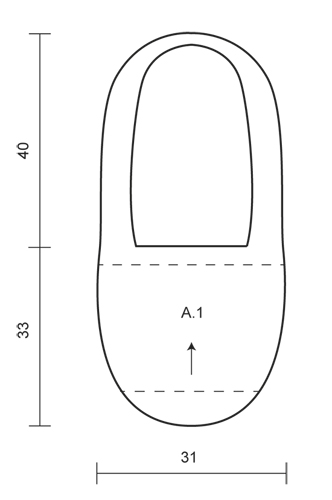
CERCHIO MAGICO: Quando si lavora in tondo, iniziare con questa tecnica per evitare buchi al centro (invece dell’anello di catenelle): Tenere l’estremità del filo e avvolgerlo una volta attorno all’indice per fare un anello. Tenere l’anello con il pollice e medio sinistro, mettere il filo sull’indice sinistro. Inserire l’uncinetto attraverso l’anello, fare 1 gettato e far passare il filo attraverso l’anello, lavorare 3 catenelle (= 1 m.a), poi lavorare a m.a. attorno all’anello. Quando è stato raggiunto il n° desiderato di m.a. tirare il filo per stringere l’anello. Affrancare l’estremità sul dietro. Continuare a lavorare in tondo a cerchio. INFO UNCINETTO: Sostituire la 1° m.a all’inizio di ogni riga con 3 cat (= 1 m.a), lavorare m.a in ogni m.a, terminare ogni giro con 1° m.bss nella 3° cat dell’inizio del giro. GRUPPI DI M.A: 1 gruppo di m.a = lavorare 2 m.a, 2 cat e 2 m.a nella stessa m.a. ---------------------------------------------------------- BORSA: Si lavora in tondo. Cominciare con il fondo della borsa lavorando un CERCHIO MAGICO - vedere le spiegazioni sopra - con Bomull Lin e l’uncinetto 4. 1° GIRO: Lavorare 16 m.a nel cerchio magico. 2° GIRO: VEDERE INFO UNCINETTO! Lavorare 2 m.a in ogni m.a = 32 m.a. 3° GIRO: * 1 m.a nella m.a seguente, 2 m.a nella m.a seguente *, ripetere da *-* tutto il giro = 48 m.a. 4° GIRO: * 1 m.a in ognuna delle 2 m.a seguenti, 2 m.a nella m.a seguente *, ripetere da *-* tutto il giro = 64 m.a. 5° GIRO: Lavorare 1 m.a in ogni m.a. 6° GIRO: * 1 m.a in ognuna delle 3 m.a seguenti, 2 m.a nella m.a seguente *, ripetere da *-* tutto il giro = 80 m.a. 7° GIRO: Lavorare 1 m.a in ogni m.a. 8° GIRO: * 1 m.a in ognuna delle 4 m.a seguenti, 2 m.a nella m.a seguenti *, ripetere da *-* tutto il giro = 96 m.a. 9° GIRO: Lavorare 1 m.a in ogni m.a. 10° GIRO: * 1 m.a in ognuna delle 5 m.a seguenti, 2 m.a nella m.a seguente *, ripetere da *-* tutto il giro = 112 m.a. 11°-13° GIRO: Lavorare 1 m.a in ogni m.a. Lavorare poi A.1 - vedere diag - così: 1° GIRO: Lavorare 5 cat (sostituiscono 1 m.a e 2 cat), saltare le prime 3 m.a, * lavorare 1 GRUPPE DI M.A - vedere le spiegazioni sopra - nella m.a seguente, 2 cat, saltare le 3 m.a seguente, 1 m.a nella m.a seguente, 2 cat, saltare 3 m.a *, ripetere da *-* tutto il giro, terminare con 1 gruppo di m.a, 2 cat, saltare le ultime 3 m.a e 1 m.bss nella 3° cat d’inizio del giro = 14 gruppi di m.a. 2° GIRO: Lavorare 1 gruppo di m.a nella stessa cat, * 2 cat, 1 m.a nell’arco di cat del gruppo di m.a seguente, 2 cat, 1 gruppo di m.a nella m.a seguente *, ripetere da *-* tutto il giro, terminare con 2 cat, 1 m.a nell’arco di cat dell’ultimo gruppo di m.a, 2 cat e 1 m.bss nella 3° cat d’inizio giro = 14 gruppi di m.a. 3° GIRO: Lavorare 5 cat, * 1 gruppo di m.a nella m.a seguente, 2 cat, 1 m.a nell’arco di cat del gruppo di m.a seguente, 2 cat *, ripetere da *-* tutto il giro, terminare co 1 gruppo di m.a nell’ultima m.a, 2 cat e 1 m.bss nella 3° cat d’inizio giro = 14 gruppi di m.a. Ripetere il 2° e il 3° GIRO. Lavorare A.1 per ca 18 cm (il lavoro misura ca 30 cm in altezza). Lavorare poi così: In ogni arco di cat, lavorare 2 m.a (anche nel arco di cat nel gruppo di m.a), in ogni m.a (non nella m.a dei gruppi di m.a) lavorare 2 m.a (vuol dire 8 m.a sopra ogni ripetizione di A.1) = 112 m.a in totale. Lavorare 1 giro con 1 m.a in ogni m.a, non tagliare il filo, ora il lavoro misura ca 33 cm in altezza. Inserire 1 segnapunti all’inizio del giro e 1 segnapunti dopo 56 m.a (= in mezzo al lato). TRACOLLA: Si lavora avanti e indietro così: Girare il lavoro e lavorare m.bss fino a 5.m.a dopo il 1° segnapunti, girare il lavoro e lavorare 1 m.a in ognuna delle 10 m seguenti (Il segnapunti si trova in mezzo a queste maglie), girare. Lavorare 1 m.a in ogni m.a finché la tracolla non misuri ca 80 cm dal segnapunti (oppure fino alla lungezza desiderata). Tagliare e fissare il filo. Cucire l’estremità all’altra parte della borsa, appena sopra il segnapunti così: Cucire con piccoli punti nella maglia più esterna dell’ultima maglia. |
||||||||||||||||
Spiegazioni del diagramma |
||||||||||||||||
|
||||||||||||||||
 |
||||||||||||||||
 |
||||||||||||||||
Avete terminato questo modello?Allora taggate le vostre foto con #dropspattern #jeanbag o inviatele alla #dropsfan gallery. Avete bisogno di aiuto con questo modello?Troverete 5 video tutorial, una sezione per i commenti/domande e molto altro guardando il modello su www.garnstudio.com © 1982-2026 DROPS Design A/S. Ci riserviamo tutti i diritti. Questo documento, compreso tutte le sue sotto-sezioni, è protetto dalle leggi sul copyright. Potete leggere quello che potete fare con i nostri modelli alla fine di ogni modello sul nostro sito. |
||||||||||||||||


Con oltre 40 anni di esperienza nel design di modelli di maglia e uncinetto, DROPS Design offre la più estesa collezione di modelli gratuiti su internet - tradotti in 17 lingue. Ad oggi vi possiamo fornire 324 cataloghi e 12291 modelli - 9562 dei quali sono tradotti in Italiano.
Ci stiamo impegnando molto per darvi il meglio che vi possiamo offrire in termini di maglia e uncinetto, ispirazioni e consigli così come filati di grande qualità ad un prezzo incredibile! Volete utilizzare i nostri modelli per qualcosa d'altro oltre al vostro uso personale? Potete leggere tutto ciò che è consentito nel testo sul Copyright in basso su tutte le pagine dei nostri modelli. Buon lavoro!
Lasciare un commento sul modello DROPS 147-22
Noi saremmo felici di ricevere i tuoi commenti e opinioni su questo modello!
Se vuoi fare una domanda, fai per favore attenzione a selezionare la categoria corretta nella casella qui sotto per velocizzare il processo di risposta. I campi richiesti sono indicati da *.