
Categorie popolari
State cercando un filato?


Commenti / Domande (195)
![]() Charlene ha scritto:
Charlene ha scritto:
I'm interested in watching this video but I cannot get the sound to work. Is there separate plug in for internet browsers in the USA? Or is there some other way I can watch the tutorials on the garnstudio website? I love the beautiful patterns that you have. They are so much nicer than what I can find in the USA.
10.12.2015 - 22:26DROPS Design ha risposto:
Dear Charlene, Our videos do not have sound. We are a worldwide company and our videos are watched by people around the world, speaking different languages, many of whom do not understand English. We have therefore written instructions to accompany this video, and there is no sound to disturb while watching. Enjoy!
11.12.2015 - 09:56
![]() Birgit ha scritto:
Birgit ha scritto:
Hallo, ich habe leider vor der Wollbestellung nicht ordentlich gelesen und nun stehen 2 Farben in der Anleitung. Wird das gute Stück 2-fädig gestrickt? Ich hab mir eine Wolle für Nadelstärke 6-8 bestellt (500 g, keine Ahnung, wie ich glauben konnte, dass das reicht ;)) LG Birgit
27.10.2015 - 09:25DROPS Design ha risposto:
Nein, es wird einfädig gestrickt, entweder mit Bomull-Lin oder mit Paris. Bei Bomull-Lin sind 500g daher in der Tat für Größe S ausreichend, wenn Sie die Maschenprobe einhalten, das ist natürlich Voraussetzung. Bei der Garnmenge müssen Sie immer die Lauflänge des Originalgarns beachten und dementsprechend umrechnen, wenn Sie ein anderes Alternativgarn verwenden wollen.
27.10.2015 - 21:18
![]() Fionn ha scritto:
Fionn ha scritto:
Hello, this is a fantastic pattern and so fun to knit! I'm on the left front piece, and I'm confused by what "band st" means. I can't find it in the tutorial videos and I don't understand the search engine results. Could you please clarify "band st"?
17.09.2015 - 18:09DROPS Design ha risposto:
Dear Mrs Fionn, the 19-21 front band sts on left front piece are the sts worked with A.1 to armhole (= 9-10 times A.1 = 19-21 sts). You continue over these sts with A.1 as you worked before. Happy knitting!
17.09.2015 - 18:28André De Castro ha scritto:
Hi! I would like to know if it is possible to tell me the finished measurents for the begining and the end of the sleeve. I want to make some alterations beacause the sleeve don't fit for the person I want to knit the jacket... Thanks in advance!
27.05.2015 - 15:52DROPS Design ha risposto:
Dear Mrs De Castro, you can calculate the measurements of your own sleeves with a simple ration (rule of three), on the basis of the tension (17 cm = 10 cm) and your desired measurements. Happy knitting!
27.05.2015 - 17:17
![]() Caroline ha scritto:
Caroline ha scritto:
Comment recuperer lesdiagrammes de ce modele 146.1 merci pour la reponse
23.02.2015 - 21:30DROPS Design ha risposto:
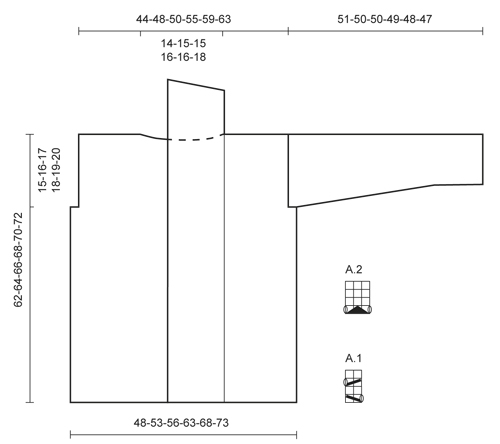
Bonjour Caroline, vous trouverez les diagrammes A.1 et A.2 en bas de page, à côté du schéma des mesures, A.1 se tricote sur 2 m et 4 rangs, A.2 sur 3 m et 4 rangs. Bon tricot!
24.02.2015 - 09:07
![]() Rita ha scritto:
Rita ha scritto:
Een telpatroon wordt van rechts naar links gelezen
05.08.2014 - 09:29
![]() Aline ha scritto:
Aline ha scritto:
Het telpatroon,word dat van links naar rechts gelezen of van rechts naar links?
05.08.2014 - 08:22DROPS Design ha risposto:
Hoi Eline. Je kan hier lezen hoe je onze telpatronen moet lezen.
06.08.2014 - 16:57
![]() Angela ha scritto:
Angela ha scritto:
Ich habe eine Frage zur Anleitung des Vorderteils. Dort steht das man glatt re' 1 Randmasche seit und 19 Blendenm zur vorderen Mitte weiter stricken soll. Sollen die Blendenm in Muster A1 gestrickt werden? Fuer Hilfe wäre ich sehr dankbar.
24.07.2014 - 19:22DROPS Design ha risposto:
Liebe Angela, ja genau, Sie haben ja mit den Blenden-M im Muster angefangen (beim Rumpfteil) und stricken die nun einfach im Muster A.1 wie zuvor weiter.
25.07.2014 - 11:26
![]() Claire ha scritto:
Claire ha scritto:
I bought the correct amount of wool for this pattern and when only one sleeve left to knit i have ran out of wool so have had to order a further 2 balls and pay postage again. i used the paris wool
05.06.2014 - 21:21
![]() Gunvor Waller ha scritto:
Gunvor Waller ha scritto:
Tyvärr stämmer mönstet inte. En bit in på första ärmen insåg jag att garnet inte skulle räcka. Jag fick köpa mer och då fanns inte samma färgbad så en ärm är med annat färgbad. När det var dags att montera såg jag genast att ärmhålet skulle bli alldeles för litet. Jag är van stickare och löste det med att sticka till 12 cm över resp axel och förlänga mönsterkanten så att det passade. Men då hade jag använt upp precis allt garn jag hade så nu syr jag ihop koftan med annat garn!
09.04.2014 - 10:36
|
||||||||||||||||
Nathalie#nathaliecardigan |
||||||||||||||||
 |
 |
|||||||||||||||
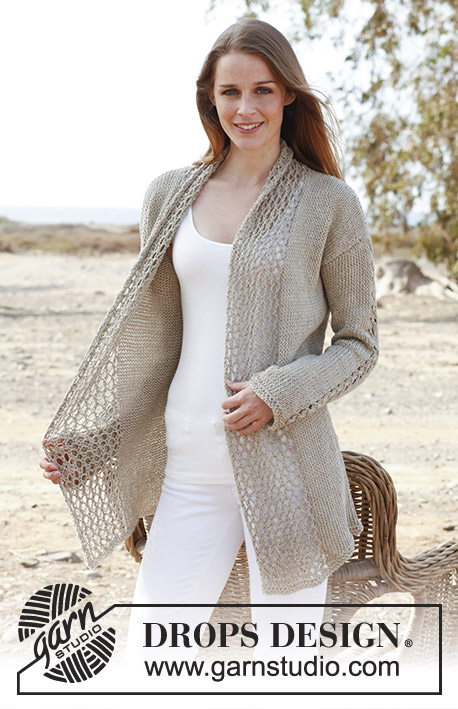
Giacca DROPS ai ferri in "Bomull Lin" o "Paris". Taglie: Dalla S alla XXXL.
DROPS 146-1 |
||||||||||||||||
|
PUNTO LEGACCIO: Lavorare tutti i ferri a dir, avanti e indietro sui ferri. 1 “costa” a legaccio = 2 ferri a dir. MOTIVO: Vedere i diagrammi A.1 e A.2. I diagrammi mostrano tutti i ferri di una ripetizione del motivo, visti sul diritto del lavoro. SUGGERIMENTO PER GLI AUMENTI: Aumentare 1 m facendo 1 m gettata; al ferro successivo, lavorare la m gettata ritorta (lavorarla quindi nell'asola posteriore e non in quella anteriore) per evitare che si formi un buco. -------------------------------------------------------- DAVANTI e DIETRO: Si lavorano avanti e indietro sui ferri circolari dal centro, davanti. Senza stringere troppo il filo, avviare 170-184-196-218-234-248 m sui ferri circolari n° 6 con il filato Bomull-Lin. Lavorare 4 ferri a punto legaccio - vedere le spiegazioni sopra. Lavorare il ferro successivo (= diritto del lavoro) come segue: 1 m vivagno a punto legaccio, lavorare il diagramma A.1 per 9-9-9-10-10-10 volte in tutto (= 19-19-19-21-21-21 m per il bordo davanti destro), lavorare a maglia rasata finché non rimangono 19-19-19-21-21-21 m, lavorare il diagramma A.1 per 9-9-9-10-10-10 volte in tutto, finire con 1 m vivagno a punto legaccio (= 19-19-19-21-21-21 m per il bordo davanti sinistro). Proseguire lavorando il diagramma A.1 sui bordi davanti da ciascun lato e a maglia rasata sulle m centrali. RICORDARSI LA TENSIONE DEL LAVORO! Quando il lavoro misura 47-48-49-50-51-52 cm, inserire 2 segni; il primo dopo le prime 47-50-53-59-63-66 m, il secondo prima delle ultime 47-50-53-59-63-66 m (= 76-84-90-100-108-116 m tra i due segni per il dietro). Al ferro successivo, intrecciare, per gli scalfi, le 3-4-5-6-7-8 m che precedono e le 3-4-5-6-7-8 m che seguono ognuno dei 2 segni (= intrecciare quindi 6-8-10-12-14-16 m da ciascun lato). Dividere ora il lavoro e finire ogni parte separatamente. DIETRO: = 70-76-80-88-94-100 m. Proseguire a maglia rasata con 1 m vivagno a punto legaccio da ciascun lato finché il lavoro non misura 60-62-64-66-68-70 cm. Intrecciare ora le 20-22-22-24-24-26 m centrali per il collo e finire ogni spalla separatamente. Al ferro successivo, intrecciare per il collo 1 m = per la spalla rimangono 24-26-28-31-34-36 m. Intrecciare tutte le m quando il lavoro misura 62-64-66-68-70-72 cm. DAVANTI SINISTRO: = 44-46-48-53-56-58 m. Proseguire a maglia rasata con 1 m vivagno a punto legaccio al lato e 19-19-19-21-21-21 m per il bordo davanti al centro finché il lavoro non misura 62-64-66-68-70-72 cm. Al ferro successivo, sul diritto del lavoro, intrecciare le prime 24-26-28-31-34-36 m per la spalla = per il bordo rimangono 20-20-20-22-22-22 m. Proseguire seguendo il diagramma A.1 con 1 m vivagno a punto legaccio da ciascun lato finché il bordo non misura 9-10-10-10-10-11 cm dalla spalla. All’inizio dei 3 ferri successivi sul diritto del lavoro, intrecciare le prime 5 m = rimangono 5-5-5-7-7-7 m. Al ferro successivo, sul diritto del lavoro, intrecciare queste m senza stringere troppo il filo. DAVANTI DESTRO: Lavorare come indicato per il DAVANTI SINISTRO ma a specchio. MANICHE: Si lavorano avanti e indietro sui ferri. Senza stringere troppo il filo, avviare 35-37-39-39-41-43 m e lavorare 4 ferri a punto legaccio. Lavorare il ferro successivo (= diritto del lavoro) come segue: 1 m vivagno a punto legaccio, 15-16-17-17-18-19 m dir, lavorare il diagramma A.2 sulle 3 m successive, 15-16-17-17-18-19 m dir, finire con 1 m vivagno a punto legaccio. Proseguire a maglia rasata seguendo il diagramma A.2 sulle 3 m centrali fino alla fine del lavoro. Quando il lavoro misura 8 cm, aumentare 1 m a 1 m vivagno da ciascun lato - vedere il SUGGERIMENTO PER GLI AUMENTI sopra. Ripetere questi aumenti ogni 6½-5½-4½-4-3½-3½ cm altre 6-7-8-9-10-10 volte (7-8-9-10-11-11 volte in tutto) = 49-53-57-59-63-65 m. Quando il lavoro misura 49-48-47-45-44-42 cm, inserire un segno da ciascun lato (servirà per la confezione). Quando il lavoro misura 51-50-50-49-48-47 cm (misure più corte per le taglie più grandi perché le spalle sono più larghe) intrecciare tutte le m senza stringere troppo il filo. CONFEZIONE: Cucire le spalla. Cucire tra di loro le due estremità del bordo, rovescio del lavoro contro rovescio del lavoro. Cucire il bordo allo scollo, sul dietro. Cucire le maniche, cucire i lati delle maniche all’interno della m vivagno - ATTENZIONE: La parte lavorata dopo il segno, nella parte superiore delle maniche, deve combaciare con le m intrecciate per lo scalfo. |
||||||||||||||||
Spiegazioni del diagramma |
||||||||||||||||
|
||||||||||||||||
 |
||||||||||||||||
Avete terminato questo modello?Allora taggate le vostre foto con #dropspattern #nathaliecardigan o inviatele alla #dropsfan gallery. Avete bisogno di aiuto con questo modello?Troverete 24 video tutorial, una sezione per i commenti/domande e molto altro guardando il modello su www.garnstudio.com © 1982-2026 DROPS Design A/S. Ci riserviamo tutti i diritti. Questo documento, compreso tutte le sue sotto-sezioni, è protetto dalle leggi sul copyright. Potete leggere quello che potete fare con i nostri modelli alla fine di ogni modello sul nostro sito. |
||||||||||||||||


Con oltre 40 anni di esperienza nel design di modelli di maglia e uncinetto, DROPS Design offre la più estesa collezione di modelli gratuiti su internet - tradotti in 17 lingue. Ad oggi vi possiamo fornire 324 cataloghi e 12290 modelli - 9561 dei quali sono tradotti in Italiano.
Ci stiamo impegnando molto per darvi il meglio che vi possiamo offrire in termini di maglia e uncinetto, ispirazioni e consigli così come filati di grande qualità ad un prezzo incredibile! Volete utilizzare i nostri modelli per qualcosa d'altro oltre al vostro uso personale? Potete leggere tutto ciò che è consentito nel testo sul Copyright in basso su tutte le pagine dei nostri modelli. Buon lavoro!
Lasciare un commento sul modello DROPS 146-1
Noi saremmo felici di ricevere i tuoi commenti e opinioni su questo modello!
Se vuoi fare una domanda, fai per favore attenzione a selezionare la categoria corretta nella casella qui sotto per velocizzare il processo di risposta. I campi richiesti sono indicati da *.