
Categorie popolari
State cercando un filato?


Commenti / Domande (196)
![]() Jasmin Braun ha scritto:
Jasmin Braun ha scritto:
Hallo Ich habe die Jacke soweit fertig und müsste nun die Ärmel einnähen...habe aber absolut keinen Plan wie ich anfangen soll. Erst einnähen und dann den Ärmel schließen? Gibt es hierzu ein Video? Danke
05.08.2017 - 11:27DROPS Design ha risposto:
Liebe Frau Braun, die Ärmel können Sie zuerst die Ärmel an den Armausschnitt zuerst einsetzten (siehe Video) und dann die Ärmel schließen. Viel Spaß beim fertigstellen!
07.08.2017 - 11:49
![]() Klára ha scritto:
Klára ha scritto:
Dobrý den, mám problém se sešitím celého svetru dohromady. Nedaří se mi zakomponovat trup ke zbytku dílů. Sešila jsem náramenice předního a zadního dílu a na zátylku jsem sešila légu. Zbyl mi trup, který zdánlivě nikam nepatří. Doufám, že není špatně upletený. Prosím o názornější návod případně lepší fotografie výsledného produktu i zezadu. Děkuji za odpověď
02.08.2017 - 14:28DROPS Design ha risposto:
Dobrý den, svetr se plete téměř vcelku - tělo jako jeden díl rozdělený u průramků na 2 přední + záda a pak samostatně 2x rukáv. Máte-li sešité náramenice i légu, máte trup komplet :-) Zbývá vsadit rukávy. Hodně zdaru! Hana
03.08.2017 - 13:01
![]() Paola ha scritto:
Paola ha scritto:
Buongiorno!! Vorrei sapere se la misura della larghezza segnata sul modello (48cm per la taglia s) va raddoppiata per controllare la larghezza totale o se la banda traforata si sovrappone, per cui vanno aggiunti i cm corrispondenti. Grazie!!
29.06.2017 - 15:09DROPS Design ha risposto:
Buongiorno Paola. La banda traforata sul davanti è sovrapposta. La larghezza indicata, quindi 48 cm, è la larghezza del dietro. Buon lavoro!
29.06.2017 - 15:46
![]() Dajana ha scritto:
Dajana ha scritto:
Hallo, wie muss man das mit dem Linken Vorderteil gemeint? fange ich vorne bei dem Muster an oder bei glatt rechts? weil eine absatz später soll man ja die Maschen für die Schluter abnehmen aber das is ja in der Hinreihe die ja rechts gestrickt wird wäre schön, wenn Sie mir helfen könnten lg :)
22.02.2017 - 20:50DROPS Design ha risposto:
Liebe Dajana, für das linke Vorderteil stricken Sie glatt mit 1 Randm an der Seite und die Blendemaschen wie zuvor bis die Arbit misst 62-72cm (siehe Größe), dann die Maschen für die Schulter abketten (am Anfang einer Hinreihe). Viel Spaß beim stricken!
23.02.2017 - 09:54
![]() Mariette ha scritto:
Mariette ha scritto:
Hallo,Als ik met patroon A1 begin en heb nog 21 steken op de naald begin ik dan weer met een omslag ? Of bewaar ik die omslag tot voor de laatste kantsteek?
16.02.2017 - 15:58DROPS Design ha risposto:
Hoi Mariette. Je breit het telpatroon zoals eerst (van de goede kant): 1 omsl, 2 r samen tot aan de kantsteek.
22.02.2017 - 12:32
![]() June ha scritto:
June ha scritto:
Hi, I'm having the same problem as Jo re the front neck edge and working it into the back. Seems like too much "edging" to fit !!!
13.08.2016 - 19:59DROPS Design ha risposto:
Dear June, the 9-10-11 cm (see size) you are working on each collar sts will be sewn along neckline on back piece and the sts on collar on left front piece and on right front piece will be sewn tog. Happy knitting!
15.08.2016 - 10:55Jo ha scritto:
I am having a lot of trouble with the band at the neck join of the L and R front pieces...It is too long. Do you only cast off the 5 stitches on the R side? And is it right that the join is in a point? Thanking you in anticipation. I don't think I can bear unpicking it again.
12.08.2016 - 02:40DROPS Design ha risposto:
Dear Jo, when working on left front piece, you will cast off the 5 sts at the beg of next 3 row from RS + cast off the remaining 5-7 sts. These 20-22 sts will be sewn tog to the collar sts on right front piece to shape collar. The collar (beg/end of rows) will then be sewn along neckline on back piece (sts cast off for neckline). Happy knitting!
15.08.2016 - 10:30
![]() June ha scritto:
June ha scritto:
In the pattern it shows 2 rows for A1, different instructions. When I watch the tutorial, it was one row repeated (knit row). When is the 2nd row used??
27.07.2016 - 01:19DROPS Design ha risposto:
Dear June, A.1 is worked over 2 sts and 4 rows, Row 1 (from RS): YO, slip 1, K1, psso Row 2 (from WS): P2 Row 3: K2 tog, YO Row 4: P2 Happy knitting!
27.07.2016 - 08:09
![]() Sara ha scritto:
Sara ha scritto:
When completing the band at front where it says to bind off 5 stitches on each of the right side row 3 times then bind off last 5 stitches when you begin these bind offs are you working in the pattern stitches of A1or do you switch to stockinette at this point?
06.05.2016 - 22:07DROPS Design ha risposto:
Dear Sara, continue working the sts in A.1 as before when shaping the collar. Happy knitting!
09.05.2016 - 09:14
![]() Gaby ha scritto:
Gaby ha scritto:
Ik begin en eindig iedere naald van het lijf met een kantsteek, toch zien de zijkanten van linker en rechter voorbies er anders uit. Hoe krijg ik deze hetzelfde?
17.04.2016 - 15:34DROPS Design ha risposto:
Hoi Gaby. Hoe brei je de kantsteek? Brei je de kantsteek r in elke naald? Dan zou de steken aan beide zijkanten ook gelijk zijn.
18.04.2016 - 14:15
|
||||||||||||||||
Nathalie#nathaliecardigan |
||||||||||||||||
 |
 |
|||||||||||||||
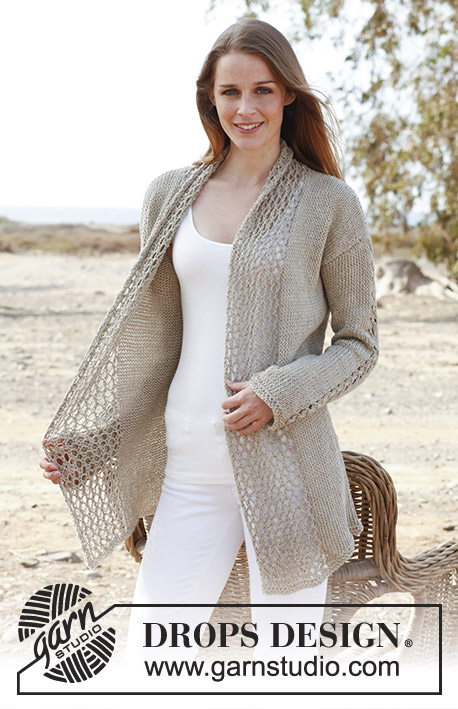
Giacca DROPS ai ferri in "Bomull Lin" o "Paris". Taglie: Dalla S alla XXXL.
DROPS 146-1 |
||||||||||||||||
|
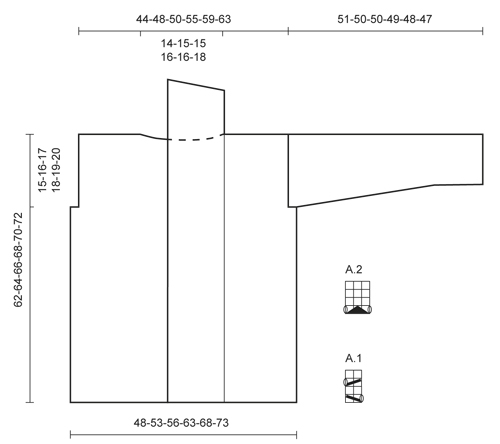
PUNTO LEGACCIO: Lavorare tutti i ferri a dir, avanti e indietro sui ferri. 1 “costa” a legaccio = 2 ferri a dir. MOTIVO: Vedere i diagrammi A.1 e A.2. I diagrammi mostrano tutti i ferri di una ripetizione del motivo, visti sul diritto del lavoro. SUGGERIMENTO PER GLI AUMENTI: Aumentare 1 m facendo 1 m gettata; al ferro successivo, lavorare la m gettata ritorta (lavorarla quindi nell'asola posteriore e non in quella anteriore) per evitare che si formi un buco. -------------------------------------------------------- DAVANTI e DIETRO: Si lavorano avanti e indietro sui ferri circolari dal centro, davanti. Senza stringere troppo il filo, avviare 170-184-196-218-234-248 m sui ferri circolari n° 6 con il filato Bomull-Lin. Lavorare 4 ferri a punto legaccio - vedere le spiegazioni sopra. Lavorare il ferro successivo (= diritto del lavoro) come segue: 1 m vivagno a punto legaccio, lavorare il diagramma A.1 per 9-9-9-10-10-10 volte in tutto (= 19-19-19-21-21-21 m per il bordo davanti destro), lavorare a maglia rasata finché non rimangono 19-19-19-21-21-21 m, lavorare il diagramma A.1 per 9-9-9-10-10-10 volte in tutto, finire con 1 m vivagno a punto legaccio (= 19-19-19-21-21-21 m per il bordo davanti sinistro). Proseguire lavorando il diagramma A.1 sui bordi davanti da ciascun lato e a maglia rasata sulle m centrali. RICORDARSI LA TENSIONE DEL LAVORO! Quando il lavoro misura 47-48-49-50-51-52 cm, inserire 2 segni; il primo dopo le prime 47-50-53-59-63-66 m, il secondo prima delle ultime 47-50-53-59-63-66 m (= 76-84-90-100-108-116 m tra i due segni per il dietro). Al ferro successivo, intrecciare, per gli scalfi, le 3-4-5-6-7-8 m che precedono e le 3-4-5-6-7-8 m che seguono ognuno dei 2 segni (= intrecciare quindi 6-8-10-12-14-16 m da ciascun lato). Dividere ora il lavoro e finire ogni parte separatamente. DIETRO: = 70-76-80-88-94-100 m. Proseguire a maglia rasata con 1 m vivagno a punto legaccio da ciascun lato finché il lavoro non misura 60-62-64-66-68-70 cm. Intrecciare ora le 20-22-22-24-24-26 m centrali per il collo e finire ogni spalla separatamente. Al ferro successivo, intrecciare per il collo 1 m = per la spalla rimangono 24-26-28-31-34-36 m. Intrecciare tutte le m quando il lavoro misura 62-64-66-68-70-72 cm. DAVANTI SINISTRO: = 44-46-48-53-56-58 m. Proseguire a maglia rasata con 1 m vivagno a punto legaccio al lato e 19-19-19-21-21-21 m per il bordo davanti al centro finché il lavoro non misura 62-64-66-68-70-72 cm. Al ferro successivo, sul diritto del lavoro, intrecciare le prime 24-26-28-31-34-36 m per la spalla = per il bordo rimangono 20-20-20-22-22-22 m. Proseguire seguendo il diagramma A.1 con 1 m vivagno a punto legaccio da ciascun lato finché il bordo non misura 9-10-10-10-10-11 cm dalla spalla. All’inizio dei 3 ferri successivi sul diritto del lavoro, intrecciare le prime 5 m = rimangono 5-5-5-7-7-7 m. Al ferro successivo, sul diritto del lavoro, intrecciare queste m senza stringere troppo il filo. DAVANTI DESTRO: Lavorare come indicato per il DAVANTI SINISTRO ma a specchio. MANICHE: Si lavorano avanti e indietro sui ferri. Senza stringere troppo il filo, avviare 35-37-39-39-41-43 m e lavorare 4 ferri a punto legaccio. Lavorare il ferro successivo (= diritto del lavoro) come segue: 1 m vivagno a punto legaccio, 15-16-17-17-18-19 m dir, lavorare il diagramma A.2 sulle 3 m successive, 15-16-17-17-18-19 m dir, finire con 1 m vivagno a punto legaccio. Proseguire a maglia rasata seguendo il diagramma A.2 sulle 3 m centrali fino alla fine del lavoro. Quando il lavoro misura 8 cm, aumentare 1 m a 1 m vivagno da ciascun lato - vedere il SUGGERIMENTO PER GLI AUMENTI sopra. Ripetere questi aumenti ogni 6½-5½-4½-4-3½-3½ cm altre 6-7-8-9-10-10 volte (7-8-9-10-11-11 volte in tutto) = 49-53-57-59-63-65 m. Quando il lavoro misura 49-48-47-45-44-42 cm, inserire un segno da ciascun lato (servirà per la confezione). Quando il lavoro misura 51-50-50-49-48-47 cm (misure più corte per le taglie più grandi perché le spalle sono più larghe) intrecciare tutte le m senza stringere troppo il filo. CONFEZIONE: Cucire le spalla. Cucire tra di loro le due estremità del bordo, rovescio del lavoro contro rovescio del lavoro. Cucire il bordo allo scollo, sul dietro. Cucire le maniche, cucire i lati delle maniche all’interno della m vivagno - ATTENZIONE: La parte lavorata dopo il segno, nella parte superiore delle maniche, deve combaciare con le m intrecciate per lo scalfo. |
||||||||||||||||
Spiegazioni del diagramma |
||||||||||||||||
|
||||||||||||||||
 |
||||||||||||||||
Avete terminato questo modello?Allora taggate le vostre foto con #dropspattern #nathaliecardigan o inviatele alla #dropsfan gallery. Avete bisogno di aiuto con questo modello?Troverete 24 video tutorial, una sezione per i commenti/domande e molto altro guardando il modello su www.garnstudio.com © 1982-2026 DROPS Design A/S. Ci riserviamo tutti i diritti. Questo documento, compreso tutte le sue sotto-sezioni, è protetto dalle leggi sul copyright. Potete leggere quello che potete fare con i nostri modelli alla fine di ogni modello sul nostro sito. |
||||||||||||||||


Con oltre 40 anni di esperienza nel design di modelli di maglia e uncinetto, DROPS Design offre la più estesa collezione di modelli gratuiti su internet - tradotti in 17 lingue. Ad oggi vi possiamo fornire 325 cataloghi e 12298 modelli - 9569 dei quali sono tradotti in Italiano.
Ci stiamo impegnando molto per darvi il meglio che vi possiamo offrire in termini di maglia e uncinetto, ispirazioni e consigli così come filati di grande qualità ad un prezzo incredibile! Volete utilizzare i nostri modelli per qualcosa d'altro oltre al vostro uso personale? Potete leggere tutto ciò che è consentito nel testo sul Copyright in basso su tutte le pagine dei nostri modelli. Buon lavoro!
Lasciare un commento sul modello DROPS 146-1
Noi saremmo felici di ricevere i tuoi commenti e opinioni su questo modello!
Se vuoi fare una domanda, fai per favore attenzione a selezionare la categoria corretta nella casella qui sotto per velocizzare il processo di risposta. I campi richiesti sono indicati da *.