
Categorie popolari
State cercando un filato?


Commenti / Domande (196)
![]() Karen Bredenhann ha scritto:
Karen Bredenhann ha scritto:
What type of wool is this, eg DK, chunky, Aran? This brand of wool is not available in South Africa and I need to know the thickness so I can search for the closest substitute. Thank you so much.
17.06.2019 - 20:05DROPS Design ha risposto:
Dear Mrs Bredenhann, you will find all informations about our yarns here and find all DROPS stores shipping worldwide here 18.06.2019 - 08:32
![]() Corinna ha scritto:
Corinna ha scritto:
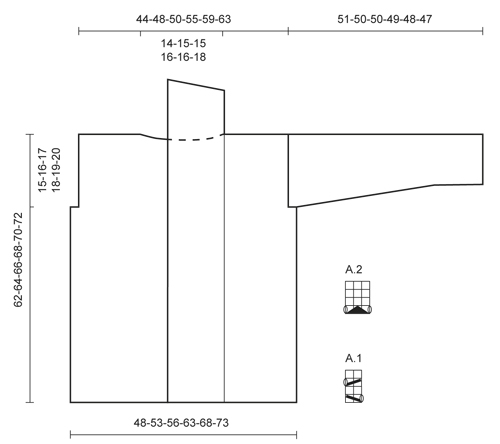
Liebes DROPS Team, Leider haben Sie meine Frage damit nicht beantwortet. Dass das Rückenteil 56cm hat sehe ich. Ich möchte wissen welche Breite das Vorderteil hat oder die Gesamtbreite, da die Jacke ja in einem gestrickt wird. Vielen Dank Corinna
30.05.2019 - 08:07DROPS Design ha risposto:
Liebe Corinna, die Breite gilt ja nur für die Breite der Jacke (mehr Maßen haben wir nicht) - wenn die Jacke flach liegt - wenn sie getragen wird, sieht es aus ungefär wie im Foto. Hier lesen Sie mehr über Maßen. Viel Spaß beim stricken!
31.05.2019 - 09:25
![]() Corinna ha scritto:
Corinna ha scritto:
Hallo, wieviel cm hat die Jacke über die gesamte Breite in L? Die Schemazeichnung sagt 56cm für das Rückenteil. Wie breit ist ein Vorderteil? Vielen Dank.
24.05.2019 - 22:59DROPS Design ha risposto:
Liebe Corinna, in L ist die Breite 56 cm, und die Länge ist 66 cm. Hier lesen Sie mehr über die Maßskizze. Viel Spaß beim stricken!
27.05.2019 - 13:22
![]() Giuliana ha scritto:
Giuliana ha scritto:
Vorrei sapere se posso lavorare con ferri normali e non circolari?
19.05.2019 - 15:41DROPS Design ha risposto:
Buongiorno Giuliana. Il cardigan è lavorato avanti e indietro, può quindi essere lavorato con i ferri dritti. I ferri circolari vengono suggeriti per via nel numero elevato di maglie. Potrebbe essere utile lavorare il dietro separatamente dai davanti. Per un aiuto più personalizzato, può rivolgersi al suo rivenditore Drops di fiducia. Buon lavoro!
19.05.2019 - 16:12
![]() Elke ha scritto:
Elke ha scritto:
Hallo, benutze ich wenn ich das Modell Nathalie mit dem Garn Paris stricke trotzdem Nadelstärke 6? Andere Modelle mit dem Garn Paris werden mit Nadelstärke 5 gestrickt. Grüße Elke
08.04.2019 - 12:36DROPS Design ha risposto:
Liebe Elke, hier muss Ihre Maschenprobe 16 M x 20 R glatt rechts sein, dh Sie brauchen Nadelgröße 6 oder die Nadelgröße anpassen, damit die Maschenprobe stimmt. Mit Nadeln 5 mm bekommt man normaleweise 17 M x 22 Reihe. Viel Spaß beim stricken!
08.04.2019 - 14:02Meghavarshini ha scritto:
Reply to question: Dear Mrs Meghavarshini, piece is worked bottom up in one piece up to armholes starting on mid front. The 170 sts include the front band sts worked in lace pattern on each side. You will have 76 sts for back piece (= approx. 48 cm) and 47 sts for each front piece. Happy knitting! Surely you mean 70sts? 76sts is for size M
17.08.2018 - 12:02DROPS Design ha risposto:
Dear Mrs Meghavarshini, you have 76 sts for the back piece between markers and 70 sts for back piece after the sts for armholes have been cast off (size S). Happy knitting!
17.08.2018 - 14:51Meghavarshini ha scritto:
Hello. I noticed that the measurements for the size small are 96cm. According to the tension mentioned here, that should be about 153-154 stitches. But I see that the CO instructions are for 170 stitches. How do the extra stitches help? Do they make the pattern more roomy, account for shrinkage, or serve some other purpose?
16.08.2018 - 19:56DROPS Design ha risposto:
Dear Mrs Meghavarshini, piece is worked bottom up in one piece up to armholes starting on mid front. The 170 sts include the front band sts worked in lace pattern on each side. You will have 76 sts for back piece (= approx. 48 cm) and 47 sts for each front piece. Happy knitting!
17.08.2018 - 11:08Stanislava ha scritto:
Dobrý deň, z plánu neviem vycitat aká je šírka trupu v cm pri veľkosti L. Ďakujem za potvrdenie
15.04.2018 - 18:00DROPS Design ha risposto:
Dobrý den, Stanislavo, šířka trupu u velikosti L je 56 cm, obvod (zadní díl + přední díly) je 112 cm, ale légy na předních dílech se překrývají. Tyto míry berte jako orientační - svetr je ležérní, volný. Hodně zdaru!
11.06.2018 - 20:39
![]() Stanka ha scritto:
Stanka ha scritto:
Dobrý deň, z plánu neviem vycitat aká je šírka trupu pri veľkosti L.
15.04.2018 - 14:31
![]() Nancy ha scritto:
Nancy ha scritto:
Pattern A2 are there 3 stockentette rows after the slip 1 st as if to K, K 2 tog, psso row? Also, the garter hem keeps flipping up. Is there anything, short of starting over, to get it to stay flat? Thanks
12.09.2017 - 00:24DROPS Design ha risposto:
Dear Nancy, it's correct about A.2, diagram is worked over 3 sts and 4 rows: 1 row with holes, 3 rows stockinette. When jacket is done, you can block it to make it flat with pins. Happy knitting!
12.09.2017 - 08:39
|
||||||||||||||||
Nathalie#nathaliecardigan |
||||||||||||||||
 |
 |
|||||||||||||||
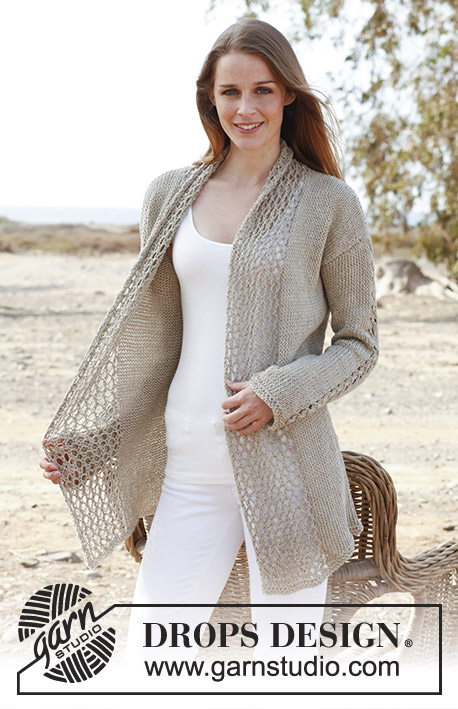
Giacca DROPS ai ferri in "Bomull Lin" o "Paris". Taglie: Dalla S alla XXXL.
DROPS 146-1 |
||||||||||||||||
|
PUNTO LEGACCIO: Lavorare tutti i ferri a dir, avanti e indietro sui ferri. 1 “costa” a legaccio = 2 ferri a dir. MOTIVO: Vedere i diagrammi A.1 e A.2. I diagrammi mostrano tutti i ferri di una ripetizione del motivo, visti sul diritto del lavoro. SUGGERIMENTO PER GLI AUMENTI: Aumentare 1 m facendo 1 m gettata; al ferro successivo, lavorare la m gettata ritorta (lavorarla quindi nell'asola posteriore e non in quella anteriore) per evitare che si formi un buco. -------------------------------------------------------- DAVANTI e DIETRO: Si lavorano avanti e indietro sui ferri circolari dal centro, davanti. Senza stringere troppo il filo, avviare 170-184-196-218-234-248 m sui ferri circolari n° 6 con il filato Bomull-Lin. Lavorare 4 ferri a punto legaccio - vedere le spiegazioni sopra. Lavorare il ferro successivo (= diritto del lavoro) come segue: 1 m vivagno a punto legaccio, lavorare il diagramma A.1 per 9-9-9-10-10-10 volte in tutto (= 19-19-19-21-21-21 m per il bordo davanti destro), lavorare a maglia rasata finché non rimangono 19-19-19-21-21-21 m, lavorare il diagramma A.1 per 9-9-9-10-10-10 volte in tutto, finire con 1 m vivagno a punto legaccio (= 19-19-19-21-21-21 m per il bordo davanti sinistro). Proseguire lavorando il diagramma A.1 sui bordi davanti da ciascun lato e a maglia rasata sulle m centrali. RICORDARSI LA TENSIONE DEL LAVORO! Quando il lavoro misura 47-48-49-50-51-52 cm, inserire 2 segni; il primo dopo le prime 47-50-53-59-63-66 m, il secondo prima delle ultime 47-50-53-59-63-66 m (= 76-84-90-100-108-116 m tra i due segni per il dietro). Al ferro successivo, intrecciare, per gli scalfi, le 3-4-5-6-7-8 m che precedono e le 3-4-5-6-7-8 m che seguono ognuno dei 2 segni (= intrecciare quindi 6-8-10-12-14-16 m da ciascun lato). Dividere ora il lavoro e finire ogni parte separatamente. DIETRO: = 70-76-80-88-94-100 m. Proseguire a maglia rasata con 1 m vivagno a punto legaccio da ciascun lato finché il lavoro non misura 60-62-64-66-68-70 cm. Intrecciare ora le 20-22-22-24-24-26 m centrali per il collo e finire ogni spalla separatamente. Al ferro successivo, intrecciare per il collo 1 m = per la spalla rimangono 24-26-28-31-34-36 m. Intrecciare tutte le m quando il lavoro misura 62-64-66-68-70-72 cm. DAVANTI SINISTRO: = 44-46-48-53-56-58 m. Proseguire a maglia rasata con 1 m vivagno a punto legaccio al lato e 19-19-19-21-21-21 m per il bordo davanti al centro finché il lavoro non misura 62-64-66-68-70-72 cm. Al ferro successivo, sul diritto del lavoro, intrecciare le prime 24-26-28-31-34-36 m per la spalla = per il bordo rimangono 20-20-20-22-22-22 m. Proseguire seguendo il diagramma A.1 con 1 m vivagno a punto legaccio da ciascun lato finché il bordo non misura 9-10-10-10-10-11 cm dalla spalla. All’inizio dei 3 ferri successivi sul diritto del lavoro, intrecciare le prime 5 m = rimangono 5-5-5-7-7-7 m. Al ferro successivo, sul diritto del lavoro, intrecciare queste m senza stringere troppo il filo. DAVANTI DESTRO: Lavorare come indicato per il DAVANTI SINISTRO ma a specchio. MANICHE: Si lavorano avanti e indietro sui ferri. Senza stringere troppo il filo, avviare 35-37-39-39-41-43 m e lavorare 4 ferri a punto legaccio. Lavorare il ferro successivo (= diritto del lavoro) come segue: 1 m vivagno a punto legaccio, 15-16-17-17-18-19 m dir, lavorare il diagramma A.2 sulle 3 m successive, 15-16-17-17-18-19 m dir, finire con 1 m vivagno a punto legaccio. Proseguire a maglia rasata seguendo il diagramma A.2 sulle 3 m centrali fino alla fine del lavoro. Quando il lavoro misura 8 cm, aumentare 1 m a 1 m vivagno da ciascun lato - vedere il SUGGERIMENTO PER GLI AUMENTI sopra. Ripetere questi aumenti ogni 6½-5½-4½-4-3½-3½ cm altre 6-7-8-9-10-10 volte (7-8-9-10-11-11 volte in tutto) = 49-53-57-59-63-65 m. Quando il lavoro misura 49-48-47-45-44-42 cm, inserire un segno da ciascun lato (servirà per la confezione). Quando il lavoro misura 51-50-50-49-48-47 cm (misure più corte per le taglie più grandi perché le spalle sono più larghe) intrecciare tutte le m senza stringere troppo il filo. CONFEZIONE: Cucire le spalla. Cucire tra di loro le due estremità del bordo, rovescio del lavoro contro rovescio del lavoro. Cucire il bordo allo scollo, sul dietro. Cucire le maniche, cucire i lati delle maniche all’interno della m vivagno - ATTENZIONE: La parte lavorata dopo il segno, nella parte superiore delle maniche, deve combaciare con le m intrecciate per lo scalfo. |
||||||||||||||||
Spiegazioni del diagramma |
||||||||||||||||
|
||||||||||||||||
 |
||||||||||||||||
Avete terminato questo modello?Allora taggate le vostre foto con #dropspattern #nathaliecardigan o inviatele alla #dropsfan gallery. Avete bisogno di aiuto con questo modello?Troverete 24 video tutorial, una sezione per i commenti/domande e molto altro guardando il modello su www.garnstudio.com © 1982-2026 DROPS Design A/S. Ci riserviamo tutti i diritti. Questo documento, compreso tutte le sue sotto-sezioni, è protetto dalle leggi sul copyright. Potete leggere quello che potete fare con i nostri modelli alla fine di ogni modello sul nostro sito. |
||||||||||||||||


Con oltre 40 anni di esperienza nel design di modelli di maglia e uncinetto, DROPS Design offre la più estesa collezione di modelli gratuiti su internet - tradotti in 17 lingue. Ad oggi vi possiamo fornire 325 cataloghi e 12298 modelli - 9569 dei quali sono tradotti in Italiano.
Ci stiamo impegnando molto per darvi il meglio che vi possiamo offrire in termini di maglia e uncinetto, ispirazioni e consigli così come filati di grande qualità ad un prezzo incredibile! Volete utilizzare i nostri modelli per qualcosa d'altro oltre al vostro uso personale? Potete leggere tutto ciò che è consentito nel testo sul Copyright in basso su tutte le pagine dei nostri modelli. Buon lavoro!
Lasciare un commento sul modello DROPS 146-1
Noi saremmo felici di ricevere i tuoi commenti e opinioni su questo modello!
Se vuoi fare una domanda, fai per favore attenzione a selezionare la categoria corretta nella casella qui sotto per velocizzare il processo di risposta. I campi richiesti sono indicati da *.