
Categorie popolari
State cercando un filato?


Commenti / Domande (195)
![]() SarahbuH ha scritto:
SarahbuH ha scritto:
Warm greetings! Hope you're doing well. I believe in the power of financial support to change lives. I provide grants for various projects and personal circumstances. WhatsApp +380938820856
24.01.2026 - 06:04
![]() Catherine ha scritto:
Catherine ha scritto:
Donc si je comprends bien, quand c’est mentionné pour le devant gauche "Continuer en jersey avec 1 m lis au point mousse sur le côté et 19-21 m de bordure devant milieu devant jusqu'à ce que l'ouvrage mesure 62-64-66-68-70-72 cm. ", la bordure devant milieu de cette partie, c’est le point fantaisie A.1. Et pour le devant droit, je lis le diagramme du point A.1 de la même façon? Je ne l’inverse pas? Le seul changement est au niveau du rabattage des mailles?
19.01.2026 - 12:00DROPS Design ha risposto:
Bonjour Catherine, pour le devant gauche, les 19-21 m en fin de rang sur l'endroit sont pour la bordure devant = 18-20 m de A.1 + 1 m lisière au point mousse; pour le devant droit, les 19-21 premières mailles sur l'endroit sont pour la bordure devant soit 1 m lisière au point mousse et 18-20 m de A.1. Le diagramme se tricote de la même façon, on le lit de haut en bas et de droite à gauche sur l'endroit / de gauche à droite sur l'envers. Bon tricot!
20.01.2026 - 08:57
![]() Catherine ha scritto:
Catherine ha scritto:
Bonjour, ll me reste quelques petites interrogations surtout au niveau du devant gauche et du devant droit. Tout d’abord, quand on mentionne bordure devant milieu, quel point est utilisé? Je ne suis pas sûre si c’est du jersey ou le A1. De plus, je ne suis pas sûre de comprendre comment inverser le devant gauche pour obtenir le devant droit. Je ne sais pas à point je dois inverser les différents points ou rangs pour effectuer le devant droit.
17.01.2026 - 19:55DROPS Design ha risposto:
Bonjour Catherine; les mailles de bordure des devants sont tricotées en suivant le diagramme A.1 (9 à 10 fois selon la taille), avec 1 maille lisière au point mousse de chaque côté. Lorsque vous aurez divisé pour les emmanchures, vous terminez le dos et les devants séparément. Après avoir tricoté le devant gauche, tricotez le devant droit de la même façon mais rabattez les mailles de l'épaule en début de rang sur l'envers. Vous rabattrez les 5 mailles du col au début des 3 rangs suivants sur l'envers (après les 9, 10, 11 cm à partir de l'épaule). Ainsi, le devant droit est "en miroir" du devant gauche. Bon tricot!
19.01.2026 - 09:21
![]() Giusy ha scritto:
Giusy ha scritto:
Per finire questo modello ho dovuto disfare tre volte il collo perdendo moltissimo tempo. Seguendo le indicazioni fornite, così come ho letto in altri commenti, 10 cm di motivo per lo scollo dopo aver chiuso la spalla sono veramente troppi. Lavorando una taglia L sono bastati 5cm di motivo per lo scollo per ognuna delle due parti, prima di iniziare le diminuzioni per chiudere lo scollo. Comunque una grandissima perdita di tempo!
02.11.2025 - 16:31DROPS Design ha risposto:
Buonasera Giusy, grazie per il suggerimento. Buon lavoro!
02.11.2025 - 18:44
![]() Andrea ha scritto:
Andrea ha scritto:
Hallo:-) Müssen die Abnahmen für den Kragen auf der Seite zum Halsauschnitt gemacht werden oder auf der Außenseite?
08.09.2025 - 16:11DROPS Design ha risposto:
Liebe Andrea, die Kragen-Maschen behalten Sie, die Schultermaschen ketten Sie ab. Am Ende des Kragens erfolgt das Abketten (3 x je 5 M) auch an der Schulterseite. Entschuldigen Sie bitte die späte Antwort. Gutes Gelingen und viel Spaß beim Tragen!
23.10.2025 - 20:51
![]() Anne-Christine ha scritto:
Anne-Christine ha scritto:
Non, excusez moi, c’est le modèle Free Flow, mais je pense avoir compris. Merci!
29.08.2025 - 18:56
![]() Anne-Christine ha scritto:
Anne-Christine ha scritto:
Bonjour! Je ne comprends pas « Au 15e rang de A3, tricoter une maille en moins après la dernière maille du diagramme ». Est-ce que je dois rabattre une maille ou au contraire ne pas tricoter les deux mailles ensemble après le jeté? Merci d’avance pour votre réponse
28.08.2025 - 22:05DROPS Design ha risposto:
Bonjour Anne-Christine, votre question porte t'elle vraiment sur le modèle Nathalie? Je ne trouve pas cette mention dans le explications. Merci d'avance.
29.08.2025 - 16:38
![]() Angèle ha scritto:
Angèle ha scritto:
Bonsoir, J'arrive à ce niveau "Au début des 3 rangs suiv sur l'endroit, rabattre les 5 premières m = il reste 5-5-5-7-7-7 m. Rabattre souplement ces mailles au rang suivant sur l'endroit.". Dois je continuer en tricotant A1 ou en jersey. Merci pour votre retour. Bien cordialement.
27.07.2025 - 21:00DROPS Design ha risposto:
Bonjour Angèle, continuez à bien tricoter les mailles restantes comme avant, autrement dit, en point ajouré. Bon tricot!
28.07.2025 - 08:06
![]() Elisabeth Steen ha scritto:
Elisabeth Steen ha scritto:
Jeg ser av diagrammet at man skal ta et kast mellom 2 masker (nr. 2 ovenfra), men hvor er de? Det står ingenting om det hverken i Diagram A1 eller A2. Jeg har ikke prøvd oppskriften, men siden det kastet mangler kan jeg ikke skjønne annet enn at man får færre og færre masker siden man (etter hva jeg forstår) bare skal ta inn, ikke øke noe sted.
08.03.2025 - 11:06DROPS Design ha risposto:
Hei Elisabeth. Litt usikker på spørsmålet ditt. Diagram A.1 består av 2 masker som gjentas i bredden, diagrammet strikkes slik: 1 kast + ta 1 maske løst av pinnen som om den skulle strikkes rett, 1 rett, løft den løse maske over. Diagrammet består nå av 1 kast + 1 maske, altså fremdeles 2 masker. Det samme gjelder på 3. pinne (bortsett fra at man strikker 2 rett sammen + 1 kast). A.2 består av 3 masker og når man strikker 1. pinne felles det 2 masker og lages 2 kast = 3 masker. Les diagramteksten og evnt se på hjelpevideoene. mvh DROPS Design
10.03.2025 - 14:39
![]() Kathie ha scritto:
Kathie ha scritto:
And confirming - for the right and left band sections of A1, I should always count off 19 stitches, correct? Thx.
27.05.2024 - 16:32DROPS Design ha risposto:
Dear Kathie, yes, since in the pattern for each decrease there is an accompaniying yarnover, the stitchnumber of the patterned band will not change. Happy Knitting!
27.05.2024 - 18:50
|
||||||||||||||||
Nathalie#nathaliecardigan |
||||||||||||||||
 |
 |
|||||||||||||||
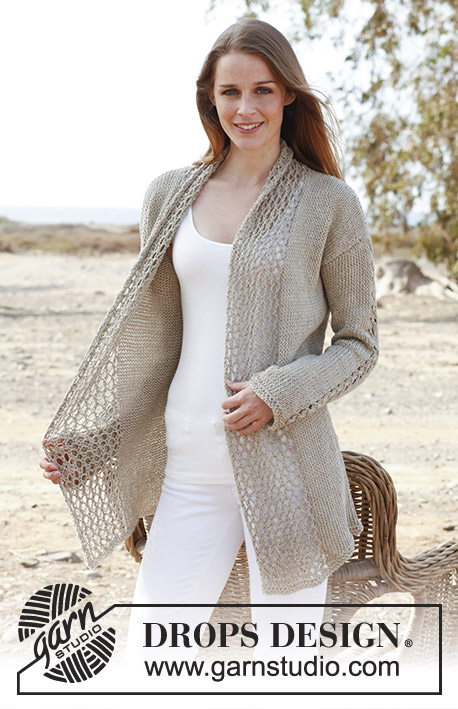
Giacca DROPS ai ferri in "Bomull Lin" o "Paris". Taglie: Dalla S alla XXXL.
DROPS 146-1 |
||||||||||||||||
|
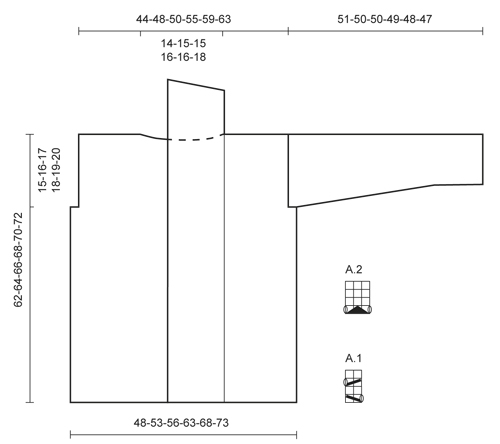
PUNTO LEGACCIO: Lavorare tutti i ferri a dir, avanti e indietro sui ferri. 1 “costa” a legaccio = 2 ferri a dir. MOTIVO: Vedere i diagrammi A.1 e A.2. I diagrammi mostrano tutti i ferri di una ripetizione del motivo, visti sul diritto del lavoro. SUGGERIMENTO PER GLI AUMENTI: Aumentare 1 m facendo 1 m gettata; al ferro successivo, lavorare la m gettata ritorta (lavorarla quindi nell'asola posteriore e non in quella anteriore) per evitare che si formi un buco. -------------------------------------------------------- DAVANTI e DIETRO: Si lavorano avanti e indietro sui ferri circolari dal centro, davanti. Senza stringere troppo il filo, avviare 170-184-196-218-234-248 m sui ferri circolari n° 6 con il filato Bomull-Lin. Lavorare 4 ferri a punto legaccio - vedere le spiegazioni sopra. Lavorare il ferro successivo (= diritto del lavoro) come segue: 1 m vivagno a punto legaccio, lavorare il diagramma A.1 per 9-9-9-10-10-10 volte in tutto (= 19-19-19-21-21-21 m per il bordo davanti destro), lavorare a maglia rasata finché non rimangono 19-19-19-21-21-21 m, lavorare il diagramma A.1 per 9-9-9-10-10-10 volte in tutto, finire con 1 m vivagno a punto legaccio (= 19-19-19-21-21-21 m per il bordo davanti sinistro). Proseguire lavorando il diagramma A.1 sui bordi davanti da ciascun lato e a maglia rasata sulle m centrali. RICORDARSI LA TENSIONE DEL LAVORO! Quando il lavoro misura 47-48-49-50-51-52 cm, inserire 2 segni; il primo dopo le prime 47-50-53-59-63-66 m, il secondo prima delle ultime 47-50-53-59-63-66 m (= 76-84-90-100-108-116 m tra i due segni per il dietro). Al ferro successivo, intrecciare, per gli scalfi, le 3-4-5-6-7-8 m che precedono e le 3-4-5-6-7-8 m che seguono ognuno dei 2 segni (= intrecciare quindi 6-8-10-12-14-16 m da ciascun lato). Dividere ora il lavoro e finire ogni parte separatamente. DIETRO: = 70-76-80-88-94-100 m. Proseguire a maglia rasata con 1 m vivagno a punto legaccio da ciascun lato finché il lavoro non misura 60-62-64-66-68-70 cm. Intrecciare ora le 20-22-22-24-24-26 m centrali per il collo e finire ogni spalla separatamente. Al ferro successivo, intrecciare per il collo 1 m = per la spalla rimangono 24-26-28-31-34-36 m. Intrecciare tutte le m quando il lavoro misura 62-64-66-68-70-72 cm. DAVANTI SINISTRO: = 44-46-48-53-56-58 m. Proseguire a maglia rasata con 1 m vivagno a punto legaccio al lato e 19-19-19-21-21-21 m per il bordo davanti al centro finché il lavoro non misura 62-64-66-68-70-72 cm. Al ferro successivo, sul diritto del lavoro, intrecciare le prime 24-26-28-31-34-36 m per la spalla = per il bordo rimangono 20-20-20-22-22-22 m. Proseguire seguendo il diagramma A.1 con 1 m vivagno a punto legaccio da ciascun lato finché il bordo non misura 9-10-10-10-10-11 cm dalla spalla. All’inizio dei 3 ferri successivi sul diritto del lavoro, intrecciare le prime 5 m = rimangono 5-5-5-7-7-7 m. Al ferro successivo, sul diritto del lavoro, intrecciare queste m senza stringere troppo il filo. DAVANTI DESTRO: Lavorare come indicato per il DAVANTI SINISTRO ma a specchio. MANICHE: Si lavorano avanti e indietro sui ferri. Senza stringere troppo il filo, avviare 35-37-39-39-41-43 m e lavorare 4 ferri a punto legaccio. Lavorare il ferro successivo (= diritto del lavoro) come segue: 1 m vivagno a punto legaccio, 15-16-17-17-18-19 m dir, lavorare il diagramma A.2 sulle 3 m successive, 15-16-17-17-18-19 m dir, finire con 1 m vivagno a punto legaccio. Proseguire a maglia rasata seguendo il diagramma A.2 sulle 3 m centrali fino alla fine del lavoro. Quando il lavoro misura 8 cm, aumentare 1 m a 1 m vivagno da ciascun lato - vedere il SUGGERIMENTO PER GLI AUMENTI sopra. Ripetere questi aumenti ogni 6½-5½-4½-4-3½-3½ cm altre 6-7-8-9-10-10 volte (7-8-9-10-11-11 volte in tutto) = 49-53-57-59-63-65 m. Quando il lavoro misura 49-48-47-45-44-42 cm, inserire un segno da ciascun lato (servirà per la confezione). Quando il lavoro misura 51-50-50-49-48-47 cm (misure più corte per le taglie più grandi perché le spalle sono più larghe) intrecciare tutte le m senza stringere troppo il filo. CONFEZIONE: Cucire le spalla. Cucire tra di loro le due estremità del bordo, rovescio del lavoro contro rovescio del lavoro. Cucire il bordo allo scollo, sul dietro. Cucire le maniche, cucire i lati delle maniche all’interno della m vivagno - ATTENZIONE: La parte lavorata dopo il segno, nella parte superiore delle maniche, deve combaciare con le m intrecciate per lo scalfo. |
||||||||||||||||
Spiegazioni del diagramma |
||||||||||||||||
|
||||||||||||||||
 |
||||||||||||||||
Avete terminato questo modello?Allora taggate le vostre foto con #dropspattern #nathaliecardigan o inviatele alla #dropsfan gallery. Avete bisogno di aiuto con questo modello?Troverete 24 video tutorial, una sezione per i commenti/domande e molto altro guardando il modello su www.garnstudio.com © 1982-2026 DROPS Design A/S. Ci riserviamo tutti i diritti. Questo documento, compreso tutte le sue sotto-sezioni, è protetto dalle leggi sul copyright. Potete leggere quello che potete fare con i nostri modelli alla fine di ogni modello sul nostro sito. |
||||||||||||||||


Con oltre 40 anni di esperienza nel design di modelli di maglia e uncinetto, DROPS Design offre la più estesa collezione di modelli gratuiti su internet - tradotti in 17 lingue. Ad oggi vi possiamo fornire 324 cataloghi e 12290 modelli - 9561 dei quali sono tradotti in Italiano.
Ci stiamo impegnando molto per darvi il meglio che vi possiamo offrire in termini di maglia e uncinetto, ispirazioni e consigli così come filati di grande qualità ad un prezzo incredibile! Volete utilizzare i nostri modelli per qualcosa d'altro oltre al vostro uso personale? Potete leggere tutto ciò che è consentito nel testo sul Copyright in basso su tutte le pagine dei nostri modelli. Buon lavoro!
Lasciare un commento sul modello DROPS 146-1
Noi saremmo felici di ricevere i tuoi commenti e opinioni su questo modello!
Se vuoi fare una domanda, fai per favore attenzione a selezionare la categoria corretta nella casella qui sotto per velocizzare il processo di risposta. I campi richiesti sono indicati da *.