
Categorie popolari
State cercando un filato?


Commenti / Domande (48)
![]() RS ha scritto:
RS ha scritto:
Hi This is a follow-up question to my previous one regarding tension. I did wash and block my swatch and the tension was 24sts to 10cm. Would you recommend using a double strand of brushed alpaca silk instead and a smaller needle to try and achieve the right tension? I am not sure how tricky it would be to use a double strand of yarn for a lace knitting.
29.09.2020 - 13:14DROPS Design ha risposto:
Dear RS, if you don't get the correct tension with needle size 4 mm, try again with larger needles until you get the right tension - read more about tension here - Happy knitting!
29.09.2020 - 14:49
![]() RS ha scritto:
RS ha scritto:
The pattern recommends 4mm needles but this is for Drops Vivaldi. Drops recommend Brushed Alpaca Silk as a substitute and for this yarn 5mm needles are suggested. I'm having trouble with the tension. When I swatched I had 24sts to 10cm with 5mm needles. I don't want to increase the needle size as this will produce a loose fabric in the finished item and this does not look nice with a lace pattern. Would it be possible to use a double strand of yarn instead and a smaller needle to get tension?
28.09.2020 - 12:14DROPS Design ha risposto:
Dear RS, Brushed Alpaca Silk is a good choice as alternative to Vivaldi (same weight/meterage). To get the finished measurements you need to have the correct tension, you can block your swatch first and check measurements after blocking - read more about tension here. Happy knitting!
28.09.2020 - 12:37
![]() RS ha scritto:
RS ha scritto:
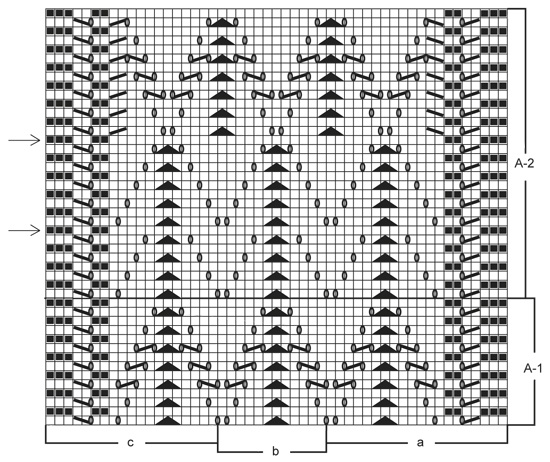
Hi On some rows in the pattern, row 1 for example, there is a YO between A1a and A1b and A1b and A1c (this is also the case in A2). I'm not exactly sure how to handle this given that I need to repeat A1b 4 times. I think that you would do the following: Do a YO at the end of A1a and then start A1b with a knit stitch and then end A1b with a YO and then when you start A1b for the second time you start with a knit stitch? Is this correct?
14.08.2020 - 13:34DROPS Design ha risposto:
Dear RS, you should always have the same number of sts in each diagram, ie each decrease will be compensate by a yarn over. work a over 20 sts, each b over 12 sts and c over 19 sts. Adding a marker between each repeat can help you to keep the correct number of sts. Happy knitting!
14.08.2020 - 13:43
![]() RS ha scritto:
RS ha scritto:
Hi, You sent me a response yesterday about how to handle A2b row 19 which ends part way through a slip 1 st as if to K, K2 tog, psso. You wrote: "On the row with the double decrease, work the last 2 sts in a/b together with the first stich in b/next b/c." Do you mean that you end A2a with a slip 1 st as if to K, K2 tog, psso and then you end A2b in the same way and then when you go back to start A2b for the 2nd time you start it with a knit stitch? Is that correct?
14.08.2020 - 13:12DROPS Design ha risposto:
Dear RS, you end A.2a with slip the next to last st in a as if to K, K tog the last st in a + the first st in b, psso = this is now the first stitch in b. Work b until 2 sts remain, slip the next st as if to K, Ktog the last st in b + first stitch next b (then c), psso = this is now the first stitch in next b (and c at the end of the row). Do not hesitate to add markers between the repeats so that you can count the stitches and check that you still get the same number of sts in each repeat in width. Happy knitting!
14.08.2020 - 13:38
![]() RS ha scritto:
RS ha scritto:
Please clarify: "When A-1 has been worked 1 time vertically, continue with A-2 the same way." Do you mean that for A-2 you also knit diagram a over the first 20 sts, diagram b 4 times in breadth and then diagram c over the last 19 sts? If yes, how do you handle A2 diagram b from row 19 onwards, as on the odd rows diagram b ends part way through a slip 1 st as if to K, K 2 tog, psso. How do you tackle this?
13.08.2020 - 12:48DROPS Design ha risposto:
Dear RS, correct, you will work (from RS): A.2a, A.2b a total of 4 times in width and A.2c - (from WS read from the left towards the right and work: A.2c, A.2b a total of 4 times and finish with A.2a). On the row with the double decrease, work the last 2 sts in a/b together with the first stich in b/next b/c. Happy knitting!
13.08.2020 - 15:46
![]() RHS ha scritto:
RHS ha scritto:
Hi Could you please tell me if there is a correction to this pattern, as I got the impression from some of the comments that there was an error in the diagram? Thank you.
13.07.2020 - 18:21DROPS Design ha risposto:
Dear RHS, pattern and diagrams are right - this could help you to understand how to read diagrams. Happy knitting!
14.07.2020 - 09:02
![]() Silvia ha scritto:
Silvia ha scritto:
Ho realizzato questo modello con lana alpaka silk e con tanta fatica ma purtroppo al primo lavaggio a 30° si è completamente infeltrito e ora è inutilizzabile.
22.05.2019 - 18:56
![]() Marie Nilsson ha scritto:
Marie Nilsson ha scritto:
Det står i början att alla varv ska stickas räta men i diagramet står det vid en symbol ”rät från rätsidan och avig från avigsidan... hur stickar man då?
02.10.2018 - 12:43DROPS Design ha risposto:
Hei Marie. Hvis du refererer til forklaringen av RILLE, så gjelder dette kun der det står i oppskriften at du skal strikke rille. Jeg kan se at i akkurat denne oppskriften er det ikke noen steder det skal strikkes riller, så akkurat her er den informasjonen irrelevant - vi skal få fjernet den. Du skal følge diagrammet som anvist, og strikke rett fra retten og vrang fra vrangen der det symbolet står. God fornøyelse.
03.10.2018 - 11:16
![]() Silvia Desiderio ha scritto:
Silvia Desiderio ha scritto:
Salve, ho iniziato a lavorare questo scialle. Potreste spiegarmi come lavorare la parte b del diagramma A1? Siccome si deve ripetere 4 volte, inizio con 1 gettata, 4 m. a rovescio, 1 m passata senza lavorarla, 2 insieme a dir, accavallo la m passata, 4 rov, 1 gett.,1 dir e poi? Ricomincio o devo fare 2 gettate? Grazie
30.08.2018 - 17:14DROPS Design ha risposto:
Buongiorno Silvia. Il primo ferro della parte b si lavora così, sul diritto del lavoro: 1 gettato, 4 m diritto, 1 m passata,2 insieme a dir, accavalla, 4 m diritto, 1 gettato, 1 dir e poi ricomincia con 1 gettato, 4 m dir e così via. Il numero delle maglie resta lo stesso su tutti i ferri. Buon lavoro!
30.08.2018 - 18:49
![]() Silvia Desiderio ha scritto:
Silvia Desiderio ha scritto:
Volevo chiedere un'altra cosa. Siccome questo scialle mi serve per un matrimonio, ho preso il colore nero (Vivaldi non era disponibile e allora ho preso brushed alpaca silk). C'è un filato da abbinare che dia un pò di luminosità? tipo un filo lurex o qualcosa del genere...
28.08.2018 - 13:11DROPS Design ha risposto:
Buongiorno Silvia. Può aggiungere un filo di glitter. Buon lavoro!
28.08.2018 - 14:09
|
|||||||||||||||||||
Fiona#fionascarf |
|||||||||||||||||||
 |
 |
||||||||||||||||||
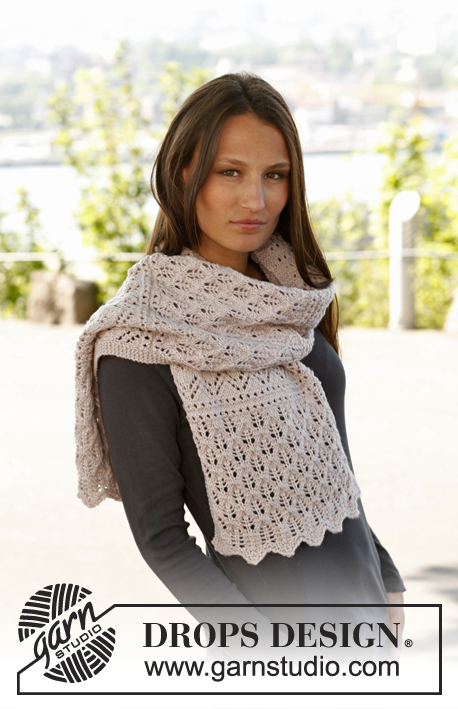
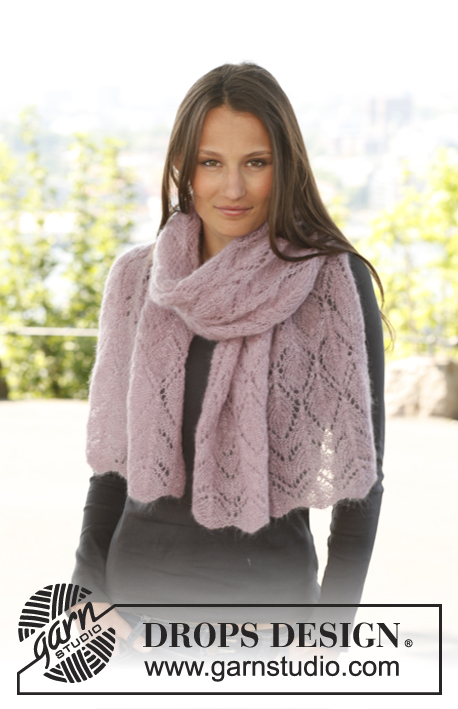
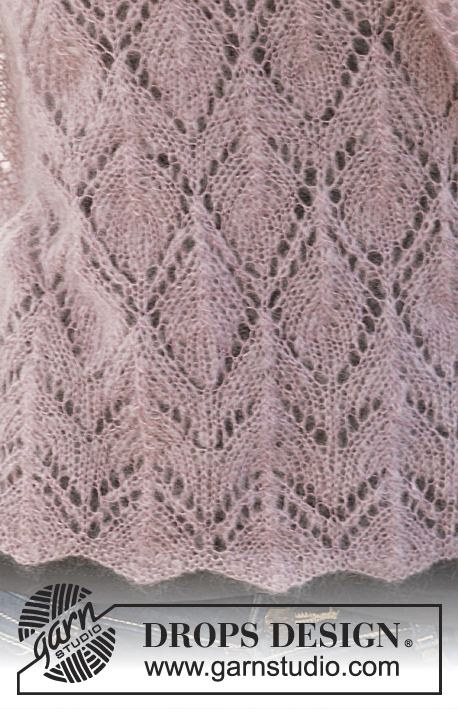
Scialle DROPS ai ferri con motivo traforato in "Vivaldi".
DROPS 141-11 |
|||||||||||||||||||
|
MOTIVO TRAFORATO: Vedere i diagrammi A-1 e A-2. I diagrammi mostrano tutti i ferri del motivo, visti sul diritto del lavoro. ---------------------------------------------------------- SCIALLE: Si lavora avanti e indietro sui ferri in 2 parti uguali unite successivamente al centro una volta terminato il lavoro. Avviare 99 m LENTE sui ferri n° 4 con il filato Vivaldi. Lavorare il primo ferro come segue (sul diritto del lavoro): 13 m dir, * passare 1 m a dir senza lavorarla, 2 m insieme a dir, accavallare la m passata sulla m lavorata, 11 m dir *, ripetere da *-* finché non rimangono 2 m , lavorare queste 2 m a dir = sul ferro ci sono 87 m. Lavorare 3 ferri a dir, avanti e indietro su tutte le m. Proseguire seguendo il diagramma A-1 come segue: diagramma a sulle prime 20 m, diagramma b 4 volte in larghezza e diagramma c sulle ultime 19 m. Dopo aver lavorato il diagramma A-1 una volta in verticale, proseguire seguendo il diagramma A-2 in modo uguale. RICORDARSI LA TENSIONE DEL LAVORO! Ripetere il diagramma A-2 in verticale finché il lavoro non misura ca. 85 cm – assicurarsi che l’ultimo ferro lavorato sia un ferro indicato da una freccia nel diagramma. Mettere le m in attesa su un ferma maglie. Lavorare la seconda parte in modo uguale. Cucire le due parti insieme a punto maglia in modo che la cucitura sia invisibile. |
|||||||||||||||||||
Spiegazioni del diagramma |
|||||||||||||||||||
|
|||||||||||||||||||
 |
|||||||||||||||||||
Avete terminato questo modello?Allora taggate le vostre foto con #dropspattern #fionascarf o inviatele alla #dropsfan gallery. Avete bisogno di aiuto con questo modello?Troverete 6 video tutorial, una sezione per i commenti/domande e molto altro guardando il modello su www.garnstudio.com © 1982-2026 DROPS Design A/S. Ci riserviamo tutti i diritti. Questo documento, compreso tutte le sue sotto-sezioni, è protetto dalle leggi sul copyright. Potete leggere quello che potete fare con i nostri modelli alla fine di ogni modello sul nostro sito. |
|||||||||||||||||||


Con oltre 40 anni di esperienza nel design di modelli di maglia e uncinetto, DROPS Design offre la più estesa collezione di modelli gratuiti su internet - tradotti in 17 lingue. Ad oggi vi possiamo fornire 324 cataloghi e 12272 modelli - 9543 dei quali sono tradotti in Italiano.
Ci stiamo impegnando molto per darvi il meglio che vi possiamo offrire in termini di maglia e uncinetto, ispirazioni e consigli così come filati di grande qualità ad un prezzo incredibile! Volete utilizzare i nostri modelli per qualcosa d'altro oltre al vostro uso personale? Potete leggere tutto ciò che è consentito nel testo sul Copyright in basso su tutte le pagine dei nostri modelli. Buon lavoro!
Lasciare un commento sul modello DROPS 141-11
Noi saremmo felici di ricevere i tuoi commenti e opinioni su questo modello!
Se vuoi fare una domanda, fai per favore attenzione a selezionare la categoria corretta nella casella qui sotto per velocizzare il processo di risposta. I campi richiesti sono indicati da *.