
Categorie popolari
State cercando un filato?


Commenti / Domande (30)
![]() Robi ha scritto:
Robi ha scritto:
I’m sorry but I’m confused on “pattern” instructions and the “ bag” instructions!! Do I combine these two and in what order?? I’ve never had a pattern like this before!! Looking forward to making this beautiful bag!! Thanks so much for your help.
15.05.2024 - 02:39DROPS Design ha risposto:
Hi Robi, The Pattern Instructions at the top of the pattern are for working the pattern, after you have reached 120 stitches on the round using the Bag Instructions. Hope this helps and happy crocheting!
15.05.2024 - 06:38
![]() Julia ha scritto:
Julia ha scritto:
I don’t understand where I’m supposed to measure the height of the bag from. I understand the instructions to mean 32 cm from the center of the ring that started the bag, but I’ve reached that height already after 34 rounds (= building up to 128 stitches + 3 x the pattern) and in the pictures the bag clearly has more rounds. My crocheting is spot on, 17 dc = 10 cm wide, circumference ca. 80 cm. Writing from Sweden, but using American instructions because I learned crochet from YouTube.
10.06.2023 - 12:24DROPS Design ha risposto:
Dear Julia, measure the bag from the center down (from 1st round) and stop when it measures 32 cm (even if the pattern is not done, adjust after a round with dc). The number of rounds might depend on your tension, do you have the correct tension for the square? Happy crocheting!
12.06.2023 - 09:37
![]() Annick ha scritto:
Annick ha scritto:
Ik begrijp het volgende niet bij de uitleg over de tas : Ga verder met 1 stokje meer tussen het meerderen iedere toer tot er 120 stokjes op de toer zijn ? Moet ik van 50 stokjes naar 120 stokjes gaan ? Elke toer 1 stokje meerderen ?
13.02.2022 - 12:25DROPS Design ha risposto:
Dag Annick,
De manier van meerderen zoals dat gedaan wordt in toer 4 en 5 zet je voort, dus je meerdert in de 6e toer 2 stokjes in iedere 5e steek, in de 6e toer meerder je 2 stokjes in iedere 6e steek, enzovoorts.
17.02.2022 - 11:45
![]() Claudia ha scritto:
Claudia ha scritto:
Die Anleitung für die Träger verstehe ich leider nicht. Kann mir jemand helfen? Danke
08.09.2019 - 08:01DROPS Design ha risposto:
Liebe Claudia, schlagen Sie 5 Luftmaschen und schliessen Sie mit 1 Kettmasche zu einem Ring; dann häkeln Sie 1 feste Masche in jede Luftmasche (= 5 fM), am Ende der 1. Runde häkeln Sie keine Kettm, sondern 1 feste Masche in die 1. feste Masche der 1. Runde, und immer so weiterhäkeln: 1 feste Masche in jede Masche bis die Träger ca 75 cm misst. Viel Spaß beim häkeln!
09.09.2019 - 08:38
![]() Rebecca ha scritto:
Rebecca ha scritto:
Bei den Vierecken steht dass man einen Luftmasche machen soll und dann um den Ring (welcher Ring?) feste Maschen häkeln soll?! Muss man diese 1. runde mit einem magic Ring beginnen???
20.07.2019 - 22:42DROPS Design ha risposto:
Liebe Rebecca, leider fehlte am Anfang der Anleitung für die Vierecke (vor der 1. Runde), dass 4 Luftmaschen angeschlagen werden und diese mit 1 Kett-Masche in die 1. Luftmasche zum Ring geschlossen werden. Dies wurde nun ergänzt. Um diesen Luftmaschenring häkeln Sie dann die 1. Runde. Viel Spaß beim Weiterhäkeln!
20.07.2019 - 23:51
![]() Rosemarie Andrews ha scritto:
Rosemarie Andrews ha scritto:
You make it hard to order yarn I ordered a set of yarn for the Sicily bag 139-13 You sent me the wrong colors I would like to try again With the set of colors on the photo Red orange white pink raspberry yellow But you make it too hard to order
31.12.2017 - 10:58
![]() Dorien Middelkoop ha scritto:
Dorien Middelkoop ha scritto:
Bij de gehaakte vierkantjes; welke kleur bedoelen jullie bij vierkantje D met abrikoos? Bij materiaal staat die kleur niet bij.... wel naturel, koraal, oranje, geel en roze.
16.03.2016 - 19:09DROPS Design ha risposto:
Hoi Dorien. Dat is een foutje en moet roze zijn. Het patroon is aangepast. Bedankt voor het melden.
23.03.2016 - 14:42
![]() Annet ha scritto:
Annet ha scritto:
De tas is bijna af.Ik moet alleen de schouderband nog. Ik snap de uitleg alleen niet :-( In de rondte gehaakt???
19.02.2014 - 22:43DROPS Design ha risposto:
Hoi Annet. De schouderband is een buisje. Dus je haakt inderdaad in de rondte: Haak 5 l met koraal en vorm een ring met 1 hv in de 1e l. Haak 1 v in iedere st in de rondte tot het werk ongeveer 75 cm meet.
20.02.2014 - 09:56
![]() Stine ha scritto:
Stine ha scritto:
Hvor mange garnnøgler af hver farve skal man bruge, sådan ca?
15.05.2012 - 13:17DROPS Design ha risposto:
Det er en fejl at der ikke står det. Det bliver lagt ud med det samme :)
25.05.2012 - 10:50
![]() Gunvor B ha scritto:
Gunvor B ha scritto:
Mycket fin sommarväska, som kan varieras i oändlighet.
01.03.2012 - 15:02
|
|
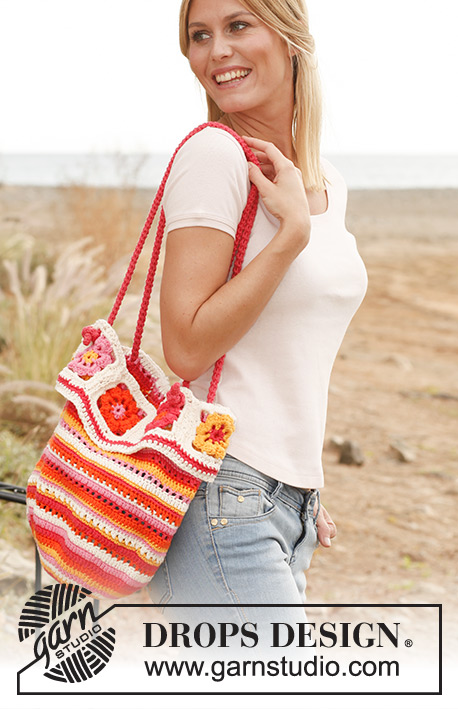
Sicily#sicilybag |
|
 |
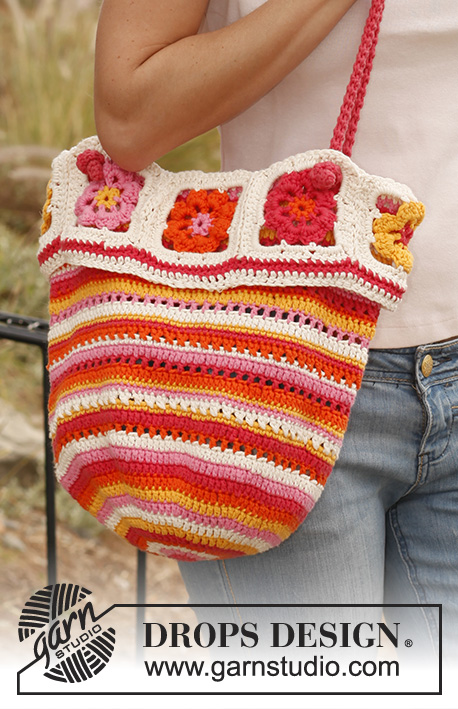 |
Borsa rigata DROPS con quadrati all’uncinetto, in "Paris".
DROPS 139-13 |
|
|
-------------------------------------------------------- SUGGERIMENTO UNCINETTO: Sostituire la 1° m.a di ogni giro con 3 cat. Sostituire la 1° m.b di ogni giro con 1 cat. Terminare ogni giro di m.a con 1 m.bss nella 3° cat d’inizio giro. Terminare ogni giro di m.b con 1 m.bss nella 1° cat d’inizio giro. RIGHE: Lavorare le righe con 1 giro di ogni colore così: * corallo, rosa, panna, arancione, corallo, giallo vivo, panna, rosa, giallo vivo, arancione *, ripetere da *-*. NOTA: Non tagliare i fili, ma farli seguire il lavoro sul rovescio del lavoro. MOTIVO: 1° GIRO: 3 cat, * 1 cat, saltare 1 m, 1 m.a nella m seguente *, ripetere da *-* tutto il giro, terminare con 1 cat, saltare l’ultima m, 1 m.bss nella 3° cat d’inizio giro. 2° GIRO: 1 m.a in ogni m.a ed in ogni cat. 3° GIRO: 1 m.b in ogni m.a. 4° GIRO: 3 cat, lavorare poi m.a incrociate così: * Saltare 1 m, 1 m.a nella m seguente, poi 1 m.a nella m saltata *, ripetere da *-* tutto il giro, terminare con 1 m.a nell’ultima m.a e 1 m.bss nella 3° cat d’inizio giro. 5° GIRO: 1 m.b in ogni m.a. 6° GIRO: 1 m.b in ogni m.b. 7° GIRO: 1 m.a in ogni m.b. Ripetere i giri 1° al 7°. -------------------------------------------------------- BORSA: Si lavora dal basso e verso l’alto. VEDERE SUGGERIMENTO UNCINETTO! Avviare 5 cat con corallo e formare 1 anello con 1 m.bss nella 1° m. Lavorare RIGHE – vedere le spiegazioni sopra - così: 1° GIRO: 10 m.a nell’anello, terminare con 1 m.bss nella 1° m.a. 2° GIRO: 2 m.a in ogni m.a = 20 m.a. 3° GIRO: *1 m.a nella m seguente, 2 m.a nella m seguente*, ripetere da *-* tutto il giro = 30 m.a. 4° GIRO: *1 m.a in ognuna delle 2 m seguenti, 2 m.a nella m seguente*, ripetere da * - * tutto il giro = 40 m.a. 5° GIRO: *1 m.a in ognuna delle 3 m seguenti, 2 m.a nella m seguente*, ripetere da * - * tutto il giro= 50 m.a. Continuare così con 1 m.a in più tra ogni aumento ad ogni giro, finché non ci siano 120 m.a sul giro. Lavorare 1 giro di m.a, allo stesso tempo, aumentare 8 m.a in modo uniformemente distribuito = 128 m.a. Continuare a righe, allo stesso tempo, lavorare il MOTIVO - ved spieg sopra! Quando il lavoro misura ca 32 cm (misurato dal centro del cerchio verso l’alto), terminare dopo 1 giro di m.a, tagliare il filo. QUADRATO ALL’UNCINETTO: Realizzare i quadrati in 4 combinazioni di colori diverse. Quadrato-1: Colore-1 = corallo, Colore-2 = giallo vivo. Quadrato-2: Colore-1 = arancione, Colore-2 = corallo. Quadrato-3: Colore-1 = rosa medio, Colore-2 = arancione. Quadrato-4: Colore-1 = giallo vivo, Colore-2 = rosa medio. Avviare 4 cat con il colore-1 e formare un anello con 1 m.bss nella 1° cat. 1° GIRO: 1 cat, 8 m.b nell’anello, terminare con 1 m.bss nella 1° m.b. 2° GIRO (in Colore-2): 5 cat (= 1 m.b + 4 cat), * 1 m.b nella m.b seguente, 4 cat *, ripetere da *-* in totale 7 volte e terminare con 1 m.bss nella 1° cat d’inizio giro = 8 m.b con 4 cat tra ognuna di esse. 3° GIRO: 1 cat, lavorare così in ogni arco di cat: 1 m.b, 1 m.m.a, 2 m.a, 1 m.m.a e 1 m.b, terminare il giro con 1 m.bss nella cat d’inizio giro = 8 petali. Tagliare il filo. 4° GIRO (in colore panna): 1 m.b in alto del 1° petalo, * 8 cat, 1 m.b in alto del petalo seguente, 3 cat, 1 m.b in alto del petalo seguente *, ripetere da *-* tutto il giro, ma terminare con 1 m.bss nella m.bss d’inizio giro. 5° GIRO: *Lavorare così nell’angolo: 5 m.a + 2 cat + 5 m.a, 4 m.a nell’arco di cat seguente *, ripetere da *-* in totale 4 volte, terminare con 1 m.bss nella 1° m.a d’inizio giro, tagliare il filo. 1 quadrato = ca 10 x 10 cm. Realizzare 2 quadrati di ogni combinazione colori. Cucirli bordo contro bordo con 1 punto in ogni maglia nell’ordine seguente: Quadrato-1, Quadrato-2, Quadrato-3, Quadrato-4, Quadrato-1, Quadrato-2, Quadrato-3 e Quadrato-4 - alla fine cucire Quadrato-4 al Quadrato-1 in modo da fare un cerchio. TRACOLLA: Avviare 5 cat con il colore corallo e l’uncinetto 3,5 e formare un anello con 1 m.bss nella 1° cat. Lavorare poi 1 m.b in ogni m in tondo finché il lavoro misura ca 75 cm. Tagliare e fissare il filo. Lavorare una 2° tracolla identica. CONFEZIONE: Fissare il cerchio con i quadrati all’uncinetto in alto della borsa – cucire bordo contro bordo con 1 punto in ogni maglia – cucire i quadrati con il rovescio verso l’esterno (devono essere ripiegati sulla borsa dopo). Lavorare 1 giro a m.a con il corallo in alto intorno ai quadrati – si deve avere 1 m.a in ogni m.a e 1 m.a in ogni cat = 16 m.a per quadrato = 128 m.a in totale. Continuare in panna, lavorare 1 giro con 1 m.a in ogni m.a. Tagliare e fissare i fili. Piegare i quadrati all’uncinetto sopra la borsa. Fissare 1 tracolla ad ogni lato della borsa così (vedere anche l’immagine): Infilare l’estremità della tracolla dal rovescio verso il diritto nell’angolo in alto a sinistra di uno dei quadrati, fare 1 nodo per tenerlo fisso là. Saltare 1 quadrato e infilare l’altra estremità della tracolla dal rovescio verso il diritto nell’angolo in alto a destra del quadrato seguente, fare 1 nodo. Fissare la 2° tracolla nella stessa maniera dall’altra parte della borsa. |
|
Avete terminato questo modello?Allora taggate le vostre foto con #dropspattern #sicilybag o inviatele alla #dropsfan gallery. Avete bisogno di aiuto con questo modello?Troverete 11 video tutorial, una sezione per i commenti/domande e molto altro guardando il modello su www.garnstudio.com © 1982-2026 DROPS Design A/S. Ci riserviamo tutti i diritti. Questo documento, compreso tutte le sue sotto-sezioni, è protetto dalle leggi sul copyright. Potete leggere quello che potete fare con i nostri modelli alla fine di ogni modello sul nostro sito. |
|


Con oltre 40 anni di esperienza nel design di modelli di maglia e uncinetto, DROPS Design offre la più estesa collezione di modelli gratuiti su internet - tradotti in 17 lingue. Ad oggi vi possiamo fornire 324 cataloghi e 12290 modelli - 9561 dei quali sono tradotti in Italiano.
Ci stiamo impegnando molto per darvi il meglio che vi possiamo offrire in termini di maglia e uncinetto, ispirazioni e consigli così come filati di grande qualità ad un prezzo incredibile! Volete utilizzare i nostri modelli per qualcosa d'altro oltre al vostro uso personale? Potete leggere tutto ciò che è consentito nel testo sul Copyright in basso su tutte le pagine dei nostri modelli. Buon lavoro!
Lasciare un commento sul modello DROPS 139-13
Noi saremmo felici di ricevere i tuoi commenti e opinioni su questo modello!
Se vuoi fare una domanda, fai per favore attenzione a selezionare la categoria corretta nella casella qui sotto per velocizzare il processo di risposta. I campi richiesti sono indicati da *.