
Categorie popolari
State cercando un filato?


Commenti / Domande (235)
![]() Anna ha scritto:
Anna ha scritto:
Hei, hvordan anbefaler dere å strikke ermene for å forlenge de? Jeg vil gjerne at de skal bli ganske lange. Tusen takk i forvei ₊˚⊹♡
06.01.2026 - 21:59DROPS Design ha risposto:
Hei Anna, Det er best å forlenge ermet etter at du er ferdig med å øke men før du begynner på ermtoppen, slik at du får fasongen riktig på nedre delen. Hilsen Drops Team.
07.01.2026 - 06:45
![]() Marjon ha scritto:
Marjon ha scritto:
Ik wil beginnen met het linker voorpand. Ik snap niet waarom ik 10st op een hulpdraad moet zetten? Brei ik die niet mee? Terwijl er staat dat je afkant voor de hals bij het begin van iedere naald. Is dat dan de buitenste steek, dus dus op de hulpdraad? Of de eerste steek die op de naald staat? Als ik ze niet meebrei, wat doe ik er dan wel mee?
25.08.2023 - 08:47DROPS Design ha risposto:
Dag Marjon,
Deze steken brei je niet mee en laat je gewoon op een hulpnaald (grote veiligheidsspeld) staan. Als je moet afkanten voor de hals zijn dat de steken ernaast. Op het eind zet je de steken van de hulpdraad weer op een naald en neem je daarnaast steken op rondom de hals om een rand rondom de hals te breien (zie 'afwerking').
28.08.2023 - 07:24
![]() Marjon ha scritto:
Marjon ha scritto:
Ik heb 308 steken opgezet. Als ik patroon volg, dan herhaal ik het patroon voor het lijf 10x (2x6st+10x17st+9x14st=308). In patroon staat 9x, maar dan kom ik op een totaal van 277st. Dit zou me wel goed uitkomen, want ik wil eigenlijk een M/L breien. Kan ik de 9x aanhouden en dus het aantal steken wijzigen en daarmee een tussenmaat breien? (En er lijkt dus een fout in het patroon te staan)
04.06.2023 - 13:27DROPS Design ha risposto:
Dag Marjon,
Je breit 6 voorbiessteken, dan herhaal je (M1 (17 st) en 14 averecht) = 31 st in totaal 9 keer, dan nog een keer M1 (17 st) en nog 6 voorbiessteken. In totaal kom je dan op 308 steken. Een tussenmaat zou je kunnen breien door in plaats van steeds 14 averecht, minder averechte steken te breien. Maar kijk dan ook even heel goed hoe dit uitkomt bij bijvoorbeeld de schouders en de armsgaten.
07.06.2023 - 11:41
![]() Marion ha scritto:
Marion ha scritto:
Als ik het vest als trui wil breien op een rondbreinaald, is het dan voldoende om middenvoor over de gehele lengte 6 steken averrecht te breien (dus de helft van de voorbies aanhouden)?
05.04.2023 - 17:38DROPS Design ha risposto:
Dag Marion,
Ja, je kunt inderdaad de helft van de voorbies weglaten, want dat is de overlap voor de knoopbies.
12.04.2023 - 20:37
![]() Shubhangi Kundu ha scritto:
Shubhangi Kundu ha scritto:
Hello! Could you kindly explain how we go from 56 sts to 33 sts after binding off for neck and armhole for size L/XL? I'm probably not understanding how the binding off works. I understood that [(2×2sts)×2 + (2×1st)×5] = 18 sts are bound off for the armhole and [(2×2sts)×1 + (2×1st)×2] = 8 sts are bound off for the neckline, but I think that is somehow wrong. Please correct me. Thank you!
14.11.2022 - 05:59DROPS Design ha risposto:
Hi Shubhangi, On the left front piece you start off with 56 stitches, as you say. On each row from the side you bind off 2 stitches x 2, the 1 stitch x 5 for the armhole (9 stitches bound off). For the neck, you place the 10 stitches towards mid-front on a thread and then bind off on each row from the neck, 2 stitches x 1 and 1 stitch x 2 (10 + 4 stitches). You have a total of 23 stitches either bound off or on a thread. 56 - 23 =33 stitches left. Hope this helps and happy knitting!
14.11.2022 - 06:53
![]() Shubhangi Kundu ha scritto:
Shubhangi Kundu ha scritto:
"Then bind off for armhole at beg of every row from the side: 2 sts 2-2-4 times and 1 st 4-5-6 times." Could you kindly explain this line to me?
08.11.2022 - 04:49DROPS Design ha risposto:
Hi Shubhangi, You are shaping the armholes by binding off at the beginning of each row. Start by binding off 2 stitches at the beginning of the row from both the right and wrong side (4 stitches in total) and then repeat this the correct number of times for your size (e.g. 1 more time in size S/M = 8 stitches bound off). Then bind off 1 stitch at the beginning of both the right side and wrong side and, using size S/M, this will be repeated 4 times = another 8 stitches bound off. Hope this helps and happy knitting!
08.11.2022 - 07:36
![]() Pam Dale ha scritto:
Pam Dale ha scritto:
How many stitches are left on the sleeves when you cast off? I’ve modified the sleeves so they are full length and I’ve worked them in the round but a bit unclear when I get to the cap of the sleeve and how many stitches cast off before final cast off
09.07.2021 - 23:10DROPS Design ha risposto:
Dear Pam Dale, the number of stitches at the end of the sleeve will depend on your tension, most important is here that you cast off the number of sts stated for the size + 2 stitches on each side until sleeve measures 40 cm (make sure you have cast off 2 sts the same number of times on each side), adjusting after a whole repeat of M.1 and cast off. Happy knitting!
12.07.2021 - 07:13
![]() Mirja ha scritto:
Mirja ha scritto:
Ich habe ein sehr großes Problem. Ich habe die schöne Jacke fast fertig gestrickt und nun reicht die angegebene Wollmenge bei mir nicht aus.( stricke S/M und hatte 500g gekauft, da die Mengenangabe bisher immer bei mir passte). Ich habe daraufhin in dem Shop ( Mondolana) nachbestellt unter Angabe der Dyelot Nr. Die gab es aber nicht mehr und die mir zugeschickte Wolle ist farblich etwas anders. Wo bekomme ich nun noch die Farbe 40 mit Dyelot Nr 839?? Ich kann sonst leider nicht fertig werden.
12.06.2021 - 18:56DROPS Design ha risposto:
Liebe Mirja, gerne können Sie einen anderen Laden fragen, oder vielleicht auch in der DROPS Workshop-Gruppe können Sie andere Strickerinnen fragen.
14.06.2021 - 08:44
![]() Marie POUPON ha scritto:
Marie POUPON ha scritto:
Bonjour ! J'ai ENFIN terminé ce gilet ! Reste à bloquer à la vapeur ! Merci pour tout ! ;-)
14.02.2021 - 07:33
![]() Nicole ha scritto:
Nicole ha scritto:
Ich bin bezüglich der Oberweite und Hüfte bei 50 cm und Taille 44 cm. Kann ich mich während des hochstrickens zunächst an Gr. L, zur Taille hin an Gr S/M und bei der Oberweite wieder an Gr. L orientieren hinsichtlich der Zu- und Abnahmen? Ausserdem kommt mir die Umfangsangabe zu Beginn ( z.B. 59 bei Gr.S/M) recht groß vor, obwohl die Jacke dort doch eng anliegen soll.
10.02.2021 - 20:48DROPS Design ha risposto:
Liebe Nicole, am besten messen Sie eine ähnliche Jacke, die Sie gerne haben und vergleichen Sie diese Maßen mit der Skizze - hier lesen Sie mehr - Sicher kann Ihnen noch Ihr DROPS Laden damit weiterhelfen, auch telefonisch oder per E-Mail. Viel Spaß beim stricken!
11.02.2021 - 06:43
|
||||||||||||||||||||||||||||
Grace#gracecardigan |
||||||||||||||||||||||||||||
 |
 |
|||||||||||||||||||||||||||
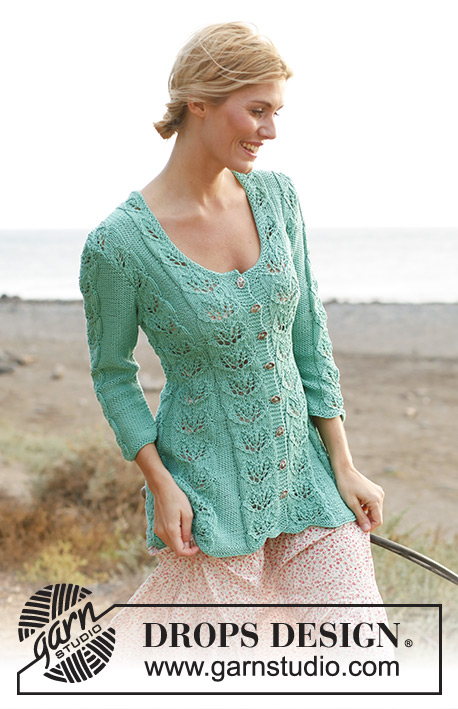
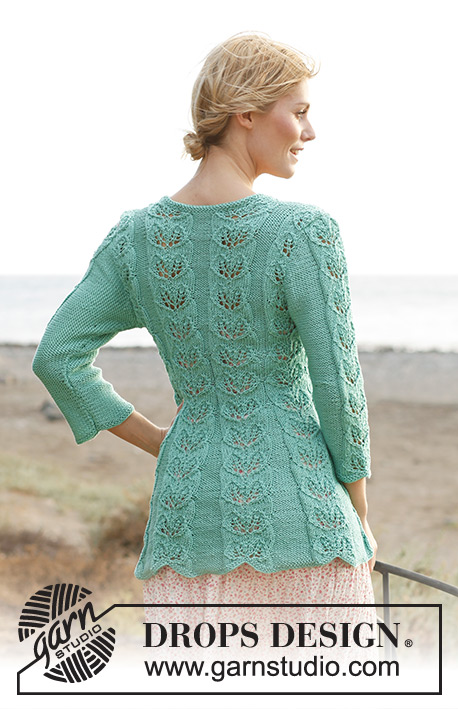
Giacca sciancrata DROPS ai ferri con motivo traforato e maniche a ¾ in "Muskat" o "Cotton Light". Taglie: dalla S alla XXXL.
DROPS 138-5 |
||||||||||||||||||||||||||||
|
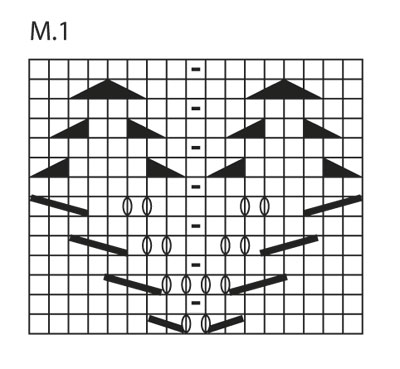
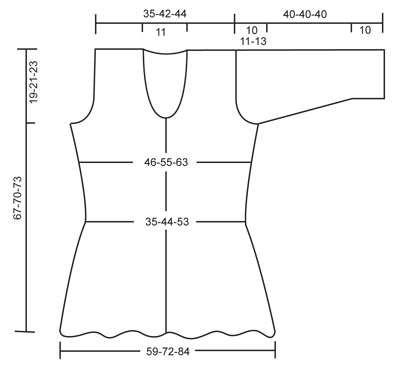
-------------------------------------------------------- PUNTO LEGACCIO (avanti e indietro sul ferro): Lavorare tutti i ferri a dir. MOTIVO: Vedere il diagramma M.1, il diagramma mostra il motivo sul diritto del lavoro. ASOLE: Chiudere le m per le asole sul bordo davanti destro. 1 asola = lavorare insieme a dir la 3° e la 4° dal bordo e inserire 1 m gettata. Chiudere le m per le asole quando il lavoro misura: TAGLIE S/M: 8, 14, 20, 26, 32, 38, 44 e 50 cm TAGLIE L/XL: 8, 14, 21, 27, 33, 40, 46 e 52 cm TAGLIE XXL/XXXL: 8, 15, 21, 28, 34, 41, 48 e 54 cm ATTENZIONE: chiudere le m per l’ultima asola quando rimangono solo 2 ferri prima delle diminuzioni per il collo. -------------------------------------------------------- DAVANTI & DIETRO: Si lavorano avanti e indietro sui ferri circolari con inizio dal bordo (centro davanti). Avviare 253-308-359 m (comprese 6 m per i bordi da ciascun lato del centro davanti) sui ferri circolari n° 4 con il filato Muskat. Lavorare 3 ferri a dir (1° ferro = rovescio del lavoro). Proseguire come segue (visto dal diritto del lavoro): 6 m per il bordo a PUNTO LEGACCIO – vedere le spiegazioni sopra - * diagramma M.1 (= 17 m), 15-14-13 m a rov *, ripetere da *-* per un totale di 7-9-11 volte, diagramma M.1 e 6 m per il bordo a punto legaccio. Proseguire così. RICORDARSI LA TENSIONE DEL LAVORO! Quando il lavoro misura ca. 3-5-7 cm (assicurarsi che il ferro successivo sia sul diritto del lavoro), diminuire 1 m in ogni gruppo di m lavorate a rov, lavorando le prime 2 m insieme a rov. Ripetere queste diminuzioni ogni 6 ferri per un totale di 14-13-12 volte – ATTENZIONE: Diminuire alternativamente alla fine e all’inizio di ogni gruppo di m lavorate a rov. ALLO STESSO TEMPO, quando il lavoro misura 8 cm, iniziare a chiudere le m per le ASOLE – vedere le spiegazioni precedenti! Terminate tutte le diminuzioni in corrispondenza dei gruppi di m lavorate a rov, sul ferro rimangono 155-191-227 m e c’è 1 sola m a rov tra ogni gruppo di m lavorate seguendo il motivo M-1 (il lavoro misura ora ca. 31 cm). Proseguire finché il lavoro non misura ca. 34-35-36 cm (assicurarsi che il ferro successivo sia sul diritto del lavoro). Aumentare ora 1 m in ogni gruppo di m lavorate a rov inserendo 1 m gettata dopo tutte le m lavorate a rov; al ferro successivo (sul rovescio del lavoro) lavorare le m gettate a dir ritorto (quindi lavorare la m nell’asola posteriore e non in quella anteriore) per evitare che si formi un buco. Ripetere gli aumenti ogni 6 ferri per un totale di 6-5-4 volte – ATTENZIONE: aumentare alternativamente prima e dopo tutte le m lavorate a rov inserendo 1 m gettata. Terminati tutti gli aumenti, ci sono 7-6-5 m a rov in ogni gruppo di m lavorate a rov e 197-236-271 m in tutto sul ferro. Quando il lavoro misura ca. 48-49-50 cm (assicurarsi che il ferro successivo sia sul diritto del lavoro), lavorare il ferro successivo come segue: lavorare 47-56-64 m come prima (= davanti destro), chiudere 7-9-11 m per gli scalfi, lavorare 89-106-121 m come prima (= dietro), chiudere 7-9-11 m per gli scalfi, lavorare le ultime 47-56-64 m come prima (= davanti sinistro). Finire ogni parte separatamente. DAVANTI SINISTRO: = 47-56-64 m. Intrecciare per gli scalfi, all’inizio di ogni ferro, sul lato come segue: 2 m per 2-2-4 volte e 1 m per 4-5-6 volte. ALLO STESSO TEMPO quando il lavoro misura 51-53-55 cm, mettere in attesa su un fermamaglie le 10 m dalla parte del bordo al centro, per il collo. Diminuire poi, all’inizio di ogni ferro, dal lato del collo, come segue: 2 m per 1 volta e 1 m per 2 volte. Terminate tutte le diminuzioni per gli scalfi e per il collo, rimangono 25-33-36 m per la spalla. Ci sono ora: ½ ripetizione del diagramma M.1 dal lato del collo per tutte le taglie, e ½ ripetizione verso lo scalfo per la taglia più piccola. Proseguire seguendo il diagramma come prima con 1 m a punto legaccio da ciascun lato. Quando il lavoro misura ca. 67-70-73 cm – completare comunque 1 ripetizione del diagramma M.1 – chiudere tutte le m. DAVANTI DESTRO: Riprendere sui ferri di lavoro le m e lavorare come fatto per il davanti sinistro, ma in senso inverso. DIETRO: = 89-106-121 m. Proseguire a diminuire per gli scalfi all’inizio di ogni ferro, da entrambe le parti, come fatto per i davanti = 73-88-93 m. Quando il lavoro misura ca. 65-68-72 cm (finire dopo 1 ferro sul rovescio del lavoro quando restano da lavorare 4 ferri del diagramma M.1) chiudere le 23-22-21 m centrali per il collo e finire ogni spalla (= 25-33-36 m) separatamente. Chiudere dopo aver portato a termine l’ultima ripetizione del diagramma M.1 MANICA: Si lavora avanti e indietro sui ferri circolari. Avviare 53-57-61 m (compresa 1 m vivagno da ciascun lato) sui ferri circolari n° 4 con il filato Muskat. Lavorare 3 ferri a dir (1° ferro = rovescio del lavoro). Lavorare il ferro successivo come segue (sul diritto del lavoro): 1 m vivagno a punto legaccio, 17-19-21 m a rov, diagramma M.1, 17-19-21 m a rov e 1 m vivagno a punto legaccio. Quando il lavoro misura 10 cm, aumentare 1 m da ciascun lato. Ripetere gli aumenti ogni 2-1½-1 cm per un totale di 10-12-15 volte = 73-81-91 m (lavorare le m aumentate a rov, guardando il lavoro sul diritto). LEGGERE TUTTE LE INDICAZIONI SEGUENTI PRIMA DI PROSEGUIRE! Quando il lavoro misura 30-29-27 cm (misure più corte per le taglie più grandi perché l’arrotondamento della manica è più lungo e le spalle sono più larghe), chiudere per l’arrotondamento della manica all’inizio di ogni ferro da ciascun lato, come segue: 4 m per 1 volta, 2 m per 3 volte e 1 m per 6-7-10 volte; chiudere poi 2 m da ciascun lato finché il lavoro non misura ca. 40 cm – completare comunque 1 ripetizione del diagramma M.1. Chiudere le m rimaste. CONFEZIONE: Cucire le spalle. BORDO DEL COLLO: Con i ferri circolari n° 4, riprendere ca. da 100 a 110 m attorno al collo ( comprese le m messe in attesa sul fermamaglie sul davanti). Lavorare 3 ferri a dir; chiudere le m. Cucire i lati delle maniche all’interno della m vivagno e cucire le maniche. Cucire i bottoni. Bloccare la giacca a vapore per portarla alla forma corretta. |
||||||||||||||||||||||||||||
Spiegazioni del diagramma |
||||||||||||||||||||||||||||
|
||||||||||||||||||||||||||||
 |
||||||||||||||||||||||||||||
 |
||||||||||||||||||||||||||||
Avete terminato questo modello?Allora taggate le vostre foto con #dropspattern #gracecardigan o inviatele alla #dropsfan gallery. Avete bisogno di aiuto con questo modello?Troverete 23 video tutorial, una sezione per i commenti/domande e molto altro guardando il modello su www.garnstudio.com © 1982-2026 DROPS Design A/S. Ci riserviamo tutti i diritti. Questo documento, compreso tutte le sue sotto-sezioni, è protetto dalle leggi sul copyright. Potete leggere quello che potete fare con i nostri modelli alla fine di ogni modello sul nostro sito. |
||||||||||||||||||||||||||||


Con oltre 40 anni di esperienza nel design di modelli di maglia e uncinetto, DROPS Design offre la più estesa collezione di modelli gratuiti su internet - tradotti in 17 lingue. Ad oggi vi possiamo fornire 324 cataloghi e 12290 modelli - 9561 dei quali sono tradotti in Italiano.
Ci stiamo impegnando molto per darvi il meglio che vi possiamo offrire in termini di maglia e uncinetto, ispirazioni e consigli così come filati di grande qualità ad un prezzo incredibile! Volete utilizzare i nostri modelli per qualcosa d'altro oltre al vostro uso personale? Potete leggere tutto ciò che è consentito nel testo sul Copyright in basso su tutte le pagine dei nostri modelli. Buon lavoro!
Lasciare un commento sul modello DROPS 138-5
Noi saremmo felici di ricevere i tuoi commenti e opinioni su questo modello!
Se vuoi fare una domanda, fai per favore attenzione a selezionare la categoria corretta nella casella qui sotto per velocizzare il processo di risposta. I campi richiesti sono indicati da *.