
Categorie popolari
State cercando un filato?


Commenti / Domande (36)
![]() Elisabeth ha scritto:
Elisabeth ha scritto:
Bonjour, je ne comprends pas comment faire les coins des carrés au 4 ème tour pour avoir 40 ms, puisque 2x 5 ml: =10ms+ 4x4 ml=16 ms+3×3ml=9ms Soit 35 ms sans les 4 angles Merci pour votre aide
03.04.2026 - 23:09DROPS Design ha risposto:
Bonjour Elisabeth, vous obtenez les 40 ms ainsi: 4 ms pour chaque arceau de 4 ml = 16 ms, 5 ms pour chaque arceau de 5 ml = 10 ms, 3 ms pour chaque arceau de 3 ml = 6 ms (il n'y a que 2 arceaux de 3 ml) et enfin 2 ms dans chaque coin = 8 ms soit 16+10+6+8=40 ms au 4ème tour. Bon crochet!
08.04.2026 - 08:56
![]() LOYAU ha scritto:
LOYAU ha scritto:
Bonjour, pourriez-vous m'indiquer comment traduire les commentaires,afin de bénéficier de l'expérience des autres membres? Merci
08.11.2025 - 18:37DROPS Design ha risposto:
Bonjour Mme Loyau, vous pouvez essayer avec un traducteur en ligne pour chaque langue, ou bien si vous avez une question, vous pouvez aussi simplement la poser ici. Bon crochet!
10.11.2025 - 07:27
![]() Catherine Gautier ha scritto:
Catherine Gautier ha scritto:
Bonjour, j'aimerais avoir le schéma des carrés. A t il été établi par une crocheteuse? Merci. Catherine
12.05.2025 - 20:02
![]() Cheryl Ellwood ha scritto:
Cheryl Ellwood ha scritto:
I have made many patterns and love them. Thank you. Two comments: - the Q&A is helpful. But I only speak English, French and Italian, so can't access answers to many questions. It would be useful to be able to choose the language of each Q&A. I'm sure many of the questions are about things I have puzzled over. On this particular pattern (Tilda) the photos of the finished bolero weren't very helpful - all the yarn colours obscure the detail. Front and back pics are helpful. Thank you.
01.01.2025 - 18:53
![]() Lena Chan ha scritto:
Lena Chan ha scritto:
Hi! For the second round of the Edge Piece, it says “.. and in every ch-loop work (37) tr...”. I know it doesn’t mean every chain on the armhole because that would be (44). What is the ch-loop? Thanks!
30.03.2020 - 17:46DROPS Design ha risposto:
Dear Mrs Chan, with "ch-loop" we mean here the 44 chains you crocheted before for armholes, you will have to crochet a total of 37 trebles evenly spaced in the 44 chains for the armholes, skipping evenly some chain stitches (so that the armholes are not too tight). Happy crocheting!
31.03.2020 - 08:24
![]() Joyce Sierhuis ha scritto:
Joyce Sierhuis ha scritto:
Hi, als ik de vierkantjes naai zoals beschreven, is het dan zo dat bij de hals-omslag de achterkant van de vierkantjes als het ware de voorkant worden, ik zie nl duidelijk het verschil tussen voor en achterkant gehaakte vierkant zo ja dan moet ik denk ik vanaf een bepaald punt de vierkantjes andersom tegen elkaar naaien....?????
13.10.2018 - 18:22DROPS Design ha risposto:
Dag Joyce, Er ontstaat inderdaad een omslag achterin de hals bij het dragen en het is inderdaad een idee om op die plek de vierkantjes er andersom in te zetten, maar dat hoeft niet perse. Maar net wat je mooi vindt.
15.10.2018 - 21:49
![]() Joyce Sierhujis ha scritto:
Joyce Sierhujis ha scritto:
Wat wordt met breen bedoeld bij vierkantjes? dank voor uw reactie
29.09.2018 - 19:47DROPS Design ha risposto:
Dag Joyce, Oeps... er stond een typefout in. Het moet zijn '...hebben dezelfde breedte.' Het is nu aangepast! Hopelijk kom je er nu uit. Veel haakplezier!
30.09.2018 - 21:03
![]() Marian Van Bochove ha scritto:
Marian Van Bochove ha scritto:
Ik ben met de rand bezig er moeten 204 stokjes gehaakt worden in mijn geval dat snap ik ook 2x 65 en 2x 37. Nu las ik hier dat de stokjes van de armsgaten om de lossenlus heen gehaakt moeten worden. Dit heb ik gedaan maar ik hou een stukje van de losselijn over.
27.10.2016 - 21:48DROPS Design ha risposto:
Hoi Marian. Je haakt om de lus heen, dus heb je ruimte over, schuif een beetje met de stk zodat ze netjes passen over de lus.
28.10.2016 - 18:01Sarietha ha scritto:
Can you please help. I am now at round 2 of edge piece. I do not understand how to increase. 16 evenly??
17.09.2016 - 18:33DROPS Design ha risposto:
Dear Sarietha, read more here on how to increase evenly. Happy crocheting!
18.09.2016 - 23:24Sarietha ha scritto:
Can you please help. I am now at round 2 of edge piece. I do not understand how to increase. 16 evenly??
17.09.2016 - 16:27DROPS Design ha risposto:
Dear Sarietha, read more here on how to increase evenly. Happy crocheting!
18.09.2016 - 23:23
|
|
Tilda#tildavest |
|
 |
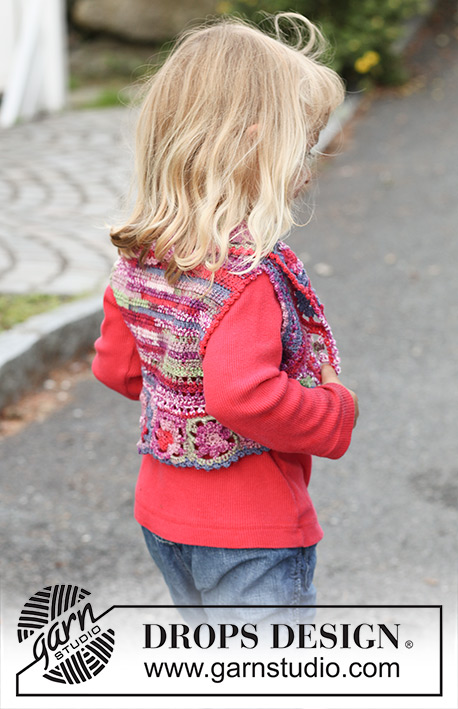 |
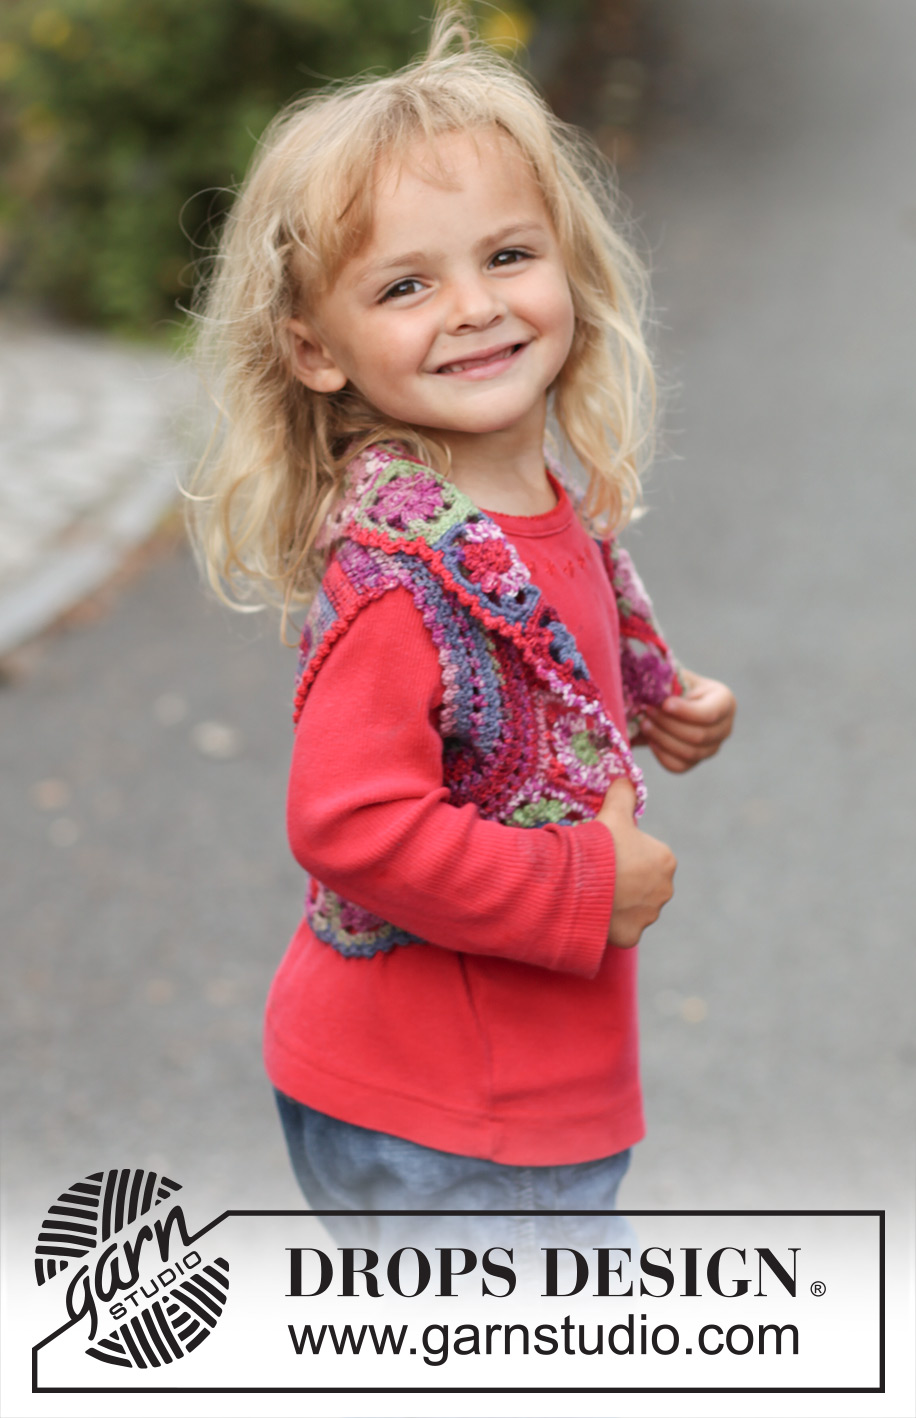
Bolero DROPS all’uncinetto in "Fabel". Taglie: dai 3 ai 12 anni.
DROPS Children 22-29 |
|
|
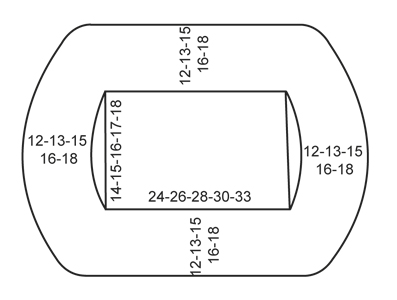
--------------------------------------------------------- INFORMAZIONI PER IL LAVORO: Sostituire la 1° m.a. su ogni riga/giro con 3 catenelle. Finire ogni giro con 1 m.bss. nella 3° catenella dall’inizio del giro. SUGGERIMENTO PER GLI AUMENTI: Aumentare lavorando 2 m.a. in 1 m. --------------------------------------------------------- DIETRO: Lavorato avanti e indietro – LEGGERE LE INFORMAZIONI PER IL LAVORO! Lavorare 67-73-79-85-91 catenelle lasse con l’uncinetto misura 3 mm e il filato Fabel. Lavorare 1 m.a. nella quarta catenella dall’uncinetto, 1 m.a. in ognuna della successive 3 catenelle, * saltare 1 catenella, 1 m.a. in ognuna delle successive 5 catenelle *, ripetere da *-* per il resto della riga = 55-60-65-70-75 m.a. Poi lavorare 1 m.a. in ogni m.a. avanti e indietro fino a quando il lavoro misura 14-15-16-17-18 cm. BORDO: Lavorare 1 m.a. in ognuna delle 55-60-65-70-75 m.a. in alto lung oil dietro, poi lavorare 39-42-44-46-49 catenelle (= scalfo), 1 m.a. in ognuna della 55-60-65-70-75 m.a. il basso lungo il dietro e poi 39-42-44-46-49 ch (= scalfo), finire con 1 m.bss. nella 1° m.a. sul giro. Sul giro successivo lavorare 1 m.a. in ogni m.a. in alto e in basso del dietro e in ogni occhiello di catenelle lavorare 33-35-37-39-41 m.a. = 176-190-204-218-232 m.a. in totale. Continuare in tondo come segue: GIRO 1: 1 m.a. nella 1° m.a. (sostituita con 3 catenelle), * 1 catenella, saltare 1 m.a., 1 m.a. nella m.a. successiva *, ripetere da *-* e finire con 1 catenella, saltare 1 m.a. e 1 m.bss. nella 3° catenella dall’inizio del giro. GIRO 2: 1 m.a. in ogni m.a. e 1 m.a. in ogni catenella. Ripetere questi 2 giri verso l’alto – ALLO STESSO TEMPO quando il bordo misura circa 3-3-3-4-4 cm (aggiustarlo in modo che il giro successivo sia un giro di solo m.a.), distribuire 16-20-24-29-34 m.a. aumentate in modo uniforme – LEGGERE IL SUGGERIMENTO PER GLI AUMENTI – ripetere gli aumenti quando il bordo misura circa 5-6-7-7-8 cm = 208-230-252-276-300 m.a. Lavorare fino a quando il bordo misura circa 7-8-10-11-13 cm. Mettere il lavoro da parte. PIASTRELLA ALL’UNCINETTO: Lavorare 4 catenelle con l’uncinetto misura 3 mm con il filato Fabel, formare un anello con 1 m.bss. nella 1° catenella. GIRO 1: 8 m.b. nell’anello di catenelle, finire con 1 m.bss. nella 1° m.b. dall’inizio del giro. GIRO 2: 1 m.bss. nella 1° m.b., * 3 catenelle, nella stessa m.b. della m.bss. lavorare 2 m.a. ma aspettare con l’ultimo passaggio attraverso ogni m.a., fino a quando entrambe le m. sono state lavorate, fare 1 gettato e far passare il filo attraverso tutte e 3 gli anelli sull’uncinetto, 3 catenelle, 1 m.bss. nella stessa m.b. dove sono state lavorate entrambe le m.a., 1 m.bss. nella m.b. successiva *, ripetere da *-* fino a quando rimane 1 m.b., lavorare come segue in questa m.b.: 1 m.bss., 3 catenelle, poi 3 m.a. ma aspettare con l’ultimo passaggio attraverso ogni m.a. fino a quando tutte e 3 le m.a. sono state lavorate, fare 1 gettato e far passare il filo attraverso tutti e 4 gli anelli sull’uncinetto (= 8 foglie). GIRO 3: * 4 catenelle, in cima alla foglia successiva lavorare 1 m.a. + 2 catenelle + 1 m.a. (= angolo), 5 catenelle, 1 m.b. in cima alla foglia successiva, 5 catenelle, in cima alla foglia successiva lavorare 1 m.a. + 2 catenelle + 1 m.a. (= angolo), 4 catenelle, 1 m.b. in cima alla foglia successiva, 4 catenelle, in cima alla foglia successiva lavorare 1 m.a. + 2 catenelle + 1 m.a. (= angolo), 3 catenelle, 1 m.b. in cima alla foglia successiva, 3 catenelle, in cima alla foglia successiva lavorare 1 m.a. + 2 catenelle + 1 m.a. (= angolo), 4 catenelle, 1 m.bss. nella 1° catenella dall’inizio del giro. GIRO 4: Nei 4 occhielli di catenelle lavorare 4 m.b., nei 5 occhielli di catenelle lavorare 5 m.b., nei 3 occhielli di catenelle lavorare 3 m.b. e nei 2 occhielli di catenelle in ogni angolo lavorare 1 m.b., 3 catenelle, 1 m.b. = un totale di 40 m.b. lungo la piastrella, finire con 1 m.bss. nella 1° m.b., tagliare il filo. Due lati hanno la stessa larghezza - circa 5 cm, 1 lato è più piccolo – circa 4½ cm e 1 lato più largo - circa 5½ cm. Lavorare 20-22-24-26-30 piastrelle. Cucire insieme le piastrelle in una striscia lunga – cucire margine a margine – assicurarsi che il lato più corto sia posto contro lo stesso lato e che i lati più lunghi siano posti lungo il lato opposto in modo che la striscia sia curva. Iniziare affrancando le 2 piastrelle centrali sulla striscia al centro dietro in cima al bordo – cucire margine a margine lungo il lato più corto sulle piastrelle. Continuare a cucire giù verso un lato e fino al centro dietro in basso sul bordo, poi attaccare l’altro lato della striscia – assicurarsi di non cucire troppo stretto quando si attacca la striscia. Se sono necessarie più o meno piastrelle, aggiustarle prima che le ultime 2 piastrelle siano attaccate al centro dietro. BORDO A PICOT: Lavorare con l’uncinetto misura 3 mm con il filato Fabel sul bordo attorno all’intera striscia di piastrelle. Iniziare nella 1° piastrella che è stata cucita sul dietro del collo e lavorare come segue: 1 m.b. nella 2° m. sulla piastrella, * 1 picot (= 3 catenelle, 1 m.b. nella 1° catenella), saltare 1 m.b., 1 m.b. nella m.b. successiva *, ripetere da *-* (ci dovrebbero essere circa 5 picots lungo ogni piastrella + 1 nel passaggio alla piastrella successiva), finire con 1 m.bss. nella 1° m.b. dall’inizio del giro. Lavorare il bordo a picot nello stesso modo lungo gli scalfi. |
|
 |
|
Avete terminato questo modello?Allora taggate le vostre foto con #dropspattern #tildavest o inviatele alla #dropsfan gallery. Avete bisogno di aiuto con questo modello?Troverete 7 video tutorial, una sezione per i commenti/domande e molto altro guardando il modello su www.garnstudio.com © 1982-2026 DROPS Design A/S. Ci riserviamo tutti i diritti. Questo documento, compreso tutte le sue sotto-sezioni, è protetto dalle leggi sul copyright. Potete leggere quello che potete fare con i nostri modelli alla fine di ogni modello sul nostro sito. |
|


Con oltre 40 anni di esperienza nel design di modelli di maglia e uncinetto, DROPS Design offre la più estesa collezione di modelli gratuiti su internet - tradotti in 17 lingue. Ad oggi vi possiamo fornire 324 cataloghi e 12290 modelli - 9561 dei quali sono tradotti in Italiano.
Ci stiamo impegnando molto per darvi il meglio che vi possiamo offrire in termini di maglia e uncinetto, ispirazioni e consigli così come filati di grande qualità ad un prezzo incredibile! Volete utilizzare i nostri modelli per qualcosa d'altro oltre al vostro uso personale? Potete leggere tutto ciò che è consentito nel testo sul Copyright in basso su tutte le pagine dei nostri modelli. Buon lavoro!
Lasciare un commento sul modello DROPS Children 22-29
Noi saremmo felici di ricevere i tuoi commenti e opinioni su questo modello!
Se vuoi fare una domanda, fai per favore attenzione a selezionare la categoria corretta nella casella qui sotto per velocizzare il processo di risposta. I campi richiesti sono indicati da *.