
Categorie popolari
State cercando un filato?


Commenti / Domande (59)
![]() Gilardi Claudette ha scritto:
Gilardi Claudette ha scritto:
Je ne comprends pas l'explication des manches.que veut dire "avec les rangs raccourcis comme avant,aux mêmes endroits" Merci
31.01.2022 - 09:02DROPS Design ha risposto:
Bonjour Mme Gilardi, vous avez auparavant tricoté des rangs raccourcis sur toute la longueur, lorsque vous tricotez les manches, vous allez tourner aux mêmes endroit qu'avant (moins de fois car moins de marqueurs), et continuer ainsi les rangs raccourcis comme avant. Bon tricot!
31.01.2022 - 10:23
![]() Martens ha scritto:
Martens ha scritto:
Ik ben deze Eden vest aan het breien. Ik ben nu de libkermouw aan het breien. Deze moeten in verkorte toeren gebreid worden. De eerste en de tweede toer van de verkorte toeren moeten gewoon volledig heen en terug gebreid worden. Blijft dit ook gelden in de mouw? Want er zijn maar 2 verkorte toeren in de mouw ipv 3. Ik begrijp tevens niet hoe je 35 cm meet (aan de onderkant op het breedste deel) in de uitleg van de linkermouw. Kan u mij daarmee helpen, please?
09.01.2021 - 20:24DROPS Design ha risposto:
Dag Martens,
De lengte van de mouw meet je aan de onderkant van de mouw op het breedste deel. Als je verkorte toeren maakt op de mouw, keer je het werk op het zelfde punt als bij de panden, dus het aantal steken vanaf de hals tot het keerpunt voor de verkorte toeren moet hetzelfde zijn. Hoe de verkorte toeren herhaald worden is verder precies hetzelfde als op de panden.
10.01.2021 - 12:15
![]() Bobby Garland ha scritto:
Bobby Garland ha scritto:
OK, I think I get it. I need to do 1 more row on the LF (row 1 for me) in order to end at the top. Then, I need to attach a new yarn to stitch #64 on the WS and knit the side piece. Then I will end up with the last row on the RS. Then I will cut that yarn. Then I will go back to the top edge on the LF and pick up yarn and turn to the WS to start the sleeve on those 51 sts. It would have been nice if the instructions had been more specific, instead of saying "work approximately..."
08.01.2021 - 19:57
![]() Bobby Garland ha scritto:
Bobby Garland ha scritto:
I get what you are saying, but I am not asking about the sleeve, as I am not there yet. I need to know if I am to cut the yarn at the lower edge of the left front piece and reattach it to the WS at stitch #64 to start the first row of the side piece so as to end on the RS of the side piece as instructed. There is no other way to end up on the RS unless you start the side piece on the WS in the middle of the work.
08.01.2021 - 17:21DROPS Design ha risposto:
Dear Mrs Garland, after left front piece measures 23 cm, adjust so that next row will be worked from RS and now work this 1 cm starting from RS = from the bottom edge over the first 64 cm - adjust this 1 cm so that last row is worked from RS, then cut the yarn and join it to work sleeve (starting from RS) over the 51 sts left unworked on needle (starting from RS). Happy knitting!
11.01.2021 - 06:57
![]() Bobby Garland ha scritto:
Bobby Garland ha scritto:
OK, so you also cut the yarn at the end of the left front, which for me is at the lower edge, and reattach to stitch # 64 (for small size) in order to start the side piece on the WS, so as to finish last row of side piece on the RS?
08.01.2021 - 15:15DROPS Design ha risposto:
Dear Mrs Garland, the last row on left front piece is worked from RS, but when you turn and work sleeve, first row on sleve is worked from WS = this means you don't need to cut the yarn between left front piece and sleeve, then after sleeve, just work the 64 sts on side at the end of a WS row. - no need to cut the yarn neither between sleeve and back piece. Happy knitting!
08.01.2021 - 16:19
![]() Bobby Garland ha scritto:
Bobby Garland ha scritto:
Thank you for your response. Another question....I finished the left front and ended on row 8 of short row sequence, which means the next row would be a right side row. In order to finish the side piece on the RS as instructed and have the side pieces be the same number of rows and have a marker in the middle, I would have to start the side piece on the WS. Do I cut the yarn and start at stitch number 64 at the other end from the WS?
08.01.2021 - 14:08DROPS Design ha risposto:
Dear Mrs Garland, last row worked for side on front piece is worked from the right side, then cut the yarn and work sleeve. Last row worked on sleeve is from WS, after you have worked this last row on sleeve, work the stitches of the side at the end of this row = from WS, all stitches are now back on needle, turn and start short rows at the beg of next row from RS. Happy knitting!
08.01.2021 - 15:02
![]() Bobby Garland ha scritto:
Bobby Garland ha scritto:
For short rows, when moving from left front to sleeve to back to sleeve to right front, do you continue in the same numerical sequence from the previous section, or do you start again at row 1 or do you reverse the short row sequence, work rows 8-1? You start with row 1 at the left front border and end up with row 8 at the right front....the pieces would not be "mirrored." Even if you have the same number of rows, the short rows would not be in the same place. Does it matter?
04.01.2021 - 14:50DROPS Design ha risposto:
Dear Mrs Garland, after you have worked the sleeve, work the short rows on back piece starting from row 1 of short rows. Happy knitting!
05.01.2021 - 10:43
![]() LISA RENBARGER ha scritto:
LISA RENBARGER ha scritto:
A friend and I are about to cast on Eden to knit at the same time. My bust measurement is between size M & L. Is there positive ease built in to the pattern?
13.01.2020 - 16:49DROPS Design ha risposto:
Dear Mrs Renbarger, measure a similar garment you have and like the shape and compare these measurements to the one in the measurement chart (taken flat from side to side, in cm) to find out the matching size. You can then either decide if you want it rather tight or rather loose (with negative or positive ease). Read more here. Happy knitting!
14.01.2020 - 07:17
![]() Kironieke ha scritto:
Kironieke ha scritto:
If i cast on 120 stitches for size M with 23st/cm (tension) how do i get to the total height of 75cm? It only adds up to the 52cm of the body, not the yoke/sleeve part.
21.05.2019 - 20:53DROPS Design ha risposto:
Dear Kironieke, the 120 stitches will measure 52 cm = whole length of jacket as shown in measurement chart (= 23 cm yoke + 29 cm body). Happy knitting!
22.05.2019 - 09:14
![]() Rosie FRANCIS ha scritto:
Rosie FRANCIS ha scritto:
When knitting the left sleeve, you will have between 51 and 62 stitches, how many do you work before turning on the short rows? The short row instructions work for the whole garment (between 115 and 138 stitches)
06.08.2018 - 22:35DROPS Design ha risposto:
Dear Mrs Francis, you should work the short rows on the left sleeve on the same places you worked the short rows on the top of front piece before, ithe "turns" should continue and be aligned from the beg of piece. Happy knitting!
07.08.2018 - 09:38
|
||||
Eden#edencardigan |
||||
|
|
||||
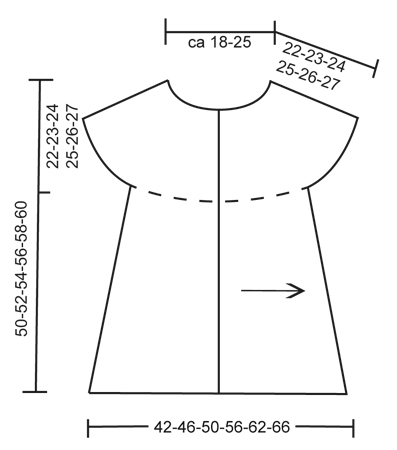
Giacchino DROPS ai ferri a punto legaccio, lavorato nel senso della lunghezza, a ferri accorciati, in "Fabel". Taglie: Dalla S alla XXXL.
DROPS 134-4 |
||||
|
SUGGERIMENTO: Ogni volta che si gira il lavoro nel corso del ferro, passare la 1° m a dir senza lavorarla, stringere il filo e lavorare il ferro di ritorno. In questo modo non si formano dei piccoli buchi quando si lavorano i ferri accorciati. FERRI ACCORCIATI: Lavorare i ferri accorciati al centro del lavoro per dare al capo una forma leggermente ad A. Iniziare a lavorare dal bordo inferiore (= parte in basso) e proseguire verso il collo (= parte in alto) come segue: * lavorare su tutte le m, girare il lavoro e lavorare il ferro di ritorno. Lavorare 103-108-112-115-119-122 m, girare il lavoro e tornare indietro. LEGGERE IL SUGGERIMENTO sopra! Lavorare 89-94-97-99-103-105 m, girare il lavoro e tornare indietro. Lavorare 71-75-77-79-81-83 m, girare il lavoro e tornare indietro *. Ripetere da *-*; quindi 1 ripetizione = 2 ferri nella parte in alto e 8 ferri nella parte in basso. SUGGERIMENTO PER PRENDERE LE MISURE: Misurare il lavoro steso su una superficie piana: è importante non tirare il lavoro mentre si prendono le misure. -------------------------------------------------------- GIACCHINO: Si lavora nel senso della lunghezza, avanti e indietro sui ferri. Si inizia dal davanti sinistro e si finisce con il davanti destro. ATTENZIONE: la fotografia del giacchino è stata stampata invertita. DAVANTI SINISTRO: Si lavora tutto a punto legaccio; lavorare quindi tutti i ferri a dir. Avviare 115-120-125-129-134-138 m lente sui ferri n° 3,5 con il filato Fabel, colore vista sul mare. Il primo ferro viene lavorato sul diritto del lavoro (si parte quindi dal bordo inferiore e si procede verso il collo). Lavorare 3 cm su tutte le m (=bordo verso il centro); finire dopo un ferro sul rovescio del lavoro. RICORDARSI LA TENSIONE DEL LAVORO! Proseguire a FERRI ACCORCIATI – vedere le spiegazioni precedenti! Proseguire in questo modo finché il lavoro non misura ca. 23-25-27-30-33-35 cm dal ferro di avvio (misurare la parte inferiore del giacchino, quindi la parte più larga) vedere il SUGGERIMENTO PER PRENDERE LE MISURE sopra! Lavorare il lato del giacchino come segue: lavorare 1 cm avanti e indietro solo sulle 64-67-70-72-74-76 m dal bordo inferiore. Inserire un segno sulla parte inferiore (= centro del lato). Lavorare 1 cm avanti e indietro sullo stesso numero di m, e metterle in attesa su un fermamaglie (finire dopo 1 ferro sul diritto del lavoro; le m verranno riprese successivamente per il dietro). Lavorare ora la manica. MANICA SINISTRA: = 51-53-55-57-60-62 m sul ferro. Lavorare avanti e indietro a ferri accorciati girando il lavoro negli stessi punti come prima, finché la manica non misura ca. 30-31-32-33-34-35 cm (misurare la parte inferiore della manica, quindi la parte più larga); finire dopo 1 ferro sul rovescio del lavoro. DIETRO: Lavorare le 64-67-70-72-74-76 m messe in attesa sul ferma maglie e riportarle sui ferri di lavoro (sul rovescio del lavoro) = 115-120-125-129-134-138 m. Proseguire a ferri accorciati come prima. Quando il lavoro misura ca. 21-23-25-28-31-33 cm dal segno sul lato (misurare la parte inferiore del giacchino, quindi la parte più larga), inserire un altro segno (= centro dietro). Proseguire a ferri accorciati finché il lavoro non misura ca. 20-22-24-27-30-32 cm dal segno al centro dietro (misurare la parte inferiore del giacchino, quindi la parte più larga). Lavorare ora il lato come segue: lavorare 1 cm avanti e indietro solo sulle 64-67-70-72-74-76 m dal bordo inferiore. Inserire un altro segno sulla parte inferiore (= centro al lato). Lavorare 1 cm avanti e indietro sulle stesse m (finire dopo 1 ferro sul diritto del lavoro) e mettere le m in attesa su un ferma maglie. Lavorare la manica destra. MANICA DESTRA: Lavorare come la manica sinistra. DAVANTI DESTRO: Lavorare le 64-67-70-72-74-76 m messe in attesa sul fermamaglie e riportarle sui ferri di lavoro (sul rovescio del lavoro) = 115-120-125-129-134-138 m. Proseguire a ferri accorciati come prima. Dopo aver lavorato lo stesso n° di ferri lavorati per il davanti sinistro (meno i 3 cm del bordo), lavorare il bordo davanti destro come segue: lavorare 1 ½ cm avanti e indietro su tutte le m. Al ferro successivo, sul diritto del lavoro, intrecciare le m per le asole come segue (= partendo dal bordo inferiore): lavorare 12 m per tutte le taglie, intrecciare le 2 m successive, * lavorare 12-13-14-14-15-15 m, intrecciare le 2 m successive *, ripetere da *-* per un totale di 4 volte, lavorare le m rimanenti del ferro. Al ferro successivo, avviare 2 nuove m in corrispondenza delle m chiuse. Lavorare su tutte le m finché il bordo non misura in tutto 3 cm. Intrecciare le m senza stringere troppo il filo. CONFEZIONE: Con l’uncinetto n° 4 e 2 capi del filato colore marrone, lavorare un bordo come segue: iniziare dalla parte inferiore del davanti destro e lavorare 1 m.b, * 2 cat, saltare ca. 1 cm, 1 m.b * ripetere da *-* lungo tutto il davanti destro, attorno al collo, sul dietro e lungo il davanti sinistro. Tagliare il filo e fermarlo. Cucire i bottoni. |
||||
Spiegazioni del diagramma |
||||
|
||||
 |
||||
Avete terminato questo modello?Allora taggate le vostre foto con #dropspattern #edencardigan o inviatele alla #dropsfan gallery. Avete bisogno di aiuto con questo modello?Troverete 6 video tutorial, una sezione per i commenti/domande e molto altro guardando il modello su www.garnstudio.com © 1982-2026 DROPS Design A/S. Ci riserviamo tutti i diritti. Questo documento, compreso tutte le sue sotto-sezioni, è protetto dalle leggi sul copyright. Potete leggere quello che potete fare con i nostri modelli alla fine di ogni modello sul nostro sito. |
||||


Con oltre 40 anni di esperienza nel design di modelli di maglia e uncinetto, DROPS Design offre la più estesa collezione di modelli gratuiti su internet - tradotti in 17 lingue. Ad oggi vi possiamo fornire 324 cataloghi e 12290 modelli - 9561 dei quali sono tradotti in Italiano.
Ci stiamo impegnando molto per darvi il meglio che vi possiamo offrire in termini di maglia e uncinetto, ispirazioni e consigli così come filati di grande qualità ad un prezzo incredibile! Volete utilizzare i nostri modelli per qualcosa d'altro oltre al vostro uso personale? Potete leggere tutto ciò che è consentito nel testo sul Copyright in basso su tutte le pagine dei nostri modelli. Buon lavoro!
Lasciare un commento sul modello DROPS 134-4
Noi saremmo felici di ricevere i tuoi commenti e opinioni su questo modello!
Se vuoi fare una domanda, fai per favore attenzione a selezionare la categoria corretta nella casella qui sotto per velocizzare il processo di risposta. I campi richiesti sono indicati da *.