
Categorie popolari
State cercando un filato?


Commenti / Domande (261)
![]() STEURS SIMONE ha scritto:
STEURS SIMONE ha scritto:
COMBIEN FAUT-IL DE PELOTTE
23.12.2015 - 15:30DROPS Design ha risposto:
Bonjour Mme Steurs, vous trouverez la quantité requise pour chaque taille au poids sous l'onglet "Fournitures", soit 100 g en gris moyen ou rose moyen + 100 g en gris mix. 1 pelote Nepal = 50 g, il vous faudra 2 pelotes des 2 coloris dans la 1ère taille, soit 4 pelotes au total. Bon tricot!
02.01.2016 - 13:02
![]() Sabrina ha scritto:
Sabrina ha scritto:
Die Boots sehen so toll aus! Würde sie gerne größer stricken. In Größe 46, kann man dann einfach 44 Maschen anschlagen? Aber passt das dann überhaupt mit den Zu-/Abnahmen? Kann mir da jemand n tip geben?? Wäre sehr dankbar...!
07.12.2015 - 11:53DROPS Design ha risposto:
Wenn Sie in erster Linie einen längeren Fuß benötigen, können Sie den oberen Fußteil einfach mit der Maschenzahl für die größte Größe länger stricken. Wenn auch der Fuß breiter werden soll, können Sie versuchen, 42 M anzuschlagen und statt 11 M 13 M stillzulegen. In beiden Fällen stricken Sie dann mehr M aus den Seitenteilen des Fußes heraus (ca. 18 M statt 16 M). Am besten messen Sie den Schuh immer mal wieder nach oder probieren ihn idealerweise zwischendurch an.
11.12.2015 - 15:58Evelyn Lewis ha scritto:
I am having difficulty understanding the instructions for the Loose cuff worked sideways: 1 st in GARTER ST -see explanation above, *K1, P1*, repeat from *_*, finish with K1 and 1 st in garter st. That is very confusing to me! Thanks.
28.11.2015 - 01:40DROPS Design ha risposto:
Dear Mrs Lewis, you are working here in rib K1/P1 with 1 edge st in garter st on each side (knit first and last st on row every row). Happy knitting!
30.11.2015 - 10:07Valerie ha scritto:
When you reach the part where it says insert marker mid front of toe and mid back of heel. Then continue in rib in the round as before for 2cm / 3/4". Is that for 2 3/4 cm or 3/4" or 3 or 4"?
12.11.2015 - 17:22DROPS Design ha risposto:
Dear Valerie, you continue in rib in the round as before for 2 cm or in inches: 3/4" (= 0.79 inch). Happy knnitting!
13.11.2015 - 09:02
![]() Lisa-Marie ha scritto:
Lisa-Marie ha scritto:
I don't understand what lenght of yarn is needed for this pattern. The pattern says 100-150-150g of gray yarn. Is this equivalent to 450 meters? Thank you!
09.11.2015 - 17:12DROPS Design ha risposto:
Dear Lisa-Marie, 1 ball Nepal is 75m, in 1st size you need 2 balls grey: 2 x 75 m = 150 m + 2 balls medium gray OR medium pink: 2 x 75 m = 150 m ==> you need 150 m Nepal in both colours (= a total of 300 m). Same for 2 larger sizes but you need then 3 balls each colours: 3x75m= 225 m in each of both colours. Happy knitting!
10.11.2015 - 09:32
![]() Aurelie ha scritto:
Aurelie ha scritto:
Je pense qu il y a une erreur au niveau de la taille de la bordure....36-37-38cm pour une cheville de femme! C est énorme non?
25.10.2015 - 18:58DROPS Design ha risposto:
Bonjour Aurélie, la bordure va être cousue au chausson (y compris le chevauchement pour les boutons) - vous pouvez toutefois ajuster à la longueur désirée si vous le souhaitez. Bon tricot!
26.10.2015 - 12:26
![]() Helene ha scritto:
Helene ha scritto:
Bonjour J'aimerais savoir....quand vous parler de tricoter avec deux fils......est-ce deux fils en meme temps ou en alternance?
21.10.2015 - 00:07DROPS Design ha risposto:
Bonjour Hélène, les chaussons se tricotent entièrement avec 2 fils (= 1 de chaque couleur) sur la base de l'échantillon de 13 m x 17 rangs jersey = 10 x 10 cm. Bon tricot!
21.10.2015 - 09:25
![]() Kimberly ha scritto:
Kimberly ha scritto:
Anyone who, has made these, I am curious how these slippers fit. I have thin ankles and somewhat narrow feet. I just started the pattern and I'm starting to wonder if these will be too stretchy! Thanks! :)
16.10.2015 - 02:48Nathalie ha risposto:
Kimberly, I made these for my son, he has also thin ankles and narrow feet and it fitted him perfectly. You can adjust the edge around the leg if you rather like to. Hope it helps :)
16.10.2015 - 09:31
![]() Joan ha scritto:
Joan ha scritto:
Are these patterns for women??? I can't get the foot long enough with the measurements provided. Thank you
05.10.2015 - 17:12DROPS Design ha risposto:
Dear Joan, yes they are, you will find sizes available at the right side of the picture. Remember to check and keep the correct tension ie 13 sts x 17 rows in stockinette st with 2 strands Nepal = 10 x 10 cm / 4'' x 4''. Happy knitting!
06.10.2015 - 09:28
![]() Anikjl ha scritto:
Anikjl ha scritto:
Bonjour je suis entrain de faire cest chaussons mais je bloque au debut quand o dit continuer sur les 9 m et en même temps au 1 ier rang monter 1 m de chaque côté (m lis)=11 m pr point 35/37 Conttinuer
15.09.2015 - 12:00
|
|
Moon Socks#moonsocks |
|
 |
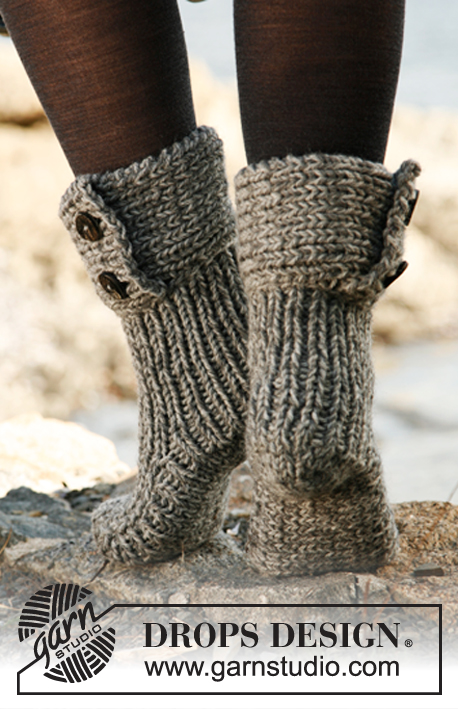 |
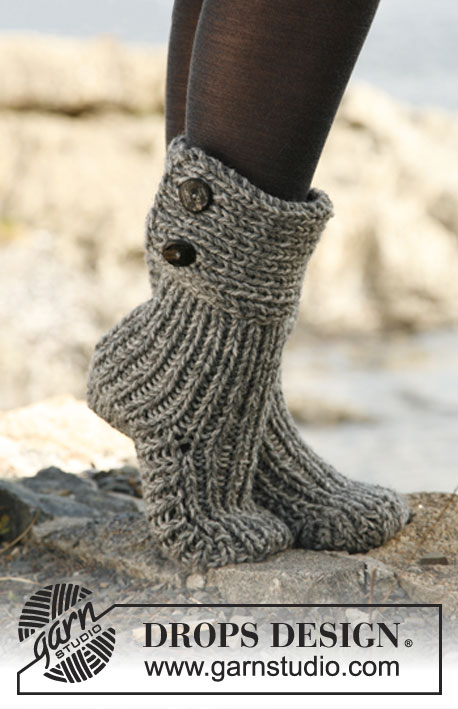
Calze DROPS lavorate con 2 capi, in "Nepal"
DROPS 134-42 |
|
|
PUNTO LEGACCIO (avanti e indietro sul f): Lavorare tutti i ferri a diritto. -------------------------------------------------------- CALZE: GAMBO: Avviare 36-38-40 m con i ferri a doppia punta 6 con 1 capo grigio medio mix e 1 capo grigio mix. Lavorare a coste 1 m dir / 1 m rov in tondo finché il lavoro non misuri ca 10 cm. PIEDE: Conservare poi le 9-11-11 prime m del giro sul ferro, passare in attesa le 27-27-29 m rimanenti su un fermamaglie/filo. Continuare a coste avanti e indietro sulle 9-11-11 m, ALLO STESSO TEMPO, al 1° ferro avviare 1 nuova m ad ogni lato (m vivagno) = 11-13-13 m. Dopo aver lavorato 7-8,5-10 cm, intrecciare 1 m vivagno ad ogni lato = 9-11-11 m. Rimettere poi le m in attesa dal fermamaglie/filo sul ferro e lavorare e riprendere 12-14-16 m ad ogni lato della parte centrale (all’interno di 1 m vivagno) = 60-66-72 m sul f. Misurare il lavoro da qui d’ora in poi. Lasciare 1 segno/filo in mezzo davanti sulla punta e 1 segno/filo in mezzo dietro sul tallone. Continuare in tondo a coste come prima per 2 cm. Terminare poi a maglia rasata - ALLO STESSO TEMPO, lavorare insieme 2 m a dir ad ogni lato di ogni segno/filo ogni 2 ferri (= 4 diminuzioni per giro). Continuare a diminuire finché la parte a maglia rasata non misuri 3-3-4 cm – intrecciare. Fare la cucitura in mezzo sotto il piede nel filo della maglia più esterna per evitare che diventi troppo spessa. BORDO, LAVORATO NEL SENSO DELLA LUNGHEZZA: Avviare 15-17-17 m con i ferri 6 e 1 capo grigio medio mix e 1 capo grigio mix. Lavorare così: 1 m PUNTO LEGACCIO - ved spieg sopra, * 1 m dir, 1 m rov *, ripetere da *-* e terminare con 1 m dir e 1 m punto legaccio. Quando il lavoro misura 2 cm, intrecciare per le 2 asole così sul diritto: 1 m punto legaccio, 1 m dir, 1 m rov, passare 1 m a dir senza lavorarla, 1 m dir, accavallare la m passata sopra quella lavorata, 1 gettato, * 1 m dir, 1 m rov *, ripetere da *-* finché non rimangano 5 m, 1 gettato, 2 m insieme a dir, 1 m rov, 1 m dir, 1 m punto legaccio. Continuate con le coste e punto legaccio ad ogni lato finché il lavoro non misuri ca 36-37-38 cm. Intrecciare con il dir sopra il dir e il rov sopra il rov. Attaccare i bottoni sul bordo e abbottonare. Infilare il gambo dentro il bordo abbottonato 2 cm. Fare attenzione che i bottoni rimangano all’esterno delle calze. Cucire il bordo di avviamento al bordo sul rovescio con punti invisibili. |
|
Avete terminato questo modello?Allora taggate le vostre foto con #dropspattern #moonsocks o inviatele alla #dropsfan gallery. Avete bisogno di aiuto con questo modello?Troverete 10 video tutorial, una sezione per i commenti/domande e molto altro guardando il modello su www.garnstudio.com © 1982-2026 DROPS Design A/S. Ci riserviamo tutti i diritti. Questo documento, compreso tutte le sue sotto-sezioni, è protetto dalle leggi sul copyright. Potete leggere quello che potete fare con i nostri modelli alla fine di ogni modello sul nostro sito. |
|


Con oltre 40 anni di esperienza nel design di modelli di maglia e uncinetto, DROPS Design offre la più estesa collezione di modelli gratuiti su internet - tradotti in 17 lingue. Ad oggi vi possiamo fornire 325 cataloghi e 12298 modelli - 9569 dei quali sono tradotti in Italiano.
Ci stiamo impegnando molto per darvi il meglio che vi possiamo offrire in termini di maglia e uncinetto, ispirazioni e consigli così come filati di grande qualità ad un prezzo incredibile! Volete utilizzare i nostri modelli per qualcosa d'altro oltre al vostro uso personale? Potete leggere tutto ciò che è consentito nel testo sul Copyright in basso su tutte le pagine dei nostri modelli. Buon lavoro!
Lasciare un commento sul modello DROPS 134-42
Noi saremmo felici di ricevere i tuoi commenti e opinioni su questo modello!
Se vuoi fare una domanda, fai per favore attenzione a selezionare la categoria corretta nella casella qui sotto per velocizzare il processo di risposta. I campi richiesti sono indicati da *.