
Categorie popolari
State cercando un filato?


Commenti / Domande (261)
![]() Joce ha scritto:
Joce ha scritto:
Numéro 134-42 je ne comprends pas a partie de "reprendre les m. en attenteet relever 14.m de chaque coté de la partie centrale" a quelle moment je fais doc 2 fois 14 m. merci de me répondre joce
25.04.2012 - 16:56DROPS Design ha risposto:
Bonjour Joce, vous devez tricotez d'abord en allers retours sur les 11(+ 1 m de chaque côté, soit 13 m) premières mailles du tour, ensuite vous tricotez ces mailles + vous relevez 14 m à gauche de cette partie tricotée en allers et retours, vous tricotez les mailles en attente et vous relevez 14 m à droite de cette partie tricotée en allers et retours, vous avez vos 66 m. Bon tricot !
25.04.2012 - 18:41
![]() Amanda ha scritto:
Amanda ha scritto:
HEJ! Jag förstår inte hur man ska kunna sätta markör på hälen och på tån eftersom jag inte ens har gjort tån, kan någon förklara snälla?/Amanda
19.04.2012 - 17:19DROPS Design ha risposto:
Längs fram på mittstycket som du just stickat är det som är fram mot tårna, så du ska sätta en markör där, mitt på kortsidan.
19.04.2012 - 19:26
![]() Deebo ha scritto:
Deebo ha scritto:
This pattern makes no sense. No one else seems to have trouble though...like when you're knitting the top of the foot for 8.5cm....that's not long enough! I finished this and came out with a sock for a baby by accident! Is there a more detailed pattern somewhere? I can't believe I'm the only one with any problems...
17.04.2012 - 19:32DROPS Design ha risposto:
Hi Deebo. The 8.5 cm is just for the upper top of the foot, have you finished the sock? It's also very stretchy due to the rib, so even if looking smaller when not on foot it should fit the sizes given. Are you on Rav elry? There are 143 finished projects there, many with detailed pictures.
17.04.2012 - 20:14
![]() Josefin Isaksson ha scritto:
Josefin Isaksson ha scritto:
Hej! Jag håller på att sticka "moon socks" men jag har fastnat! Kan ni förklara eller möjligtvis göra en video på hur denna del av foten som ska stickas: Sedan sätts m från tråden tillbaka på st och det stickas 12-14-16 m upp på varje sida av mittstycket (innanför 1 kantm) = 60-66-72 m på st.
22.03.2012 - 15:12DROPS Design ha risposto:
Hej, Du har ju stickat framsidan nu och skall sticka ned längs med sidan och sen sulan. Så då sätter du maskorna som du haft på en tråd tillbaka på stickan och stickar enligt mönster. Lycka till!
28.03.2012 - 12:02
![]() Susini ha scritto:
Susini ha scritto:
Comment avoir un diagrame
13.03.2012 - 07:18DROPS Design ha risposto:
Bonjour Susini, il n'existe pas de diagramme pour ce modèle, toutefois, je vous propose de regarder sur le forum Drops, ces chaussons ont été tricotés par différentes personnes et vous devriez y trouver des informations pour vous aider. Bon tricot !
13.03.2012 - 10:12
![]() Silvia ha scritto:
Silvia ha scritto:
Gostaria de uma explicação mais detalhada sobre a confecção do modelo. Eu não entendi os pontos que ficam a espera. Aguardo sua resposta. Desde ja agradeço a tenção. Sds Silvia
03.03.2012 - 00:26DROPS Design ha risposto:
Os pontos que ficam em espera formam o calcanhar. A explicação é já bastante detalhada. Pode sempre pedir mais conselhos ou ajudas na nossa página de fãs do Facebook ou nos nossos fóruns. Obrigada por nos contactar.
07.03.2012 - 11:27
![]() Peggy ha scritto:
Peggy ha scritto:
I dont understand how to continue, after putting the 27 sts from the st holder back on and knitting up the side. I would be greatly appreciate any help.
01.03.2012 - 20:45DROPS Design ha risposto:
When you put the 27 sts on a holder you continued back and forth over 9 or 11 sts for 7-10 cm. You will then have an edge on each side of the 9-11 sts, along which you knit up 12-14-16, on each side. So when putting all sts back on needles you will have the 9-11 at front for toes, 12-16 each side, and 27-29 sts in the back of foot, start working in the round on these sts.
06.03.2012 - 01:28
![]() Franziska ha scritto:
Franziska ha scritto:
Wie bzw. wo muss ich die Mitte markieren? Und weiß daher, wo ich zusammenstricken muss. Dass ist mir nicht ganz klar geworden.
27.02.2012 - 21:42DROPS Design ha risposto:
Die mittlere Masche an der Ferse (von den 27-27-29 M. auf dem Hilfsfaden) und danch nach 30-33-36 M.
28.02.2012 - 09:49
![]() Silvia ha scritto:
Silvia ha scritto:
Gostaria de saber como faço para levantar os pontos, os aumentos. Qdo levanto os 9 pontos em espera fica um buraco, esta certo assim? Tem video de como fazer esta pantufa? Desde ja agradeço a atenção. sds Silvia
27.02.2012 - 15:49DROPS Design ha risposto:
Quando levanta os pontos está criando um ponto a mais. Consulte nossa videoteca para saber como fazer aumentos. Procure na categoria tricô e, mesmo que não encontre ainda em português, poderá sempre consultar a videoteca em espanhol ou em qualquer outra língua. Quanto as pontos em espera não são levantados. Simplesmente são colocados em espera. Obrigado por nos contactar.
07.03.2012 - 11:30
![]() Deutsch ha scritto:
Deutsch ha scritto:
Ich komm mit der Anleitung leider auch nicht klar. Irgendwie sieht das nicht richitg aus. Nach dem Schaft habe ich die ersten 9 Maschen weitergestrickt und eben jeweils noch eine dazu genommen. Nach ca 8cm ist eine der vier Seiten länger als die anderen drei. Dann habe ich zwei abgekettet und immer noch das 8cm Teil betreffend 12 Maschen an jeder Seite aufgenommen und mit den anderen 3 Seiten rund ,Bündchen weiter gestrickt. Das sieht komisch aus!
26.02.2012 - 18:26DROPS Design ha risposto:
Ich habe die Socken selber gestrickt. Die Anleitung funktioniert. Achten Sie darauf dass die 8 cm nicht die Ferse sonder der Fussrücken ist.
27.02.2012 - 13:48
|
|
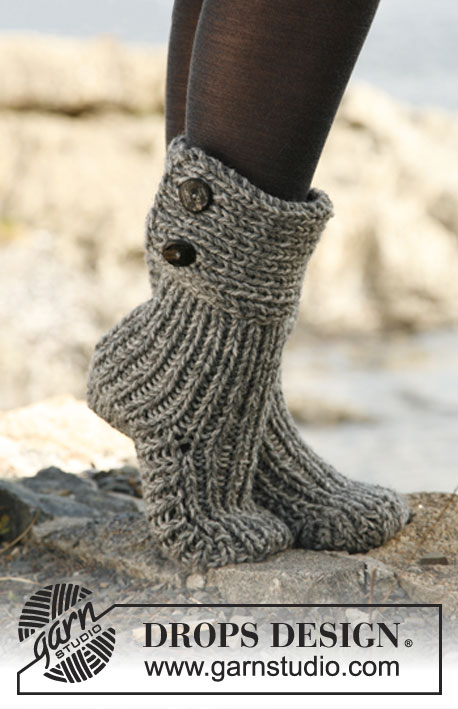
Moon Socks#moonsocks |
|
 |
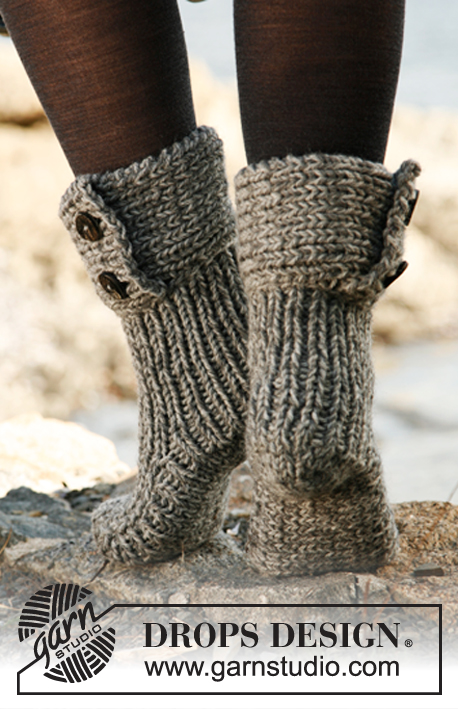 |
Calze DROPS lavorate con 2 capi, in "Nepal"
DROPS 134-42 |
|
|
PUNTO LEGACCIO (avanti e indietro sul f): Lavorare tutti i ferri a diritto. -------------------------------------------------------- CALZE: GAMBO: Avviare 36-38-40 m con i ferri a doppia punta 6 con 1 capo grigio medio mix e 1 capo grigio mix. Lavorare a coste 1 m dir / 1 m rov in tondo finché il lavoro non misuri ca 10 cm. PIEDE: Conservare poi le 9-11-11 prime m del giro sul ferro, passare in attesa le 27-27-29 m rimanenti su un fermamaglie/filo. Continuare a coste avanti e indietro sulle 9-11-11 m, ALLO STESSO TEMPO, al 1° ferro avviare 1 nuova m ad ogni lato (m vivagno) = 11-13-13 m. Dopo aver lavorato 7-8,5-10 cm, intrecciare 1 m vivagno ad ogni lato = 9-11-11 m. Rimettere poi le m in attesa dal fermamaglie/filo sul ferro e lavorare e riprendere 12-14-16 m ad ogni lato della parte centrale (all’interno di 1 m vivagno) = 60-66-72 m sul f. Misurare il lavoro da qui d’ora in poi. Lasciare 1 segno/filo in mezzo davanti sulla punta e 1 segno/filo in mezzo dietro sul tallone. Continuare in tondo a coste come prima per 2 cm. Terminare poi a maglia rasata - ALLO STESSO TEMPO, lavorare insieme 2 m a dir ad ogni lato di ogni segno/filo ogni 2 ferri (= 4 diminuzioni per giro). Continuare a diminuire finché la parte a maglia rasata non misuri 3-3-4 cm – intrecciare. Fare la cucitura in mezzo sotto il piede nel filo della maglia più esterna per evitare che diventi troppo spessa. BORDO, LAVORATO NEL SENSO DELLA LUNGHEZZA: Avviare 15-17-17 m con i ferri 6 e 1 capo grigio medio mix e 1 capo grigio mix. Lavorare così: 1 m PUNTO LEGACCIO - ved spieg sopra, * 1 m dir, 1 m rov *, ripetere da *-* e terminare con 1 m dir e 1 m punto legaccio. Quando il lavoro misura 2 cm, intrecciare per le 2 asole così sul diritto: 1 m punto legaccio, 1 m dir, 1 m rov, passare 1 m a dir senza lavorarla, 1 m dir, accavallare la m passata sopra quella lavorata, 1 gettato, * 1 m dir, 1 m rov *, ripetere da *-* finché non rimangano 5 m, 1 gettato, 2 m insieme a dir, 1 m rov, 1 m dir, 1 m punto legaccio. Continuate con le coste e punto legaccio ad ogni lato finché il lavoro non misuri ca 36-37-38 cm. Intrecciare con il dir sopra il dir e il rov sopra il rov. Attaccare i bottoni sul bordo e abbottonare. Infilare il gambo dentro il bordo abbottonato 2 cm. Fare attenzione che i bottoni rimangano all’esterno delle calze. Cucire il bordo di avviamento al bordo sul rovescio con punti invisibili. |
|
Avete terminato questo modello?Allora taggate le vostre foto con #dropspattern #moonsocks o inviatele alla #dropsfan gallery. Avete bisogno di aiuto con questo modello?Troverete 10 video tutorial, una sezione per i commenti/domande e molto altro guardando il modello su www.garnstudio.com © 1982-2026 DROPS Design A/S. Ci riserviamo tutti i diritti. Questo documento, compreso tutte le sue sotto-sezioni, è protetto dalle leggi sul copyright. Potete leggere quello che potete fare con i nostri modelli alla fine di ogni modello sul nostro sito. |
|


Con oltre 40 anni di esperienza nel design di modelli di maglia e uncinetto, DROPS Design offre la più estesa collezione di modelli gratuiti su internet - tradotti in 17 lingue. Ad oggi vi possiamo fornire 325 cataloghi e 12298 modelli - 9569 dei quali sono tradotti in Italiano.
Ci stiamo impegnando molto per darvi il meglio che vi possiamo offrire in termini di maglia e uncinetto, ispirazioni e consigli così come filati di grande qualità ad un prezzo incredibile! Volete utilizzare i nostri modelli per qualcosa d'altro oltre al vostro uso personale? Potete leggere tutto ciò che è consentito nel testo sul Copyright in basso su tutte le pagine dei nostri modelli. Buon lavoro!
Lasciare un commento sul modello DROPS 134-42
Noi saremmo felici di ricevere i tuoi commenti e opinioni su questo modello!
Se vuoi fare una domanda, fai per favore attenzione a selezionare la categoria corretta nella casella qui sotto per velocizzare il processo di risposta. I campi richiesti sono indicati da *.