
Categorie popolari
State cercando un filato?


Commenti / Domande (261)
![]() Gertrude McCarty ha scritto:
Gertrude McCarty ha scritto:
I would like to make the Moon Socks in sizw 7 1/2 but am not sure how much yarn to order
16.10.2014 - 00:52DROPS Design ha risposto:
Dear Mrs MacCarty, in size 7½, you need 150 g (= 3 balls DROPS Nepal) in each of the both colours 0517 + 0501, ie a total of 6 balls. Happy knitting!
16.10.2014 - 09:41
![]() Carol ha scritto:
Carol ha scritto:
This section of the pattern, At The Same Time k2 tog on each side of both markers on every other round (=4 st less per round) is that meant to be 4 Dec then a non decrease round. I ended up with a triangle in the bottom of the slipper.
14.10.2014 - 05:41DROPS Design ha risposto:
Dear Carol, you are correct, you will dec 4 sts on a round, then work 1 round withouth dec, until the section in stocking st measures 3-4 cm (see size). When you fold the slipper double, toe and heel side will "lean" towards middle to shape the sole. Happy knitting!
14.10.2014 - 10:00
![]() Janine ha scritto:
Janine ha scritto:
I have just completed the bootie/slipper part of this pattern. This has been one of the most confusing patterns I've encountered. It's not the actual knitting that is difficult, just the way it's worded, and would really have liked voice description on the video...I am going to keep trying because I like the way these slippers look...wish me luck!
14.10.2014 - 00:00
![]() Michelle ha scritto:
Michelle ha scritto:
Hi I am wondering how many needles i need as the dbl pointed needles only come with 4 and your video she uses up to 6 this is confusing
11.10.2014 - 06:51DROPS Design ha risposto:
Dear Michelle, when all sts are picked up/ knitted back from st holder, sts are distributed onto 4 double pointed needle, we work then with the 5th needle. Happy knitting!
11.10.2014 - 11:15
![]() Elisabeth ha scritto:
Elisabeth ha scritto:
Er det muligt at få opskriften til baby/børn?
10.10.2014 - 18:33DROPS Design ha risposto:
Der findes flere lignende tøfler til både baby og børn. Søg på baby og så på børn nede under søgeord. God fornøjelse!
17.10.2014 - 15:35
![]() Jess ha scritto:
Jess ha scritto:
I dont understand what it means to cast on with two different colours of yarn. Does anyone know how to do this or can direct me to a video? or do you just knit with the two colours together as if they are one strand of yarn.
08.10.2014 - 21:52DROPS Design ha risposto:
Dear Jess, slippers are worked with 1 strand of each colour held together as if they are only 1 strand of yarn (double thread). Happy knitting!
09.10.2014 - 10:06France Ouellet ha scritto:
After you pick up the 16 sts on both side it said MEASURE PIECE FROM HERE is it the length of the foot that is need it. THANK YOU
08.10.2014 - 11:29DROPS Design ha risposto:
Dear Mrs Ouellet, you measure for foot after picking the 16 sts on each side of middle part, work rib for 2 cm then continue in st st with dec until the stocking st section measures 3 cm (ie a total of 5 cm from sts picked up). Happy knitting!
08.10.2014 - 12:56
![]() Betty ha scritto:
Betty ha scritto:
Hva menes når det står: avslutt med en 1r og en 1 m rille? Er det snakk om enkeltmasker eller en omgang av hver?
07.10.2014 - 10:25DROPS Design ha risposto:
Hej Betty. Du strikker paa retten 1 ret og 1 rille, det bliver saa 1 vr og 1 rille paa vrangen. Det er begge enkeltmasker.
07.10.2014 - 16:54
![]() Susana ha scritto:
Susana ha scritto:
Olá, Seria possível obter a receita desta bota mas para crianças?? Obrigada desde ja
22.09.2014 - 22:19
![]() Tara ha scritto:
Tara ha scritto:
I'm confused on the cuff. I'm not certain what you mean by "Work as follows: 1 st in GARTER ST - see explanation above, * K 1, P 1 *, repeat from *-*, finish with K 1 and 1 st in garter st. " Does this mean that the first stitch will be a k and then work K1 P1 the rest of the way and then on the other side it will be K1 P1 and end with a K1? Thanks!
21.09.2014 - 08:13DROPS Design ha risposto:
Dear Tara, you will work in rib K1/P1 with 1 st in garter st each side, so that you will start from RS with K1 (edge st in garter st), *K1, P1*, repeat from *-* and finish with K1 (from rib) and K1 for edge st. From WS, you will work K1, *P1, K1*, repeat from *-* and finish with P1 and K1 (edge st). Happy knitting!
22.09.2014 - 10:17
|
|
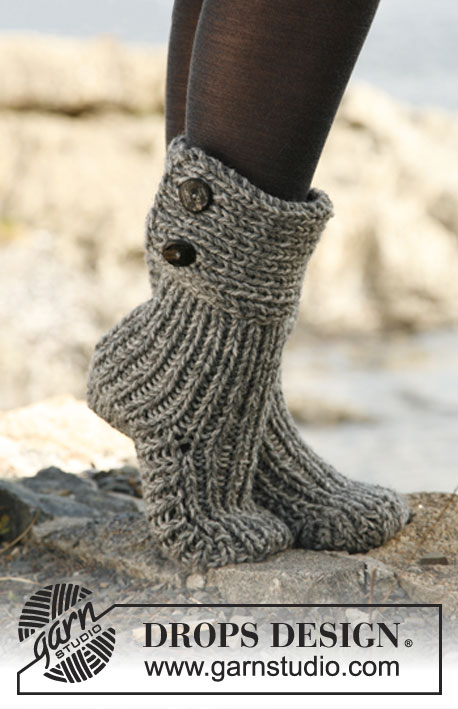
Moon Socks#moonsocks |
|
 |
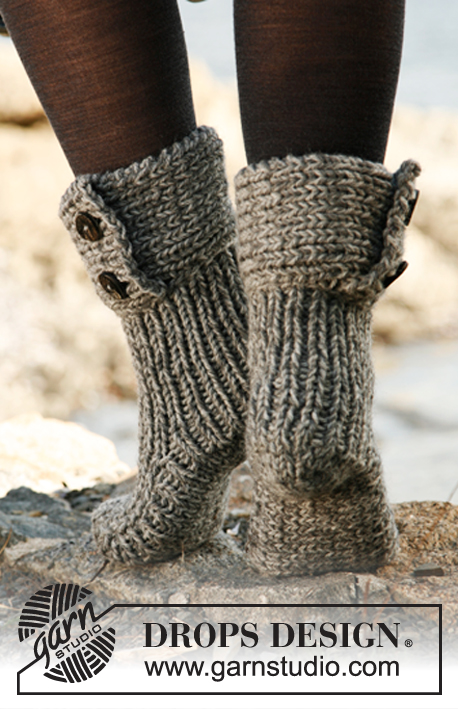 |
Calze DROPS lavorate con 2 capi, in "Nepal"
DROPS 134-42 |
|
|
PUNTO LEGACCIO (avanti e indietro sul f): Lavorare tutti i ferri a diritto. -------------------------------------------------------- CALZE: GAMBO: Avviare 36-38-40 m con i ferri a doppia punta 6 con 1 capo grigio medio mix e 1 capo grigio mix. Lavorare a coste 1 m dir / 1 m rov in tondo finché il lavoro non misuri ca 10 cm. PIEDE: Conservare poi le 9-11-11 prime m del giro sul ferro, passare in attesa le 27-27-29 m rimanenti su un fermamaglie/filo. Continuare a coste avanti e indietro sulle 9-11-11 m, ALLO STESSO TEMPO, al 1° ferro avviare 1 nuova m ad ogni lato (m vivagno) = 11-13-13 m. Dopo aver lavorato 7-8,5-10 cm, intrecciare 1 m vivagno ad ogni lato = 9-11-11 m. Rimettere poi le m in attesa dal fermamaglie/filo sul ferro e lavorare e riprendere 12-14-16 m ad ogni lato della parte centrale (all’interno di 1 m vivagno) = 60-66-72 m sul f. Misurare il lavoro da qui d’ora in poi. Lasciare 1 segno/filo in mezzo davanti sulla punta e 1 segno/filo in mezzo dietro sul tallone. Continuare in tondo a coste come prima per 2 cm. Terminare poi a maglia rasata - ALLO STESSO TEMPO, lavorare insieme 2 m a dir ad ogni lato di ogni segno/filo ogni 2 ferri (= 4 diminuzioni per giro). Continuare a diminuire finché la parte a maglia rasata non misuri 3-3-4 cm – intrecciare. Fare la cucitura in mezzo sotto il piede nel filo della maglia più esterna per evitare che diventi troppo spessa. BORDO, LAVORATO NEL SENSO DELLA LUNGHEZZA: Avviare 15-17-17 m con i ferri 6 e 1 capo grigio medio mix e 1 capo grigio mix. Lavorare così: 1 m PUNTO LEGACCIO - ved spieg sopra, * 1 m dir, 1 m rov *, ripetere da *-* e terminare con 1 m dir e 1 m punto legaccio. Quando il lavoro misura 2 cm, intrecciare per le 2 asole così sul diritto: 1 m punto legaccio, 1 m dir, 1 m rov, passare 1 m a dir senza lavorarla, 1 m dir, accavallare la m passata sopra quella lavorata, 1 gettato, * 1 m dir, 1 m rov *, ripetere da *-* finché non rimangano 5 m, 1 gettato, 2 m insieme a dir, 1 m rov, 1 m dir, 1 m punto legaccio. Continuate con le coste e punto legaccio ad ogni lato finché il lavoro non misuri ca 36-37-38 cm. Intrecciare con il dir sopra il dir e il rov sopra il rov. Attaccare i bottoni sul bordo e abbottonare. Infilare il gambo dentro il bordo abbottonato 2 cm. Fare attenzione che i bottoni rimangano all’esterno delle calze. Cucire il bordo di avviamento al bordo sul rovescio con punti invisibili. |
|
Avete terminato questo modello?Allora taggate le vostre foto con #dropspattern #moonsocks o inviatele alla #dropsfan gallery. Avete bisogno di aiuto con questo modello?Troverete 10 video tutorial, una sezione per i commenti/domande e molto altro guardando il modello su www.garnstudio.com © 1982-2026 DROPS Design A/S. Ci riserviamo tutti i diritti. Questo documento, compreso tutte le sue sotto-sezioni, è protetto dalle leggi sul copyright. Potete leggere quello che potete fare con i nostri modelli alla fine di ogni modello sul nostro sito. |
|


Con oltre 40 anni di esperienza nel design di modelli di maglia e uncinetto, DROPS Design offre la più estesa collezione di modelli gratuiti su internet - tradotti in 17 lingue. Ad oggi vi possiamo fornire 325 cataloghi e 12298 modelli - 9569 dei quali sono tradotti in Italiano.
Ci stiamo impegnando molto per darvi il meglio che vi possiamo offrire in termini di maglia e uncinetto, ispirazioni e consigli così come filati di grande qualità ad un prezzo incredibile! Volete utilizzare i nostri modelli per qualcosa d'altro oltre al vostro uso personale? Potete leggere tutto ciò che è consentito nel testo sul Copyright in basso su tutte le pagine dei nostri modelli. Buon lavoro!
Lasciare un commento sul modello DROPS 134-42
Noi saremmo felici di ricevere i tuoi commenti e opinioni su questo modello!
Se vuoi fare una domanda, fai per favore attenzione a selezionare la categoria corretta nella casella qui sotto per velocizzare il processo di risposta. I campi richiesti sono indicati da *.