
Categorie popolari
State cercando un filato?


Commenti / Domande (18)
![]() Martina Thorn ha scritto:
Martina Thorn ha scritto:
Hallo, die Maschenprobe stimmt, aber die Stulpen scheinen viel zu weit zu werden. Wie berechne ich die passende Weite? Liebe Grüße
13.03.2025 - 10:21DROPS Design ha risposto:
Liebe Frau Thorn, sollte Ihre Maschenprobe stimmen, dann sollten die Stulpen auch passen, beachten Sie daß die Maschenprobe im Bündchen auch richtig wird - sonns sollen Sie je nach der gewünschten Breite/den gewüsnchten Umfang umrechnen. Viel Spaß beim Stricken!
13.03.2025 - 16:00
![]() Lisebeth ha scritto:
Lisebeth ha scritto:
Bonjour, Etes-vous sûre qu'il faut monter jusqu'à 41cm avant de passer aux côtes ?? Ca me paraît trop long. J'ai les 6 torsades comme sur la photo, et je suis à 31 cm avant les côtes... Bien cordialement.
01.12.2022 - 14:24DROPS Design ha risposto:
Bonjour Lisbeth, c'est ainsi que ce modèle a été fait, mais en fonction de votre tension en hauteur, et de la longueur souhaitée pour les jambières, n'hésitez pas à tricotes les 2 cm de côtes quand vous le souhaitez. Bon tricot!
01.12.2022 - 17:27
![]() Pyret Göthlund ha scritto:
Pyret Göthlund ha scritto:
Hej! En fråga angående mönstret, det står På nästa v från avigsidan stickas det så här: 1 kantm, * 1 am, 1 rm *, upprepa *-* över de nästa 24 m, 12 am, 1 rm, upprepa *-* över de nästa 22 m, och avsluta med 1 kantm. Men hur många gånger ska man upprepa?
03.12.2020 - 21:26DROPS Design ha risposto:
Hej. Du stickar det som står innanför stjärnorna (dvs 1 am, 1 rm) först över 24 maskor och sedan nästa gång över 22 maskor. Mvh DROPS Design
04.12.2020 - 08:38
![]() Magdalena ha scritto:
Magdalena ha scritto:
What's the circumference of those supposed to be? I just finished one (not stitched yet, just knitted the rectangle) and it's 31cm wide despite the fact that I used 6mm needles (to get 11sts per row, 16 sts rib to get 10cm, so it's not the gauge issue) and even decreased by a few stitches after the first few rows when I noticed how wide it was getting. When I try it on my leg (I pinned the sides together) it slides right off :( Where did I go wrong? :(
22.03.2015 - 20:22DROPS Design ha risposto:
Dear Magdalena, this is a one-size pattern and your leg may be smaller, you can try to tighten the top of leg warmers with the crocheting edge. Remember you can also get tips & advices from your DROPS store. Happy knitting!
23.03.2015 - 10:29
![]() Claudine ha scritto:
Claudine ha scritto:
Guten Tag liebes Drops-team! Ich möchte fragen, warum die Stulpen nicht rund gestrickt werden. Man könnte sich doch so eine Naht sparen... Hat es mit dem Zopfmuster zu tun? Vielen Dank! Bin sozusagen in den Startlöchern😊
10.11.2014 - 12:46DROPS Design ha risposto:
Es kann etwas "hakelig" sein, die Stulpen auf einem Nadelspiel zu stricken und zusätzlich noch mit der Hilfsnadel für das Zopfmuster zu hantieren. Wenn Ihnen das aber nichts ausmacht (oder Sie die Naht noch mehr scheuen ;-) ), können Sie die Stulpen auch in Runden stricken, dann lassen Sie einfach die Rand-M weg. Dann haben Sie ja 58 M und die Zunahme erfolgt in der 30. M. Sie können auch probieren, ob es mit einer kurzen Rundnadel funktioniert, das könnte allerdings etwas knapp werden.
10.11.2014 - 20:32
![]() Yvette ha scritto:
Yvette ha scritto:
Je moet een even aantal steken opzetten (60), en de kabels vallen in 12 st in het midden. Waarom is het dan nodig dat je 1 st meerdert? Met een oneven aantal heb je links en rechts van de 12 st toch geen gelijk aantal, en gaat het midden dan ook niet verspringen? Of moet je de ene kant meer steken doen (24) en de ander kant minder (23)?
29.11.2013 - 16:33DROPS Design ha risposto:
Hoi Yvette. Het antwoord staat eigenlijk in het patroon. Na het meerderen brei je: 1 kant st, * 1 st av, 1 st r *, herhaal *-* over de volgende 24 st, 12 st av, 1 st r, herhaal *-* over de volgende 22 st en eindig met 1 kant st = 1 + 24 + 12 + 1 + 22 + 1 = 61 st op de nld.
29.11.2013 - 17:51Laura ha scritto:
Muchas gracias por la aclaración anterior. Ya los he terminado, sólo me falta unir los lados y hacer el borde. Los lados los uno con el mismo color de la pieza? o color diferente? No me queda claro cómo realizarlo. Tendrán una foto de la parte posterior para ver cómo queda? Muchas gracias!
16.04.2012 - 00:12DROPS Design ha risposto:
Si, unes con el mismo color de la pieza. El hilo café es para la orilla en ganchillo.
16.04.2012 - 03:22
![]() Linda ha scritto:
Linda ha scritto:
Hej! Jag får det inte till 61 m när jag ökat med två maskor, utan till 64 m, stämmer det? Mvh, Linda
12.04.2012 - 14:59DROPS Design ha risposto:
Du lägger upp 60 m, och efter 2 cm ökar du en maska genom att sticka 2 m i en och samma maska, då har du 61 m på stickan.
13.04.2012 - 00:07Laura ha scritto:
Hola, No me queda claro el diagrama M1. En el diagrama marcan que debo pasar a aguja auxiliar 8 puntos, pero luego habla de 4 puntos. Cómo sería? Muchas gracias, Laura
06.04.2012 - 23:22DROPS Design ha risposto:
Hola Laura! Deslizas 4 pts en ag aux hacia el frente / hacia atrás de la labor, tejes 4 derechos y después haces el cruce tejiendo los 4 derechos de la ag aux = 8 pts. Estos 8 pts + los 4 derechos al inicio / final hacen un total de 12 pts sobre los cuales estás tejiendo el diagrama M.1 en el centro de la pieza.
07.04.2012 - 05:38
![]() Inga Holm ha scritto:
Inga Holm ha scritto:
Flotte benvarmere
15.07.2011 - 10:52
|
||||||||||
Ballerina#ballerinalegwarmers |
||||||||||
|
|
||||||||||
Scaldamuscoli DROPS lavorati a coste, trecce e con un bordo all’uncinetto in "Andes" o "Snow".
DROPS 132-5 |
||||||||||
|
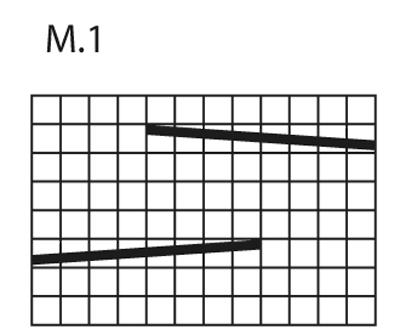
MOTIVO: Vedere il diagramma M.1. Il diagramma mostra lo schema dal diritto del lavoro. -------------------------------------------------------- -------------------------------------------------------- SCALDAMUSCOLI: Lavorato avanti e indietro sui ferri. Con i ferri misura 7 mm e il filato viola avviare 60 m (compresa 1 m di vivagno per lato). Lavorare a coste come segue (1° ferro = diritto del lavoro): lavorare a dir 1 m di vivagno su tutti i ferri, * 1 m rov, 1 m dir *, ripetere da *-* e finire con 1 m di vivagno a dir su tutti i ferri. Continuare in questo modo fino a quando il lavoro misura 2 cm Sul ferro successivo dal diritto del lavoro, aumentare 1 m lavorando 2 dir nelle prime 31 m sul ferro = 61 m. Sul ferro successivo dal rovescio del lavoro continuare come segue: 1 m di vivagno, * 1 rov, 1 dir *, ripetere da *-* sulle successive 24 m, 12 rov, 1 m dir, ripetere da *-* sulle successive 22 m e finire con 1 m di vivagno. Quindi continuare con le coste come prima e lavorare il diagramma M.1 sulle 12 m al centro del lavoro. Continuare in questo modo fino a quando il lavoro misura 41 cm Sul ferro successivo dal diritto del lavoro, lavorare insieme a dir la 31° e la 32° m = 60 m. Quindi lavorare a coste (= 1 rov /1 dir) su tutte le m per circa 2 cm. Intrecciare con dir su dir e rov su rov. BORDO ALL’UNCINETTO E CONFEZIONE: Lavorare all’uncinetto lungo il bordo a ogni lato con l’uncinetto misura 6 mm e il marrone come segue: 1 m.b. nella prima m, * 1 catenella, saltare circa 1 cm, 1 m.b. nella m successiva *, ripetere da *-*. NOTA! Assicuratevi che il bordo all’uncinetto non sia né troppo tirato né troppo molle. Cucire gli scaldamuscoli all’interno della m di vivagno. |
||||||||||
Spiegazioni del diagramma |
||||||||||
|
||||||||||
 |
||||||||||
Avete terminato questo modello?Allora taggate le vostre foto con #dropspattern #ballerinalegwarmers o inviatele alla #dropsfan gallery. Avete bisogno di aiuto con questo modello?Troverete 8 video tutorial, una sezione per i commenti/domande e molto altro guardando il modello su www.garnstudio.com © 1982-2026 DROPS Design A/S. Ci riserviamo tutti i diritti. Questo documento, compreso tutte le sue sotto-sezioni, è protetto dalle leggi sul copyright. Potete leggere quello che potete fare con i nostri modelli alla fine di ogni modello sul nostro sito. |
||||||||||


Con oltre 40 anni di esperienza nel design di modelli di maglia e uncinetto, DROPS Design offre la più estesa collezione di modelli gratuiti su internet - tradotti in 17 lingue. Ad oggi vi possiamo fornire 324 cataloghi e 12290 modelli - 9561 dei quali sono tradotti in Italiano.
Ci stiamo impegnando molto per darvi il meglio che vi possiamo offrire in termini di maglia e uncinetto, ispirazioni e consigli così come filati di grande qualità ad un prezzo incredibile! Volete utilizzare i nostri modelli per qualcosa d'altro oltre al vostro uso personale? Potete leggere tutto ciò che è consentito nel testo sul Copyright in basso su tutte le pagine dei nostri modelli. Buon lavoro!
Lasciare un commento sul modello DROPS 132-5
Noi saremmo felici di ricevere i tuoi commenti e opinioni su questo modello!
Se vuoi fare una domanda, fai per favore attenzione a selezionare la categoria corretta nella casella qui sotto per velocizzare il processo di risposta. I campi richiesti sono indicati da *.