
Categorie popolari
State cercando un filato?


Commenti / Domande (12)
![]() Malgorzata ha scritto:
Malgorzata ha scritto:
Jak mam obliczyc ile nabrac oczek jesli moja probka liczy 11o-20rz 10x10
26.08.2019 - 14:02DROPS Design ha risposto:
Witaj Małgosiu! Podany rozmiar drutów jest orientacyjny, jeżeli masz za mało oczek na 10 cm, użyj mniejszych drutów i jeszcze raz wykonaj próbkę. Aby wymiary swetra były zgodne ze schematem, próbka musi być taka sama jak w nagłówku wzoru czyli 14 o. x 26 rz. > 10x10 cm. Pozdrawiamy!
27.08.2019 - 09:24
![]() Penny Shuman ha scritto:
Penny Shuman ha scritto:
The finish dimensions are without the fringe or with the fringe?
05.11.2017 - 17:23DROPS Design ha risposto:
Hi Penny. The finish dimensions do not include the fringe.
05.11.2017 - 23:34Nella ha scritto:
1) Wool not enough. 2) Pattern size incorrect 3) Mistake in the pattern.
25.09.2016 - 04:16DROPS Design ha risposto:
Dear Nella, remember to always check and keep correct tension to get same measurements as in chart measurements and enough yarn. Happy knitting!
26.09.2016 - 10:26
![]() Sara Penchev ha scritto:
Sara Penchev ha scritto:
I have a question, for the poncho, the sizes are S/M - L/XL - XXL/XXXL but in the pattern there are only three selections for materials and then cast on stitches (materials: 500-600-700 g, cast on: 180-204-228 sts) so is the middle numbers 600 grams and cast on 204 the site M-L? Please advise. Also is there a sizing chart anywhere for what a M-L chest size would be for this poncho?
25.10.2013 - 18:40DROPS Design ha risposto:
Dear Mrs Penchev, this pattern is given in 3 sizes: S/M , L/XL and XXL/XXXL. You will find the measurements in the chart at the bottom of the page, so that you can check whether you should work 1st size, ie S/M or 2nd size, L/XL. Happy knitting!
29.10.2013 - 08:42
![]() Patricia ha scritto:
Patricia ha scritto:
Hallo! Ist die Wollmenge für die Mütze inklusive Pompon angegeben? Das wirkt irgendwie so wenig... Danke Patricia
30.12.2012 - 21:15DROPS Design ha risposto:
Liebe Patricia, ja die Garnmenge ist inklusive Pompon.
31.12.2012 - 11:10
![]() Catharina Nilsson ha scritto:
Catharina Nilsson ha scritto:
Hur kan antal maskor bli fel när 1:a markörerna är satta på ponchon? Jag får 11 över istället för 17... Stickar stl L/XL...
21.10.2012 - 14:44
![]() Drops Design ha scritto:
Drops Design ha scritto:
You do inc from 96 to 108 and that will make the collar get wider as shown in chart. Make sure to bind off loosely,
13.02.2012 - 17:29
![]() Kelli ha scritto:
Kelli ha scritto:
The pattern for the neck just doesn't see right. Your diagram shows that the neck grows, but the pattern just ends with the neck at 108 (for small) stiches, and continue with the 108 stitches until the piece measures 75 cm. Should the pattern say something about adding more stitches with each row until it measures 75 cm? Confused - Kelli -
12.02.2012 - 21:59
![]() Kelli ha scritto:
Kelli ha scritto:
The pattern for the neck just doesn't see right. Your diagram shows that the neck grows, but the pattern just ends with the neck at 108 (for small) stiches, and continue with the 108 stitches until the piece measures 75 cm. Should the pattern say something about adding more stitches with each row until it measures 75 cm? Confused - Kelli -
12.02.2012 - 21:51
![]() Trimimaux ha scritto:
Trimimaux ha scritto:
Pompom me semble approprié. ;p
29.07.2011 - 13:39
|
|
Pompom#pompomset |
|
 |
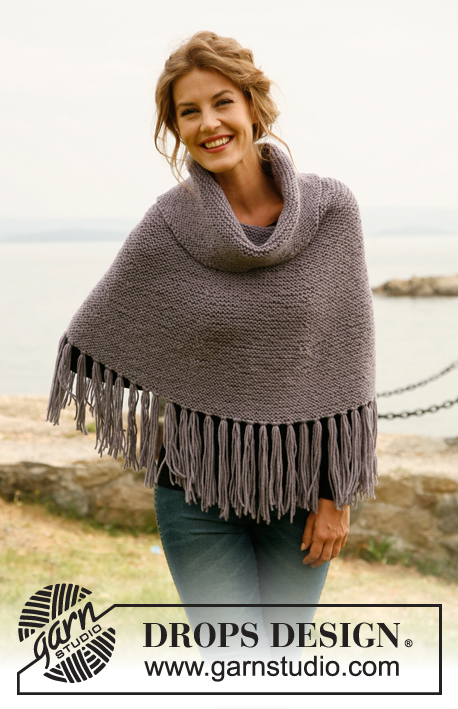 |
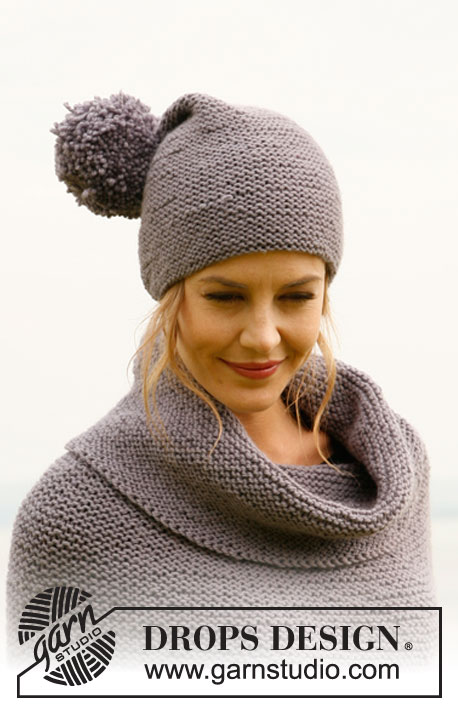
Cappello con pompon e poncho DROPS con frange e ampio collo, ai ferri, a punto legaccio in "Nepal". Taglie: dalla S alla XXXL
DROPS 134-15 |
|
|
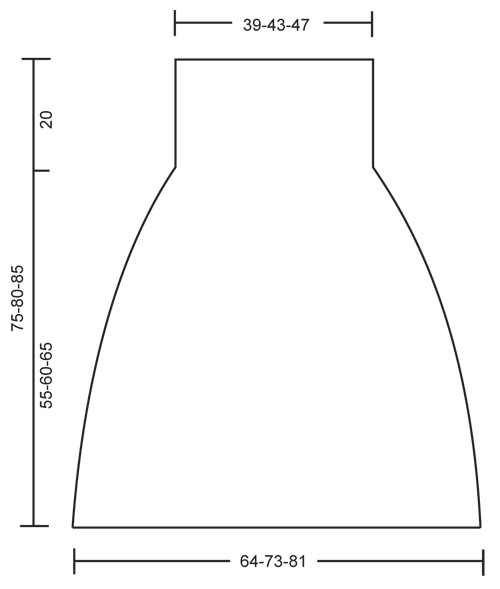
PUNTO LEGACCIO (avanti e indietro sul ferro): Lavorare tutti i ferri a diritto CAPPELLO: Si lavora avanti e indietro sui ferri, dal basso verso l’alto. Avviare 80-88 m con i ferri n° 4,5 e il filato Nepal. Lavorare a PUNTO LEGACCIO – vedere spiegazioni precedenti! RICORDARSI LA TENSIONE DEL LAVORO! Quando il lavoro misura 16-17 cm, inserire 8 segni: inserire il 1° segno dopo 5-5 m, poi inserire gli altri 7 segni a distanza di 10-11 m l’uno dall’altro; dopo l’ultimo segno rimangono 5-6 m. * Al ferro successivo lavorare insieme a dir le 2 m che seguono ogni segno. Lavorare 3 ferri a dir senza diminuzioni. Al ferro successivo, lavorare insieme a dir le 2 m che precedono ogni segno. Lavorare 3 ferri a dir senza diminuzioni. * Ripetere da * a * per 3 volte = 32-40 m. Lavorare il ferro successivo come segue: * 2 m a dir, 2 m insieme a dir *, ripetere da * a * per tutto il ferro = 24 -30 m. Lavorare 1 ferro a dir senza diminuzioni. Lavorare il ferro successivo come segue: * 1 m a dir, 2 m insieme a dir *, ripetere da * a * per tutto il ferro = 16-20 m. Al ferro successivo, lavorare tutte le m insieme a 2 a 2 a dir = 8-10 m. Tagliare il filo e passarlo attraverso le m rimaste. Cucire il cappello al centro, sul dietro, bordo contro bordo per evitare una cucitura troppo spessa. Il cappello misura ca. 24-25 cm di altezza. POMPON: Preparare un pompon grande e compatto, di ca. 10 cm di diametro e cucirlo in cima al cappello. PONCHO: Si lavora avanti e indietro sul ferro circolare (per avere sufficiente spazio per tutte le m), dal basso verso l’alto. Avviare 180-204-228 m con il ferro circolare n° 6 e il filato Nepal. Lavorare a PUNTO LEGACCIO – vedere spiegazioni precedenti! RICORDARSI LA TENSIONE DEL LAVORO! Quando il lavoro misura 12 cm, inserire 6 segni come segue: inserire il 1° segno dopo 15-17-19 m, inserire gli altri 5 segni a distanza di 30-34-38 m l’uno dall’altro; dopo l’ultimo segno rimangono 15-17-19 m. Al ferro successivo, diminuire 1 m da ciascun lato di ogni segno lavorando 2 m insieme a dir (= vengono diminuite 12 m). Ripetere le diminuzioni ogni 6 cm per 7-8-9- volte = 96-108-120 m. Quando il lavoro misura 55-60-65 cm, aumentare 1 m da ciascun lato di ogni segno lavorando 2 volte la stessa m = 108-120-132 m. Quando il lavoro misura 75-80-85 cm, chiudere le m molto lente. CONFEZIONE: Cucire il poncho al centro, sul dietro, bordo contro bordo per evitare una cucitura troppo spessa FRANGE: Inserire le frange ogni 4° m sul bordo inferiore del poncho, sulla riga di avvio delle m. 1 FRANGIA = tagliare 4 fili lunghi 45 cm. Piegarli in due e passare l’anello attraverso le m di avvio. Passare le estremità del filo attraverso l’anello. |
|
 |
|
Avete terminato questo modello?Allora taggate le vostre foto con #dropspattern #pompomset o inviatele alla #dropsfan gallery. Avete bisogno di aiuto con questo modello?Troverete 8 video tutorial, una sezione per i commenti/domande e molto altro guardando il modello su www.garnstudio.com © 1982-2026 DROPS Design A/S. Ci riserviamo tutti i diritti. Questo documento, compreso tutte le sue sotto-sezioni, è protetto dalle leggi sul copyright. Potete leggere quello che potete fare con i nostri modelli alla fine di ogni modello sul nostro sito. |
|


Con oltre 40 anni di esperienza nel design di modelli di maglia e uncinetto, DROPS Design offre la più estesa collezione di modelli gratuiti su internet - tradotti in 17 lingue. Ad oggi vi possiamo fornire 324 cataloghi e 12290 modelli - 9561 dei quali sono tradotti in Italiano.
Ci stiamo impegnando molto per darvi il meglio che vi possiamo offrire in termini di maglia e uncinetto, ispirazioni e consigli così come filati di grande qualità ad un prezzo incredibile! Volete utilizzare i nostri modelli per qualcosa d'altro oltre al vostro uso personale? Potete leggere tutto ciò che è consentito nel testo sul Copyright in basso su tutte le pagine dei nostri modelli. Buon lavoro!
Lasciare un commento sul modello DROPS 134-15
Noi saremmo felici di ricevere i tuoi commenti e opinioni su questo modello!
Se vuoi fare una domanda, fai per favore attenzione a selezionare la categoria corretta nella casella qui sotto per velocizzare il processo di risposta. I campi richiesti sono indicati da *.