
Categorie popolari
State cercando un filato?


Commenti / Domande (59)
![]() Lara ha scritto:
Lara ha scritto:
Muss ich den Zopf dann auch erst links und danach rechts sricken? Weil bei mir flicht sich das Muster nicht.
19.01.2013 - 20:44DROPS Design ha risposto:
Hallo Lara, in der Legende zum Diagramm finden Sie beschrieben, wie die Verzopfung entsteht (die M abwechselnd VOR und HINTER die Arbeit legen).
20.01.2013 - 19:08
![]() Saar ha scritto:
Saar ha scritto:
Er ontstaat geen gat in het breiwerk zelf maar onderin de kabel ontstaat er een soort van hol
18.01.2013 - 14:38DROPS Design ha risposto:
Dat is ook wat ik bedoelde in mijn vorige antwoord ;o) Ik denk dat jij de kabel wat strakker moet breien. Zie video of ga naar de winkel voor persoonlijke ondersteuning.
18.01.2013 - 16:07
![]() Lara ha scritto:
Lara ha scritto:
Hallo! Muss ich während dem Muster auch abwechselnd re. li. stricken oder nur am Ende? LG
17.01.2013 - 18:50DROPS Design ha risposto:
Hallo Lara, es wird in den Hin-R rechts gestrickt und in den Rück-R links. Viel Erfolg!
18.01.2013 - 07:54
![]() Saar ha scritto:
Saar ha scritto:
Aan het begin van het patroon als ik een naald heb gemaakt, begin ik met de kabel maar er ontstaat na de eerste naald een gat in het breiwerk.
17.01.2013 - 18:32DROPS Design ha risposto:
Er ontstaat een gat in de kabel zelf? Dan moet je het kabeltje een beetje strakker breien. Zie evt de instructievideo hoe u het kan breien.
18.01.2013 - 13:37
![]() Sofie ha scritto:
Sofie ha scritto:
Je n'arrive pas à faire la torsade :( Pourtant je sais les tricoter mais je crois que je ne comprends pas bien les explications. Faut-il d'abord tricoter 5 mailles endroit et ensuite en passer 5 sur aiguilles auxiliaire ??? Merci par avance !
27.11.2012 - 21:05DROPS Design ha risposto:
Bonjour Sofie, dans les diagrammes 1 case= 1mx1 rang. Au rang 5 de M.2, vous tricotez : 5 m end, puis la torsade : glissez 5 m sur l'aiguille auxiliaire devant l'ouvrage, tricotez 5 m end, reprenez les 5 m en attente et tricotez les à l'end. Au rang 11, vous commencez par la torsade : glissez 5 m sur l'aiguille auxiliaire derrière l'ouvrage, tricotez 5 m end, reprenez les 5 m en attente et tricotez les à l'end, terminez par 5 m end. Bon tricot !
28.11.2012 - 09:27
![]() Ulla ha scritto:
Ulla ha scritto:
Meget flot og smart
22.10.2012 - 10:59
![]() Steffi ha scritto:
Steffi ha scritto:
Was für eine Randmasche muss ich denn stricken? vielen dank!
21.06.2012 - 18:03DROPS Design ha risposto:
Am besten sticken Sie die Randmasche immer rechts.
25.06.2012 - 22:11Anastasia ha scritto:
I wanna knit this lovely scarf , but can't understand how to read the diagram: from what side and what corner? Thanks!
08.06.2012 - 13:55DROPS Design ha risposto:
Dear Anastasia, the diagrams are read begninng in the lower right-hand corner and work towards the left (1st row = RS). On return row, work from the left to the right. Happy Knitting !
06.12.2012 - 11:20
![]() Wallry ha scritto:
Wallry ha scritto:
Il est indique sur les explications qu'il faut 300g de laine pour le tour du cou.
02.02.2012 - 12:19
![]() Drops Design France ha scritto:
Drops Design France ha scritto:
Bonjour Lange et merci. Cliquez en haut sur "détaillants" puis choisissez votre pays pour accéder à la liste des détaillants. La quantité nécessaire est toujours indiquée au poids, cliquez sur "voir le nuancier" pour voir les couleurs et en savoir plus sur la laine, en l’occurrence, Polaris se présente sous forme de pelote de 100 g. Bon tricot !
03.01.2012 - 09:18
|
||||||||||||||||
Braidy#braidyset |
||||||||||||||||
 |
 |
|||||||||||||||
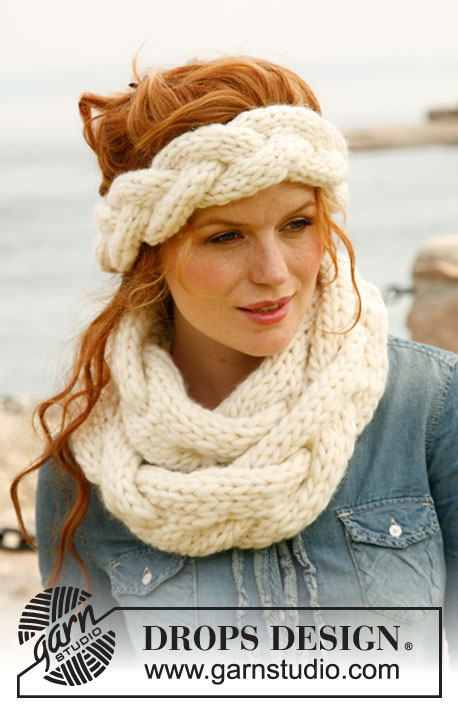
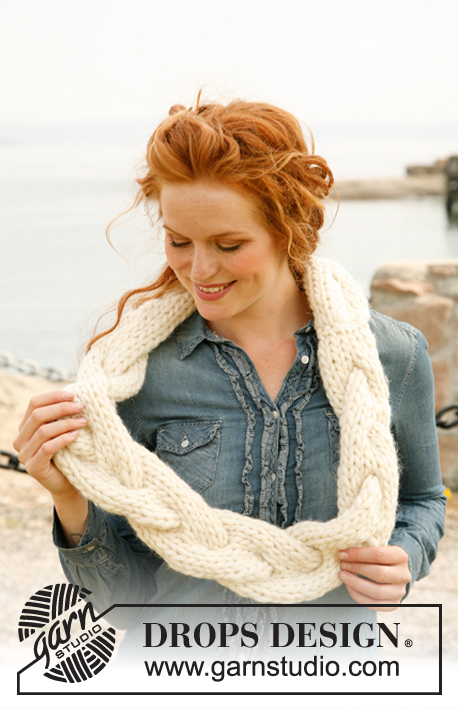
Fascia DROPS ai ferri e scalda collo con ampia treccia, in "Polaris".
DROPS 134-7 |
||||||||||||||||
|
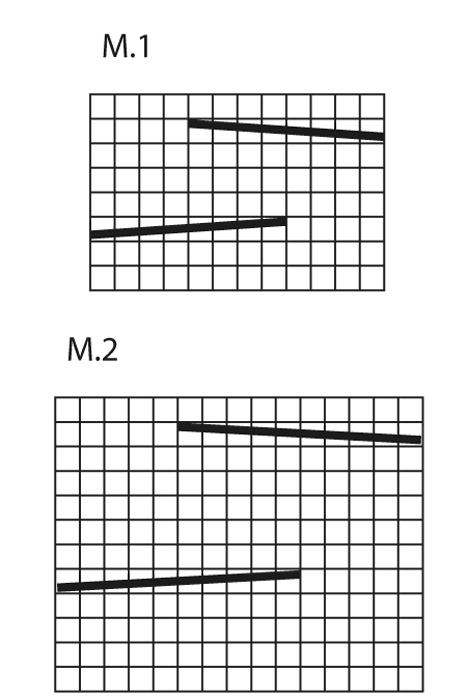
MOTIVO: Vedere il diagramma M.1 per la fascia e il diagramma M.2 per lo scalda collo. I diagrammi mostrano il motivo sul diritto del lavoro. SUGGERIMENTO PER CAMBIARE GOMITOLO: Quando si cambia gomitolo con il filato Polaris, dividere in 2 gli ultimi 15 cm del filo del gomitolo finito – tagliare una delle due parti e fare la stessa cosa con il filo del gomitolo da iniziare. Sovrapporre i primi e gli ultimi 15 cm dei due gomitoli, in modo da ottenere lo spessore giusto e continuare a lavorare – questo consente di rendere invisibile il passaggio tra due gomitoli. FASCIA: Si lavora avanti e indietro in un unico lungo pezzo, cucito in cerchio alla fine. Avviare 12 m sul ferro n° 12 con il filato Polaris. Lavorare il diagramma M.1 finché il lavoro non misura ca. 50 cm – finire comunque dopo aver completato un’intera ripetizione del motivo. Lavorare 1 ferro a maglia rasata e chiudere le m senza stringere troppo il filo. Cucire insieme la riga di avvio delle m con la riga di chiusura; cucire bordo contro bordo per evitare una cucitura troppo spessa. SCALDACOLLO: Si lavora avanti e indietro in un unico lungo pezzo, cucito in cerchio alla fine. Avviare 15 m sui ferri n° 15 con il filato Polaris. Lavorare il diagramma M.2 finché il lavoro non misura ca 120 cm - finire comunque dopo aver completato un’intera ripetizione del motivo. Lavorare 4 ferri a maglia rasata e chiudere le m senza stringere troppo il filo. Cucire insieme la riga di avvio delle m con la riga di chiusura; cucire bordo contro bordo per evitare una cucitura troppo spessa Piegare in due lo scaldacollo (formare un otto), prima di indossarlo. |
||||||||||||||||
Spiegazioni del diagramma |
||||||||||||||||
|
||||||||||||||||
 |
||||||||||||||||
Avete terminato questo modello?Allora taggate le vostre foto con #dropspattern #braidyset o inviatele alla #dropsfan gallery. Avete bisogno di aiuto con questo modello?Troverete 5 video tutorial, una sezione per i commenti/domande e molto altro guardando il modello su www.garnstudio.com © 1982-2026 DROPS Design A/S. Ci riserviamo tutti i diritti. Questo documento, compreso tutte le sue sotto-sezioni, è protetto dalle leggi sul copyright. Potete leggere quello che potete fare con i nostri modelli alla fine di ogni modello sul nostro sito. |
||||||||||||||||


Con oltre 40 anni di esperienza nel design di modelli di maglia e uncinetto, DROPS Design offre la più estesa collezione di modelli gratuiti su internet - tradotti in 17 lingue. Ad oggi vi possiamo fornire 324 cataloghi e 12290 modelli - 9560 dei quali sono tradotti in Italiano.
Ci stiamo impegnando molto per darvi il meglio che vi possiamo offrire in termini di maglia e uncinetto, ispirazioni e consigli così come filati di grande qualità ad un prezzo incredibile! Volete utilizzare i nostri modelli per qualcosa d'altro oltre al vostro uso personale? Potete leggere tutto ciò che è consentito nel testo sul Copyright in basso su tutte le pagine dei nostri modelli. Buon lavoro!
Lasciare un commento sul modello DROPS 134-7
Noi saremmo felici di ricevere i tuoi commenti e opinioni su questo modello!
Se vuoi fare una domanda, fai per favore attenzione a selezionare la categoria corretta nella casella qui sotto per velocizzare il processo di risposta. I campi richiesti sono indicati da *.