
Categorie popolari
State cercando un filato?


Commenti / Domande (64)
![]() Tammy ha scritto:
Tammy ha scritto:
I'm used to reading a pattern as "left front" meaning from the perspective of the wearer. This would mean the armhole side would be to the right from RS, thus the initial increasing in the last stitch from the RS would be to the center. Is the "left front" meant as seen looking at the wearer? Thank you.
06.05.2014 - 06:38DROPS Design ha risposto:
Dear Tammy, the left front piece is the left side when worn, you will inc 1 st at the end of row from RS, ie at the left side of work seen from RS - inc will be done either at the end of row from RS or at the beg of row from WS. Happy knitting!
06.05.2014 - 09:13
![]() Audrey ha scritto:
Audrey ha scritto:
Bonjour, je suis au paragraphe DOS & DEVANT (je tricote en taille L) et je ne comprends pas "Répéter ces augmentations tous les rangs sur l'endroit jusqu'à la fin = environ 33 rangs avec des augmentations" quelle fin.? j'ai mis mes marqueurs à la 29ème maille de chaque côté mais je bloque sur l'augmentation. faut-il toujours la faire de chaque côté à la 29ème maille.? merci de votre réponse
01.09.2013 - 17:44DROPS Design ha risposto:
Bonjour Audrey, vous augmentez tous les 2 rangs (=tous les rangs sur l'endroit) sur les côtés = de chaque côté des marqueurs repères pour les côtés, ces augmentations se répètent 33 fois au total, toujours de chaque côté des marqueurs, soit pour une tension équivalente en hauteur, environ 29 cm. Bon tricot!
02.09.2013 - 10:18
![]() Els Inghelram ha scritto:
Els Inghelram ha scritto:
Beste, Als ik de tekening van het achterpand bekijk dan is het tussendeel duidelijk breder dan de schouderdelen. Toch is er amper verschil in het stekenaantal tussen de schouders en het middel deel. Is er een fout of heb ik het verkeerd voor? Want als ik het gebreide vest bekijk is dat ook duidelijk breder. Mvg, els inghelram
18.07.2013 - 14:29DROPS Design ha risposto:
Hoi Els. Het patroon is correct. Je meerdert gelijkmatig volgens het patroon en door het model / meerderingen zal het gaan vallen zoals op de foto als je klaar bent.
19.07.2013 - 12:50
![]() Gro ha scritto:
Gro ha scritto:
Kunne ønsket meg et alternativ med oppskrift på halv-lange ermer. Er det mulig å få til?
10.05.2013 - 14:51DROPS Design ha risposto:
Hej Gro. Vi kan desvaerre ikke lave en ekstra, men skal skrive det paa önskesedlen til fremtidige kollektioner. Maaske kan du finde et par halv-lange aermer paa en anden model i samme strikkefasthed og selv tilpasse? God fornöjelse.
10.05.2013 - 16:22
![]() Mary ha scritto:
Mary ha scritto:
I don't understand the inc. When I increase on the 9th, 7th, 6th, 4th, 4th, 3rd rows and then I repeat 14 times for xl. Do I do the 7th repeat on the 9th row again or do I just repeat every 3rd row till I make the rest of the 14 repeats. I'm really confused by this line. I love this but I'm really stuck. Thank you
07.05.2013 - 01:28DROPS Design ha risposto:
Dear Mary, if you are working size XL, you will repeat the inc a total of 14 times every 4th row (left front piece). Happy knitting!
07.05.2013 - 09:30
![]() Susan Fenerty ha scritto:
Susan Fenerty ha scritto:
Best vest yet. Casual, Modern, uncomplicated, with great lines, relatively easy to knit in stockinette stitch. Adapted for using a worsted weight alpaca yarn with no give or stretch, this pattern suited it very well. Now I want to make it again, but this time in the yarn for which it was designed-for summer layering. I followed directions in the pattern for the Muskat yarn for the Alpaca.
30.03.2013 - 18:16
![]() Clara Suárez-Llanos Arroyo ha scritto:
Clara Suárez-Llanos Arroyo ha scritto:
¿Antes de poner todo en la aguja circular debo cortar la hebra para uno de los delanteros? No me queda claro con qué hebra trabajar cuando ya tengo las 3 piezas (los 2 delanteros y la espalda). ¿Debo aprovechar la hebra de uno de los delanteros y tener cortadas las hebras de la espalda y del otro delantero? Por otro lado, ¿qué tipo de orillo recomiendan para este trabajo?
24.03.2013 - 12:06
![]() Sarah ha scritto:
Sarah ha scritto:
Leider stimmt beim linken Vorderteil die Maschenprobe für Größe S mit Muskat und Nadel 6 gar nicht. Es wird viel länger. Auch mit Nadel 5 kommt es nicht hin. Sollte ich vielleicht lieber Nadel 4 nehmen oder die Aufnahmen nicht in jeder 9. sondern 7. Reihe machen?
10.01.2013 - 10:57DROPS Design ha risposto:
Liebe Sarah, wenn die Breite sitmmt, würde ich Nadel 4 nehmen.
27.01.2013 - 15:56
![]() Sandra ha scritto:
Sandra ha scritto:
Sto lavorando il davanti sx in taglia S e alla fine del pezzo mi ritrovo con 24 m. In effetti ho 1 m in piu dopo i primi 2 cm e 6 m in piu dopo gli aumenti successivi (per un tot di 7). O magari sono io che non sto capendo bene le istruzioni... Aiutatemi!
25.03.2012 - 19:23DROPS Design ha risposto:
Innanzitutto abbiamo modificato leggermente alcune parole nel testo. Spero sia più chiaro. Lei sta facendo bene: avvio 17 m, dopo 2 cm + 1 m, poi per un totale di 6 (!!) volte, aumento di 1 m, quindi 17+1+6=24 m. Forse l'errore sta nelle 7 volte. Sono 6 aumenti ogni 9 ferri.
26.03.2012 - 10:53
![]() Mette ha scritto:
Mette ha scritto:
Vesten er ferdig - men det ble veldig mye rull mot ermhullet og mot midten på forstykkene. Jeg har løst dette ved å hekle 2 omganger fastmasker rundt ermene (først fra retten og så fra vrangen så det blir mer stabilt) og 3 omganger med fastmasker rundt fra forstykke bak hals og ned forstykke. Valgte elastisk avfelling (som DROPS video) og da gikk det fint nederste på vesten.
29.07.2011 - 21:35
|
|
Take Me To Spain#takemetospainvest |
|
 |
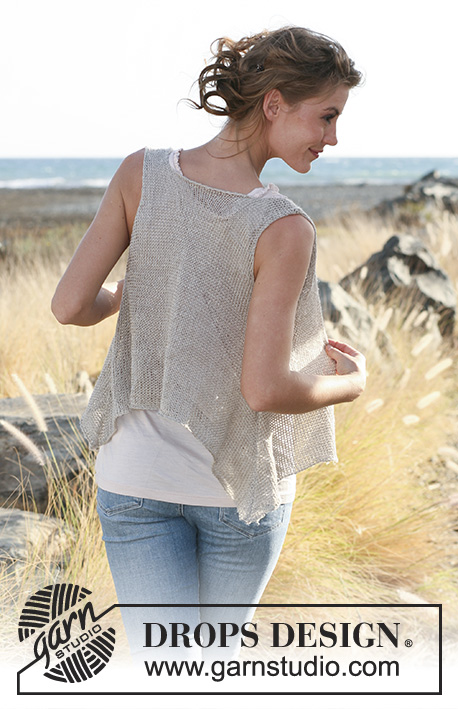 |
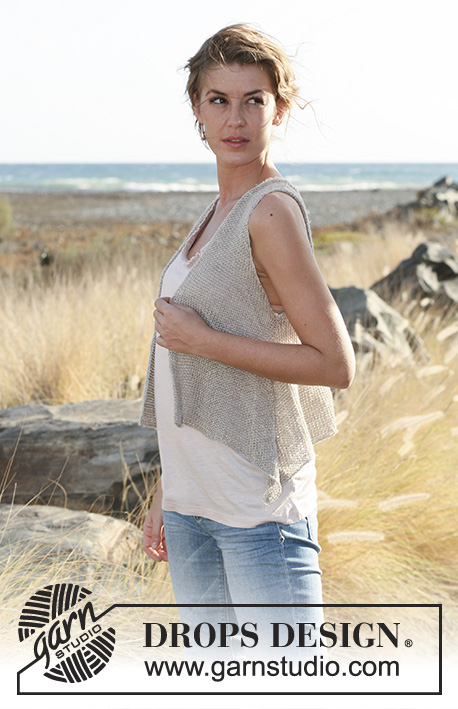
Top asimmetrico DROPS lavorato top down in "Lin" o "Muskat". Taglia: dalla S alla XXXL.
DROPS 129-15 |
|
|
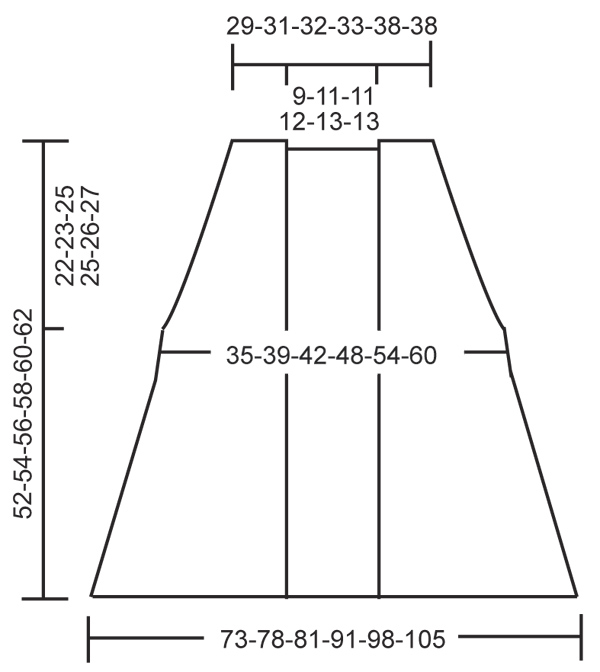
CONSIGLIO PER L’AUMENTO: Aumentare lavorando 1 gettato a ogni lato della m. con il segnapunti per ogni lato come segue: Lavorare a maglia rasata fino al segnapunti, 1 gettato, lavorare la maglia con il segnapunti a maglia rasata, 1 gettato. Lavorare a rovescio il gettato nel ferro successivo per creare i buchi. Il pezzo è lavorato top down. Il davanti e il dietro sono lavorati avanti e indietro separatamente fino agli scalfi. Quindi tutte le m. vengono trasferite sulle stesso ferro circolare. Poi il pezzo viene lavorato avanti e indietro dal centro. DAVANTI SINISTRO: Lavorato avanti e indietro sui ferri circolari. Avviare 17-17-18-18-21-21 m. sui ferri circolari 5 mm con Lin. Lavorare a maglia rasata. Quando il lavoro misura 2 cm, aumentare 1 m. verso il lato degli scalfi lavorando 2 m. nell’ultima m. (visto dal diritto del lavoro). Ripetere gli aumenti nella m. più esterna verso i lati ogni 9-7-6-4-4-3 ferri (cioè nell’ultima m. sul diritto del lavoro o nella 1° m. sul rovescio del lavoro) un totale di 6-8-10-14-15-20 volte = 23-25-28-32-36-41 m. FARE ATTENZIONE ALLA TENSIONE DEL LAVORO! Quando sono stati fatti tutti gli aumenti verso i lati, il lavoro misura circa. 22-23-25-25-26-27 cm. Trasferire le m. su un ferro ausiliario. DAVANTI DESTRO: Lavorato come il davanti, ma con gli aumenti dalla parte opposta. DIETRO: Spalla sinistra: Avviare 17-17-18-18-21-21 m. sui ferri circolari 5 mm con Lin. Lavorare 5 ferri a maglia rasata iniziando dal diritto del lavoro. Tagliare il filo e mettere da parte il lavoro. Spalla destra: Avviare 17-17-18-18-21-21 m. sui ferri circolari 5 mm con Lin. Lavorare 5 ferri a maglia rasata iniziando dal diritto del lavoro, quindi avviare 16-18-18-20-22-22 m. alla fine del ferro successivo sul rovescio del lavoro = 33-35-36-38-43-43 m. Lavorare le maglie della spalla sinistra sullo stesso ferro = 50-52-54-56-64-64 m. Continuare a maglia rasata, ALLO STESSO TEMPO, quando il lavoro misura 2 cm dalle spalle, aumentare 1 m. nella 1° e nell’ultima m. sul ferro. Ripetere gli aumenti per ogni lato ogni 9-7-6-4-4-3 ferri per un totale di 6-8-10-14-15-20 volte = 62-68-74-84-94-104 m. Quando tutti gli aumenti sono stati fatti, il lavoro misura circa 22-23-25-25-26-27 cm. Tagliare il filo. CORPO: Trasferire tutte le maglie del davanti destro e sinistro sullo stesso ferro circolare con il dietro. Ora lavorare il pezzo avanti e indietro iniziando dal centro davanti = 108-118-130-148-166-186 m. Inserire 2 segnapunti nel lavoro, nella 24-26-29-33-27-42° m. da ogni lato (dietro = 60-66-72-82-92-102 m.). Continuare a maglia rasata per 2 cm, il lavoro ora misura circa 24-25-27-27-28-29 cm. Sul ferro successivo sul diritto del lavoro, aumentare 1 m. a ogni lato della m. con il segnapunti – LEGGERE IL CONSIGLIO PER L’AUMENTO! Ripetere gli aumenti ogni ferro sul diritto del lavoro fino alla lunghezza finale = circa. 32-33-33-36-37-38 ferri con aumenti (circa 28-29-29-31-32-33 cm). Alla fine degli aumenti ci sono circa 236-250-262-292-314-338 m. sul ferro. Intrecciare SENZA STRINGERE. Adesso il lavoro misura circa 52-54-56-58-60-62 cm misurati dalle spalle in giù (i lati sono più lunghi a causa degli aumenti finalizzati a dare maggior lunghezza e larghezza). CONFEZIONE: Cucire i margini delle spalle. |
|
 |
|
Avete terminato questo modello?Allora taggate le vostre foto con #dropspattern #takemetospainvest o inviatele alla #dropsfan gallery. Avete bisogno di aiuto con questo modello?Troverete 14 video tutorial, una sezione per i commenti/domande e molto altro guardando il modello su www.garnstudio.com © 1982-2026 DROPS Design A/S. Ci riserviamo tutti i diritti. Questo documento, compreso tutte le sue sotto-sezioni, è protetto dalle leggi sul copyright. Potete leggere quello che potete fare con i nostri modelli alla fine di ogni modello sul nostro sito. |
|


Con oltre 40 anni di esperienza nel design di modelli di maglia e uncinetto, DROPS Design offre la più estesa collezione di modelli gratuiti su internet - tradotti in 17 lingue. Ad oggi vi possiamo fornire 324 cataloghi e 12290 modelli - 9561 dei quali sono tradotti in Italiano.
Ci stiamo impegnando molto per darvi il meglio che vi possiamo offrire in termini di maglia e uncinetto, ispirazioni e consigli così come filati di grande qualità ad un prezzo incredibile! Volete utilizzare i nostri modelli per qualcosa d'altro oltre al vostro uso personale? Potete leggere tutto ciò che è consentito nel testo sul Copyright in basso su tutte le pagine dei nostri modelli. Buon lavoro!
Lasciare un commento sul modello DROPS 129-15
Noi saremmo felici di ricevere i tuoi commenti e opinioni su questo modello!
Se vuoi fare una domanda, fai per favore attenzione a selezionare la categoria corretta nella casella qui sotto per velocizzare il processo di risposta. I campi richiesti sono indicati da *.