
Categorie popolari
State cercando un filato?


Commenti / Domande (64)
![]() Allinson Sherratt ha scritto:
Allinson Sherratt ha scritto:
Further to your answer to my earlier question, I would confirm I did do a tension square & it was fine. I'm mainly concerned that I'm interpreting the pattern correctly IE am I correct to increase the yo marker increases on the right side only - for the largest side this would equate to 76 rows. Thanks
06.08.2021 - 14:04DROPS Design ha risposto:
Dear Allinson, you are right, you only increase on the right side. About the amount of rows to work, you need to check the measurements for your sizes with the ones in the diagram below the pattern; but there should be 76 rows, yes. The texture of the work should be loose and light.
07.08.2021 - 11:13
![]() Allinson Sherratt ha scritto:
Allinson Sherratt ha scritto:
If you only increase around the markers on every right sided row, you knit 38 X 2(for the largest size), 76 rows in total. I have used 6 balls of Muskat so far & need to knit 30 more rows. Can you please confirm the quantity of yarn required ?
06.08.2021 - 12:41DROPS Design ha risposto:
Dear Allison, the amount of yarn we use dto knit the modell is stated in the pattern. However the amount of yarn a knitter catually uses depends on many factors, mostly on the gauge she is knitting with. If you knit with gauge given, the amount of yarn should be enough. Happy stitching!
06.08.2021 - 13:15
![]() Nathalie ha scritto:
Nathalie ha scritto:
Buongiorno, non ho capito il passaggio del retro dx e sx . Si ripete spalla destra, immagino ci sia un errore e volevo capire se tutte e due le spalle e’ corretto lavorarle in modo diverso Io per le due parti davanti ho lavorato i due pezzi insieme sullo stesso ferro Posso farlo anche per il dietro? Grazie mille ♥️
06.05.2020 - 11:59DROPS Design ha risposto:
Buongiorno Nathalie, abbiamo corretto il testo. Deve lavorare prima la spalla sinistra e poi la destra, e quando le viene chiesto unirà le maglie della spalla sinistra. Buon lavoro!
06.05.2020 - 12:40
![]() Laura Crockarell ha scritto:
Laura Crockarell ha scritto:
When doing the increases for the arm hole from the WS, should i still do a Knit front and back or another type increase stitch?
24.03.2019 - 23:15DROPS Design ha risposto:
Dear Mrs Crockarell, when increasing from the WS you can purl front and back to keep the same kind of increase -seen from RS all the way. Happy knitting!
25.03.2019 - 12:12
![]() Debbie Owen ha scritto:
Debbie Owen ha scritto:
When doing the YO, do we need to move the marker? I am not but do have the correct increases each time. Marker started at 37 and after 2 rows of increases it is now in 39. Is that correct.
25.04.2018 - 16:18DROPS Design ha risposto:
Dear Mrs Owen, marker should stay in the same st all the way (just move it upwards when working), ie after 2 rows increase you have increased 2 sts and there are now 38 sts before marker (= marker is in the 39th st) in 5th size. Happy knitting!
25.04.2018 - 16:39
![]() Connie Ruebling ha scritto:
Connie Ruebling ha scritto:
While making this vest I have noticed by looking at the finished projects, there are two different ways people are knitting the yarn over increases. The pattern says in the body to increase in the 24-42nd stitch depending on your size in from each side. As you continue, that number does not stay the same. The next knit row after you have purled back, the increase will be in the 25-43rd stitch, then the 26-44th stitch and so on. Not the 24-42nd stitch throughout.
17.06.2015 - 21:18DROPS Design ha risposto:
Dear Mr Ruebling, the marker on body has to be inserted in the 24th st in each side, and inc are done each side of the marker, so that you will have 23 sts for front piece before 1st inc, 24 sts after 1st inc and so on. Let marker follow this st and inc each side of this st will make the front pieces inc with 1 st and back piece with 2 sts on each inc row. Happy knitting!
18.06.2015 - 09:08
![]() Tamila ha scritto:
Tamila ha scritto:
I have made it, and mine curls so much being stockinette stitch. The picture with the model doesn't seem to curl so much. Is that because of blocking? Or is there something I can do to keep it from curling. I tried doing a rib edge, but didn't like it, and it still curled some.
05.05.2015 - 18:08DROPS Design ha risposto:
Dear Tamila, blocking will prevent curling, you can also add a crocheted edge.
06.05.2015 - 09:17
![]() Neuling ha scritto:
Neuling ha scritto:
Hallo liebes Drops-Team! Sie schreiben in der Anleitung "...glatt stricken...". Meinen Sie damit glatt rechts, also Vorderseite rechte Maschen, Rückseite linke Maschen. Oder meinen Sie damit wirklich Vorder- und Rückseite rechte Maschen? Jetzt schon vielen lieben Dank für Ihre Antwort.
23.09.2014 - 16:23DROPS Design ha risposto:
"glatt" bedeutet bei uns immer glatt rechts. Gutes Gelingen!
23.09.2014 - 22:16
![]() Cherry ha scritto:
Cherry ha scritto:
Hallo liebes Drops-Team! Ich habe gerade das linke Vorderteil gestrickt und es rollt sich an den Seiten sehr ein. Ist das so gewollt (auf dem Bild ist das für mich nicht ersichtlich!)oder sollte ich einfach ein/zwei Maschen am Rand als kraus rechts dazustricken (oder einfach von den anfänglichen 17 Maschen vier als Randmaschen (kraus rechts) einplanen - also auf jeder Seite 2?)???? Für eine Antwort wäre ich sehr dankbar.
02.08.2014 - 11:39DROPS Design ha risposto:
Sie können die Weste nach dem Stricken anfeuchten und spannen oder unter feuchten Tüchern trocknen lassen, dann rollen sich die Ränder weniger stark. Sie können ein Probestück stricken und ausprobieren, wie stark es sich nach solch einer Behandlung noch einrollt. Falls das nicht reicht, können Sie wie von Ihnen vorgeschlagen ein paar Maschen am Rand kraus rechts stricken statt glatt rechts (nicht zusätzlich), ich würde 3-4 M kraus re pro Seite stricken.
04.08.2014 - 13:48
![]() Heike König ha scritto:
Heike König ha scritto:
150 g Wolle haben für die Größe S nicht ausgereicht. Ich habe noch 100 g dazubestellt.
01.06.2014 - 16:23
|
|
Take Me To Spain#takemetospainvest |
|
 |
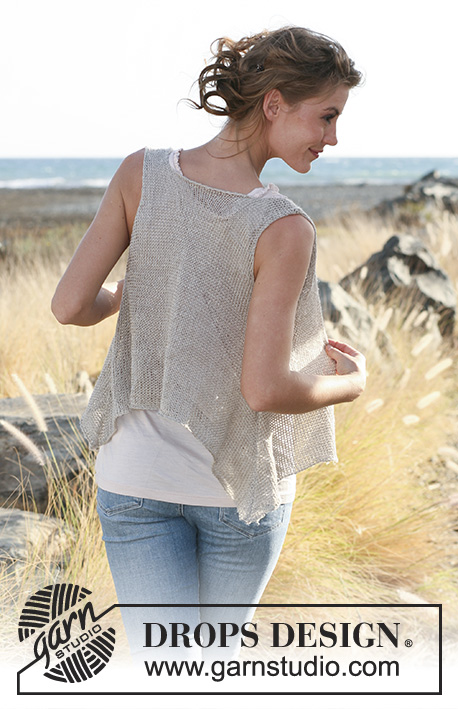 |
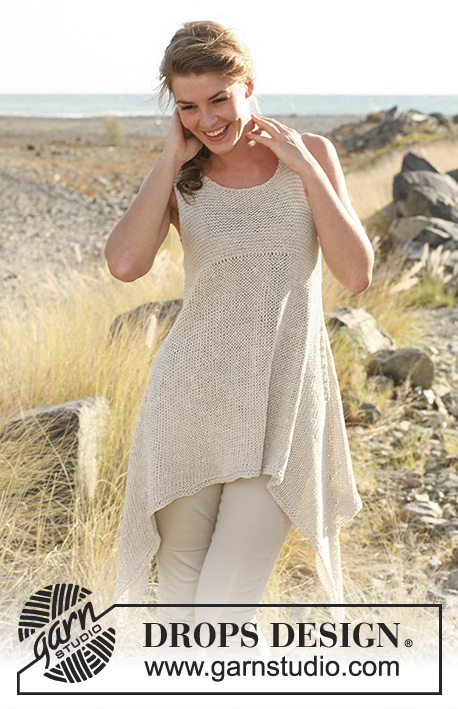
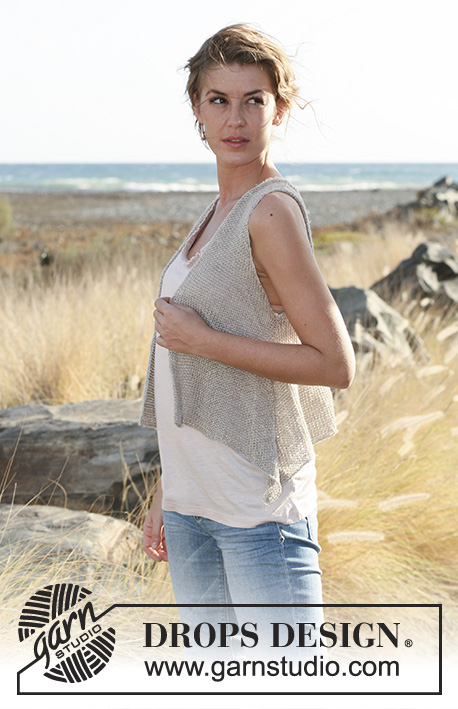
Top asimmetrico DROPS lavorato top down in "Lin" o "Muskat". Taglia: dalla S alla XXXL.
DROPS 129-15 |
|
|
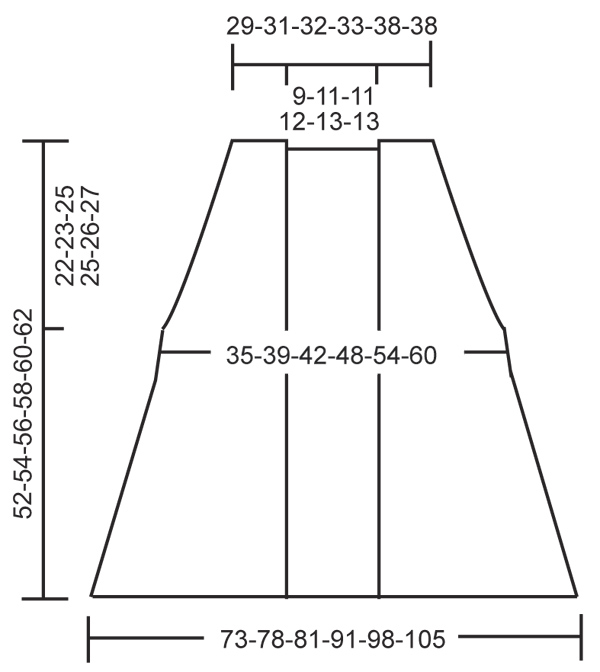
CONSIGLIO PER L’AUMENTO: Aumentare lavorando 1 gettato a ogni lato della m. con il segnapunti per ogni lato come segue: Lavorare a maglia rasata fino al segnapunti, 1 gettato, lavorare la maglia con il segnapunti a maglia rasata, 1 gettato. Lavorare a rovescio il gettato nel ferro successivo per creare i buchi. Il pezzo è lavorato top down. Il davanti e il dietro sono lavorati avanti e indietro separatamente fino agli scalfi. Quindi tutte le m. vengono trasferite sulle stesso ferro circolare. Poi il pezzo viene lavorato avanti e indietro dal centro. DAVANTI SINISTRO: Lavorato avanti e indietro sui ferri circolari. Avviare 17-17-18-18-21-21 m. sui ferri circolari 5 mm con Lin. Lavorare a maglia rasata. Quando il lavoro misura 2 cm, aumentare 1 m. verso il lato degli scalfi lavorando 2 m. nell’ultima m. (visto dal diritto del lavoro). Ripetere gli aumenti nella m. più esterna verso i lati ogni 9-7-6-4-4-3 ferri (cioè nell’ultima m. sul diritto del lavoro o nella 1° m. sul rovescio del lavoro) un totale di 6-8-10-14-15-20 volte = 23-25-28-32-36-41 m. FARE ATTENZIONE ALLA TENSIONE DEL LAVORO! Quando sono stati fatti tutti gli aumenti verso i lati, il lavoro misura circa. 22-23-25-25-26-27 cm. Trasferire le m. su un ferro ausiliario. DAVANTI DESTRO: Lavorato come il davanti, ma con gli aumenti dalla parte opposta. DIETRO: Spalla sinistra: Avviare 17-17-18-18-21-21 m. sui ferri circolari 5 mm con Lin. Lavorare 5 ferri a maglia rasata iniziando dal diritto del lavoro. Tagliare il filo e mettere da parte il lavoro. Spalla destra: Avviare 17-17-18-18-21-21 m. sui ferri circolari 5 mm con Lin. Lavorare 5 ferri a maglia rasata iniziando dal diritto del lavoro, quindi avviare 16-18-18-20-22-22 m. alla fine del ferro successivo sul rovescio del lavoro = 33-35-36-38-43-43 m. Lavorare le maglie della spalla sinistra sullo stesso ferro = 50-52-54-56-64-64 m. Continuare a maglia rasata, ALLO STESSO TEMPO, quando il lavoro misura 2 cm dalle spalle, aumentare 1 m. nella 1° e nell’ultima m. sul ferro. Ripetere gli aumenti per ogni lato ogni 9-7-6-4-4-3 ferri per un totale di 6-8-10-14-15-20 volte = 62-68-74-84-94-104 m. Quando tutti gli aumenti sono stati fatti, il lavoro misura circa 22-23-25-25-26-27 cm. Tagliare il filo. CORPO: Trasferire tutte le maglie del davanti destro e sinistro sullo stesso ferro circolare con il dietro. Ora lavorare il pezzo avanti e indietro iniziando dal centro davanti = 108-118-130-148-166-186 m. Inserire 2 segnapunti nel lavoro, nella 24-26-29-33-27-42° m. da ogni lato (dietro = 60-66-72-82-92-102 m.). Continuare a maglia rasata per 2 cm, il lavoro ora misura circa 24-25-27-27-28-29 cm. Sul ferro successivo sul diritto del lavoro, aumentare 1 m. a ogni lato della m. con il segnapunti – LEGGERE IL CONSIGLIO PER L’AUMENTO! Ripetere gli aumenti ogni ferro sul diritto del lavoro fino alla lunghezza finale = circa. 32-33-33-36-37-38 ferri con aumenti (circa 28-29-29-31-32-33 cm). Alla fine degli aumenti ci sono circa 236-250-262-292-314-338 m. sul ferro. Intrecciare SENZA STRINGERE. Adesso il lavoro misura circa 52-54-56-58-60-62 cm misurati dalle spalle in giù (i lati sono più lunghi a causa degli aumenti finalizzati a dare maggior lunghezza e larghezza). CONFEZIONE: Cucire i margini delle spalle. |
|
 |
|
Avete terminato questo modello?Allora taggate le vostre foto con #dropspattern #takemetospainvest o inviatele alla #dropsfan gallery. Avete bisogno di aiuto con questo modello?Troverete 14 video tutorial, una sezione per i commenti/domande e molto altro guardando il modello su www.garnstudio.com © 1982-2026 DROPS Design A/S. Ci riserviamo tutti i diritti. Questo documento, compreso tutte le sue sotto-sezioni, è protetto dalle leggi sul copyright. Potete leggere quello che potete fare con i nostri modelli alla fine di ogni modello sul nostro sito. |
|


Con oltre 40 anni di esperienza nel design di modelli di maglia e uncinetto, DROPS Design offre la più estesa collezione di modelli gratuiti su internet - tradotti in 17 lingue. Ad oggi vi possiamo fornire 324 cataloghi e 12290 modelli - 9561 dei quali sono tradotti in Italiano.
Ci stiamo impegnando molto per darvi il meglio che vi possiamo offrire in termini di maglia e uncinetto, ispirazioni e consigli così come filati di grande qualità ad un prezzo incredibile! Volete utilizzare i nostri modelli per qualcosa d'altro oltre al vostro uso personale? Potete leggere tutto ciò che è consentito nel testo sul Copyright in basso su tutte le pagine dei nostri modelli. Buon lavoro!
Lasciare un commento sul modello DROPS 129-15
Noi saremmo felici di ricevere i tuoi commenti e opinioni su questo modello!
Se vuoi fare una domanda, fai per favore attenzione a selezionare la categoria corretta nella casella qui sotto per velocizzare il processo di risposta. I campi richiesti sono indicati da *.