
Categorie popolari
State cercando un filato?


Commenti / Domande (131)
![]() Yvonne ha scritto:
Yvonne ha scritto:
Ik vind het patroon echt erg moeilijk. Bijvoorbeeld hoeveel keer M1, M2 enz. enz. Ik heb het werk nu al drie keer uitgetrokken terwijl ik in 1 kleur brei. Als ik naar de instructievideo kijk wordt ik niet veel wijzer. Heeft u dit patroon niet in Jip en Janneke taal? Ik hoop dat u kunt helpen.
03.11.2017 - 21:30DROPS Design ha risposto:
Hallo Yvonne, We hebben het patroon zo geschreven, zodat het voor iedereen begrijpelijk zou moeten zijn. Je kunt altijd hier terrecht voor vragen, maar je kunt ook bij je verkooppunt vragen om hulp, zodat iemand met je mee kan kijken. Na het opzetten brei je een aantal herhalingen (hoeveel is afhankijlijk van je maat) in de breedte van A.1 en A.1 brei je één keer in de hoogte. De getallen waar streepjes tussen staan corresponderen met de maten, dus als er bijv. staat 168-180-192-216-240-264 steken op de naald is dat 168 voor S, 180 voor M en zo verder.
04.11.2017 - 13:41Sandra Martins ha scritto:
Hello again! I realised that on my phone the box with description of the diagram often doesn't have the symbols in it, that's why it all looked the same. I got to the bit on size S-L, and now it says to work M6 over the next 8 repetitions, but M6 is an increase and if increased once, you cannot repeat it. can you help? Many thanks, Sandra
09.04.2017 - 19:29DROPS Design ha risposto:
Dear Mrs Martins, in size L, you will work M.5 over the first 4 repeats (= as before), but now work M.6 over the next 8 repeats (= you will inc over the next 8 repeats), work M.5 over the 4 next repeats as before. When you have worked M.6 1 time in height, work M.3 over M.6 but work M.5 as before over the repeats of M.5. Happy knitting!
12.04.2017 - 11:41
![]() Sandra Martins ha scritto:
Sandra Martins ha scritto:
Hi, I'm looking forward to do this project but cannot work out why knit and purl are both represented in the diagram the same way (white box), nor can I understand how the pattern is worked out. Many thanks for your help, Sandra
06.03.2017 - 23:55DROPS Design ha risposto:
Dear Mrs Martins, the white box in diagram will be worked K from RS and the dot will be worked P, so that in M1 for example you work 1 round K (with dec on 1st round), 1 round P and in M.3, you will work 2 rounds (with dec/inc on 1st row). Happy knitting!
07.03.2017 - 09:06
![]() Lucie ha scritto:
Lucie ha scritto:
Dobrý den, vzor M1 má kolik řad ? aby byla sekvence dokončená ? a chápu dobře, že se ve vzoru M1 plete hladce 7ok a poté se dle schéma splétá ? děkuji za radu.
19.06.2016 - 22:28DROPS Design ha risposto:
Dobrý den, Lucie, vzor M.1 je tvořen 2 řadami (lícovou a rubovou). V lícové řadě upleteme 7 ok hladce, pak 3 oka spleteme - přetažením, tj. 1 oko sejmeme hladce, 2 oka spleteme hladce a to sejmuté přes ně přetáhneme - pak upleteme 6 ok hladce a začneme zase od začátku. V následující řadě (rubové) upleteme všechna oka obrace. Tím je dokončena celá sekvence vzoru M.1. Hodně zdaru! Hana
20.06.2016 - 07:04
![]() Øygunn ha scritto:
Øygunn ha scritto:
Ang. høyre stolpe :etter at jeg har strikket 3 rette og snudd: skal jeg strikke helt frem til der jeg strikket tre rette eller blir det 6 masker til sammen der jeg skal øke?
16.09.2015 - 10:04DROPS Design ha risposto:
Hej Øygunn, Du vender og strikker helt fram til før de 3 m midt bak, legg deretter opp 6 nye m på slutten av p midt bak til høyre stolpe. Det er altså nye m du legger op (så det overlapper den anden side. God fornøjelse!
16.09.2015 - 15:06
![]() Andrea Jacobsen ha scritto:
Andrea Jacobsen ha scritto:
Når jeg afprøver strikkefastheden følgetr jeg diagrammet, så jeg kan lave sik-sakmønster. Men jeg øger maskeantallet ved at følge mønstret, og dermed ikke i stand til at måle mon strikkefasthed, hvad gør jeg forkert ? mvh Andrea
05.09.2015 - 18:32DROPS Design ha risposto:
Hej Andrea. Pröv at strikke din pröve efter M.2, M.3 eller M.5, der aendres antallet af masker ikke.
08.09.2015 - 15:47
![]() Dianne ha scritto:
Dianne ha scritto:
What does the guage directions mean? - "US 6 - or size needed to get 24 sts with zigzag pattern=width 4" ; I'm used to the pattern giving me the amount of stitches horizontally and vertically to make a 4" swatch. Please help! Thanks, Diannw
05.07.2015 - 01:05DROPS Design ha risposto:
Dear Dianne, in zigzag pattern tension should be 24 sts = 4" in width with larger needle, height can be adjusted with the measurements, but you should get a tension of 22 sts x 46 rows in garter sts = 4"x4" with smaller needdle. Happy knitting!
06.07.2015 - 10:03
![]() Ann ha scritto:
Ann ha scritto:
Hi You helped a lot with the rows ie M1 M2 etc, it would be so good if the pattern had said that, but now I want to ask about the colour changes. Can you simplify that for me. The stripes in ridges and stripes in stocking stitch is confusing me. Do you mean follow the ridge colours on the decreasing rows (which form the ridge) and the colours in stocking stich when you are not decreasing? Thanks.
31.05.2015 - 19:54DROPS Design ha risposto:
Dear Ann, 1 ridge = 2 rounds in garter st (= K 1 round, P 1 round), M2 is worked in garter st ie you will work M2 in garter st a total of 22 rounds - 11 ridges), then continue working the other diagrams following the stripes in stocking st. Happy knitting!
01.06.2015 - 10:42
![]() Ann ha scritto:
Ann ha scritto:
I love the pattern but its so complicated. You do M1 for row 1 then do you do M2 for 1 row then M3 for 1 row then repeat these 3 rows over and over, or do you do M1 in 1 colour then M2 in next colour then M3 in next and so on. I've knitted lots of things but never seen a pattern which gives lots of different things to do but no clear instructions. Very very disappointed after I bought all the materials then found the pattern so baffling. Can anyone help?
28.05.2015 - 19:49DROPS Design ha risposto:
Dear Ann, you first work the 2 rows in M.1, then the 2 rows in M2 while working the stripes in garter st, then repeat the 2 rows in M3 with the stripes in stocking st until piece measures 18 cm, then work the 2 rows in M4 and repeat the 2 rows in M5 until piece measures 23 cm while continuing stripes in st st in M4 and M5. Then continue as stated in pattern. Happy knitting!
29.05.2015 - 09:32
![]() Lise ha scritto:
Lise ha scritto:
Har nå endelig knekt koden på denne toppen etter mang en gang å ha rekt opp, men hadde bestemt meg på at denne skulle jeg klare. Synes det er vanskelig å lese og forstå denne oppskriften men strikker nå min andre topp av dette mønsteret men lager den litt lengre enn oppskriften sier.
23.05.2015 - 13:42
|
|||||||||||||||||||
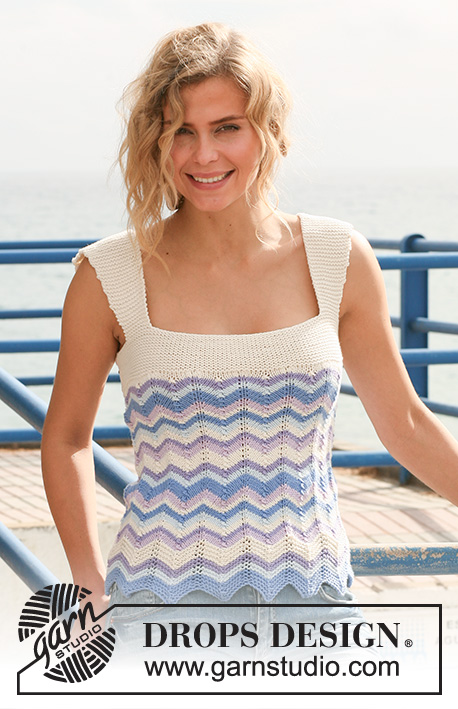
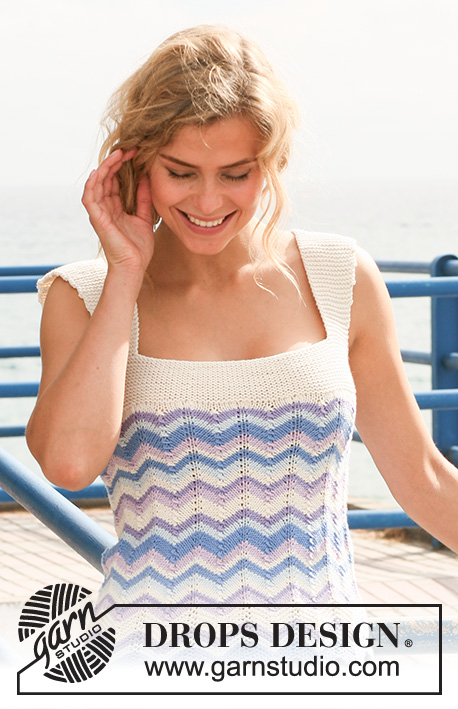
Breaking Waves Top#breakingwavestop |
|||||||||||||||||||
 |
 |
||||||||||||||||||
Top DROPS ai ferri, con motivo a zig zag e strisce in "Muskat" Taglie: Dalla S alla XXXL.
DROPS 128-3 |
|||||||||||||||||||
|
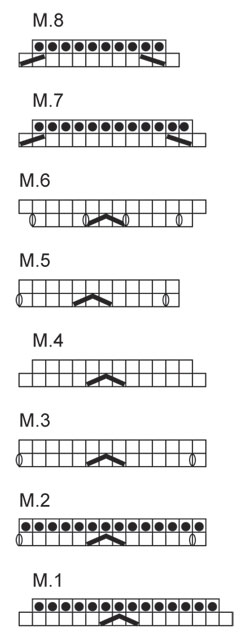
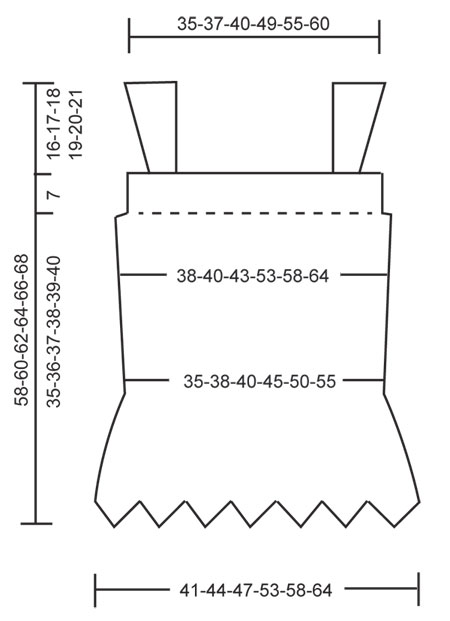
PUNTO LEGACCIO (in tondo, sui ferri circolari): 1 “costa” a legaccio = 2 giri, * 1 giro a dir e 1 giro a rov *, ripetere da *-*. PUNTO LEGACCIO (avanti e indietro sui ferri): Lavorare tutti i ferri a dir. MOTIVO: Vedere i diagrammi da M.1 a M.8. STRISCE A COSTE LEGACCIO: (1 ripetizione del diagramma M.2 in verticale = 1 costa a legaccio (2 giri a punto legaccio)) 3 coste a legaccio in azzurro chiaro 2 coste a legaccio in blu ghiaccio chiaro 2 coste a legaccio in blu viola chiaro 4 coste a legaccio in panna STRISCE A MAGLIA RASATA: 3 giri in azzurro chiaro 2 giri in blu viola chiaro 3 giri in panna 3 giri in blu ghiaccio chiaro 3 giri in azzurro chiaro 2 giri in panna 3 giri in viola chiaro 5 giri in azzurro chiaro 3 giri in blu ghiaccio chiaro 3 giri in blu viola chiaro 5 giri in panna Ripetere il motivo a strisce finché non vengono date indicazioni diverse. ASOLE: Intrecciare le m per le asole sul bordo destro. 1 asola = lavorare insieme a dir la 2a e la 3a m sul diritto del lavoro e fare 1 m gettata. -------------------------------------------------------- TOP: Si lavora in tondo sui ferri circolari. Avviare 224-240-256-288-320-352 m sui ferri circolari n° 4 con il colore azzurro chiaro. Lavorare il diagramma M.1 su tutte le m – vedere MOTIVO (= 14-15-16-18-20-22 ripetizioni). Dopo aver lavorato il diagramma M.1 una volta in verticale, sui ferri ci sono 196-210-224-252-280-308 m. RICORDARSI LA TENSIONE DEL LAVORO! Proseguire lavorando il diagramma M.2 sopra il diagramma M.1. ALLO STESSO TEMPO lavorare a STRISCE A PUNTO LEGACCIO – vedere le spiegazioni precedenti! Proseguire lavorando il diagramma M.3 su tutte le m. ALLO STESSO TEMPO lavorare a STRISCE A MAGLIA RASATA - vedere le spiegazioni precedenti! Quando il lavoro misura 18 cm (finire dopo un’intera ripetizione del diagramma M.3 in verticale), lavorare il diagramma M.4 sopra il diagramma M.3. Dopo aver lavorato il diagramma M.4 una volta in verticale, sui ferri ci sono 168-180-192-216-240-264 m. Proseguire lavorando il diagramma M.5 sopra il diagramma M.4. Quando il lavoro misura 23 cm, proseguire come segue a seconda della misura (inizio del giro = centro, sul dietro): TAGLIE S-L: Proseguire seguendo il diagramma M.5 sulle prime 4-4-4 ripetizioni come prima, lavorare il diagramma M.6 sopra le 6-7-8 ripetizioni successive, proseguire con il diagramma M.5 sulle restanti 4-4-4 ripetizioni come prima (= 2 giri) = 180-194-208 m. Lavorare il diagramma M.3 sopra il diagramma M.6, lavorare le rimanenti ripetizioni seguendo il diagramma M.5 come prima (= 2 giri). Proseguire ripetendo gli ultimi 2 giri del motivo. TAGLIE XL-XXXL: Lavorare il diagramma M.6 sopra il diagramma M.5. Dopo aver lavorato il diagramma M.6 una volta in verticale (= 2 giri), sui ferri ci sono 252-280-308 m. Lavorare poi il diagramma M.3 sopra il diagramma M.6 (= 2 giri). Proseguire ripetendo gli ultimi 2 giri del motivo. TUTTE LE TAGLIE: Quando il lavoro misura 35-36-37-38-39-40 cm, finire il motivo a strisce e il motivo a zig zag (completare un’intera ripetizione in verticale). Passare ai ferri circolari n° 2,5 e proseguire con il colore panna. Lavorare come segue dall’inizio del giro (centro, sul dietro): diagramma M.7 su tutto il diagramma M.3 e diagramma M.8 su tutto il diagramma M.5 = 152-164-176-216-240-264 m. Lavorare il giro successivo come segue: 3 m dir, girare il lavoro e lavorare 1 ferro a dir sul rovescio del lavoro fino alle 3 m al centro sul dietro, avviare 6 nuove m alla fine del ferro al centro, sul dietro, per il bordo per le asole = 158-170-182-222-246-270 m. Proseguire a PUNTO LEGACCIO – vedere le spiegazioni precedenti – avanti e indietro su tutte le m del ferro. Quando la parte lavorata a punto legaccio misura 2 cm, intrecciare per la prima ASOLA – vedere le spiegazioni precedenti! Intrecciare le m per un’altra asola quando la parte lavorata a punto legaccio misura 5 cm in verticale. Quando la parte lavorata a punto legaccio misura 7 cm in verticale (tutto il lavoro misura ora 42-43-44-45-46-47 cm), lavorare il ferro successivo, sul diritto del lavoro, come segue: intrecciare le prime 24-25-26-27-28-29 m sul ferro. Lavorare metà spallina, avanti e indietro sulle m successive come segue: 12-13-14-15-16-17 m dir, girare il lavoro e lavorare 12-13-14-15-16-17 m dir; proseguire lavorando avanti e indietro a dir su queste m. ALLO STESSO TEMPO, dopo aver lavorato 4 ferri a punto legaccio (2 coste a legaccio), aumentare 1 m per le spalline lavorando 2 volte a dir l’ultima m del ferro, sul diritto del lavoro. Ripetere questi aumenti ogni 8 ferri, per un totale di 9-9-9-10-10-10 volte = 21-22-23-25-26-27 m. Intrecciare le m a dir quando la spallina misura 16-17-18-19-20-21 cm. Intrecciare le 10-12-14-30-38-46 m successive del top (primo scalfo). Lavora metà spallina sulle 12-13-14-15-16-17 m successive, e ALLO STESSO TEMPO, aumentare per la spallina lavorando 2 volte a dir l’ultima m sul ferro, sul rovescio del lavoro. Intrecciare le m quando la spallina misura 16-17-18-19-20-21 cm. Intrecciare le 42-44-46-48-50-52 m successive al centro, sul davanti del top. Lavorare metà spallina sulle 12-13-14-15-16-17 m successive (aumentare verso il lato esterno lavorando 2 volte a dir l’ultima m sul ferro sul diritto del lavoro). Intrecciare le m quando la spallina misura 16-17-18-19-20-21 cm. Intrecciare le 10-12-14-30-38-46 m successive del top (2° scalfo). Lavorare metà spallina sulle 12-13-14-15-16-17 m successive (aumentare verso il lato esterno lavorando 2 volte a dir l’ultima m del ferro, sul rovescio del lavoro). Intrecciare le m quando la spallina misura 16-17-18-19-20-21 cm. Intrecciare le rimanenti 24-25-26-27-28-29 m. Il lavoro misura ca. 58-60-62-64-66-68 cm. CONFEZIONE: Cucire le spalline. Cucire, con piccoli punti, il bordo di avvio delle m del bordo per i bottoni davanti alla parte inferiore del bordo sinistro. Cucire i bottoni sul bordo sinistro. |
|||||||||||||||||||
Spiegazioni del diagramma |
|||||||||||||||||||
|
|||||||||||||||||||
 |
|||||||||||||||||||
 |
|||||||||||||||||||
Avete terminato questo modello?Allora taggate le vostre foto con #dropspattern #breakingwavestop o inviatele alla #dropsfan gallery. Avete bisogno di aiuto con questo modello?Troverete 19 video tutorial, una sezione per i commenti/domande e molto altro guardando il modello su www.garnstudio.com © 1982-2026 DROPS Design A/S. Ci riserviamo tutti i diritti. Questo documento, compreso tutte le sue sotto-sezioni, è protetto dalle leggi sul copyright. Potete leggere quello che potete fare con i nostri modelli alla fine di ogni modello sul nostro sito. |
|||||||||||||||||||


Con oltre 40 anni di esperienza nel design di modelli di maglia e uncinetto, DROPS Design offre la più estesa collezione di modelli gratuiti su internet - tradotti in 17 lingue. Ad oggi vi possiamo fornire 324 cataloghi e 12290 modelli - 9561 dei quali sono tradotti in Italiano.
Ci stiamo impegnando molto per darvi il meglio che vi possiamo offrire in termini di maglia e uncinetto, ispirazioni e consigli così come filati di grande qualità ad un prezzo incredibile! Volete utilizzare i nostri modelli per qualcosa d'altro oltre al vostro uso personale? Potete leggere tutto ciò che è consentito nel testo sul Copyright in basso su tutte le pagine dei nostri modelli. Buon lavoro!
Lasciare un commento sul modello DROPS 128-3
Noi saremmo felici di ricevere i tuoi commenti e opinioni su questo modello!
Se vuoi fare una domanda, fai per favore attenzione a selezionare la categoria corretta nella casella qui sotto per velocizzare il processo di risposta. I campi richiesti sono indicati da *.