
Categorie popolari
State cercando un filato?


Commenti / Domande (90)
![]() Reed Loder ha scritto:
Reed Loder ha scritto:
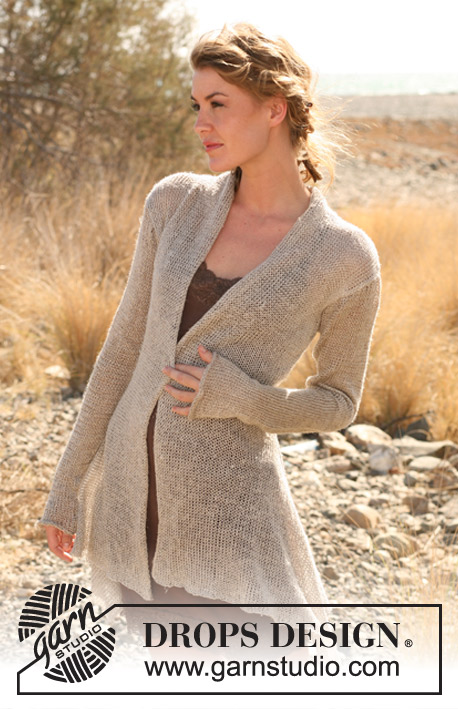
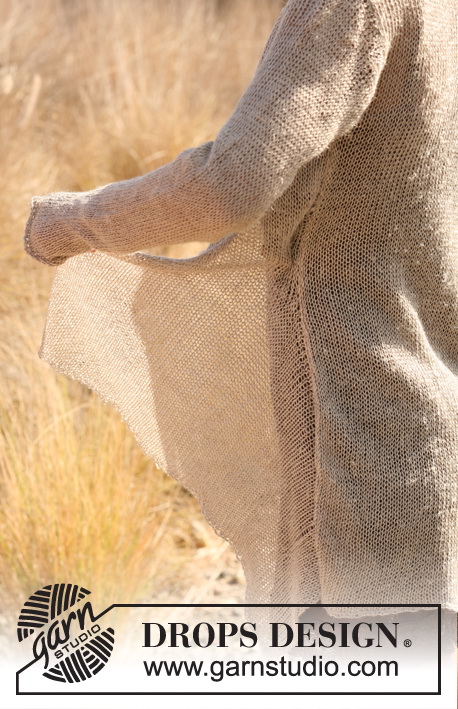
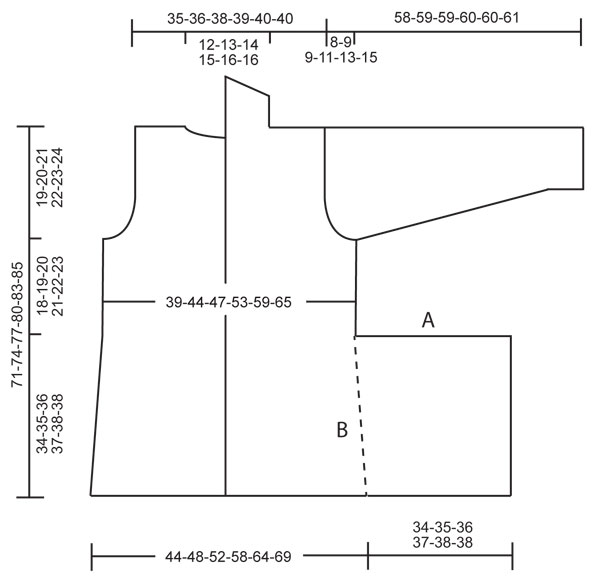
I am confused about the flap (A) of Drops 129-3. Will it just hang? On what side should the armhole binding be done on each on each front piece (on the totally straight side or side with binding offs? Is there a video on assembly? Thank you!
16.03.2024 - 23:24DROPS Design ha risposto:
Dear Reed, you can see in the second photo how A will look. When not straightened out it will look like a big fold. The armhole decreases are always in the side or lateral edge of the piece (not towards the neck), that is, where you had previously cast off stitches for the flap. There are no videos on how to assembly this piece. Happy knitting!
18.03.2024 - 00:19
![]() Reed Loder ha scritto:
Reed Loder ha scritto:
What is an "edge stitch"? Is it simply one knit or purl? (Lady Jane pattern LN-009)
19.02.2024 - 06:39DROPS Design ha risposto:
Dera Mrs Loder, this edge stitch is used for the seam allowance, it can be worked in stocking stitch or in garter stitch, as you like. Happy knitting!
19.02.2024 - 09:54
![]() Jirina ha scritto:
Jirina ha scritto:
Hallo, Leider reicht bei mir die Wolle nicht mal ansatzweise. Wie viel Wolle muss ich circa für die Ärmel in Größe M nachbestellen?
22.09.2022 - 21:17DROPS Design ha risposto:
Liebe Jirina, die Jacke haben wir leider nicht mehr, so können wir damit nicht helfen, aber gerne wird Ihnen damit Ihr Wollladen weiterhelfen (auch per Telephon oder per E-Mail). Viel Spaß beim stricken!
23.09.2022 - 07:50
![]() Sharon ha scritto:
Sharon ha scritto:
Could you please provide some additional detail re: "Sew collar tog mid back..."? For example, which two edges do I sew together (is it the angled parts of each half of the collar?), and then is it the shorter side of each collar that gets attached to the back piece? Thanks!
07.06.2021 - 17:14DROPS Design ha risposto:
Dear Sharon, you will sew together the cast off stitches on each collar piece and then sew the long side towards shoulder along back piece, ie as in this video. Happy knitting!
08.06.2021 - 08:50
![]() Sharon ha scritto:
Sharon ha scritto:
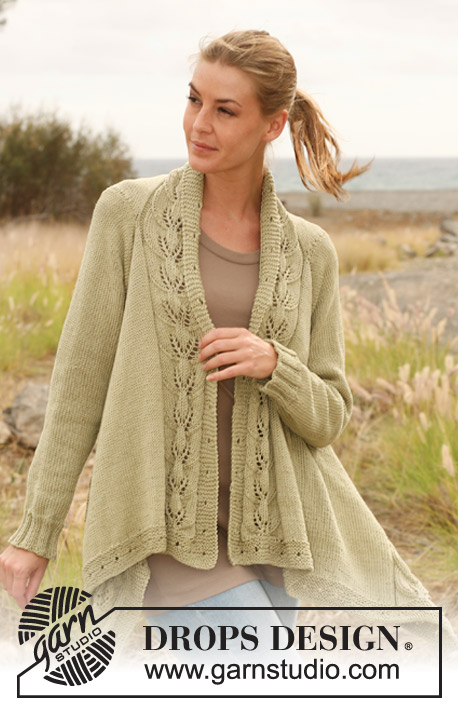
This is my first attempt at following a cardigan pattern. I’m having trouble understanding the purpose of the extended side piece B and where the front B sides will attach.
16.05.2021 - 23:05DROPS Design ha risposto:
Dear Sharon, this is an extra piece that will be then sewn to the side, maybe the 2nd picture will help you to visualize how it will look like. Happy knitting!
17.05.2021 - 09:43
![]() LesLee ha scritto:
LesLee ha scritto:
I’m having trouble getting yarn to make 129-3. No one has this yarn. Muskat. Is it a DK so that I can go elsewhere and get a suitable replacement yarn. I’m really upset that the two Places that are listed on your site do not respond or don’t offer a place for contacting them. Very upsetting. LesLee
22.07.2018 - 16:53DROPS Design ha risposto:
Dear Leslee, DROPS Lin can here be replaced by DROPS Muskat - make sure you will get the correct tension adjusting needle size if needed. You'll find here list of DROPS stores shipping to USA - click on the profile each store to get email/social medias to contact them. Happy knitting!
23.07.2018 - 08:17
![]() Kathi ha scritto:
Kathi ha scritto:
Hallo, bei mir wird der schräge Teil des Kragens nochmals 8cm lang (nach den 10 cm grade), ist das nicht zu lange? Ich habe Angst, dass der Kragen nach dem Zusammennähen als Spitze hinten absteht. Oder müsste ich beim zweiten Vorderteil die Schräge weg vom Hals stricken, so dass eine schräge Kragennaht entsteht? Danke!
24.06.2018 - 09:49DROPS Design ha risposto:
Liebe Kathi, diese abgeketteten Maschen von beiden Kragen werden zusammengenäht, nur die ersten 10 m werden am Rückenteil (Halsauschnitt) genäht. Viel Spaß beim stricken!
25.06.2018 - 08:27
![]() Bénédicte ha scritto:
Bénédicte ha scritto:
Bonjour, J'aimerais savoir si tous les fils de la catégorie de fils B peuvent être utilisés ou seulement Muskat, merci. Cordialement.
16.03.2017 - 23:31DROPS Design ha risposto:
Bonjour Bénédicte, vous trouverez ici toutes les informations nécessaires relatives aux alternatives possibles. Bon tricot!
17.03.2017 - 08:50
![]() Margit ha scritto:
Margit ha scritto:
Liebes Drops-Team, ich möchte diese Jacke gerne mit "Belle" stricken. Können Sie mir das auch empfehlen, oder raten Sie mir eher ab. Bei den Garnalternative zu "Lin" ist sie schon mit aufgeführt. Ich müsste allerdings auch noch wissen, welche Lauflänge "Lin" hatte. Vielen Dank!
26.05.2016 - 20:32DROPS Design ha risposto:
Liebe Margrit, Belle könnne wir sehr empfehlen. Die Lauflänge der älteren Garne finden Sie unter "Auslaufgarne" (oben im Menu unter "Garne").
27.05.2016 - 08:05
![]() Dina ha scritto:
Dina ha scritto:
Og en ting til, vil ikke kanten på forstykkene rulle veldig innover? (altså i åpningen foran) Hvordan kan jeg evt strikke for å unngå dette?
04.04.2016 - 17:00DROPS Design ha risposto:
Hej igen, Du kan dampe kanterne let når du er klar, hvis du vil have en lille kant mod midt foran, så kan du strikke de yderste 4-5 masker mod midt foran i retstrik, men sådan er den ikke ifølge opskriften. God fornøjelse!
05.04.2016 - 11:12
|
|
Lady Jane#ladyjanecardigan |
|
 |
 |
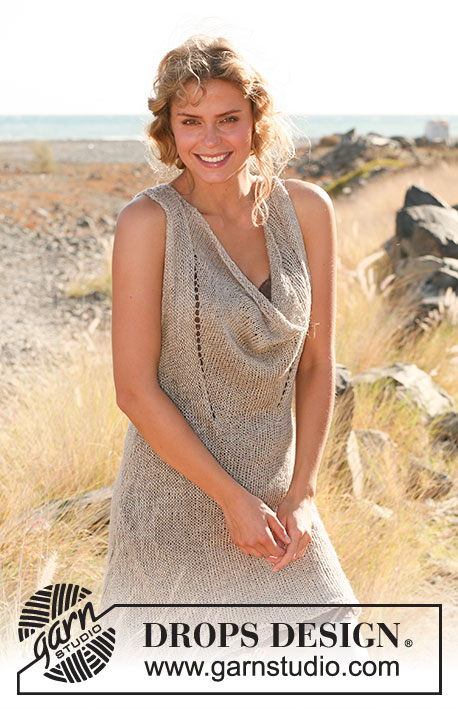
Giacca asimmetrica DROPS in "Lin" o "Muskat". Dalla S alla XXXL.
DROPS 129-3 |
|
|
DIETRO: Si lavora avanti e indietro sul ferro circolare. Avviare 76-84-90-100-110-120 m (incl. 1 m vivagno ai lati) sui ferri circolari n. 5 con filato Lin. Lavorare a maglia rasata. Quando il lavoro misura 10 cm, diminuire 1 m ad ogni lato. Ripetere la diminuzione ogni 7-7½-7½-8-8½-8½ cm per un totale di 4 volte = 68-76-82-92-102-112 m. RICORDATI LA TENSIONE DELLA MAGLIA! Inserire un segno nella m. vivagno su ogni lato quando il lavoro misura 34-35-36-37-38-38 cm (= segnaposto per la confezione). Quando il lavoro misura 52-54-56-58-60-61 cm, intrecciare le maglie e diminuire per gli scalfi delle maniche all’inizio di ogni riga su ogni lato come segue: 3 m. per 1 volta, 2 m. per 0-1-2-3-5-7 volte e dim. 1 m. 1-2-2-4-4-5 volte = 60-62-64-66-68-68 m. Quando il lavoro misura 69-72-75-78-81-83 cm, intrecciare le 18-20-22-24-26-26 m. centrali per formare il collo e lavorare quindi ogni spalla separatamente. Dim. 1 m. nella riga seguente dal lato del collo = 20 m. rimanenti sul f. per tutte le taglie. Intrecciare tutte le maglie quando il lavoro 71-74-77-80-83-85 cm. DAVANTI SINISTRO: Si lavora avanti e indietro sul ferro circolare. Avviare 91-97-103-109-115-121 maglie (incl. 1 m. vivagno ai lati) sul ferro circolare n. 5 con filato Lin. Lavorare a maglia rasata. Quando il lavoro misura 34-35-36-37-38-38 cm, intrecciare le prime 57-59-62-63-64-65 m. dal diritto = 34-38-41-46-51-56 m. Continuare a maglia rasata. Quando il lavoro misura 52-54-56-58-60-61 cm, intrecciare e diminuire per lo scalfo della manica sul lato come per il dietro = 30-31-32-33-34-34 m. Quando il lavoro misura 71-74-77-80-83-85 cm, intrecciare le prime 20 m. dal diritto per la spalla per tutte le taglie = 10-11-12-13-14-14 m. rimaste sul f. per il collo. Continuare a maglia rasata finché il collo misura 8-8-9-9-10-10 cm misurati a partire dalla spalla. Continuare a maglia rasata, ALLO STESSO TEMPO intrecciare 1 m. all’inizio di ogni riga dal diritto finché tutti I punti sono stati intrecciati. DAVANTI DESTRO: Lavorare come il davanti sinistro ma in modo speculare. MANICA: Si lavora avanti e indietro sui ferri circolari. Avviare 36-38-40-42-44-46 m. (incl. 1 m. vivagno ai lati) sui ferri circolari n. 5 con filato Lin. Lavorare a maglia rasata. Quando il lavoro misura 8 cm, aumentare di 1 m. su entrambi I lati. Ripetere l’aumento ogni 4-3½-3-2½-2½-2 cm per un totale di 10-12-13-15-15-17 volte = 56-62-66-72-74-80 m. Quando il lavoro misura 50-50-50-49-47-46 cm (NOTA! misura più corta per le taglie grandi perché lo scalfo della manica è più lungo e le spalle più larghe)intrecciare per lo scalfo della manica all’inizio di ogni ferro su ogni lato come segue: 3 m. per 1 volta, 2 m. per 2-2-3-3-3-3 volte, 1 m. per -3-4-2-5-7-9 volte. Quindi intrecciare 2 m. su ogni lato finché il lavoro misura 57-58-58-59-59-60 cm, poi intrecciare 3 m. per 1 volta su ogni lato. Intrecciare tutte le maglie. Ora il lavoro misura circa 58-59-59-60-60-61 cm. Lavorare allo stesso modo l’altra manica. CONFEZIONE: Cucire le spalle. Cucire insieme il collo al centro dietro e attaccarlo al retro della giacca. Cucire insieme lateralmente il davanti e il dietro ai lati dei punti a m. vivagno (ovvero cucire A (=bordo intrecciato del davanti) con B (=lato del dietro) – vedere diagramma. NOTA! Fate in modo che il bordo intrecciato di ogni davanti venga cucito fino al segno posizionato sul dietro, poi continuare la cucitura laterale come prima, ai lati della m. vivagno fino allo scalfo della manica. – vedere diagramma. Cucire le maniche ai lati dei punti a m. vivagno e quindi attaccare le maniche al resto della giacca. |
|
 |
|
Avete terminato questo modello?Allora taggate le vostre foto con #dropspattern #ladyjanecardigan o inviatele alla #dropsfan gallery. Avete bisogno di aiuto con questo modello?Troverete 13 video tutorial, una sezione per i commenti/domande e molto altro guardando il modello su www.garnstudio.com © 1982-2026 DROPS Design A/S. Ci riserviamo tutti i diritti. Questo documento, compreso tutte le sue sotto-sezioni, è protetto dalle leggi sul copyright. Potete leggere quello che potete fare con i nostri modelli alla fine di ogni modello sul nostro sito. |
|


Con oltre 40 anni di esperienza nel design di modelli di maglia e uncinetto, DROPS Design offre la più estesa collezione di modelli gratuiti su internet - tradotti in 17 lingue. Ad oggi vi possiamo fornire 324 cataloghi e 12290 modelli - 9561 dei quali sono tradotti in Italiano.
Ci stiamo impegnando molto per darvi il meglio che vi possiamo offrire in termini di maglia e uncinetto, ispirazioni e consigli così come filati di grande qualità ad un prezzo incredibile! Volete utilizzare i nostri modelli per qualcosa d'altro oltre al vostro uso personale? Potete leggere tutto ciò che è consentito nel testo sul Copyright in basso su tutte le pagine dei nostri modelli. Buon lavoro!
Lasciare un commento sul modello DROPS 129-3
Noi saremmo felici di ricevere i tuoi commenti e opinioni su questo modello!
Se vuoi fare una domanda, fai per favore attenzione a selezionare la categoria corretta nella casella qui sotto per velocizzare il processo di risposta. I campi richiesti sono indicati da *.