
Categorie popolari
State cercando un filato?


Commenti / Domande (82)
![]() Delphine ha scritto:
Delphine ha scritto:
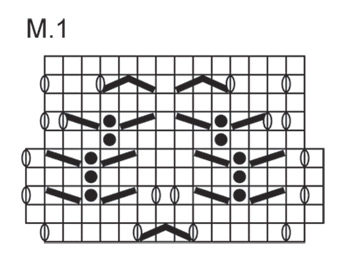
Bonjour, je tricote ce modèle et j'ai beaucoup d'incertitudes en passant du rang 5 au rang 6 avec les mailles envers. La 1ère maille envers du rang 6 doit être tricotée au bout de combien de mailles du bord ? Car j'ai souvent 1 maille de plus au début ou à la fin des rangs. Pourquoi sur les rangs de 1 à 4 y a t il une maille supplémentaire au début et à la fin et pas sur les autres rangs ? En vous remerciant par avance pour votre aide.
02.11.2020 - 19:08DROPS Design ha risposto:
Bonjour Delphine, au rang 1, on fait 4 jetés et on diminue 2 m = on augmente 2 m. Aux rangs 2 à 4,o n va donc tricoter sur 16 m. Au rang 5, on diminue 4 m, mais on ne fait que 2 jetés = on se retrouve de nouveau avec 14 m. Les mailles envers des rangs 6 et 7 seront alignées au-dessus des précédentes, même si elles apparaissent décalées dans le diagramme . Pour vous aider, pensez à mettre un marqueur entre chaque diagramme à répéter, vous pourrez ainsi plus facilement vérifier votre nombre de mailles dans chaque motif à répéter, à chaque rang. Bon tricot!
03.11.2020 - 08:28
![]() Katarzyna Matejek ha scritto:
Katarzyna Matejek ha scritto:
Witam czy na lewej stronie sobutki robimy oczka lewe. A na prawej stronie robótki według schematu?
22.02.2019 - 15:27DROPS Design ha risposto:
Witaj Kasiu, na prawej stronie robótki (rzędy nieparzyste schematu) przerabiamy wg schematu, a na lewej stronie robótki (rzędy parzyste) przerabiamy wszystkie oczka na lewo, za wyjątkiem tych które są oznaczone symbolem czarnej kropki, które są przerabiane na prawo na lewej stronie robótki. Powodzenia!
22.02.2019 - 16:54
![]() Rosy ha scritto:
Rosy ha scritto:
Bonjour, est-il possible de tricoter ce modèle avec de la laine "Lace" avec un fil en double, ou bien faut-il le laisser en simple fil ? Merci !
07.01.2019 - 12:58DROPS Design ha risposto:
Bonjour Rosy, vous pouvez probablement tricoter ce modèle en DROPS Lace, en simple, mais le motif sera plus ajouré - il pourra être ensuite bloqué. N'hésitez pas à demander conseil à votre magasin - même par mail ou téléphone. Bon tricot!
07.01.2019 - 14:36
![]() Susanne Axelsen ha scritto:
Susanne Axelsen ha scritto:
Hej Når jeg skal starte pind 6, hvad gør jeg så efter de 4 retmasker .....?
31.12.2018 - 10:51DROPS Design ha risposto:
Hei Susanne. Jeg antar du mener pinne 6 i M.1? Du følger diagrammet som vanlig (Pinne 6 strikkes fra vrangsiden): etter de 6 rillemaskene i siden strikker du altså 3 masker vrang, 1 maske rett, 5 masker vrang, 1 maske rett, 4 masker vrang. Første rapport av M.1 er ferdig og denne gjentar du til det gjenstår 4 masker på pinnen,. Strikk 4 masker i rille som vanlig (retmasker på dansk). God fornøyelse
04.01.2019 - 09:27
![]() Valeria ha scritto:
Valeria ha scritto:
Dit patroon klopt niet: als je 2 gebreide delen aan elkaar gaat breien, kloppen de rijen niet! Dit komt doordat de zijkanten verschillend zijn. Je moet eigenlijk bij deel 2 links en rechts omwisselen.
13.11.2018 - 23:42
![]() Clarissa Koeditz ha scritto:
Clarissa Koeditz ha scritto:
Have you actually made this piece?? If you had, you would know what I am talking about. If both of the outsides of each piece were exactly the same, then what you are telling me would work. But, they are not. One side has an extra stockinette stitch and if you simply put the right sides together, you would see that the extra stockinette stitch would be on opposite sides of each other.
01.04.2018 - 00:54DROPS Design ha risposto:
Dear Mrs Koeditz, both pieces are the same: you finish M.1 with a WS row and K 3 rows (= 1 row from RS, 1 row from WS and 1 row from RS). Then graft sts from both pieces together from RS. For any further personnal assistance you are welcome to contact the store where you bought your yarn, even per mail or telephone, they will be able to explain you. Happy assembly!
03.04.2018 - 08:39
![]() Clarissa Koeditz ha scritto:
Clarissa Koeditz ha scritto:
I sewed each half exactly the same way, which means that when you hold them up side-by-side, they have that one stitch in stickinette on the same side. But when I turn one half to make the right sides together so I can graft them, that stockinette stitch on the half that I turned is now on the opposite side. I would basically have to make one half backward from the other to make the stockinette stitch on the same side when I graft them.
28.03.2018 - 20:29DROPS Design ha risposto:
Dear Mrs Koeditz, last row on both pieces has been worked from RS, place both pieces from RS to graft them together with kitchener stitches. Happy assemby!
30.03.2018 - 11:51
![]() Halina Andruszkiewicz ha scritto:
Halina Andruszkiewicz ha scritto:
Witam nie mogę rozszyfrować tego wzoru nie zgadza mi się ilość oczek proszę o instrukcję wzór jest bardzo ładnyi chciałabym wykorzystać na swoją robótkę. Z góry dziękuję.
14.03.2018 - 07:46DROPS Design ha risposto:
Witaj Halino! Niestety nie ma dokładnego opisu tego wzoru, a tylko schemat na dole. Nad schematem znajduje się legenda. Schemat odczytujemy od prawego dolnego rogu, od prawej do lewej strony na prawej stronie robótki, i od lewej do prawej strony na lewej stronie robótki. Najlepiej umieścić marker między każdym kolejnym powtarzanym motywem, aby uniknąć pomyłek. W razie pytań proszę o kontakt. Miłej pracy!
14.03.2018 - 14:04
![]() Clarissa Koeditz ha scritto:
Clarissa Koeditz ha scritto:
For pattern 127-39: In the chart pattern, on the 6th row, the pattern goes down by 2 sets {1 st at each end). How do I handle these missing stitches? Do I slip st?
04.02.2018 - 15:58DROPS Design ha risposto:
Dear Mrs Koeditz, on row 5 in pattern you will dec 4 sts while only making 2 YOs, ie you will decrease 2 sts in each repetition of M.1. Happy knitting!
05.02.2018 - 09:44
![]() Laure B. ha scritto:
Laure B. ha scritto:
Bonjour, Est-il possible d'avoir la marche à suivre de ce modèle par écrit, et non avec le schéma. Je suis très nulle avec les schémas mais par contre si j'ai le détail avec les explications écrites j'y arrive. Merci d'avance. Cordialement, Laure
27.08.2017 - 23:17DROPS Design ha risposto:
Bonjour Laure B, il n'existe qu'un diagramme pour les explications de ce motif, vous trouverez la légende juste au-dessus du diagramme. Lisez le diagramme en commençant en bas à droite, de droite à gauche sur l'endroit et de gauche à droite sur l'envers. N'hésitez pas à ajouter des marqueurs entre chaque motif à répéter pour bien vous repérer et éviter les erreurs. Bon tricot!
29.08.2017 - 11:58
|
|||||||||||||||||||
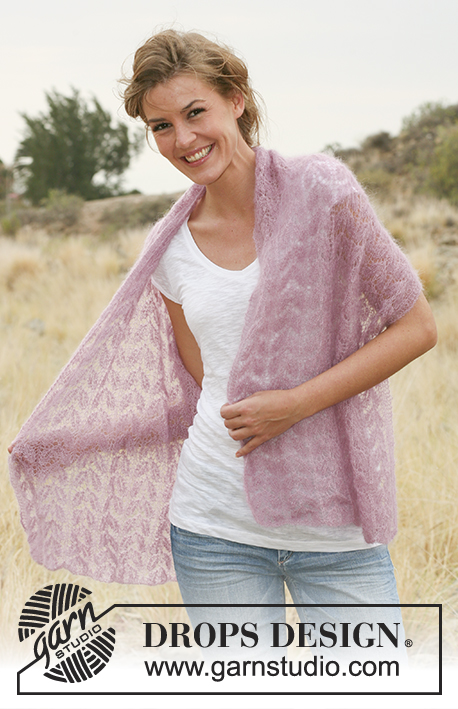
Silk Leaves#silkleavesshawl |
|||||||||||||||||||
 |
 |
||||||||||||||||||
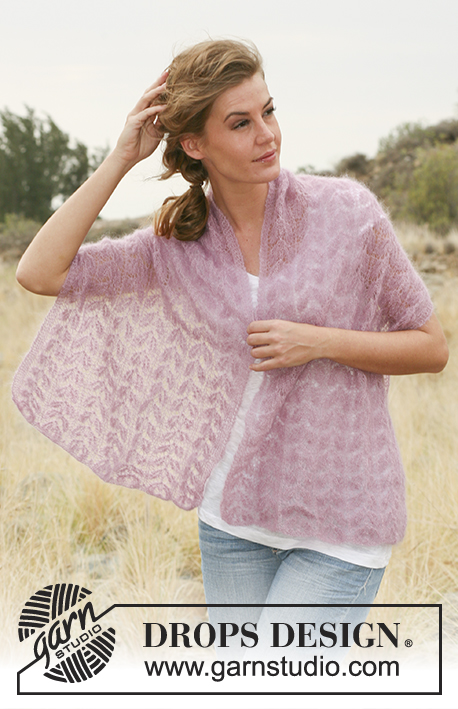
Scialle DROPS con motivo traforato, lavorato ai ferri e filato "Kid-Silk"
DROPS 127-39 |
|||||||||||||||||||
|
MOTIVO TRAFORATO:
Vedere M.1 (il diagramma mostra il motivo dal diritto del lavoro) PUNTO LEGACCIO (andata e ritorno sul ferro): lavorare a diritto tutte le righe. SUGGERIMENTO: Il numero di m può variare a seconda della riga del motivo traforato; potrebbe, quindi, essere utile inserire dei segni tra le ripetizioni del motivo. SCIALLE : Si lavora con ferri di andata e ritorno sul ferro circolare in modo da avere spazio per tutte le m. Avviare 107 m sul ferro circolare n. 3,5 con il filato Kid-Silk. Lavorare quattro righe a punto legaccio – vedere spiegazioni precedenti. Continuare il lavoro come segue: 4 m a punto legaccio, M.1 (1.a riga lavorata sul diritto del lavoro) sulle 98 m seguenti (= il motivo viene ripetuto 7 volte – Leggere il SUGGERIMENTO), 1 m a maglia rasata e 4 m a punto legaccio. Continuare in questo modo fino a quando il lavoro non misura circa 70 cm. (terminare comunque tutte le righe del motivo; la riga successiva è sul diritto del lavoro); lavorare 3 righe a diritto su tutte le m e passare le m su un fermamaglie. In questo modo è stato lavorato metà dello scialle. Lavorare la seconda metà in modo identico. Unire le due parti prendendo insieme le maglie dai ferma maglie. |
|||||||||||||||||||
Spiegazioni del diagramma |
|||||||||||||||||||
|
|||||||||||||||||||
 |
|||||||||||||||||||
Avete terminato questo modello?Allora taggate le vostre foto con #dropspattern #silkleavesshawl o inviatele alla #dropsfan gallery. Avete bisogno di aiuto con questo modello?Troverete 14 video tutorial, una sezione per i commenti/domande e molto altro guardando il modello su www.garnstudio.com © 1982-2026 DROPS Design A/S. Ci riserviamo tutti i diritti. Questo documento, compreso tutte le sue sotto-sezioni, è protetto dalle leggi sul copyright. Potete leggere quello che potete fare con i nostri modelli alla fine di ogni modello sul nostro sito. |
|||||||||||||||||||


Con oltre 40 anni di esperienza nel design di modelli di maglia e uncinetto, DROPS Design offre la più estesa collezione di modelli gratuiti su internet - tradotti in 17 lingue. Ad oggi vi possiamo fornire 324 cataloghi e 12290 modelli - 9561 dei quali sono tradotti in Italiano.
Ci stiamo impegnando molto per darvi il meglio che vi possiamo offrire in termini di maglia e uncinetto, ispirazioni e consigli così come filati di grande qualità ad un prezzo incredibile! Volete utilizzare i nostri modelli per qualcosa d'altro oltre al vostro uso personale? Potete leggere tutto ciò che è consentito nel testo sul Copyright in basso su tutte le pagine dei nostri modelli. Buon lavoro!
Lasciare un commento sul modello DROPS 127-39
Noi saremmo felici di ricevere i tuoi commenti e opinioni su questo modello!
Se vuoi fare una domanda, fai per favore attenzione a selezionare la categoria corretta nella casella qui sotto per velocizzare il processo di risposta. I campi richiesti sono indicati da *.