
Categorie popolari
State cercando un filato?


Commenti / Domande (68)
![]() Mona Lunding ha scritto:
Mona Lunding ha scritto:
Hvorfor er der ikke mønster med til 123_2
27.03.2026 - 18:06
![]() Werna ha scritto:
Werna ha scritto:
Thank you for your reply. But there is still something I do not understand. Please explain : 1 Edge stitch in garter stitch, 5 stocking sts, M.1. How does this come to 9 sts ?
23.01.2025 - 07:30DROPS Design ha risposto:
Dear Werna, M.1 is a chart, such as M.2A, M.2B and M.2C and chart M.1 has 9 stitches. It's not that the edge stitches, the stocking st stitches and M.1 add up to 9, it means that M.1 has 9 stitches. We write the numbers here so that you can add up the number of stitches in the row without having to look at the charts below. Happy knitting!
25.01.2025 - 18:45
![]() Werna ha scritto:
Werna ha scritto:
I am knitting the med. It says : Work next row as follows from RS: 1 edge st in garter st, 5-5-6-7-8-8 stocking sts, M.1 (= 9 sts), 62-72-79-89-100-111 stocking sts, M.2A . Instead of 9 stitches I only have 5. What is M.2A , M.2B and C ?
21.01.2025 - 14:43DROPS Design ha risposto:
Dear Werna, M.1 and M. 2 are the diagrams you will find at the bottom of the page; M.1 is worked over 9 sts and M.2 over 19 sts as shown in diagram, then work in M: 1 edge st in garter st, 5 stocking sts, M.1 (= 9 sts), 72 stocking sts, M.2A (= 19 sts), 72 stocking sts, M.1 (= 9 sts), 5 stocking sts and 1 edge st in garter st. Read more about diagrams here. You will here first work M.2A then repeat the rows marker with M.2B a total of 8 times (in height) then work M.2C and finish with reversed stocking stitch as explained in the written pattern. Happy knitting!
21.01.2025 - 17:12
![]() Saisha Gardner ha scritto:
Saisha Gardner ha scritto:
Help, I am very confused. I am knitting the Large size. I got to 45 cm and did all the binding off as instructed and finished off the right and left front pieces all fine. But I am left with 107 stitches on the back not 93 stitches as I should I have gone back over all the instructions again and again and cannot see where or why I have an extra 14 stitches everything was done as instructed. What has gone wrong?
16.12.2023 - 22:30DROPS Design ha risposto:
Dear Saisha, before working each piece separately, you should have checked that all of the pieces were correctly divided. After the piece, reaches 46 cm divide as follows: 44 stitches for the front piece, cast off 10 stitches for armhole, 93 stitches for the back, cast off 10 stitches for armhole and 44 stitches for the front piece. Remember that, 1cm before dividing the piece (at the 45 cm mark) you should have cast off 7 stitches towards the mid-front in each front piece, for the neck. So you will have 14 stitches less when dividing the front pieces and back piece. Happy knitting!
17.12.2023 - 19:06
![]() Saisha Gardner ha scritto:
Saisha Gardner ha scritto:
Hi I cannot buy the buttons for this pattern anymore : 533 what size were they so I can pick a replacement? Thank you so much Saisha
17.09.2023 - 00:00DROPS Design ha risposto:
Dear Saisha, we use 20mm buttons. Happy knitting!
17.09.2023 - 21:11
![]() Caroline ha scritto:
Caroline ha scritto:
When I've made the 8 decreases = 32 stitches in size M, it says I should be left with 161 stitches, do I discount the stitches of the leaf pattern when counting these? Thank you
15.03.2022 - 18:31DROPS Design ha risposto:
Dear Caroline, count M.1 = 9 sts and M.2A = 19 sts when checking your number of stitches (= do not count the extra stitches increased in the leaf pattern). Happy knitting!
16.03.2022 - 09:08
![]() Manuela Meyer ha scritto:
Manuela Meyer ha scritto:
Rechtes Vorderteil: Ich verstehevnicht den Unterschied von „zur Mitte“ und „zum Hals“ hin abketten“ ! Bitte um eine Erklärung! Dankeschön
21.02.2022 - 01:21DROPS Design ha risposto:
Liebe Frau Meyer, wenn Sie "gegen die Mitte" abketten/abnehmen sollen, sollen Sie die Maschen am Anfang der Reihe vom Hals abketten/abnehmen, dh beim rechten Vorderteil ketten/nehmen Sie am Anfang einer Hinreihe ab; beim linken Vorderteil ketten Sie bei den Rückreihen ab und nehmen Sie am Ende einer Hinreihe; Viel Spaß beim stricken!
21.02.2022 - 10:16
![]() Sylke Prager-Ngejeme ha scritto:
Sylke Prager-Ngejeme ha scritto:
Fehler bei der Maschenangabe für Gr. M: Es sollen 193 M angeschlagen werden, dann Markierung nach 47 und 99 M. Also 2x 47 M für die Voederseiten und 99 für das Rückenteil . Dies ergeben insgesamt 183 und nicht 193 M. Werde statt 72 M glatt rechts also nur 67 M stricken.
03.12.2021 - 19:29DROPS Design ha risposto:
Liebe Frau Prager-Ngejeme, die Maschenanzahl stimmt so: 47+99+47=193 Maschen - Viel Spaß beim stricken!
06.12.2021 - 09:23Hanaa Zahran ha scritto:
Hi I'm fm Egypt I wish to do this pattern I need yr help to do same with double pointed needles unfortunately I can't make it with circle needles thanks
02.03.2017 - 19:42DROPS Design ha risposto:
Dear Mrs Zahran, pattern is here worked back and forth on needle, only edges around armholes are worked in the round. Please find here how to adjust a pattern on straight needle. For any further assistance you are welcome to contact your DROPS store even per mail or telephone. Happy knitting!
03.03.2017 - 10:06
![]() Katja ha scritto:
Katja ha scritto:
Habe gerade die schöne Weste angefangen, aber finde in der Anleitung nicht, wie ich die Rückseite des Musters stricken muss?!
12.04.2016 - 17:34DROPS Design ha risposto:
Liebe Katja, es sind Hin-und Rückreihen dargestellt.
12.04.2016 - 19:16
|
|||||||||||||||||||||||||||||||
Misty vines |
|||||||||||||||||||||||||||||||
 |
 |
||||||||||||||||||||||||||||||
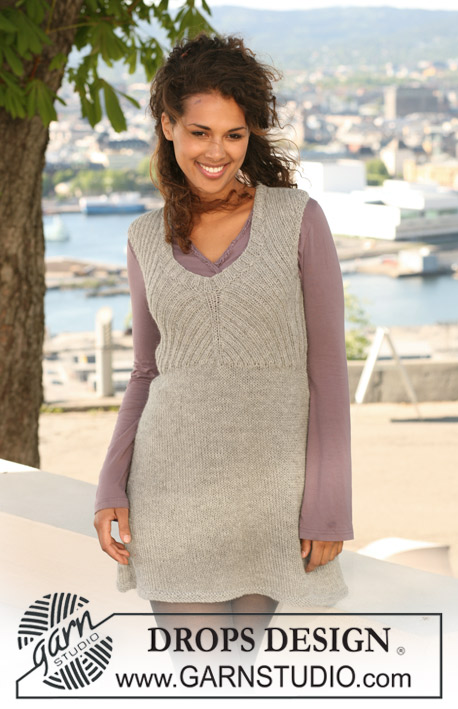
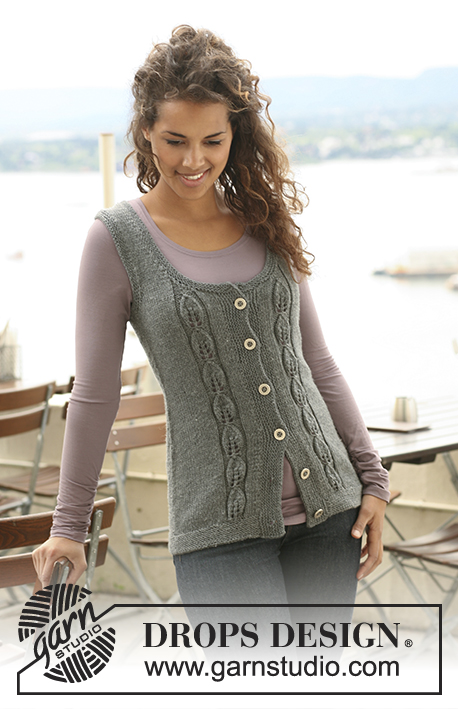
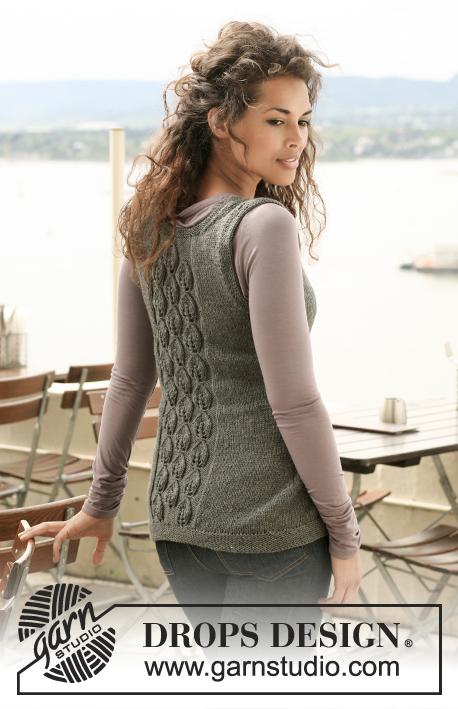
Gilet DROPS con motivi di foglie in "Karisma". Dal S al XXXL.
DROPS 125-2 |
|||||||||||||||||||||||||||||||
|
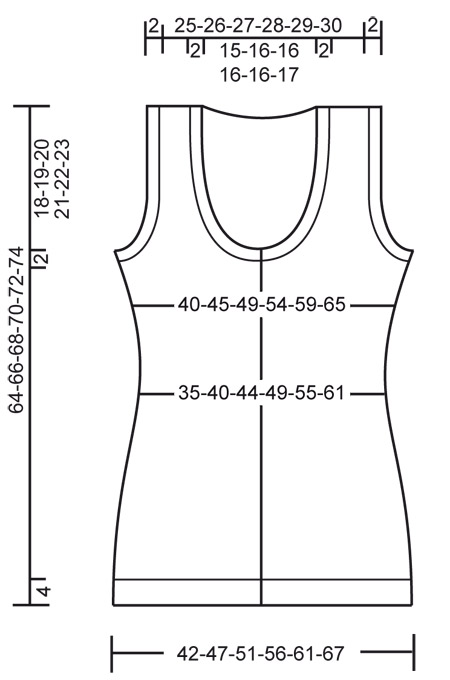
PUNTO LEGACCIO (avanti e indietro sul ferro): Lavorare tutti i ferri a diritto. PUNTO LEGACCIO (in tondo sul ferro circolare): 1 f dir, 1 f rov. CONSIGLI DIMINUZIONI (i lati del corpo (dietro&davanti)): Tutte le diminuzioni si fanno sul diritto. Cominciare 2 m prima del segno/filo e lavorare così: 2 m insieme a dir, passare 1 m a dir senza lavorarla, 1 m dir, accavallare la m passata sopra quella lavorata. CONSIGLI AUMENTI (i lati del corpo (dietro&davanti)): Tutte le diminuzioni si fanno sul diritto. Aumentare 1 m riprendendo la m dal giro precedente, lavorare questa m a dir. MOTIVO: Ved diag M.1 e M.2. I diag mostrano il motivo sul diritto e il 1° f del diagramma = diritto. -------------------------------------------------------- GILET: Si lavora avanti e indietro sul ferro circolare a partire dal centro davanti. CORPO (DIETRO&DAVANTI): Avviare 173-193-209-231-255-277 m con il ferro circolare 3,5 ed il filo Karisma. Lavorare a PUNTO LEGACCIO avanti e indietro sul f – ved spieg sopra. Quando il lavoro misura 4 cm continuare con il ferro circolare 4. Lasciare 2 segni/fili a 42-47-51-57-63-68 m da ogni lato = 89-99-107-117-129-141 m tra i segni per il dietro. Lavorare il f seguente sul diritto: 1 m vivagno al punto legaccio, 5-5-6-7-8-8 m maglia rasata, M.1 (= 9 m), 62-72-79-89-100-111 m maglia rasata, M.2A (= 19 m), 62-72-79-89-100-111 m maglia rasata, M.1 (= 9 m), 5-5-6-7-8-8 m maglia rasata e 1 m vivagno al punto legaccio. Continuare il motivo così – NOTA: Dopo 1 motivo di M.2A in altezza, continuare con M.2B, ripetere M.2B in totale 8-8-8-8-9-9 volte in altezza, lavorare poi M.2C 1 volta prima di continuare con maglia rasata rovescia (rov sul diritto e dir sul rovescio) sulle 19 m del M.2 fino alle diminuzioni per lo scollo dietro. Ripetere M.1 in totale 7 volte in altezza per tutte le taglie, poi continuare a maglia rasata rovescia (rov sul diritto e dir sul rovescio) sulle 9 m del M.1 fino alle diminuzioni dello scollo davanti. RICORDATI LA TENSIONE DELLA MAGLIA! ALLO STESSO TEMPO, quando il lavoro misura 5 cm, diminuire 1 m ad ogni lato dei 2 segni/fili (= 4 m diminuzioni) – VEDERE CONSIGLI DIMINUZIONI! Ripetere queste diminuzioni ogni 3-3-3,5-3,5-3,5-4 cm in totale 8-8-7-7-7-6 volte = 141-161-181-203-227-253 m. Quando il lavoro misura 31-32-31-31-32-31 cm, aumentare 1 m ad ogni lato dei 2 segni/fili (= 4 aumenti) – VEDERE CONSIGLI AUMENTI! Ripetere questi aumenti ogni 2-2-3-3-4-4,5 cm in totale 6-6-5-5-4-4 volte = 165-185-201-223-243-269 m. Quando il lavoro misura 44-45-46-47-48-49 cm, lavorare il f seguente così: lavorare 36-41-44-50-54-60 m come prima (= davanti), intrecciare 8-8-10-10-12-12 m per lo scalfo (= 4-4-5-5-6-6 m ad ogni lato del segno/filo), lavorare 77-87-93-103-111-125 m (= dietro), intrecciare 8-8-10-10-12-12 m per lo scalfo e lavorare le 36-41-44-50-54-60 m rimanenti come prima (= davanti). Terminare ogni parte separatamente. DIETRO: = 77-87-93-103-111-125 m. Continuare come prima a maglia rasata e M.2 sulle 19 m centrali, ALLO STESSO TEMPO, intrecciare per gli scalfi all’inizio di ogni ferro ad ogi lato così: 3 m 0-0-0-1-1-2 volte, 2 m 3-5-6-7-8-10 volte e 1 m 5-5-5-4-5-4 volte = 55-57-59-61-63-65 m (incl 1 m vivagno ad ogni lato). Continuare il motivo come prima. Quando il lavoro misura 61-63-64-66-68-69 cm, intrecciare le 31-33-27-29-29-31 m centrali per lo scollo e terminare ogni spalla separatamente. Intrecciare poi all’inizio di ogni ferro lato collo: 2 m 1-1-2-2-2-2 volte e 1 m 2-2-3-3-3-3 volte = rimangono 8-8-9-9-10-10 m per la spalla. Intrecciare quando il lavoro misura 64-66-68-70-72-74 cm. Ripetere lungo l’altra spalla. DAVANTI DESTRO: = 36-41-44-50-54-60 m. Continuare come prima a maglia rasata e M.1, ALLO STESSO TEMPO, intrecciare per lo scalfo all’inizio di ogni ferro al lato (= ogni ferro sul rovescio) come per il dietro. ALLO STESSO TEMPO, quando il lavoro misura 45 cm per tutte le taglie, intrecciare 6-6-7-8-9-9 m lato centro davanti, ciò vuol dire sul diritto per lo scollo. Intrecciare poi per lo scollo all’inizio di ogni fa partire dal mezzo davanti così: 2 m 3 volte e 1 m 3 volte, intrecciare poi all’inizio di ogni 2 ferri a partire dal centro davanti: 1 m 2-3-2-3-2-2 volte. Quando tutte le diminuzioni per gli scalfi e lo scollo sono state fatte, rimangono 8-8-9-9-10-10 m sul ferro. Continuare finché il davanti non misuri come il dietro, intrecciare senza stringere troppo. DAVANTI SINISTRO: Si lavora come il davanti destro, ma in senso inverso, questo vuol dire intrecciare per lo scalfo ogni ferro sul diritto (anziché sul rovescio) e intrecciare per lo scollo sul rovescio (non sul diritto). CONFEZIONE: Cucire le spalle. BORDO DELLE MANICHE: Riprendere sul diritto ca 84-106 m intorno allo scalfo (a 1 m vivagno) con il ferro circolare 3,5 ed il filo Karisma. Lavorare a PUNTO LEGACCIO in tondo sul ferro –ved spieg sopra. Quando il bordo misura ca 2 cm, intrecciare. Ripetere intorno all’altro scalfo. BORDO DESTRO: Riprendere sul diritto ca 86-102 m lungo il davanti destro (a 1 m vivagno) con il ferro circolare 3,5 e Karisma. Lavorare a punto legaccio avanti e indietro. Dopo 2,5 cm distribuire le 6 asole uniformemente – posizionare l’asola più in alto ca 1 cm dall’arrotondamento dello scollo e quella più i basso ca 2-3 cm dal bordo in basso. 1 ASOLA = intrecciare 1 m e riavviare 1 nuova sopra quella intrecciata al ferro seguente. Intrecciare quando il bordo misura 4 cm. BORDO SINISTRO: Si lavora come il bordo davanti destro, ma senza asole sul bordo sinistro. Attaccare i bottoni sul bordo davanti sinistro. BORDO DEL COLLO: Riprendere sul diritto ca 140 –170 m intorno al collo (anche sopra i bordi) con il ferro circolare 3,5 ed il filo Karisma. Lavorare a punto legaccio avanti e indietro sul ferro finché il collo non misuri ca 2 cm, e intrecciare. |
|||||||||||||||||||||||||||||||
Spiegazioni del diagramma |
|||||||||||||||||||||||||||||||
|
|||||||||||||||||||||||||||||||
 |
|||||||||||||||||||||||||||||||
 |
|||||||||||||||||||||||||||||||
Avete terminato questo modello?Allora taggate le vostre foto con #dropspattern o inviatele alla #dropsfan gallery. Avete bisogno di aiuto con questo modello?Troverete 20 video tutorial, una sezione per i commenti/domande e molto altro guardando il modello su www.garnstudio.com © 1982-2026 DROPS Design A/S. Ci riserviamo tutti i diritti. Questo documento, compreso tutte le sue sotto-sezioni, è protetto dalle leggi sul copyright. Potete leggere quello che potete fare con i nostri modelli alla fine di ogni modello sul nostro sito. |
|||||||||||||||||||||||||||||||


Con oltre 40 anni di esperienza nel design di modelli di maglia e uncinetto, DROPS Design offre la più estesa collezione di modelli gratuiti su internet - tradotti in 17 lingue. Ad oggi vi possiamo fornire 325 cataloghi e 12298 modelli - 9569 dei quali sono tradotti in Italiano.
Ci stiamo impegnando molto per darvi il meglio che vi possiamo offrire in termini di maglia e uncinetto, ispirazioni e consigli così come filati di grande qualità ad un prezzo incredibile! Volete utilizzare i nostri modelli per qualcosa d'altro oltre al vostro uso personale? Potete leggere tutto ciò che è consentito nel testo sul Copyright in basso su tutte le pagine dei nostri modelli. Buon lavoro!
Lasciare un commento sul modello DROPS 125-2
Noi saremmo felici di ricevere i tuoi commenti e opinioni su questo modello!
Se vuoi fare una domanda, fai per favore attenzione a selezionare la categoria corretta nella casella qui sotto per velocizzare il processo di risposta. I campi richiesti sono indicati da *.