
Categorie popolari
State cercando un filato?


Commenti / Domande (37)
![]() Labiche Odette ha scritto:
Labiche Odette ha scritto:
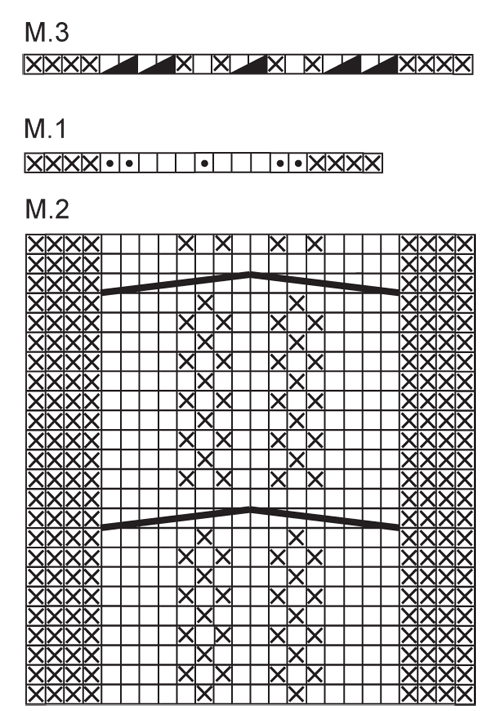
Bonjour, pourriez vous me dire si le diagramme n°2 je fais un rang endroit et un rang envers donc le total est de 22 rangs ? Pour la torsade je la fais avant le diagramme n°3 ou après ? En attendant votre réponse je vous souhaite une bonne journée.
17.09.2025 - 17:02DROPS Design ha risposto:
Bonjour Mme Labiche, vous tricotez dle diagramme M.2 en commençant sur l'envers (car M.1 se tricote sur l'endroit et ainsi les torsades de M.2 sont sur l'endroit) et vous répétez la totalité des rangs de M.2: sur l'endroit lisez de droite à gauche et sur l'envers, de gauche à droite; quand le diagramme est terminé en hauteur, reprenez-le au 1er rang. Quand vous aurez atteint la hauteur souhaitée, tricotez M.3. Bon tricot!
18.09.2025 - 18:12
![]() Diane Songer ha scritto:
Diane Songer ha scritto:
I don’t understand why with this headband, you only cast on 27 sets. Isn’t that too little?
19.11.2024 - 22:24DROPS Design ha risposto:
Dear Mrs Songer, if your tension is right you should get the correct finished measurements - note that you will increase on the first row in M.1 to compensate the number of stitches required for the cable. Happy knitting!
20.11.2024 - 08:13
![]() Gladys Freer ha scritto:
Gladys Freer ha scritto:
What is the yardage needed to make this head band? Thank you.
14.11.2022 - 21:39DROPS Design ha risposto:
Hi Gladys, The Drops yarn has approx. 82 yards per ball and you need 2 balls. Happy knitting!
15.11.2022 - 07:00
![]() Nicole Rivard ha scritto:
Nicole Rivard ha scritto:
Comment fait-on pour ajuster au 11 e ou 23e rang du M2? Et le M3, est-ce qu\'il se tricote quand on a finit au complet le diagramme M2? Merci
02.11.2021 - 16:53
![]() Marie ha scritto:
Marie ha scritto:
Danke für die schnelle Antwort !
09.10.2019 - 13:50
![]() Marie ha scritto:
Marie ha scritto:
Muß die 1. Reihe von M2 eine Rückreihe nach der Reihe M1 sein?
09.10.2019 - 10:48DROPS Design ha risposto:
Liebe Marie, ja genau, M.1 wird eine Hin-Reihe, so daß M.2 beginnt mit einer Rückreihe, so daß die Zöpfe bei Hinreihen gestrickt werden. Viel Spaß beim stricken!
09.10.2019 - 11:17
![]() Luisa ha scritto:
Luisa ha scritto:
Sorry one question how do I work the wrong side or it is on the diagrams for both sides wrong and right sides thanks much
25.08.2019 - 13:04DROPS Design ha risposto:
Dear Luisa, this pattern is worked flat, back and forth on needles. The diagram shows both right and wrong rows: start to read it from bottom right corner to left for right side rows and from left to right for wrong side rows. Happy knitting!
25.08.2019 - 15:32
![]() Tammy ha scritto:
Tammy ha scritto:
This ear warmer looks soooo cute. Is there a written pattern or only the chart? I’ve tried to do charts but I just haven’t been able to do them successfully.
18.11.2018 - 22:53DROPS Design ha risposto:
Dear Tammy, there are only diagrams to this pattern - 1 square in diagram = 1 row - both RS and WS rows are shown in diagram. Start M.1 from the right side reading from the right towards the left (= you increase 5 sts) then work M.2 starting on the bottom corner on the left sdie from WS towards the right - and work RS rows from the right towards the left. See diagram key to know how to work each stitch. Happy knitting!
19.11.2018 - 09:19
![]() Patty ha scritto:
Patty ha scritto:
I actually figured it out how to get 30 stitches. Please clarify which direction to read the different rows on the chart. Thanks much!
18.09.2018 - 19:14DROPS Design ha risposto:
Dear Patty, M.1 is worked from RS = from the right towards the left. M.2 is worked beginning from WS = start on the bottom corner on the left side and read WS rows from the left towards the right and the RS rows from the right towards the left. M.3 will be then worked from RS = from the right towards the left. Happy knitting!
19.09.2018 - 09:28
![]() Patty ha scritto:
Patty ha scritto:
I have read over this several times. After M1, I am not sure how you get 30 stitches?? the 3 garter stitches, M1 (19 stitches) and 3 garter stitches = 19 + 6 = 25. So after M1 I end up with 25 stitches. Please clarify. It seems like many people have had the same question. Thank you
18.09.2018 - 19:02DROPS Design ha risposto:
Hi Patty. It is correct that M.1 is worked across 19 stitches, but in 5 of those stitches you'll work 2 stitches in one = 5 stitches increased. So after M.1 is worked once, you'll have 30 stitches on the needle: 3 garter + 24 M.1 (including 5 increased) + 3 garter. Happy knitting.
01.10.2018 - 15:47
|
|||||||||||||||||||
Hot Line#hotlineheadband |
|||||||||||||||||||
|
|
|||||||||||||||||||
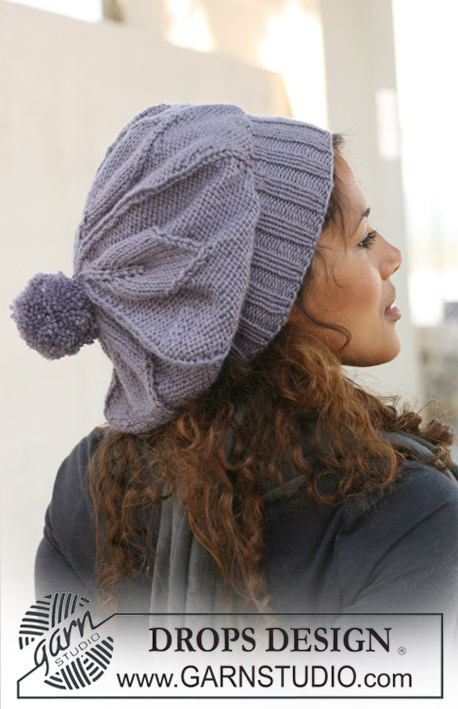
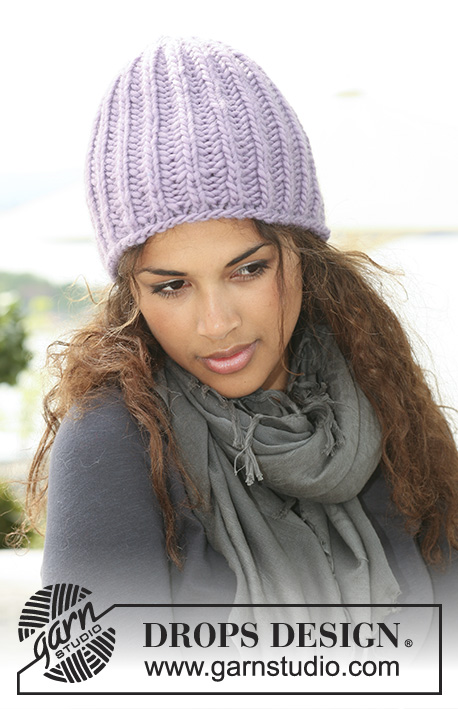
Fascia DROPS con treccia in ”Nepal”.
DROPS 126-24 |
|||||||||||||||||||
|
PUNTO LEGACCIO (avanti e indietro): Lavorare tutti i ferri a diritto. MOTIVO: Ved diag M.1, M.2 e M.3. Il diag mostra il motivo sul diritto. -------------------------------------------------------- FASCIA: Si lavora avanti e indietro sul f. Avviare 25 m con i ferri 4,5 e il filo Nepal e lavorare 2 ferri di PUNTO LEGACCIO – ved spieg sopra. Lavorare il ferro successivo sul diritto: 3 m punto legaccio, M.1 (= 19 m), 3 m punto legaccio. Dopo M.1 rimangono 30 m sul f. Lavorare, poi, M.2 con 3 m punto legaccio ad ogni lato fino a ca 52 a 57 cm di altezza totale – aggiustare dopo l’11° o 23° f di M.2. Lavorare poi M.3 con 3 m punto legaccio ad ogni lato = 25 m sul f. Lavorare 2 f di punto legaccio ed intrecciare tutte le m. Unire la fascia cucendo in mezzo dietro in modo da avere i 2 f di punto legaccio l’uno contro l’altro. |
|||||||||||||||||||
Spiegazioni del diagramma |
|||||||||||||||||||
|
|||||||||||||||||||
 |
|||||||||||||||||||
Avete terminato questo modello?Allora taggate le vostre foto con #dropspattern #hotlineheadband o inviatele alla #dropsfan gallery. Avete bisogno di aiuto con questo modello?Troverete 11 video tutorial, una sezione per i commenti/domande e molto altro guardando il modello su www.garnstudio.com © 1982-2026 DROPS Design A/S. Ci riserviamo tutti i diritti. Questo documento, compreso tutte le sue sotto-sezioni, è protetto dalle leggi sul copyright. Potete leggere quello che potete fare con i nostri modelli alla fine di ogni modello sul nostro sito. |
|||||||||||||||||||


Con oltre 40 anni di esperienza nel design di modelli di maglia e uncinetto, DROPS Design offre la più estesa collezione di modelli gratuiti su internet - tradotti in 17 lingue. Ad oggi vi possiamo fornire 324 cataloghi e 12290 modelli - 9561 dei quali sono tradotti in Italiano.
Ci stiamo impegnando molto per darvi il meglio che vi possiamo offrire in termini di maglia e uncinetto, ispirazioni e consigli così come filati di grande qualità ad un prezzo incredibile! Volete utilizzare i nostri modelli per qualcosa d'altro oltre al vostro uso personale? Potete leggere tutto ciò che è consentito nel testo sul Copyright in basso su tutte le pagine dei nostri modelli. Buon lavoro!
Lasciare un commento sul modello DROPS 126-24
Noi saremmo felici di ricevere i tuoi commenti e opinioni su questo modello!
Se vuoi fare una domanda, fai per favore attenzione a selezionare la categoria corretta nella casella qui sotto per velocizzare il processo di risposta. I campi richiesti sono indicati da *.