
Categorie popolari
State cercando un filato?


Commenti / Domande (47)
Cheryl ha scritto:
Hi thank you do i increase and how many sts? and how many times do i repeat?
24.04.2012 - 03:45DROPS Design ha risposto:
You inc 1 st each time. When inc not is specified you can chose preferred method (like M1 (make 1) or increase in front and back). Inc til you have the number of sts given in pattern.
25.04.2012 - 00:08Cheryl ha scritto:
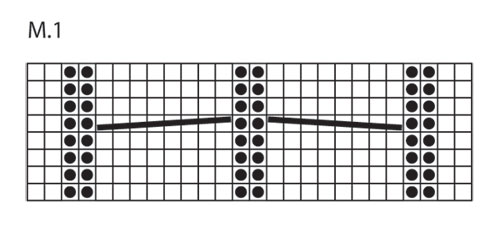
. I do not understand this paragrath can you help meAT THE SAME TIME as beg M.1 also work shortened rows on the garter sts each side. Work back and forth 1 time on the garter sts at beg of every row from RS. And work back and forth 1 time on the garter sts at beg of every other row from WS (these rows each side are additional and not included with respect to the inc).
20.04.2012 - 05:48DROPS Design ha risposto:
You work short rows each side over 4 K sts and M.1 on rem sts when working over all sts like this, starting from RS: *K4 turn K4, turn and from RS work all sts on row, turn and from WS work all sts on row, K4 turn K4, turn and from RS work all sts on row, turn K4 turn K4, turn and from WS work all sts on row, turn* - repeat *-*.
23.04.2012 - 19:56Cheryl Ford ha scritto:
Hi i like the scraf is it cable? if it is cable how many row inbetween cable
03.04.2012 - 06:29DROPS Design ha risposto:
Yes, it's cables on the scarf. There is a chart below, showing the cables are done on every 8th row.
10.04.2012 - 00:07
![]() DROPS Design NL ha scritto:
DROPS Design NL ha scritto:
U zegt, aan het einde, maar waar u precies bedoelt is niet duidelijk. In de regel breit u door in de stekensoort totdat aangegeven staat dat u iets anders moet doen. Dus als u in ribbelst breit, gaat u daarmee verder tot er bijv staat dat u verder moet gaan in tricotst. In het hele patroon staat of vermeld hoeveel centimeter u moet breien of hoeveel naalden u moet breien (bijvoorbeeld, meerder 4 keer elke 6e nld, dan breit u dus tot de meerderingen klaar zijn.)
24.01.2012 - 16:27
![]() Carla ha scritto:
Carla ha scritto:
Hallo, dit weekend enthousiast begonnen maar vast gelopen. Mijn vraag is: aan het eind is mij niet duidelijk in wat voor steek ik verder moet breien en hoeveel centimeter er dan nog gebreid moet worden. Er zit ook geen schema bij van de sjaal. Kan iemand mij helpen!!!!
23.01.2012 - 13:58
![]() Aase ha scritto:
Aase ha scritto:
I den danske opskrift er forklaringen til sort prik i diagrammet forkert. Skal være lige som den norske udgave. hilsen Aase
02.10.2010 - 23:09
![]() Jytte ha scritto:
Jytte ha scritto:
Fejl i diagram oversættelsen... I sidste linie skal der stå ... 4 m. på hj pinden BAG arb....
06.09.2010 - 10:41
![]() Brigitte ha scritto:
Brigitte ha scritto:
Habe es gestrickt, suprer. wer wills noch haben? ich stricke es für sie
05.09.2010 - 14:13
![]() Merja ha scritto:
Merja ha scritto:
Heti kun ohje tulee niin tämän teen
03.08.2010 - 18:07
![]() Lucia ha scritto:
Lucia ha scritto:
Esta muy lindo podrian traducirlo al español Cariños lucia
18.07.2010 - 01:43
|
|||||||||||||
DROPS 125-19 |
|||||||||||||
|
|
|||||||||||||
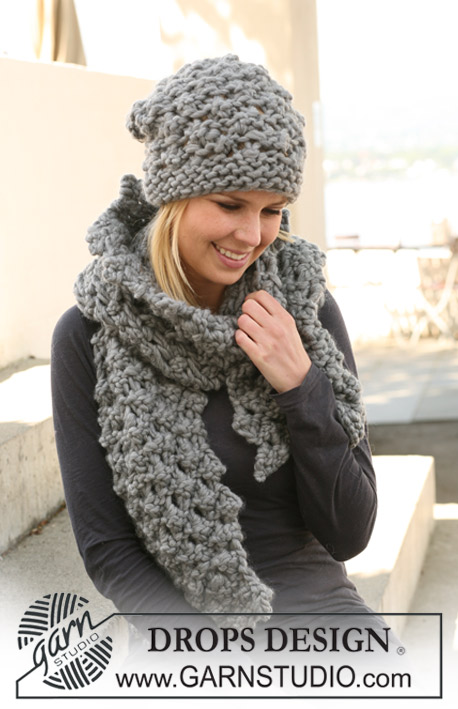
Sciarpa DROPS con trecce in "Snow".
DROPS 125-19 |
|||||||||||||
|
MOTIVO: Ved diag M.1. Il diag mostra il motivo sul diritto. RILLE (avanti e indietro): Lavorare tutti i ferri a diritto. -------------------------------------------------------- SCIARPA: Avviare 26 m con il f 8 e il filo Snow. Lavorare a PUNTO LEGACCIO - ved spieg sopra - avanti e indietro per ca 12 cm. Continuare con il f 7 in punto coste così (sul diritto): 2 m Legaccio, * 2 m dir, 2 m rov *, ripetere da *-* e terminare con 2 m dir e 2 m legaccio. Continuare così finché le coste misurano ca 15 cm. Riprendere i ferri 8. Lavorare il f seguente sul diritto così: 1 m punto legaccio, 1 gett, 1 m punto legaccio, 1 gett, 2 m dir, 2 m rov, 2 m dir, 1 gett, 2 m dir, 1 gett, 2 m dir, 2 m rov, 2 m dir, 1 gett, 2 m dir, 1 gett, 2 m dir, 2 m rov, 2 m dir, 1 gett, 1 m punto legaccio, 1 gett e 1 m punto legaccio = 34 m. Lavorare il ferro seguente sul rovescio così: 4 m punto legaccio, 2 m rov, 2 m dir, 8 m rov, 2 m dir, 8 m rov, 2 m dir, 2 m rov, 4 m punto legaccio. NOTA! Lavorare i gett ritorti al ferro seguente per evitare un buco. LEGGERE ATTENTAMENTE TUTTO IL PARAGRAFO PRIMA DI CONTINUARE! Lasciare 1 segno/filo a 4 m da ogni lato e continuare seguendo M.1 tra i segni/fili in punto legaccio ad ogni lato. ALLO STESSO TEMPO, aumentare i punto legaccio ad ogni lato così (sul diritto): aumentare 1 m prima del 1° segno/filo ogni 4 f e 1 m dopo il 2° segno/filo ogni 8 f. Continuare così finché non rimangano 17 m prima del 1° segno/filo e 10 m dopo il 2° segno/filo (= in totale 53 m). ALLO STESSO TEMPO, dal momento in cui si comincia a lavorare M.1, lavorare anche ferri accorciati sui punti legaccio ad ogni lato. Lavorare 1 volta avanti e indietro sui punti legaccio all’inizio di tutti i ferri sul diritto. E lavorare 1 volta avanti e indietro soltanto sui punti legaccio all’inizio del ferro ogni 2 ferri sul rovescio (questi ferri ad ogni lato sono supplementari e non compresi negli aumenti). Quando tutti gli aumenti sono fatti, lavorare 1 f sul rovescio come si presentano le m (dir sopra dir e rov sopra rov). Lavorare poi 1 f diritto sul diritto su tutte le m, ALLO STESSO TEMPO, diminuire 2 m sopra ogni treccia (= diminuire in totale 4 m) = 49 m. Lavorare 1 f dir sul rovescio su tutte le maglie. Intrecciare 17 m punto legaccio (= collo) all’inizio del f, lavorare le m rimanenti sul f = 32 m. Lavorare i punti legaccio sulle m rimanenti con ferri accorciati così (1° f = sul rovescio): Lavorare finché rimangono 3 m sul f, girare il lavoro, stringere il filo e lavorare il f seguente. Continuare così finché rimangono 6 m sul f, girare il lavoro, stringere il filo e lavorare il f seguente. Continuare così con 3 m in più prima di girare il lavoro ogni volta finché si lavora avanti e indietro su 2 m. Lavorare poi q avanti e indietro su tutte le m e intrecciare. Lavorare un 2° pezzo nella stessa maniera, ma in senso inverso. CONFEZIONE: Unire in mezzo dietro con una cucitura, bordo contro bordo nelle m più esterne della maglia per evitare una cucitura troppo spessa. Riprendere 26 m con il f 7 e il filo Snow dietro le coste dal lato destro. Lavorare così: 2 m punto legaccio, * 2 m dir, 2 m rov *, ripetere da *-* e terminare con 2 m dir e 2 m punto legaccio. Continuare così finché le coste misurano ca 15 cm (aggiustare sui lati del davanti). Intrecciare con il dir sopra il dir e il rov sopra rov. Cucire le coste al dietro della sciarpa. |
|||||||||||||
Spiegazioni del diagramma |
|||||||||||||
|
|||||||||||||
 |
|||||||||||||
Avete terminato questo modello?Allora taggate le vostre foto con #dropspattern o inviatele alla #dropsfan gallery. Avete bisogno di aiuto con questo modello?Troverete 14 video tutorial, una sezione per i commenti/domande e molto altro guardando il modello su www.garnstudio.com © 1982-2026 DROPS Design A/S. Ci riserviamo tutti i diritti. Questo documento, compreso tutte le sue sotto-sezioni, è protetto dalle leggi sul copyright. Potete leggere quello che potete fare con i nostri modelli alla fine di ogni modello sul nostro sito. |
|||||||||||||


Con oltre 40 anni di esperienza nel design di modelli di maglia e uncinetto, DROPS Design offre la più estesa collezione di modelli gratuiti su internet - tradotti in 17 lingue. Ad oggi vi possiamo fornire 324 cataloghi e 12290 modelli - 9561 dei quali sono tradotti in Italiano.
Ci stiamo impegnando molto per darvi il meglio che vi possiamo offrire in termini di maglia e uncinetto, ispirazioni e consigli così come filati di grande qualità ad un prezzo incredibile! Volete utilizzare i nostri modelli per qualcosa d'altro oltre al vostro uso personale? Potete leggere tutto ciò che è consentito nel testo sul Copyright in basso su tutte le pagine dei nostri modelli. Buon lavoro!
Lasciare un commento sul modello DROPS 125-19
Noi saremmo felici di ricevere i tuoi commenti e opinioni su questo modello!
Se vuoi fare una domanda, fai per favore attenzione a selezionare la categoria corretta nella casella qui sotto per velocizzare il processo di risposta. I campi richiesti sono indicati da *.