
Categorie popolari
State cercando un filato?

































Commenti / Domande (41)
 Carol ha scritto:
I dont understand rows 11/12 after the cable row I am ending up with too may stitches on my needle for the following row, I must be reading it wrong for the YO's ? could you explain where i could be going wrong. I am usually able to work out cables but am getting very frustrated. Thank you.
18.10.2026 - 08:35DROPS Design ha risposto:
Dear Carol, in the 11th row you start with 2 purl stitches, 1 yarn over, 2 purl stitches 1 yarn over (the yarn overs are worked twisted in the next row). Then you work the first cable: slip 4 sts on cable needle in front of piece, 1 YO, P3, 1 YO, K4 tog into back of loop from cable needle. You increase 2 stitches (2 yarn overs) but decrease 3 (k4tog) so the net result is -1 stitch. In the 2nd cable you work the reflection: slip 3 sts on cable needle behind piece, K4 tog, 1 YO, P3 from cable needle, 1 YO . Again you have 2 yarn overs (+2sts) but k4tog (-3 sts), so you decrease 1 stitch overall in this cable. Then you work the purl section: purl 1, yarn over, purl 2, yarn over, purl 1. So in the purl sections you have increased 2 sts in each, but in the cable sections you have decreased 1 stitch per cable; in total, you will have 2 increases on each M.1 repeat of this row. That is, for each repeat of M.1 you should have 24 stitches; multiply it according to the number of times you work M.1 in your size to get the number of stitches. Happy knitting!
18.10.2026 - 20:58
EVT ha scritto:
My question got cut off. Trying again. I don't understand the M1. Row 11 says P1, 1 YO, K YO into back of loop on next row. But next row says P everything (I am knitting in circles). How should it be? Should there be a hole left? Should I purl or knit?
26.09.2026 - 09:57DROPS Design ha risposto:
Dear EVT, you knit the yarn over into the back loop, so it's twisted and there is no hole left. In the next row you don't purl everything; the stitches where the increases where worked are knitted from the wrong side, so you knit these stitches, including the yarn overs. Remember that the symbols have different meanings when worked on right side rows and wrong side rows. Happy knitting!
28.09.2026 - 00:28
 EVT ha scritto:
I don't understand the M1. Row 11 says P1, 1 YO, --> K YO into back of loop on next row
25.09.2026 - 15:56DROPS Design ha risposto:
Dear EVT, that's correct. In this symbol, you work 1 purl stitch and 1 yarn over. Then, on the next row, when working over the yarn over, it will be knitted twisted, or into the back loop. Happy knitting!
27.09.2026 - 23:26
 Marion ha scritto:
Ist bei dem Diagramm nur die Hinreihe gezeichnet und zurück wie die Maschen erscheinen, oder muss die Rückreihe auch nach Diagramm gearbeitet werden? Danke im voraus
10.08.2026 - 10:34DROPS Design ha risposto:
Liebe Marion, bei den Hinreihen liest man rechts nach links und bei Rückreihen liest man links nach rechts - siehe Zeichenerklärung um zu wissen, wie die Maschen bei den Hin- (auf der Vorderseite) und bei den Rückreihen (auf der Rückseite) gestrickt werden. Viel Spaß beim Stricken!
10.08.2026 - 16:23
Susanne ha scritto:
Ich würde gerne wissen, warum nach dem Bündchen Maschen abgenommen werden?
07.02.2026 - 09:20DROPS Design ha risposto:
Liebe Susanne, das wird für die Passform gemacht, das Bündchen soll nicht zu eng werden. Viel Spaß beim Stricken!
08.02.2026 - 08:38
Lynette ha scritto:
Thanks for getting back.Im sorry my real problem is the first symbol on graph the 4 sts slipped I've tried it's the yarn front and back I dont get .does yarn come back to front after slipping sts leaving loop in front .does this stitch have a name . beautiful cardigan love to finish it .had visions of making 2nd one for a gift .
24.04.2023 - 23:30DROPS Design ha risposto:
Dear Lynette, on the 7th symbol, work as follows from wrong side: place yarn towards you (towards wrong side of piece), slip the next 4 stitches as if to purl (without working them ), place the yarn away from you and knit the next stitches as shown in diagram. Happy knitting!
25.04.2023 - 08:45
 Lynette ha scritto:
Pattern graph 4 sts as to purl yarn behind, the jumper version is different do you have visual explanation as to do this
23.04.2023 - 00:03DROPS Design ha risposto:
Dear Lynette, this symbol is different because it's worked on a wrong side row on the jacket (and since jumper is worked in the round, this is worked on a right side row on jumper). Happy knitting!
24.04.2023 - 10:47
Pat ha scritto:
For the mid elevation do you start knitting from the marker to the end and then turn Do you have to do the elevation ?
24.02.2023 - 20:23DROPS Design ha risposto:
Dear Pat, if you don't want to work an elevation, you can skip it and go to NECKLINE directly. Happy knitting!
26.02.2023 - 22:50
Pat ha scritto:
If the diagram shows right side stitches only, what stitches do you do on the wrong side
16.02.2023 - 13:55DROPS Design ha risposto:
Dear Pat, the diagrams shows all the rows, seen from RS, this means read them from the bottom corner on the right side towards the left from RS and from the left towards the right from WS - and see symbols to know if you have to K or P the stitches from WS. Happy knitting!
16.02.2023 - 14:02
Lynette Bailey ha scritto:
How can I purl wrong side circular needle ,back to start right side pattern 121/29 first row.
18.09.2022 - 08:53DROPS Design ha risposto:
Dear Mrs Bailey, from wrong side read the diagram left towards the right and work as explained by the symbols: x = knit from wrong side, white = purl from wrong side. Happy knitting!
19.09.2022 - 11:43
|
||||||||||||||||||||||||||||||||||||||||
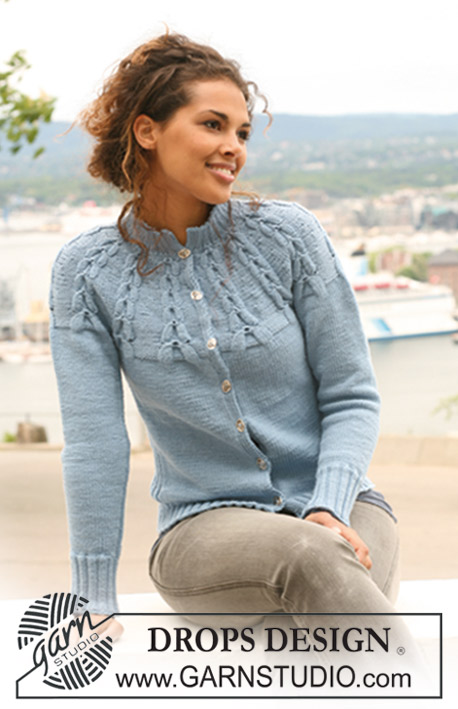
Ice Storm Cardigan#icestormcardigan |
||||||||||||||||||||||||||||||||||||||||
|
|
||||||||||||||||||||||||||||||||||||||||
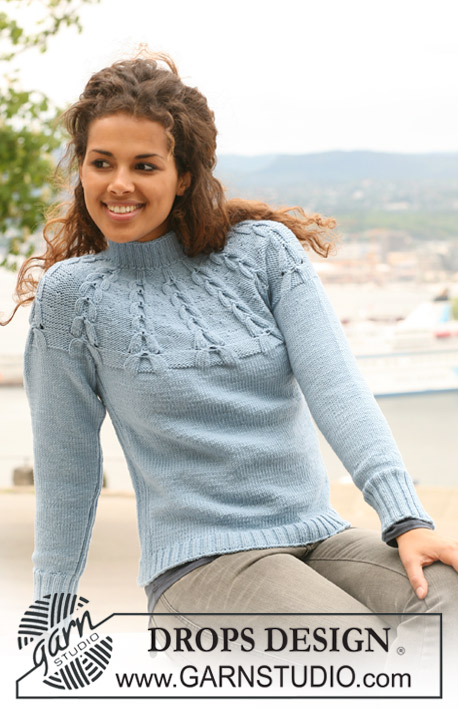
Cardigan DROPS lavorato ai ferri con maniche a raglan e trecce in ”Karisma”. Taglie: S - XXXL.
DROPS 121-29 |
||||||||||||||||||||||||||||||||||||||||
|
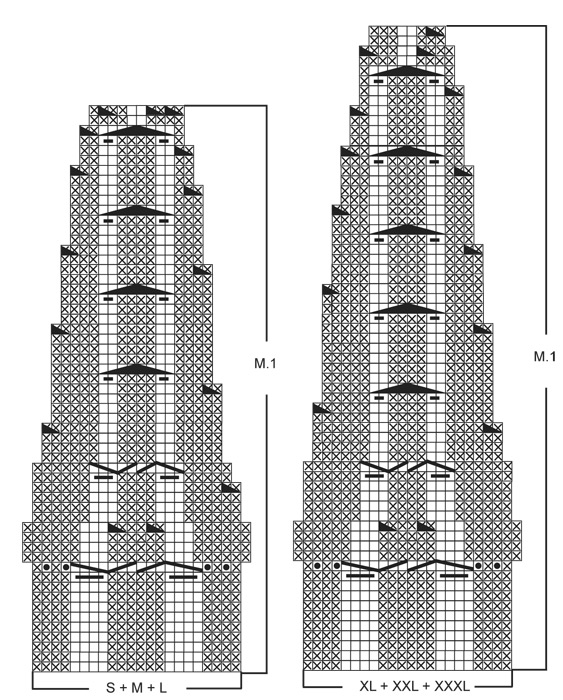
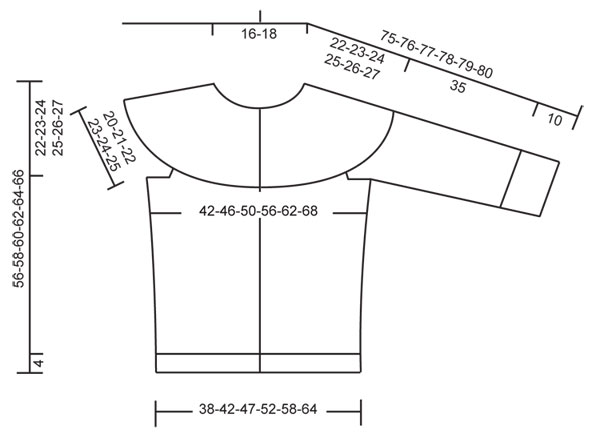
M LEGACCIO (avanti e indietro sui f): Lavorare tutti i f a dir. SUGGERIMENTO PER GLI AUMENTI: Aumentare a ogni lato della sezione a coste a ogni lato sul corpo e al centro sotto la manica. Fare tutti gli aumenti dal diritto del lavoro! Aumentare 1 m riprendendo la m dal f precedente e lavorarla a dir. MOTIVO: Vedere il diagramma M.1 – vedere il diagramma per la vostra taglia. Il diagramma mostra il motivo dal diritto del lavoro e il 1° f del diagramma = diritto del lavoro. ASOLE: Fare le asole sul bordo davanti destro. 1 asola = fare 1 gettato dopo la 4° m dal bordo e poi lavorare insieme a dir la 5° e la 6° m. Fare le asole quando il lavoro misura: TAGLIA S: 4, 12, 20, 28, 36, 45 e 54 cm TAGLIA M: 4, 13, 21, 30, 38, 47 e 56 cm TAGLIA L: 4, 13, 22, 31, 40, 49 e 58 cm TAGLIA XL: 5, 13, 21, 29, 37, 45, 53 e 61 cm TAGLIA XXL: 5, 13, 22, 30, 39, 47, 55 e 63 cm TAGLIA XXXL: 5, 14, 23, 32, 41, 49, 57 e 65 cm -------------------------------------------------------- CARDIGAN: Lavorato avanti e indietro sui f circolari dal centro davanti. CORPO: Avviare 212-228-260-288-320-352 m (comprese 7 m per il bordo a ogni lato verso il bordo davanti) con i f circolari n° 3,5 mm con Karisma. Lavorare 1 f rov dal rovescio del lavoro, poi continuare a coste come segue dal diritto del lavoro: 1 m a M LEGACCIO - leggere sopra, 1 m dir, 1 m rov, 1 m dir, 1 m rov, 1 m dir, 1 m rov, * 2 m dir, 2 m rov *, ripetere *-* fino a quando rimangono 9 m, finire con 2 m dir, 1 m rov, 1 m dir, 1 m rov, 1 m dir, 1 rov, 1 m dir e 1 m a M LEGACCIO. Continuare in questo modo fino a quando il lavoro misura 4 cm. Ora inserire 2 segnapunti nel lavoro, all'interno di 56-60-68-76-84-92 m da ogni lato. Passare ai f circolari n° 4 mm e continuare a m rasata con 7 m per il bordo davanti a ogni lato come prima (= 1 m a m legaccio, 1 m dir, 1 m rov, 1 m dir, 1 m rov, 1 m dir e 1 m rov viste dal diritto del lavoro) e le 14 m centrali a ogni lato (cioè 7 m a ogni lato del segnapunti) a coste (= 2 m rov, 2 m dir, 2 m rov, 2 m dir, 2 m rov, 2 m dir e 2 m rov). ALLO STESSO TEMPO sul 1° f a m rasata distribuire 9-9-12-14-16-18 diminuzioni in modo uniforme su ogni davanti e 20-20-26-26-30-34 sul dietro – NOTA: non diminuire sui bordi davanti e sulle 14 m a coste a ogni lato = 174-190-210-234-258-282 m. FARE ATTENZIONE ALLA TENSIONE DEL LAVORO E RICORDARSI DELLE ASOLE SUL BORDO DAVANTI DESTRO! Quando il lavoro misura 8 cm aumentare 1 m a ogni lato delle 14 m a coste a ogni lato – leggere il SUGGERIMENTO PER GLI AUMENTI! Ripetere gli aumenti ogni 7 cm per un totale di 4 volte = 190-206-226-250-274-298 m. Quando il lavoro misura 34-35-36-37-38-39 cm lavorare il f successivo come segue dal diritto del lavoro: lavorare 44-48-53-59-65-71 m (= davanti destro), intrecciare le 14 m a coste (quindi 7 m a ogni lato del segnapunti), lavorare 74-82-92-104-116-128 m (= dietro), intrecciare le 14 m a coste (cioè 7 m a ogni lato del segnapunti) e lavorare le 44-48-53-59-65-71 m rimaste (= davanti sinistro). Mettere il lavoro da parte e lavorare le maniche. MANICA: Avviare 56-56-60-60-64-64 m con i f a doppia punta n° 3,5 mm con Karisma. Lavorare 1 giro dir, poi lavorare a coste, 2 m dir/2 m rov. Quando le coste misurano 10 cm passare ai f a doppia punta n° 4 mm. Lavorare il giro successivo come segue: 2 m dir, 2 m rov, 2 m dir, 2 m rov, poi lavorare a m rasata fino a quando rimangono 6 m sul giro, ALLO STESSO TEMPO distribuire 6-4-6-6-8-8 diminuzioni in modo uniforme su queste m a m rasata, finire con 2 m rov, 2 m dir e 2 m rov = 50-52-54-54-56-56 m. Continuare in questo modo a m rasata e 14 m a coste al centro sotto la manica. Quando il lavoro misura 13-12-11-12-11-14 cm aumentare 2 m al centro sotto la manica (cioè 1 m a ogni lato della sezione a coste) – leggere il SUGGERIMENTO PER GLI AUMENTI! Ripetere gli aumenti ogni 2,5-2,5-2,5-2-2-1,5 cm per un totale di 12-13-14-16-17-19 volte = 74-78-82-86-90-94 m. Quando il lavoro misura 45 cm per tutte le taglie intrecciare le 14 m a coste al centro sotto la manica = 60-64-68-72-76-80 m. Mettere il lavoro da parte e lavorare l'altra manica. SPRONE: Trasferire le maniche sullo stesso f circolare del corpo dove sono state intrecciate le m per lo scalfo = 282-306-334-366-398-430 m. Lavorare 2-3-4-2-3-4 cm a m rasata (con i bordi davanti come prima). ALLO STESSO TEMPO dopo 1 cm a m rasata distribuire 4-6-6-0-5-10 diminuzioni in modo uniforme – non diminuire sui bordi davanti. Ripetere le diminuzioni nelle taglie L + XXL + XXXL dopo altri 1-1-2 cm a m rasata = 278-300-322-366-388-410 m. Lavorare il f successivo come segue dal diritto del lavoro: 7 m per il bordo davanti come prima, lavorare M.1 (= 22 m – vedere il diagramma per la vostra taglia) per un totale di 12-13-14-16-17-18 volte e finire con 7 m per il bordo davanti come prima. Continuare il motivo in questo modo e ALLO STESSO TEMPO diminuire come indicato nel diagramma. Alla fine di M.1 ci sono 98-105-112-126-133-140 m rimaste sul f. ALZATA AL CENTRO DIETRO: Inserire un segnapunti al centro sul f (nelle TAGLIE S + L + XL + XXXL tra le 2 m centrali e nelle TAGLIE M + XXL nella m centrale sul f = centro dietro). Iniziare dal rovescio del lavoro all'altezza del segnapunti e lavorare dir su dir e rov su rov fino a quando rimangono 18 m sul f (cioè fermarsi appena prima delle 2 m rov visto dal rovescio del lavoro), girare il lavoro, passare la 1° m, tirare il filo e lavorare il f fino a quando rimangono 19 m sul f (cioè fermarsi appena prima delle 2 m dir visto dal diritto del lavoro). Girare il lavoro, passare la 1° m, tirare il filo e lavorare il f fino a quando rimangono 25-25-25-32-32-32 m (cioè fermarsi appena prima delle 2 m rov visto dal rovescio del lavoro), girare il lavoro, passare la 1° m, tirare il filo e lavorare il f fino a quando rimangono 26-26-26-33-33-33 m (cioè fermarsi appena prima delle 2 m dir visto dal diritto del lavoro). Girare il lavoro, passare la 1° m, tirare il filo e lavorare il f fino a quando rimangono 32-32-32-46-46-46 m (cioè fermarsi appena prima delle 2 m rov visto dal rovescio del lavoro), girare il lavoro, passare la 1° m, tirare il filo e lavorare il f fino a quando rimangono 33-33-33-47-47-47 m (cioè fermarsi appena prima delle 2 m dir visto dal diritto del lavoro). Girare il lavoro, passare la 1° m, tirare il filo e lavorare il f fino a quando rimangono 39-39-39-52-52-52 m (cioè fermarsi appena prima delle 2 m rov visto dal rovescio del lavoro), girare il lavoro, passare la 1° m, tirare il filo e lavorare il f fino a quando rimangono 40-40-40-53-53-53 m (cioè fermarsi appena prima delle 2 m dir visto dal diritto del lavoro). TAGLIE S + M + L finire qui, tagliare il filo. TAGLIE XL + XXL + XXXL: Girare il lavoro, passare la 1° m, tirare il filo e lavorare il f fino a quando rimangono 59 m sul f (cioè fermarsi appena prima delle 2 m rov visto dal rovescio del lavoro), girare il lavoro, passare la 1° m, tirare il filo e lavorare il f fino a quando rimangono 60 m sul f (cioè fermarsi appena prima delle 2 m dir visto dal diritto del lavoro, tagliare il filo. SCOLLATURA: Passare ai f a doppia punta n° 3,5 mm. Iniziare dal diritto del lavoro e lavorare 2 f dir su tutte le m (lavorare i bordi davanti come prima), ALLO STESSO TEMPO sull’ultimo f distribuire 11-10-9-4-3-2 aumenti in modo uniforme = 109-115-121-130-136-142 m. Continuare a coste come segue dal diritto del lavoro: 7 m per il bordo come prima, * 2 m dir/1 m rov*, ripetere *-* fino a quando rimangono 9 m, finire con 2 m dir e 7 m per il bordo davanti come prima. Continuare in questo modo fino a quando la scollatura misura 4-5 cm. Intrecciare con dir su dir e rov su rov. CONFEZIONE: Cucire le aperture sotto le maniche. Attaccare i bottoni. |
||||||||||||||||||||||||||||||||||||||||
Spiegazioni del diagramma |
||||||||||||||||||||||||||||||||||||||||
|
||||||||||||||||||||||||||||||||||||||||
 |
||||||||||||||||||||||||||||||||||||||||
 |
||||||||||||||||||||||||||||||||||||||||
Avete terminato questo modello?Allora taggate le vostre foto con #dropspattern #icestormcardigan o inviatele alla #dropsfan gallery. Avete bisogno di aiuto con questo modello?Troverete 14 video tutorial, una sezione per i commenti/domande e molto altro guardando il modello su www.garnstudio.com © 1982-2026 DROPS Design A/S. Ci riserviamo tutti i diritti. Questo documento, compreso tutte le sue sotto-sezioni, è protetto dalle leggi sul copyright. Potete leggere quello che potete fare con i nostri modelli alla fine di ogni modello sul nostro sito. |
||||||||||||||||||||||||||||||||||||||||






Con oltre 40 anni di esperienza nel design di modelli di maglia e uncinetto, DROPS Design offre la più estesa collezione di modelli gratuiti su internet - tradotti in 17 lingue. Ad oggi vi possiamo fornire 333 cataloghi e 12525 modelli - 9799 dei quali sono tradotti in Italiano.
Ci stiamo impegnando molto per darvi il meglio che vi possiamo offrire in termini di maglia e uncinetto, ispirazioni e consigli così come filati di grande qualità ad un prezzo incredibile! Volete utilizzare i nostri modelli per qualcosa d'altro oltre al vostro uso personale? Potete leggere tutto ciò che è consentito nel testo sul Copyright in basso su tutte le pagine dei nostri modelli. Buon lavoro!
Lasciare un commento sul modello DROPS 121-29
Noi saremmo felici di ricevere i tuoi commenti e opinioni su questo modello!
Se vuoi fare una domanda, fai per favore attenzione a selezionare la categoria corretta nella casella qui sotto per velocizzare il processo di risposta. I campi richiesti sono indicati da *.