
Categorie popolari
State cercando un filato?


Commenti / Domande (53)
Annie82 ha scritto:
Aaaaaa.... now I am enlightened! :-D Thanks a lot! One just have to read a little more carefully. Happy knitting for everyone!
31.10.2017 - 11:53Annie ha scritto:
Dear DROPS Design, as a beginner I chose this sweater to knit, but know I don't really understand how to knit the armpit. The L size instructions sais, that I should decrease from 64 sts to 52 sts (which means 12 sts) by casting off 2 sts 2 times and 1 st 2 times- but that's just 6 sts. Do I have to repeat this patter of castin off (2stsX2 + 1 stsX2)? I just doesn't add up in my head. Thank you for your kind answer. Best regards, Annie
31.10.2017 - 08:12DROPS Design ha risposto:
Dear Annie, you will have to bind off the stitches for armhole at the beginning of each row (both from RS and WS), ie you will bind off on each side 2 sts 2 times and 1 st 2 times = 6 sts dec on each side x 2 sides = 12 sts decreased = 52 sts remain. Happy knitting!
31.10.2017 - 09:52Brigitte Beaney ha scritto:
Thank you so much for getting back to me. But now I'm just wondering how many rows to do for the neck to get the fold seen in the picture?
05.08.2016 - 05:58DROPS Design ha risposto:
Dear Mrs Beany, number of rows to neck will depend on your tension in height. Cast off sts in M.1 when neck measures 24-26 cm from pick up sts. You can also try on the jumper to check measurements on you before casting off. Happy knitting!
05.08.2016 - 09:53Brigitte Beaney ha scritto:
Hi, I am currently knitting this sweater but am struggling to understand decrease: "Continue in pattern as before AT THE SAME TIME bind off for armhole at the beg of every row each side: 2 sts 1-2-2-4-5-7 times and 1 st 1-2-2-1-2-1 times = 46-46-52-52-55-55 sts." This is my first jumper, because I feel to get down to the required 46 stitches I think I should follow the second decrease instructions but am then clueless about what to do with the first set? Please help.
03.08.2016 - 01:45DROPS Design ha risposto:
Dear Mrs Beaney, in 2nd size you will bind off at the beg of every row (= both from RS and from WS): 2 sts 2 times and 1 st 2 times (= 6 sts bound off on each side for armholes). Happy knitting!
03.08.2016 - 09:38
![]() Tara Caldwell ha scritto:
Tara Caldwell ha scritto:
Forgive me, I understand the pattern. No need to reply.
06.02.2016 - 06:04
![]() Tara Caldwell ha scritto:
Tara Caldwell ha scritto:
I am knitting the woman's sweater number 125-10. I see the photo of the pattern, though the directions under "PATTERN: See diagram M.1" does not tell me how to knit the pattern. Am I missing the directions? Please help with how to knit the pattern. Your help is appreciated.
06.02.2016 - 06:01DROPS Design ha risposto:
Dear Mrs Caldwell, you will work in pattern following diagram M.1 - see at the end of the pattern below the sleeve and diagram text just above. Read more about diagrams here. Happy knitting!
08.02.2016 - 11:09Karin ha scritto:
Dann? Das was unter dem Ärmel des Diagramms steht!
24.11.2013 - 18:25
![]() Bianca B. ha scritto:
Bianca B. ha scritto:
Hallo Liebes Drops Team Was ist das für ein Muster? Rippe und dann? Liebe Grüße
23.11.2013 - 21:28Runa ha scritto:
Diagram: below the sleeve diagram ( right side) as usual.
03.11.2013 - 16:42
![]() Viktoria ha scritto:
Viktoria ha scritto:
Hej. Håller nu på och stickar på den här tröjan, den blir lång och jättemysig. Har en fråga angående antalet maskor man ska plocka upp runt halsringningen. Hur ska man veta hur många man ska plocka upp eftersom det inte står något exakt antal? Tack på förhand /Viktoria
13.09.2013 - 14:58DROPS Design ha risposto:
Plocka upp 40 till 60 m dvs 40 i den minsta str osv... blir det för många m går det att justera på 1:a varvet. Lycka till!
18.09.2013 - 13:20
|
|||||||
DROPS 125-10 |
|||||||
|
|
|||||||
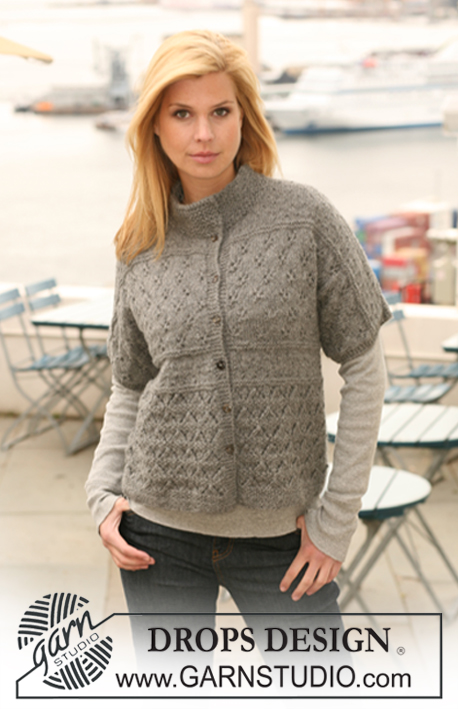
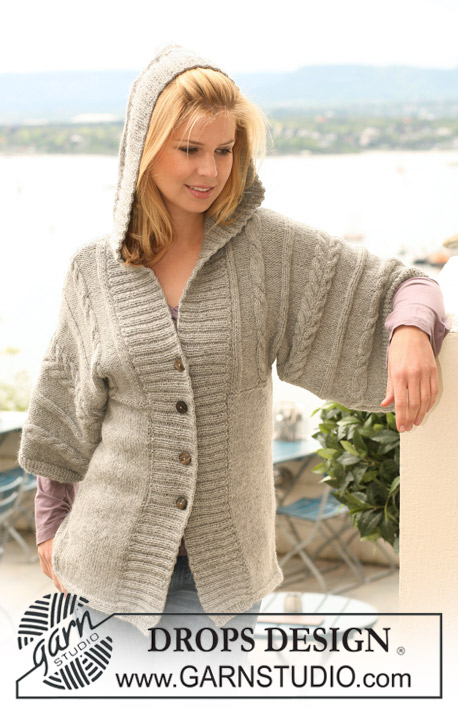
Maglione DROPS in "Snow". Taglie: Dalla S alla XXXL.
DROPS 125-10 |
|||||||
|
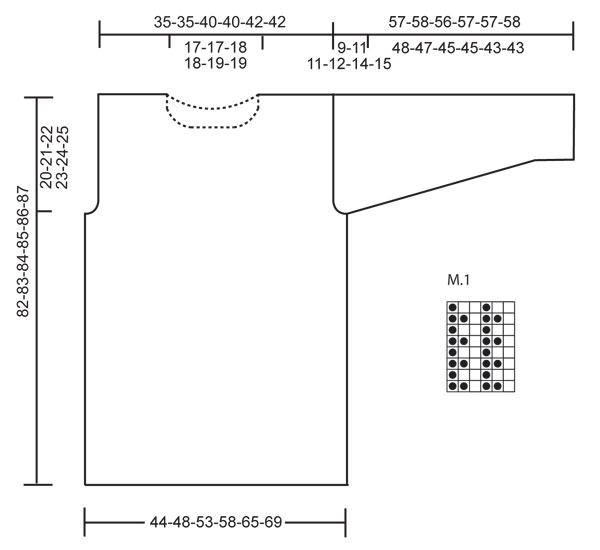
MOTIVO: Vedere il diagramma M.1 – il diagramma mostra il motivo sul diritto del lavoro. PUNTO LEGACCIO (in tondo): Lavorare * 1 giro a dir e 1 giro a rov *, ripetere da *-*. SUGGERIMENTO PER GLI AUMENTI 1: Aumentare 1 m facendo 1 m gettata; al giro successivo, lavorare la m gettata ritorta per evitare che si formi un buco. SUGGERIMENTO PER GLI AUMENTI 2: Aumentare 1 m a 1 m dal bordo facendo 1 m gettata; al giro successivo, lavorare la m gettata ritorta per evitare che si formi un buco. Lavorare le m aumentate seguendo il diagramma M.1 man mano che si procede con il lavoro. ------------------------------------------------------- DAVANTI E DIETRO: Si lavorano in tondo. Avviare 97-106-117-128-143-152 m sui ferri circolari n° 8 con il filato Snow. Lavorare 6 ferri a PUNTO LEGACCIO - vedere sopra. ALLO STESSO TEMPO, nel corso dell’ultimo ferro, aumentare 17-20-21-22-25-28 m in modo uniforme - vedere il SUGGERIMENTO PER GLI AUMENTI 1 = 114-126-138-150-168-180 m. Inserire un segno nella prima m e un segno nella m n° 57-63-69-75-84-90 (indicano i lati). Proseguire seguendo il diagramma M.1 in tondo. RICORDARSI LA TENSIONE DEL LAVORO! Quando il lavoro misura 62 cm, intrecciare 5 m da ciascun lato per gli scalfi (la m con il segno è la m centrale di queste 5 m). Tagliare il filo. Completare ogni parte separatamente. DIETRO: = 52-58-64-70-79-85 m. Proseguire seguendo il motivo come prima. ALLO STESSO TEMPO, intrecciare per gli scalfi, all’inizio di ogni ferro, da ciascun lato, come segue: 2 m 1-2-2-4-5-7 volte e 1 m 1-2-2-1-2-1 volte = 46-46-52-52-55-55 m. Proseguire finché il lavoro non misura 79-80-81-82-83-84 cm. Intrecciare ora le 20-20-22-22-23-23 m centrali per il collo e, al ferro successivo, intrecciare 2 m per il collo = per la spalla rimangono 12-12-14-14-15-15 m. Proseguire finché il lavoro non misura 82-83-84-85-86-87 cm; intrecciare le m. DAVANTI: = 52-58-64-70-79-85 m. Proseguire seguendo il motivo e intrecciare per gli scalfi, da ciascun lato, come indicato per il dietro = 46-46-52-52-55-55 m. Quando il lavoro misura 79 cm, mettere in attesa su un ferma maglie le 18-18-18-18-19-19 m centrali per il collo e finire ogni lato separatamente. Intrecciare per il collo, all’inizio di ogni ferro al centro davanti, come segue: 2 m 1 volte e 1 m 0-0-1-1-1-1 volte = per la spalla rimangono 12-12-14-14-15-15 m. Proseguire finché il lavoro non misura 82-83-84-85-86-87 cm; intrecciare le m. MANICHE: Si lavorano avanti e indietro sui ferri. Avviare 27-28-29-30-31-32 m (compresa 1 m vivagno da ciascun lato) sui ferri n° 8 con il filato Snow. Lavorare 6 ferri a PUNTO LEGACCIO - vedere sopra; ALLO STESSO TEMPO, nel corso dell’ultimo ferro, aumentare 2-4-6-8-7-9 m in modo uniforme = 29-32-35-38-38-41 m. Proseguire seguendo il diagramma M.1 con 1 m vivagno da ciascun lato. Quando il lavoro misura ca. 7 cm, aumentare 1 m da ciascun lato, e ripetere questi aumenti ogni 4,5-4,5-4-4-3-3 cm per un totale di 9-9-9-9-12-12 volte – vedere il SUGGERIMENTO PER GLI AUMENTI 2 = 47-50-53-56-62-65 m. Proseguire finché il lavoro non misura ca. 48-47-45-45-43-43 cm (ATTENZIONE! misure più corte per le taglie più grandi perché l’arrotondamento della manica è più lungo e le spalle sono più larghe). Intrecciare ora 3 m da ciascun lato per l’arrotondamento delle maniche, poi intrecciare, all’inizio di ogni ferro, da ciascun lato, come segue: 2 m 2-2-3-3-4-4 volte e 1 m 0-0-0-1-1-0 volte, poi 2 m all’inizio di ogni ferro da ciascun lato, finché il lavoro non misura ca. 55-56-54-55-55-56 cm. Intrecciare ora 3 m da ciascun lato 1 volta; intrecciare poi le restanti m. Il lavoro misura ca. 57-58-56-57-57-58 cm. CONFEZIONE: Cucire le spalle. Cucire le maniche. Cucire i lati delle maniche all’interno della m vivagno. COLLO: Si lavora in tondo. Con i ferri circolari n° 7 ed il filato Snow, riprendere da 40 a 60 m (comprese le m messe in attesa sul ferma maglie) intorno al collo. Lavorare 1 giro a rov, 1 giro a dir e 1 giro a rov; ALLO STESSO TEMPO, durante l’ultimo giro, portare il n° delle m a 50-56-62-68-74-76. Lavorare ora 1 giro a dir e proseguire a coste 1 m dir /1 m rov. Quando le coste misurano ca. 4 cm, aumentare 1 m dopo ogni m dir (aumentare facendo 1 m gettata). Al giro successivo, lavorare la m gettata a dir ritorto = 75-84-93-102-111-114 m. Lavorare ora il diagramma M.1 su tutte le m. Proseguire finché il collo non misura ca. da 24 a 26 cm; intrecciare le m seguendo il diagramma M.1. |
|||||||
Spiegazioni del diagramma |
|||||||
|
|||||||
 |
|||||||
Avete terminato questo modello?Allora taggate le vostre foto con #dropspattern o inviatele alla #dropsfan gallery. Avete bisogno di aiuto con questo modello?Troverete 23 video tutorial, una sezione per i commenti/domande e molto altro guardando il modello su www.garnstudio.com © 1982-2026 DROPS Design A/S. Ci riserviamo tutti i diritti. Questo documento, compreso tutte le sue sotto-sezioni, è protetto dalle leggi sul copyright. Potete leggere quello che potete fare con i nostri modelli alla fine di ogni modello sul nostro sito. |
|||||||


Con oltre 40 anni di esperienza nel design di modelli di maglia e uncinetto, DROPS Design offre la più estesa collezione di modelli gratuiti su internet - tradotti in 17 lingue. Ad oggi vi possiamo fornire 324 cataloghi e 12290 modelli - 9561 dei quali sono tradotti in Italiano.
Ci stiamo impegnando molto per darvi il meglio che vi possiamo offrire in termini di maglia e uncinetto, ispirazioni e consigli così come filati di grande qualità ad un prezzo incredibile! Volete utilizzare i nostri modelli per qualcosa d'altro oltre al vostro uso personale? Potete leggere tutto ciò che è consentito nel testo sul Copyright in basso su tutte le pagine dei nostri modelli. Buon lavoro!
Lasciare un commento sul modello DROPS 125-10
Noi saremmo felici di ricevere i tuoi commenti e opinioni su questo modello!
Se vuoi fare una domanda, fai per favore attenzione a selezionare la categoria corretta nella casella qui sotto per velocizzare il processo di risposta. I campi richiesti sono indicati da *.